









- bhavya gada
- No Comments
If you disturb soil on a home project in Howard County, BMP upkeep starts before digging and ends only after the site is fully stable. In plain terms: install perimeter controls first, inspect them weekly and within 24 hours after rain of 0.25 inches or more, fix failures the same day when needed, and do not remove controls until the site has stable cover and approval where required.
Here’s the article in one simple view:
- What needs attention: silt fence, wattles or compost logs, stone construction entrances, inlet protection, diversions, swales, and temporary slope cover
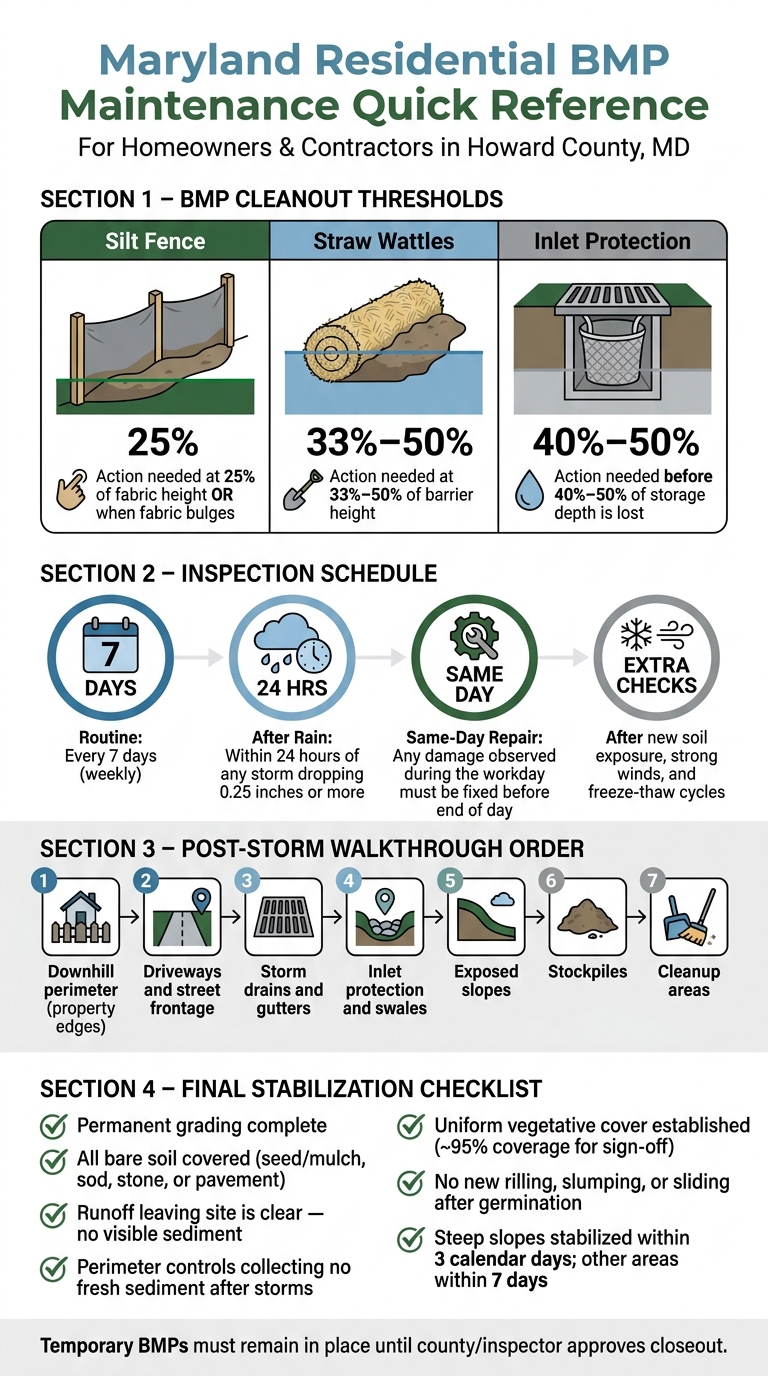
- Main cleanout points:
- silt fence at 25% of fabric height or when bulging
- wattles at about 1/3 to 1/2 of barrier height
- inlet protection before it loses about 40%–50% of storage depth
- Main inspection timing: at least once a week and after runoff-producing rain
- Main storm steps: check before rain, then inspect property edges, drains, slopes, and pavement after the storm
- Main closeout rule: leave temporary controls in place until grading is done, bare soil is covered, runoff is clear, and vegetation is well established – often around 95% cover for sign-off
| Item | What I’d watch most closely | When action is usually needed |
|---|---|---|
| Silt fence | tears, undermining, sediment buildup, ends not turned uphill | at 25% buildup or bulging |
| Wattles / compost logs | gaps, movement, poor staking | at about 33%–50% buildup |
| Stone entrance | ruts, exposed soil, mud trackout | when tires track mud to pavement |
| Inlet protection | clogging, backup water, lost storage | before 50% of depth is filled |
| Slope cover | lifted edges, washouts, flow under blanket | right after rain or wind damage |
Bottom line: this guide explains when home projects need BMPs, which controls need the most care, how often to inspect them, what to fix after storms, and when removal is safe at the end of the job.
Maryland Residential BMP Maintenance Thresholds & Inspection Guide
Extend BMP Life: Stormwater Inspection & Maintenance Best Practices
sbb-itb-843f8be
Core BMPs to Maintain on Maryland Home Projects
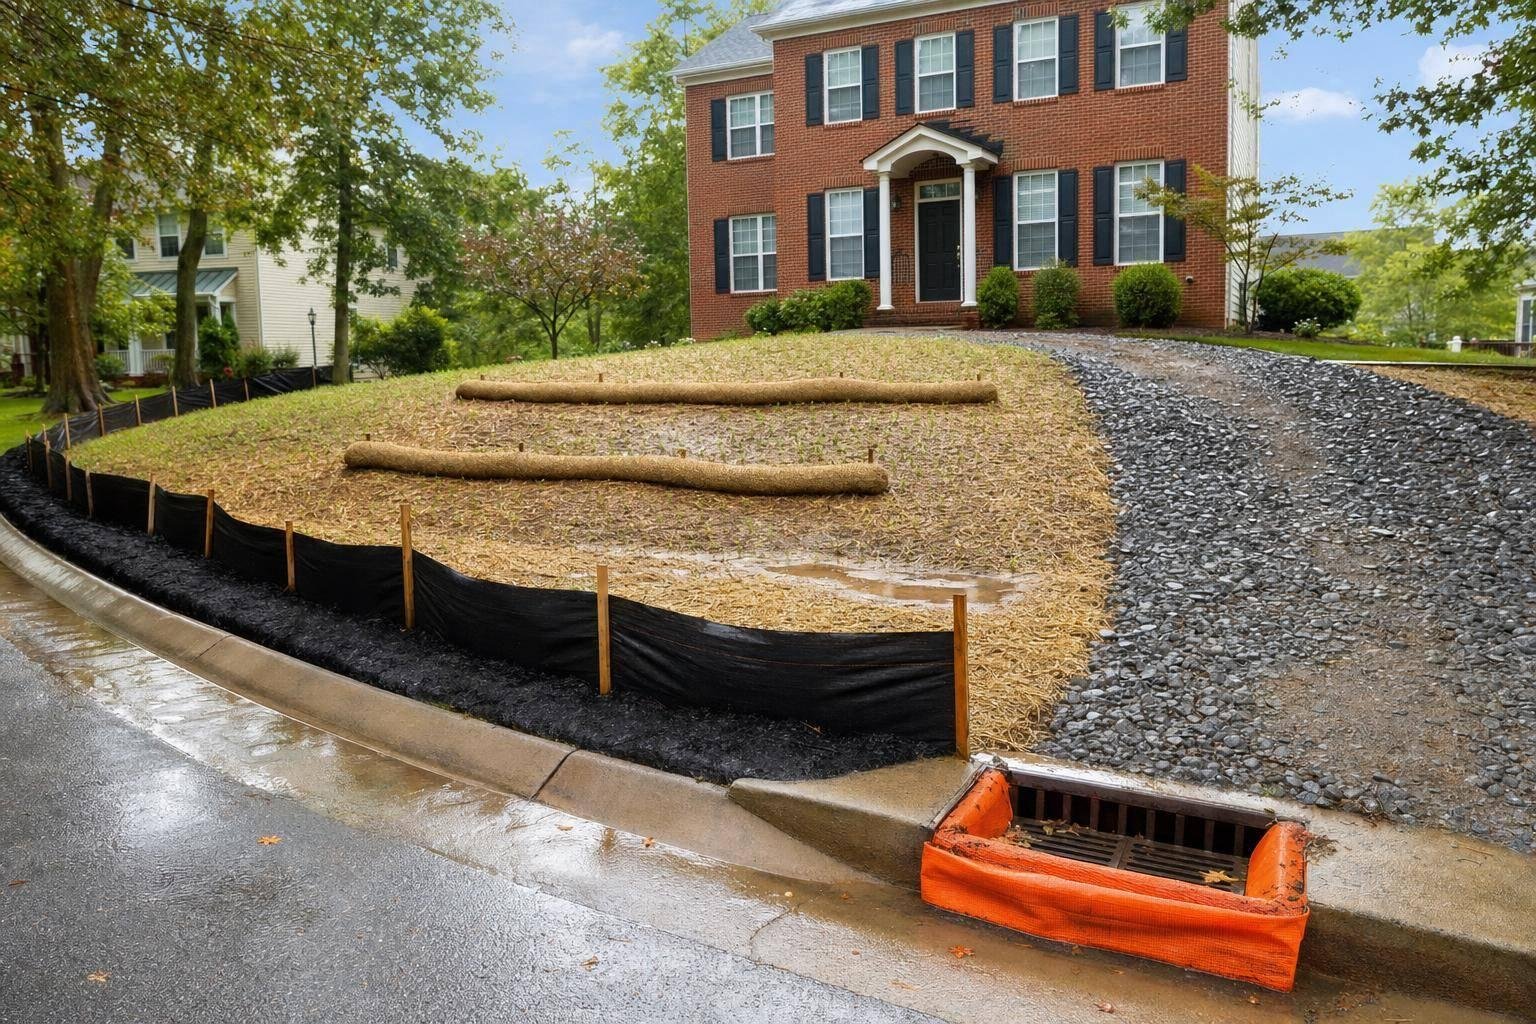
Central Maryland home projects usually depend on a small set of temporary controls. Each one does a different job, and each one needs upkeep if you want sediment to stay on the lot. These are often the first things to go wrong once rain, vehicle traffic, or sloppy site care starts taking a toll. After the controls are in place, the day-to-day job is simple: keep every one of them working.
Silt Fence, Wattles, and Perimeter Sediment Barriers
Silt fence sits along the downslope edge of disturbed soil and catches shallow sheet flow. Water passes through, while sediment drops out on the uphill side. But it only works if it’s installed the right way. The fabric needs to be trenched into the soil, the posts need to be driven deep, and both ends need to turn uphill at least 5 ft at about a 45-degree angle so runoff doesn’t slip around the ends.[3]
Straw wattles and compost logs help in spots where silt fence is tough to install, like around stockpiles, on small slopes, or in narrow areas near utilities. They work best when the ends overlap by about 6 inches and the barrier stays tight to the ground.[8][9]
The main trigger for upkeep is sediment buildup. Maryland guidance says to clean silt fence when sediment reaches 25% of the fabric height or when the fabric starts to bulge.[3] For wattles and compost logs, cleanout should happen when sediment gets to about one-third to one-half of the barrier height.[8][9] Check all three every week and after any rain that creates runoff.
Use the table below to line up each control with where it works best and how it tends to fail.
| BMP | Best Use | Sediment Cleanout Threshold | Common Failure Points |
|---|---|---|---|
| Silt fence | Property boundaries and downslope edges | 25% of fabric height, or when fabric bulges | Undermining, ends not turned upslope, fabric tears |
| Straw wattles | Slopes and small stockpiles | About one-third to one-half of roll height | Gaps between sections, inadequate staking, undermining |
| Compost logs | High-risk zones, sidewalk edges, and around inlets | About half of log height | Not keyed into ground, displacement, clogging |
Stabilized Construction Entrances and Trackout Control
A stabilized construction entrance, or SCE, is a pad of coarse angular stone, usually 2–3 inches in diameter and at least 6 inches deep, placed over nonwoven geotextile at the driveway or main access point.[4] On single-family lots, Maryland allows a shorter minimum length of 30 ft instead of the 50 ft used on bigger sites.[4] The idea is straightforward: the stone knocks mud off tires before vehicles hit the street. If sediment gets tracked onto pavement, sweep or vacuum it right away. Don’t wash it into a storm drain.[3]
Inspections should focus on three warning signs:
- Ruts deeper than 2–3 inches
- Tire paths cutting down to soil or geotextile
- Muddy tracks leaving the pad
If you see any of those, add stone, regrade the pad, lengthen the entrance, or tighten up where vehicles are allowed to drive.
| Control Type | Best Use | Maintenance Needs |
|---|---|---|
| Stabilized stone entrance | Multi-day projects with regular vehicle traffic | Weekly inspection, top-dress stone as needed, daily sweeping of pavement |
| Temporary mat or composite panel | Short projects and decorative driveway protection | Daily cleaning and checks for gaps or edge erosion |
| Simple driveway protection | Very short, low-equipment jobs | Daily inspection; keep vehicles on the protected area only |
Inlet Protection, Diversions, and Temporary Slope Cover
Storm drain inlet protection – fabric barriers, stone rings, or prefabricated devices around curb or yard inlets – helps stop sediment-laden runoff from getting into the storm drain system. Clean it out before it loses half its storage space, which usually means when sediment reaches 40% to 50% of the barrier’s effective depth.[6][7] If an inlet device clogs, water can back up and flood a small area nearby, so post-storm checks matter.
Diversion berms and swales move runoff away from bare soil and toward stable areas. After storms, look for breaches and outlet erosion. Temporary slope cover – mulch, straw, or erosion control blankets – protects exposed soil from raindrop impact and is required when bare soil will stay exposed for more than about 13 days.[5] After rain, inspect blankets for displacement, edge undermining, and channeling underneath.
Once these controls are set, routine inspections and quick repairs are what keep them working through the week and after each rain event.
Routine Inspection and Repair During Construction
Once silt fence, stabilized entrances, inlet protection, and slope cover are in place, the job shifts from installation to upkeep. These BMPs only work if you inspect them often and fix problems fast. That starts with a clear inspection schedule.
Inspection Schedule: Weekly Checks and After Rain Events
Inspect active BMPs at least once a week and within 24 hours after any storm that drops 0.25 inches or more of rain.[11] Howard County also requires any controls damaged during the workday to be repaired by the end of the day.[3] It also makes sense to add extra checks after new soil is exposed, after strong winds, and during freeze-thaw swings.
The goal is simple: catch small issues before they turn into sediment leaving the site or a failed control line.
Site Walkthrough Checklist and Basic Repair Steps
Use the same walking pattern each time so nothing gets missed. Follow the drainage path and start with the areas most likely to fail first.
- Check the downhill perimeter first
- Move to driveways and street frontage
- Look at storm drains and gutters
- Inspect inlet protection and swales
- Review exposed slopes
- Check stockpiles
- Finish at cleanup areas
At each stop, look for three things: whether the BMP is still in place, whether sediment is building up or moving offsite, and whether the issue needs a same-day fix.
Common repairs are pretty straightforward:
- Re-trenching silt fence
- Replacing torn fabric
- Adding stone
- Grading out washouts
- Re-anchoring lifted blanket edges
If the same spot keeps failing, that usually means the layout needs to change. A quick patch may hold for a day or two, but it won’t solve the root problem.
Inspection Logs, Crew Roles, and Correction Deadlines
Write down the date, weather, inspector, BMPs checked, problems found, photos, and repair date. Be specific. Notes should show what you inspected and what got fixed, not just that a walk happened.
One site lead should own the log and make sure repairs are closed out. Offsite sediment, blocked inlets, and failed perimeter controls should be treated as same-day fixes.[3]
Storm response builds on these routine checks.
Rain Event Response and Seasonal Adjustments in Central Maryland
Once routine inspections are set, the next job is rain response. In central Maryland, storms are the main stress test for residential BMPs. Check and fix controls before and after each major rain.
Pre-Storm Checks Before Forecast Rain
When rain is in the forecast, walk the site before it starts. Remove built-up sediment and debris from inlet protection. Make sure the silt fence is upright and trenched in at least 6 inches at the bottom, with stakes on the downstream side and no gaps or sagging sections.[12][15] Cover or move loose soil stockpiles so they don’t turn into a sediment source.
Post-Storm Priorities Within 24 Hours
If the pre-storm check was done right, the post-storm walk shows what held and what needs work. Start at the edges of the site: neighboring property lines, sidewalks, curbs, curb inlets, and street drains. Those spots tell you fast whether the controls did their job.[13][14]
If sediment got out, stop the source first. Then repair breached perimeter controls and eroded slopes with mulch or blankets. Sweep mud off paved surfaces before it dries and gets washed into storm drains.
Seasonal Maintenance: Spring, Summer, Fall, and Winter
Spring and summer storms can hit hard and fast. A control that looked fine one day can get overwhelmed the next. During spring and summer, shorten response times because runoff comes faster and more often.
Fall brings leaf litter, and that stuff piles up fast. Leaves can block swales, curb inlets, and sediment barriers, which cuts drainage capacity right when fall rains start picking up.[16][20] Clear leaves from inlets and the construction entrance as soon as possible. Leaf mats can reduce entrance performance and increase trackout.
Winter is the toughest season for BMP performance. Freeze-thaw cycles can loosen fence posts, shift gravel pads, and open gaps in silt fence lines that were tight before the ground froze.[17] During late fall through early spring, mulch, erosion control blankets, and structural controls do more of the stabilization work.[4][18][19] Inspect after thaw cycles and winter storms, and leave structural controls in place until the soil can be stabilized.
Final Stabilization, BMP Removal, and Project Closeout
Closeout starts only after the site is fully stabilized. Pull temporary BMPs too soon, and you can end up right back where you started: new erosion, new sediment, and more cleanup.
Once the site meets that standard, remove temporary controls in the order that gives the soil the most protection from re-erosion.
Signs a Site Is Ready for Final Stabilization
A site is ready for final stabilization when all of these conditions are met:
- Permanent grading is complete, and no more cut-and-fill work is expected
- All bare soil is covered with seed and mulch, sod, stone, pavement, or another approved permanent cover
- Runoff leaving the site is clear, with no visible sediment reaching sidewalks, streets, or neighboring properties
- Perimeter controls are no longer collecting fresh sediment after storms
- Uniform vegetative cover is established with no large bare patches – local inspectors often look for roughly 95% coverage before approving removal [21][23][27]
- Growth stays consistent after germination, with no new rilling, slumping, or sliding
For permitted work, temporary BMPs must stay in place until the county or inspector approves closeout [3][29]. Steep slopes, drainage swales, and other erosion-prone areas must be stabilized within 3 calendar days. Other disturbed areas usually have a 7-day window when they are not being actively worked [1][28][29].
Only after those conditions are met should temporary BMPs be removed.
How to Safely Remove Temporary Controls
Remove controls only after the soil they protect is stable. A good rule of thumb: start with the least-needed barrier and leave the last line of defense for the end.
| BMP Type | When to Remove | Key Steps |
|---|---|---|
| Silt Fence | After upslope soil is stabilized and no new sediment builds up after rain; often within about 30 days after final stabilization [22][24][26][27][29] | Remove trapped sediment to a stable upland area; cut and remove fabric and stakes; backfill and compact the trench; seed and mulch the disturbed strip |
| Inlet Protection | After the contributing drainage area is stabilized and protection is no longer needed; often within about 30 days after stabilization [22] | Lift devices carefully; shovel captured sediment onto a stable upland area; clean inlet grates; stabilize disturbed soil around the inlet |
| Stabilized Construction Entrance | After heavy construction traffic ends and the permanent driveway or access is in place [25][2][27] | Remove stone and geotextile unless the stone is part of the permanent drive; grade the area; add topsoil if needed; seed, sod, or pave per the design |
| Temporary Slope Blankets | After vegetation is firmly rooted, often several weeks after germination | Leave biodegradable products in place to break down; cut and remove synthetic products with care so plants stay rooted; touch up bare spots with seed and mulch |
After removal, any area disturbed by the BMP work itself – like a silt fence trench or post holes – should be backfilled, graded to match the surrounding ground, and stabilized right away. Maryland’s stormwater design guidance treats final grading, landscaping, stabilization, and removal of controls as a planned sequence, not a last-minute cleanup step [25].
Key Habits for BMP Closeout
Stay on top of repairs before the next storm. Keep sediment off streets and out of storm drains. Give each crew member a clear task so small items don’t slip through the cracks.
Do not remove controls until the site is stable and approved for closeout.
In Maryland, the person in control must keep grades, drainage, vegetation, and erosion controls in good repair until the site is fully stabilized [10].
If grading, drainage, or stabilization work is still unfinished, leave BMPs in place until closeout is complete. For Howard County and central Maryland homeowners, Pro Landscapes MD can help with grading, drainage, and final stabilization.
FAQs
Do I need BMPs before I start digging?
Yes. You need to install approved erosion and sediment control measures before any soil-disturbing work starts.
In Maryland, you need an approved plan if your project disturbs 5,000 square feet of land or moves 100 cubic yards of soil. You’ll also need an on-site pre-construction meeting with an inspector. Excavation can’t begin until the inspector confirms the controls are installed and in place.
What counts as final stabilization?
Final stabilization means every disturbed soil area has been stabilized for the long term, so you no longer need erosion controls. In most cases, that means reaching at least 70% vegetation density compared with nearby undisturbed ground, or using an approved alternative like mulch.
After you verify and document stabilization with dated, multi-angle photos, and finish all required materials or certifications, you can move ahead with permit termination or the Notice of Termination (NOT).
Who is responsible for BMP inspections and repairs?
BMP inspections are handled by the responsible inspection authority. In Maryland, that usually means MDE for routine sediment control inspections and local county departments for compliance inspections.
During the project, you need to schedule and complete the inspections required by your approved plan or permit. If an inspection finds a problem with a BMP, fix it promptly – usually within seven days, or right away if the failure creates a high-risk situation.
Chat with Us