










- bhavya gada
- No Comments
If I disturb 5,000 square feet of land or move 100 cubic yards of soil in Maryland, I should expect erosion and sediment control paperwork before work starts. That usually means I need to keep permits, plans, inspection notes, repair logs, photos, and final closeout records in one place.
Here’s the short version:
- I check whether my yard project hits the 5,000 sq. ft. or 100 cu. yd. trigger.
- I keep a file with my project description, sketch, permits, approvals, and contractor papers.
- During work, I log inspections at least every 14 days and around storms of 0.25 inches or more.
- I track repairs, sediment cleanup, washouts, clogged drains, and wall or drainage issues.
- I save before, during, and after photos with dates and plain file names.
- If the job changes drainage or grading, I note it and check with the county before moving ahead.
- When the project ends, I keep as-built plans, final approvals, warranties, and maintenance notes with my house records.
A few details matter most. Sediment should usually be removed before it reaches about one-third the height of a silt fence. Drainage items like swales, French drains, and inlets should be checked in spring, fall, and after major storms. And even smaller jobs can still get county review if drainage patterns change.
If I want fewer permit issues later, I keep the paperwork simple, dated, labeled, and updated from day one.
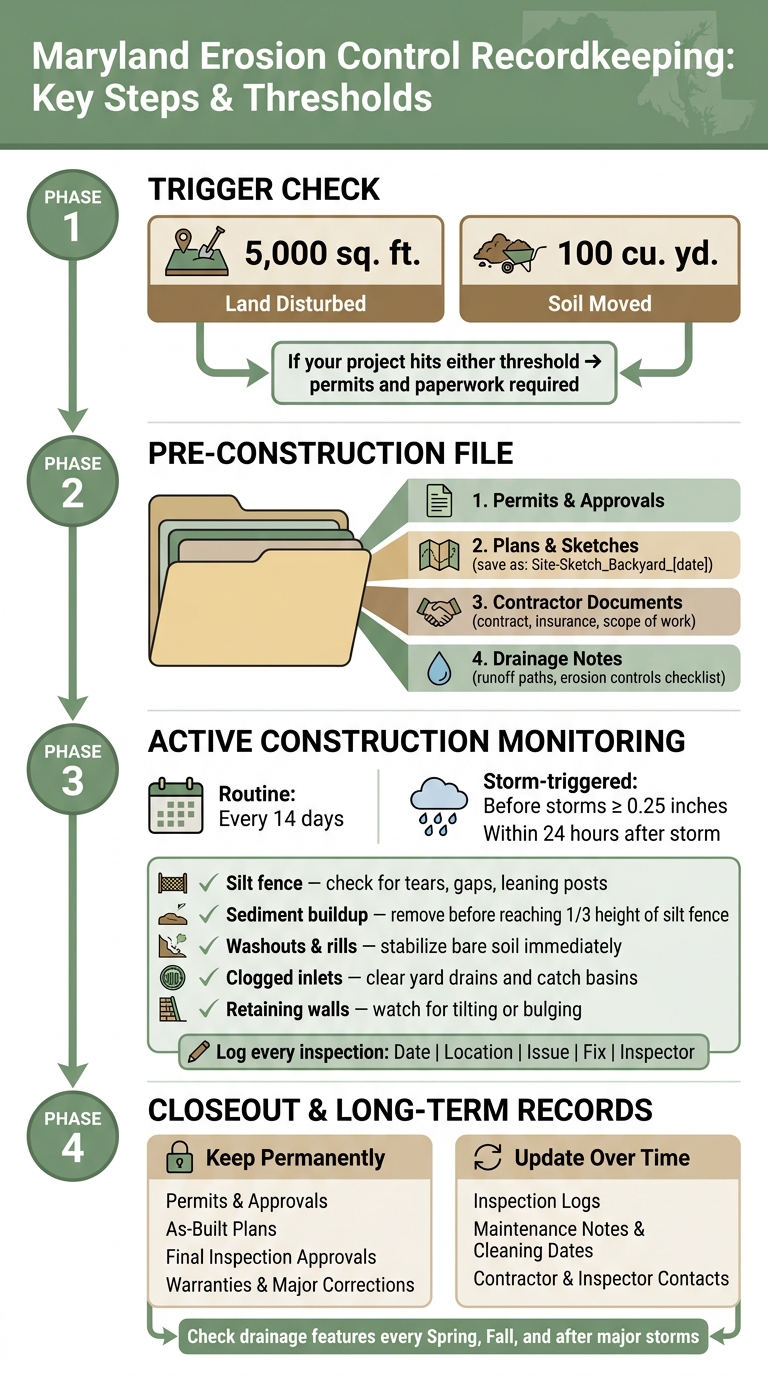
Maryland Erosion Control Recordkeeping: Key Steps & Thresholds
Pre-Construction Paperwork and Permit Files
Before any soil is disturbed, set up a pre-construction file. Put in a written project description, a simple site sketch, drainage notes, permit applications and approvals, contractor proposals and contracts, and any correspondence with the county or Maryland Department of the Environment (MDE).[1][10]
Create a digital folder named Erosion Control Project – 09-03-2026. Then make a paper binder with labeled tabs:
- Permits
- Plans & Sketches
- Contractor Documents
- Drainage Notes
Save copies in both places. This file is your starting point for inspections, corrections, and the final closeout folder.[8][11]
Project Description, Site Sketch, and Drainage Notes
Start with a one-page project description. Say what work will be done, where it will happen, and how much land will be disturbed, listed in square feet and cubic yards. For example: Regrade rear yard, install swale along south property line, add 40 ft retaining wall, and new downspout extension.[1][10]
That short summary gives reviewers and inspectors a fast read on the scope.
For the site sketch, use a county GIS aerial or property plat as the base map. Trace the property lines, house footprint, driveway, existing patios, and clear features like trees and sheds. Add arrows to show slope direction. Mark low spots where water pools. Label each downspout as DS1, DS2, and so on. Note nearby storm drains or drainage easements so it’s clear how runoff and sediment will be controlled.[1][3]
Outline or shade the planned work areas and label them in plain language, such as New swale, Stone construction entrance, or Temporary seeding zone. Use those same labels in your inspection notes and photos. It sounds simple, but that small bit of consistency can save a lot of confusion later.
Add drainage notes that show current runoff paths, known downstream issues, and the measures planned to deal with them. Then attach a brief Erosion Controls checklist that names each practice and links it to a spot on the sketch. Common examples include:
- Silt fence – installed along downslope edges of disturbed soil to trap sediment before it leaves the site
- Straw wattles – placed across small slopes or swales to slow runoff and hold soil in place
- Mulch and temporary seeding – applied to bare soil promptly after grading to establish vegetative cover
- Stone construction entrance – a pad of compacted stone at the driveway or access point to reduce tracking mud onto the street
Save the sketch as Site-Sketch_Backyard_09-03-2026.[8][10]
Permits, Approvals, and Contractor Documents
File the approved erosion and sediment control plan, grading permit, and any stormwater approvals together before work starts. If the project adds a lot of impervious surface, such as a large patio or paver driveway, it will usually also need a stormwater management plan.[5][7]
Label each file by type and date. For example: Grading-Permit-Approval_09-03-2026.[8][11] That makes revisions much easier to follow.
For retaining walls, many Maryland counties require a building permit when a wall reaches 3 to 4 feet in height, and some require structural design plans at 3 feet or greater.[6][9][11] Check county wall-permit rules early. Then file drawings, specs, and calculations with the grading and stormwater documents.
Keep contractor records in a separate Contractor – Agreements & Insurance subfolder. Include the signed contract, scope of work, insurance proof, and project contacts.[9][10] Also check that the square footage and soil volume listed in the proposal match the numbers in your permit application. If they don’t, plan review can slow down.[1][11]
If the contractor is handling permits, the contract should spell out which permits they will obtain and should require copies for your file.[9][10] Once that paperwork is in place, you can start tracking inspections and site changes as work begins.
sbb-itb-843f8be
Inspection Timing, Maintenance Logs, and Photo Records
Once your pre-construction file is set up and work starts, you need to track what’s happening on-site. That’s how you document compliance, repairs, and final stabilization. Put simply: routine site checks become proof that the job was monitored and corrected when needed.
A Basic Inspection Schedule for Active Projects
Inspect active sites at least every 14 days. You also need storm-triggered inspections: check perimeter controls before storms forecast to bring 0.25 inches or more, then come back within 24 hours after the storm passes to check for damage.[4]
Use the same inspection route every time. That makes it easier to spot changes and match your notes to the site plan. Pay close attention to these conditions:
- Silt fence: Check for tears, leaning posts, gaps under the fabric, and spots where water is running around the ends.
- Sediment buildup: Remove sediment before it reaches about one-third the height of the silt fence. If it gets higher, water can flow over the top during the next storm.[4]
- Washouts and rills: Small channels in bare soil are a red flag. They usually mean the surface cover isn’t doing its job and the area needs stabilization soon.
- Clogged inlets: Look at yard drains and catch basins for debris. A blocked inlet can cause ponding and send runoff where it doesn’t belong.
- Retaining walls: Watch for tilting, bulging, or gaps between wall blocks and soil. Those signs can point to drainage trouble behind the wall.[12]
Fix and log any failed control right away. Use the same labels from your site sketch so each note lines up with the plan.
How to Keep a Maintenance and Repair Log
For each inspection, record the date, location, issue, fix, and inspector. A simple table handles the job:
| Date | Time | Location / Feature | Issue Found | Action Taken | Inspector |
|---|---|---|---|---|---|
| 09/03/2026 | 10:30 AM | Rear yard – silt fence by property line | Sediment buildup; fence leaning; minor washout | Removed sediment, replaced 10 ft. of fence, added straw mulch on slope | J.D. |
| 09/10/2026 | 4:15 PM | Side yard swale and inlet | Inlet 50% clogged; ponding after storm | Cleared inlet grate, raked swale, added mulch along bare edge | J.D. |
| 09/22/2026 | 9:00 AM | Side slope below driveway | Bare soil with rills after 0.4 in. storm; no mulch | Raked smooth, applied 2 in. of shredded mulch, seeded with turf-type tall fescue | J.D. |
Be specific where you can. Notes like “replaced 10 ft. of silt fence” or “mulched 300 sq. ft. of slope” are much stronger than a vague line that says repairs were made. That extra detail helps show the work was done in a way that matched the problem.
Add weather notes too, such as “post-storm, ~0.5 in. rainfall last night,” because Maryland inspection templates often ask for that.[14] If your contractor handles maintenance visits, fold their notes into the same log so everything stays in one place.
Before, During, and After Photo Documentation
Use labeled, dated photos to show job progress and final stabilization.[12] At a minimum, take photos at these stages: before work starts, during control installation, during drain pipe placement and retaining wall drainage details, after final seeding or stabilization, and after each repair.
When you find a problem, photograph it right away. Then photograph the finished repair. That way, the file shows both the deficiency and the fix.[15]
Name each file with the date and a short description, such as Silt-Fence-Repair_09-03-2026. Keep a matching caption list with the date, project stage, and a one-line description. Store labeled photos in a cloud folder and in a local backup. Those images become part of the correction and closeout file.
If an inspection turns up a problem, or if the work changes, add that to the correction notes.
Correction Notes and Mid-Project Changes
Use correction notes to track problems, fixes, and any shift in the plan. If an inspection turns up an issue, log the fix in the same file. That paper trail shows how the problem was handled and whether the site still lines up with the approved plan. It also gives county inspectors and future homeowners a clear way to follow what happened.
What to Write When a Problem Is Found
Each correction note should follow the same basic format: exact location, problem description, temporary fix, final fix, completion date, and the person or crew who did the work.[4][17][18]
For example:
Sept. 3, 2026 – Behind garage, 6 ft. from west corner. Small rill forming after rain. Temporary fix: straw wattles and tarp over exposed soil. Final fix: regraded slope and replanted vegetation, completed Sept. 6. Work performed by homeowner.
Write the issue in plain language. Skip vague labels like “drainage issue.” Tie the note to the matching photo pair. Keep receipts, invoices, revised sketches, and inspection comments with that note. Then use the full record to decide whether you’re looking at a small repair or a change to the plan.
Minor Repairs Versus Changes That Affect Plans
Some fixes keep the job on plan. Others need approval before work moves forward. A minor correction puts the site back in its intended condition. A major change shifts grading, drainage flow, or the size or location of a drainage feature.[1][16][19]
| Minor Correction | Major Change | |
|---|---|---|
| Examples | Clearing sediment from an inlet; patching mulch on a bare slope; repairing a torn silt fence section | Regrading a yard; moving a swale outlet; resizing or relocating a French drain |
| What to do next | Log entry with date, description, and completion note | Redline the approved plan, write a short narrative explaining the change, and confirm with the county engineering office or Soil Conservation District before continuing work |
Mark any change on the approved plan before work continues. If the fix changes the approved layout, stop and document the revision before anything else happens on site. Counties like Baltimore use correction notices and can enforce violations when site conditions no longer match the approved plan,[13][2] so check first.
Final Project Files and Long-Term Recordkeeping
When construction ends, put every record into one closeout folder. That folder should show what was installed, where it is, and how it has been maintained. After all repairs are closed out, turn it into the permanent file.
What to Save in the Final Project Folder
Your final folder should include permits and approvals, the final or as-built plan set, contracts and invoices, inspection logs, correction notes, material product sheets, labeled completion photos, and maintenance instructions. As-built or redlined plans show the finished site layout.
Keep that folder with your house records for resale, insurance claims, warranty claims, or future renovations. Save a digital backup too.
You can also use the folder to make a simple maintenance sheet for the finished site.
Maintenance Instructions for Drainage and Erosion Features
Create a one-page summary that lists what was installed, where each feature is located, what it does, and when it should be checked. Check drainage features each spring, each fall, and after major storms or rapid snowmelt.[20]
For a French drain, check that the inlet is clear, look for sediment buildup, and watch for any change in how water moves across the yard. If the flow changes, call a contractor.
If Pro Landscapes MD installed your drainage features, keep the as-built details and maintenance guidance with this summary.
Conclusion: The Records That Matter Most
Good recordkeeping does more than satisfy the county during construction. It helps at resale, supports warranty claims, and makes future improvements easier to plan. From there, separate the records you should keep permanently from the notes you’ll keep updating.
| Document | How Long to Keep | Why It Matters |
|---|---|---|
| Permits and approvals | Permanently | Proves the work was authorized |
| As-built / redlined plans | Permanently | Shows the exact finished layout |
| Final inspection approvals | Permanently | Confirms the project passed review |
| Warranties and major correction records | Permanently | Supports future claims and resale questions |
| Inspection logs | Update over time | Tracks changing site conditions |
| Maintenance notes and cleaning dates | Update over time | Builds a usable maintenance history |
| Contractor and inspector contacts | Update over time | Keeps service information current for repairs |
Save permits, final plans, inspection logs, photos, correction notes, and maintenance instructions in one labeled folder, then keep it with the rest of your house records. Add a note each time you complete a repair, inspection, or modification so the file stays useful over time.
FAQs
Do I need county approval for small drainage changes?
It depends on the scope of the project.
Small drainage changes may not need approval. But structural work, like retaining walls, often does.
For example, in Montgomery County, you need a permit if a retaining wall:
- Is over 36 inches tall
- Supports a surcharge load
- Crosses a property line
- Is part of a tiered system
Check local rules before you start work.
Who should keep the inspection records, me or my contractor?
In Maryland, erosion control permits are issued to the property owner. That means you are the one on the hook for compliance and recordkeeping.
Your contractor can take care of the design, construction, and drainage details. Still, it’s smart to keep your own master file with:
- inspection reports
- maintenance logs
- photos
That way, if local authorities ask for paperwork at any point during the project, you have it ready to go.
What happens if I miss an inspection or repair log?
Missing an inspection or repair log can create regulatory problems for your erosion control project and put permit compliance at risk.
Those records matter because they help show that drainage and structural elements are doing their job. If your documentation has gaps, it becomes much harder to prove the project meets safety and environmental standards.
Chat with Us