









- bhavya gada
- No Comments
If I pick the wrong basin for the soil, the system can fail. In Maryland, where annual rainfall is about 35 to 50 inches, I need to test the exact basin spot to see whether water should soak into the ground, sit for a short time, or leave through a pipe or underdrain.
Here’s the short version:
- Retention basins need soil that drains well enough for infiltration.
- Detention basins fit sites where soil drains slowly or groundwater is too close.
- Test pits show shallow layers, fill, debris, and hardpan.
- Borings check deeper soil, groundwater, and bedrock.
- Infiltration tests show how fast water drops, often in inches per hour.
- Soil texture – sand, silt, or clay – helps shape depth, footprint, slopes, and outlet details.
- Setbacks matter too, including distance from foundations, wells, and septic parts.
A few numbers make the choice easier:
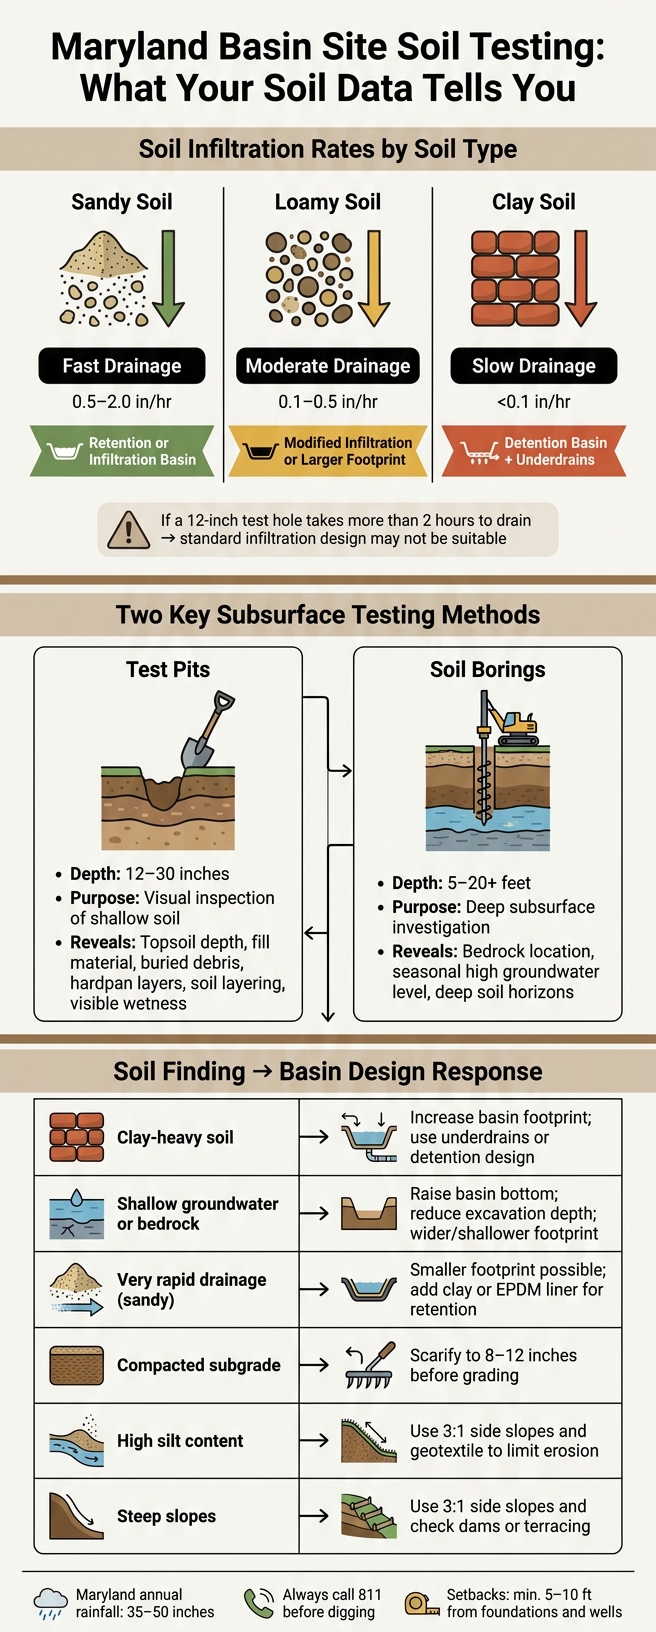
- Sandy soil: about 0.5 to 2.0 in/hr
- Loamy soil: about 0.1 to 0.5 in/hr
- Clay soil: often under 0.1 in/hr
- If a 12-inch test hole takes more than 2 hours to drain, a standard infiltration setup may not fit that spot.
| Soil result | What I’d likely do |
|---|---|
| Fast drainage, deep groundwater | Use a retention or infiltration basin |
| Medium drainage | Use a modified layout, more area, or soil work |
| Slow drainage, shallow groundwater, or hard layers | Use detention, underdrains, or a different basin location |
The main point: I should test the basin location first, then let the soil data decide the basin type, depth, and layout.
Maryland Soil Testing for Basins: Infiltration Rates & Basin Design Guide
Performing Soil Evaluations for On-Site Septic System Designs
Site Evaluation and Soil Testing Basics
Walk the property during or right after rain. Pay attention to where water moves, where it collects, and how long the ground stays soaked. Check for bare or washed-out soil near downspouts, low spots that stay wet, and parts of the lawn that have thinned out or died for no clear reason. Those signs can point to compaction, buried debris, or a high seasonal water table. They show you where to investigate, but they don’t tell you what’s happening below the surface.
In Maryland yards, construction work often disrupts natural soil layers. That means surface signs can send you in the wrong direction if you don’t confirm them below grade.
Define the Basin Goal Before Testing the Soil
Test the soil only for the type of basin you plan to build. An infiltration basin and a detention basin need different soil data. Start with the drainage problem first. That tells you where to test and how deep to go.
Test the Soil in the Exact Proposed Basin Location
Soil can change within just a few feet, even in the same yard. One area may contain compacted fill, while the spot right next to it may be native soil that drains just fine. So test the exact place where the basin will go.
Before you dig test pits or borings, call 811 (Miss Utility) to mark underground utilities. Then confirm setbacks. The proposed basin area should be at least 5 to 10 feet from building foundations, basements, and wells [1][6]. If the property has septic components, check those clearances on their own. Structures and utilities nearby can rule out a site that looks good at first glance, before any soil sample is taken.
After the location check, use test pits and borings to verify the subsurface profile. If surface signs point to poor drainage or disturbed fill, those tests help confirm what’s below.
Use Test Pits and Soil Borings to Check Subsurface Conditions
Surface clues can tell you where water is collecting. Test pits and borings help you figure out why. Once the site points to a problem area, open up the soil and confirm it. That gives you a clearer read on soil layers, limiting zones, and groundwater conditions that affect whether a basin will work. It also helps you decide if the proposed basin location can support retention or detention.
Inspect Shallow Soils with Test Pits
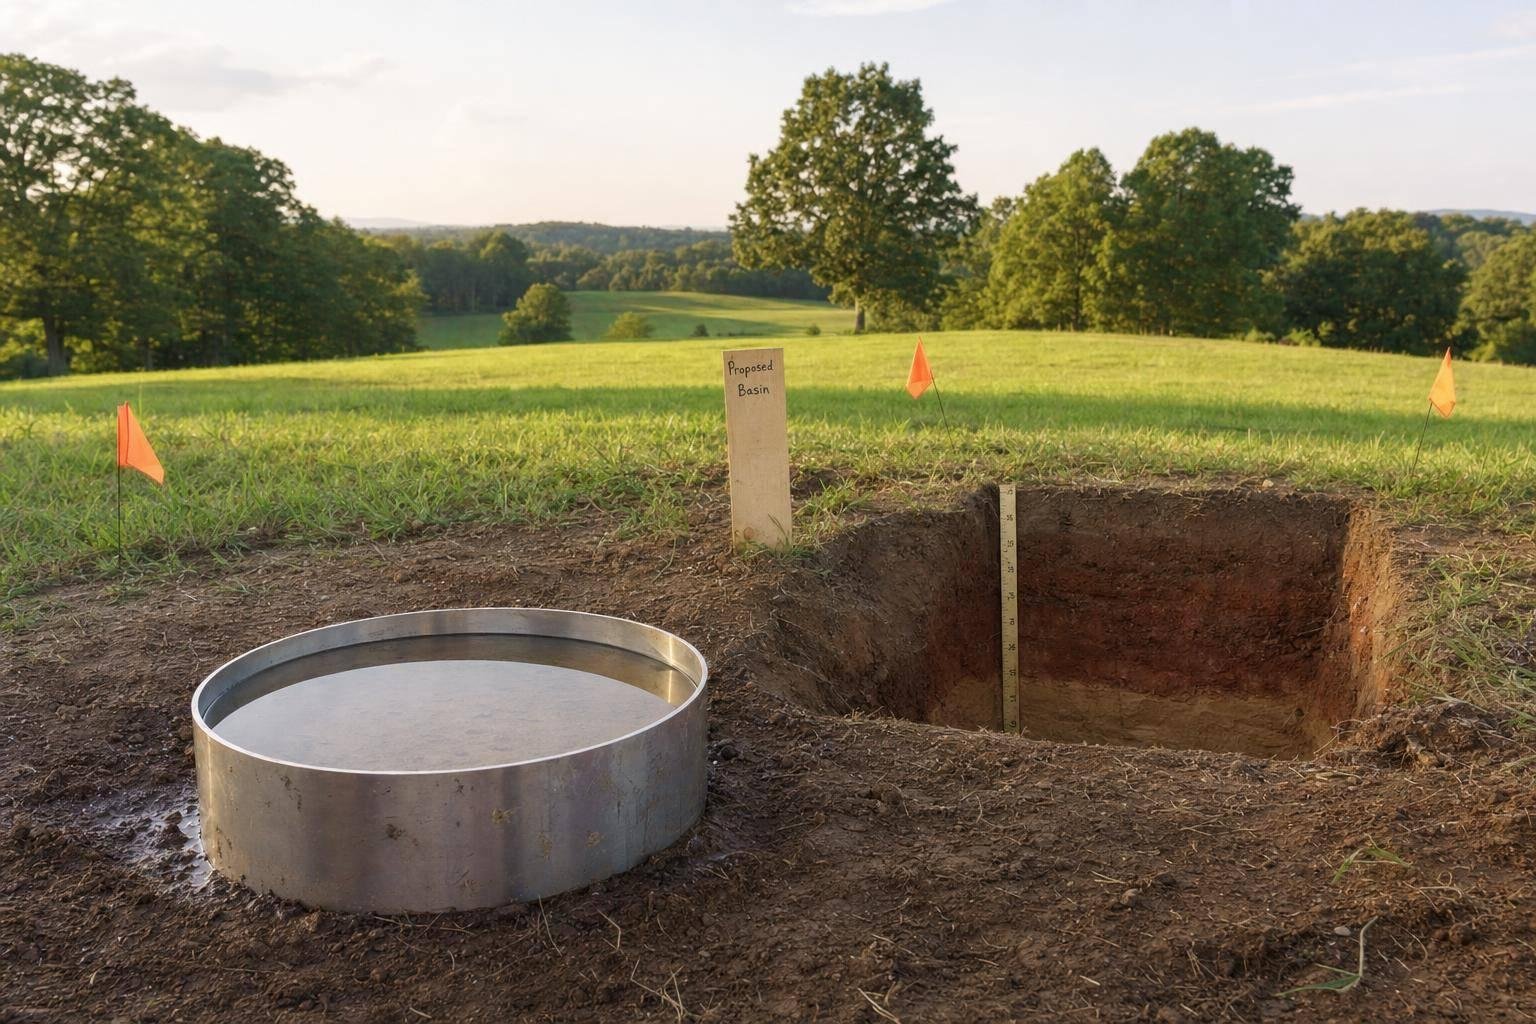
A test pit is a hand-dug or machine-excavated hole, usually 12 to 30 inches deep [2][3], made within the proposed basin footprint. It gives you a direct look at the shallow soil profile.
You’re checking for topsoil depth, fill material, and abrupt shifts between soil layers – known as a sharp change in soil layers. When soil texture changes suddenly, water can hang up at that boundary and cause waterlogging.
Construction can leave a mess below the surface. It often removes topsoil, mixes layers, and leaves behind poor fill [4]. A test pit can expose buried debris such as plywood scraps, rocks, or compacted fill dirt from earlier work [4].
If you hit a hardpan anywhere in the basin area, pay attention. This dense layer can block water movement and stop downward drainage [4]. Finding that early keeps you from designing around the wrong picture of the site.
Use a pit to spot shallow issues. Use borings when you need to see deeper.
Use Borings to Confirm Groundwater Depth and Bedrock Location
If the basin needs deeper excavation, a shallow pit won’t tell you enough. Soil borings go deeper – usually 5 to 20+ feet [5] – and matter most in places where bedrock shows up at uneven depths [5]. If bedrock is too close to the surface, you may need to move the basin or redesign it to cut excavation depth.
Borings also help confirm the seasonal high groundwater level. If groundwater sits within the proposed storage zone, reduce infiltration depth, add an underdrain, or switch to a filtered overflow system [1]. Depth to groundwater, wet layers, and rock depth should shape the basin layout before the design is locked in.
| Method | Primary Purpose | Typical Depth | What It Reveals |
|---|---|---|---|
| Test Pits | Visual inspection of shallow soil profile | 12–30 inches [2][3] | Topsoil depth, fill material, buried debris, visible wetness, and soil layering |
| Soil Borings | Deep subsurface investigation | 5–20+ feet [5] | Bedrock location, seasonal high groundwater level, and deep soil horizons |
Use pits for shallow layers, borings for depth, and infiltration checks to see how fast water drains. These tests show the site’s soil limits, and infiltration checks show how the basin is likely to perform.
sbb-itb-843f8be
Run Percolation and Infiltration Checks and Read the Results
Test pits and borings tell you what the soil is. Percolation and infiltration tests tell you how the soil behaves when water hits it. That difference matters. It’s what tells you whether the site can move water fast enough for the basin you want to build. Once pits and borings confirm the soil profile, infiltration testing shows how that soil actually drains.
Measure Drainage Rate Instead of Relying on Surface Appearance
A yard can look bone dry after a week with no rain and still have slow subsoil. On the flip side, a lawn that looks soggy may have grading issues, not poor permeability [2].
That’s why a quick look from the surface doesn’t tell you much. The better move is to test the spot where the basin will go. Dig a 6- to 18-inch hole at the proposed basin footprint, soak it once, refill it, and track how far the water drops over several hours [1][2]. That drop rate, measured in inches per hour, is your infiltration rate.
Soil type shapes those numbers:
- Sandy soils in Maryland usually infiltrate at 0.5 to 2.0 inches per hour [1].
- Loamy soils usually fall around 0.1 to 0.5 inches per hour [1].
- Clay soils are often less than 0.1 inches per hour [1].
If a 12-inch-deep hole takes more than 2 hours to drain, the soil is draining too slowly for a standard infiltration design [7]. That’s a red flag.
Compaction can also throw off the result. Construction zones and heavily used play areas often develop tight layers that stop water from moving downward. So test the actual basin footprint, not a nearby patch that looks nicer or feels looser underfoot [1][2][7].
Use that drainage rate alongside depth to groundwater before you settle on the basin type.
Use Test Results to Choose Between Retention, Detention, or a Modified Design
Higher infiltration rates usually fit retention or infiltration designs. Lower rates tend to push you toward detention or a modified setup. In plain terms: let the soil test help choose the basin, not the other way around.
| Infiltration Rate | Soil Type | Recommended Approach |
|---|---|---|
| > 0.5 in/hr | Sandy | Retention basin, infiltration trench, or soakaway |
| 0.1–0.5 in/hr | Loamy | Modified infiltration, larger footprint, or soil amendments |
| < 0.1 in/hr | Clay or compacted fill | Detention basin with controlled release or underdrains |
Slow soils don’t automatically kill the project. They just change the design. You may need a larger storage footprint, an underdrain to carry water out after a storm, or an overflow route to a swale or outlet structure [1][7].
Regional soil patterns matter too. Maryland’s Piedmont region often has clay-heavy soils, so detention or underdrain setups are common there. Coastal Plain areas usually have sandier soils, but high seasonal water tables can still limit infiltration [5].
Use the infiltration rate together with groundwater depth to decide between retention, detention, underdrains, or a larger footprint.
Next, use soil texture to refine basin footprint, grading, and outlet details.
Evaluate Soil Texture and Apply the Findings to Basin Layout
Once the infiltration rate tells you how fast water moves through the soil, texture tells you why it behaves that way and what that means for the basin shape. It helps explain drainage patterns and how the basin is likely to perform over time. After infiltration testing, use soil texture to fine-tune the layout.
How Sand, Silt, and Clay Content Affects Basin Performance
Sandy soils, which are common on Maryland’s Coastal Plain, drain fast and are often a good fit for infiltration. But fast drainage can be a problem if the goal is retention. In that case, add a compacted clay liner or a synthetic EPDM membrane to limit water loss[3].
Clay soils, common in Maryland’s Piedmont and central counties, drain slowly and compact easily[1]. Water tends to stay put because clay limits both lateral and downward movement. That usually means the basin needs a larger footprint, underdrains, or a shift to a detention design.
Silty soils can be trouble on slopes because they erode easily. Use 3:1 side slopes and geotextile to protect stone and pipes.
These soil traits should guide key layout choices, including footprint, depth, slope, and outlet details.
Adjust Footprint, Depth, Grading, and Outlet Details Based on Soil Data
Use texture findings to set basin footprint, depth, grading, and outlet details. In slower soils, a wider, shallower basin often works better than just digging deeper[1].
If borings show seasonal high groundwater or bedrock close to the proposed basin bottom, cut back excavation depth, raise the basin bottom elevation, or use underdrains[1][5]. Construction traffic can compact the subgrade, which hurts performance, so protect the basin bottom during construction. If the subgrade gets compacted, scarify it 8 to 12 inches before final grading[4][5]. And one rule is non-negotiable: never dig or grade clay soil when it’s wet[4].
| Soil Finding | Design Response |
|---|---|
| Clay-heavy soil | Increase basin footprint; use underdrains or switch to a detention-style design. |
| Shallow groundwater or bedrock | Raise basin bottom elevation; reduce excavation depth; consider a wider, shallower footprint. |
| Very rapid drainage (sandy) | A smaller footprint may be possible; add a clay or EPDM liner if the goal is retention[1][3]. |
| Compacted subgrade | Scarify to 8 to 12 inches before grading[4][5]. |
| High silt content | Use 3:1 side slopes and geotextile to limit erosion and clogging[6]. |
| Steep slopes | Use 3:1 side slopes and check dams or terracing to slow flow[6]. |
Conclusion: Use Soil Data to Place the Right Basin in the Right Spot
Once you know the soil texture, drainage rate, and subsurface limits, basin placement stops being a guess and starts becoming a design decision. Test pits, borings, and infiltration checks show if the site can support a basin and what kind of basin makes sense there. The drainage rate also helps determine whether the site is better suited for a retention basin, a detention basin, or a modified design.
That information shapes the basin’s footprint, depth, grading, and outlet setup. Soil texture helps explain why water moves through the ground the way it does, and it points to the right fixes – such as a wider footprint, underdrains, soil amendments, or a detention-style outlet. Skip even one of these checks, and you’re designing around assumptions instead of the actual site conditions.
In Maryland, the right basin starts with the right soil data at the exact site. For Maryland basin site checks, Pro Landscapes MD can review soil, grading, and drainage and recommend a basin layout based on site conditions.
FAQs
How many soil tests do I need for one basin site?
There’s no set number for a single basin site. It depends on the size of the project and how complicated the site is.
For a small residential installation, it usually makes sense to dig test holes in several spots. That helps you check subgrade depth, look for possible peat deposits, and get a sense of overall infiltration.
On larger or more complex projects, you may need multiple percolation tests, along with a recommendation from a licensed engineer.
Can a basin still work if my yard has clay soil?
Yes. A basin can still work in clay soil, but it usually needs a few changes because clay drains very slowly, often at less than 0.1 inches per hour.
What does that mean in practice? The basin may need to be larger so water has more room to spread out and soak in over time. In some cases, it also makes sense to add underdrains or a filtered overflow to deal with extra water and help prevent standing water after a storm.
When should I use borings instead of just test pits?
Use borings for large or complex projects like commercial installations, major retaining walls, or long driveways.
Test pits are a good fit for smaller residential areas. But borings give you a much closer look at the soil at deeper levels, along with the geotechnical data needed for engineered recommendations.
Chat with Us