









- bhavya gada
- No Comments
If I’m planning a swale on a Maryland home site, I need to get 5 things right: location, slope, soil, inlets/outlets, and upkeep.
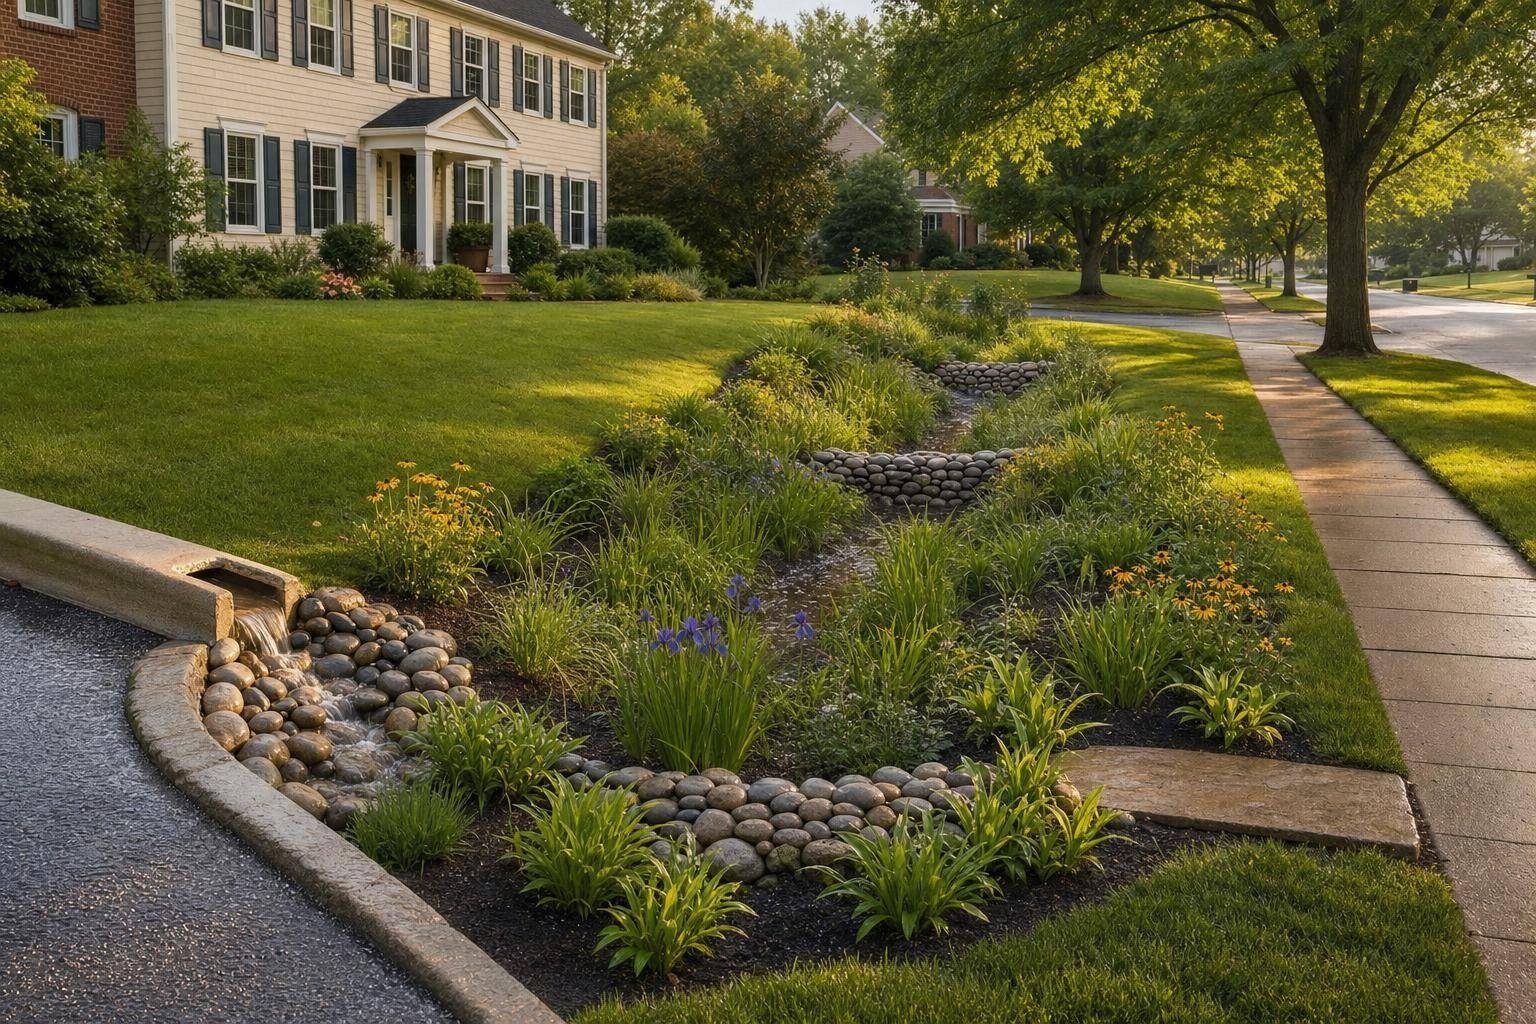
A swale is a shallow planted channel that slows runoff, spreads it out, filters sediment, and sometimes lets water soak into the ground. On most Maryland lots, it works best for small, frequent storms – not as a fix for major drainage failure.
Before I lay one out, I’d keep these points in mind:
- Pick the right spot: side yards, driveway edges, below downspouts, and low lawn areas often work well
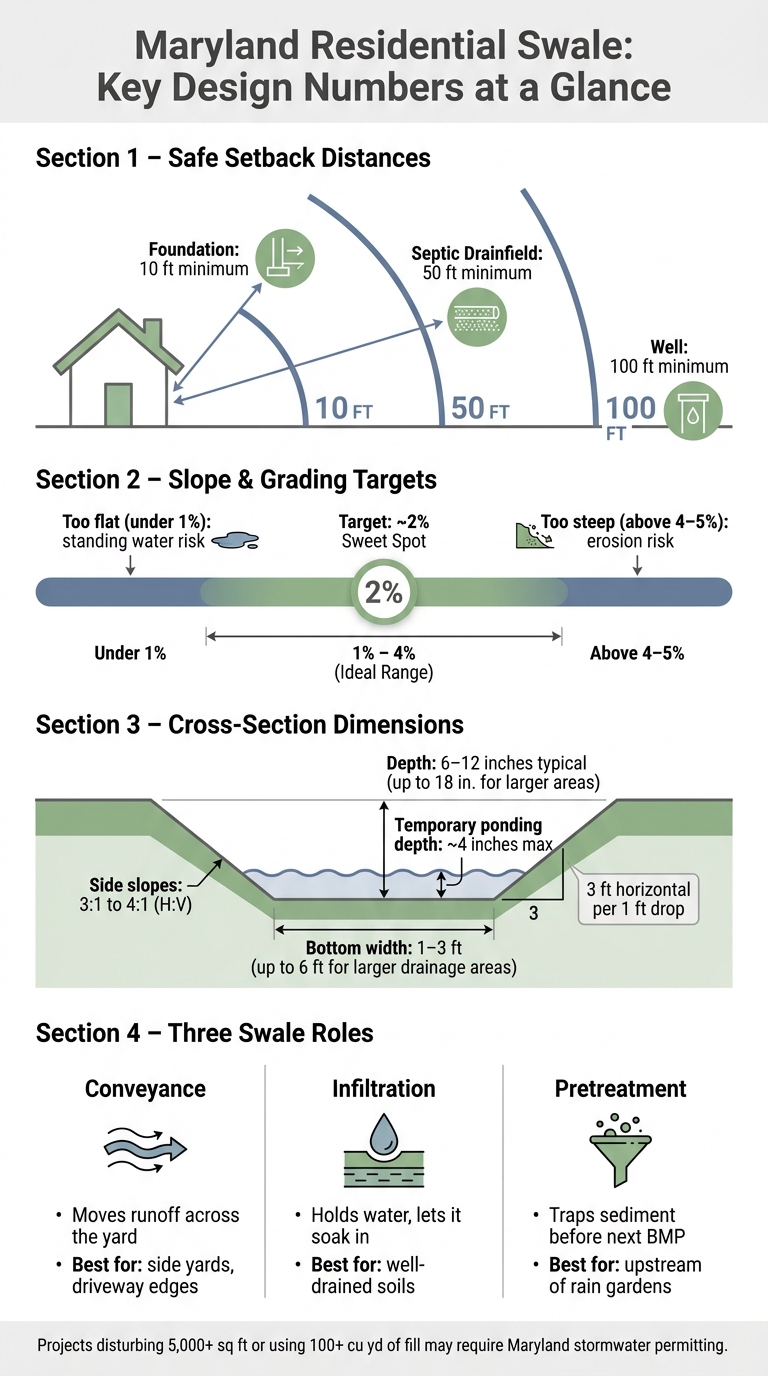
- Keep safe setbacks: about 10 ft from foundations, 50 ft from septic drainfields, and 100 ft from wells
- Use the right slope: about 1%–4%, with 2% as a solid target; too flat can hold water, too steep can erode
- Size it simply: many home swales are 6–12 in. deep, with 3:1 to 4:1 side slopes
- Know the soil: sandy soils can soak in more water; clay soils often move and filter water more than they absorb
- Protect entry and exit points: stone splash pads, grass lining, and a stable outlet help stop washouts
- Plan for overflow: water should have a safe path during heavy storms
- Check it after rain: if water sits for more than 48 hours, something is wrong
A swale can serve three main roles:
| Role | What it does | Best fit |
|---|---|---|
| Conveyance | Moves runoff across the yard | Side yards, driveway edges, drainage paths |
| Infiltration | Holds water and lets it soak in | Yards with well-drained soil and enough setback distance |
| Pretreatment | Traps sediment before water reaches another BMP | Upstream of rain gardens or bioretention areas |
One more thing: if a project disturbs 5,000 sq. ft. or more or uses 100 cu. yd. or more of fill, Maryland permitting may come into play. So before I dig, I’d check grading rules, utilities, easements, and how the yard drains during a storm.
That’s the short version: a Maryland swale works when the grading is even, the soil drains, the flow stays shallow, and the outlet is stable.
Maryland Swale Design: Key Dimensions & Setback Requirements
Designing Swales for SuDS (UK) and LID (US) | Engineering Best Practices | InfoDrainage | #02
sbb-itb-843f8be
1. Site Fit and Local Design Limits
Once you know the basic limits, the next step is simple: can the lot actually fit a swale?
The best sites are the ones where water already moves in shallow, even flow. You’ll often see that across a lawn, along the edge of a driveway, or below downspouts. That’s a good sign. But if water is already carving a gully or sitting in one spot, deal with the grading or drainage problem first. A swale isn’t meant to rescue a badly failing drainage pattern. It also needs enough open room for a stable shape and for routine maintenance.
Best Locations for a Residential Swale
On Maryland lots, swales tend to work best in a few common areas:
- Along side or rear property lines that already carry runoff between homes
- Parallel to driveway edges to intercept sheet flow
- Below downspouts where water is washing out mulch or turf
- At the base of small slopes where runoff from several lawn areas comes together
No matter where it goes, the swale should send water away from your foundation, well head, and septic drainfield. Keep infiltration swales about 10 feet from foundations, 50 feet from septic fields, and 100 feet from wells.[8][2] For lengthwise slope, 1% to 4% works best, with about 2% preferred.[11] Below about 1%, water can stall. Above about 5% to 6%, the risk of erosion goes up.
Before you mark out the swale path, check for underground utilities, drainage easements shown on your plat, and wet areas that stay soggy for long periods. Those wet spots can point to high groundwater. A good LID swale needs to fit the lot and match the runoff it’s supposed to handle. In Maryland, projects that disturb 5,000 square feet or more, or need 100 cubic yards or more of fill, may trigger stormwater management permitting, so that threshold should shape your layout choices.[7]
Conveyance, Infiltration, and Pretreatment: Key Differences
After the site clears those first checks, pick the swale’s main job. That matters more than people think. A swale can move runoff, soak it into the ground, or slow water and catch sediment before it reaches another stormwater feature. The main role drives the design.
| Swale Role | Main Purpose | Best Fit on a Home Site | When Extra Features May Be Needed |
|---|---|---|---|
| Conveyance | Move runoff safely across the site and reduce velocity | Along natural drainage paths, beside driveways, or between property areas | If runoff volume is high, slope is steep, or water must be directed to another BMP |
| Infiltration | Store runoff and let it soak into suitable soil | Where soils drain well and groundwater/bedrock setbacks are adequate | Often needs an underdrain if soils are tight, groundwater is shallow, or code requires a defined outlet |
| Pretreatment | Trap sediment and slow water before it enters another practice | Upstream of rain gardens, bioretention cells, or infiltration areas | Usually still needs a downstream feature for final treatment or storage |
Most residential swales in Maryland do more than one job at once. For example, a side-yard swale may carry runoff toward the back of the lot, let some of that water soak in, and catch sediment before the flow reaches a rain garden. Start by choosing the primary function. That one decision affects the location, soil work, and approval path. It also sets the swale’s dimensions.
2. Runoff Control Goals and Swale Performance
A swale has a straightforward job: slow runoff, spread it out, and cut erosion while helping with filtration and infiltration where the soil can take water in.
How a Swale Changes Flow on a Maryland Lot
Runoff from roofs, driveways, and compacted lawns tends to move fast and bunch up in one path. That’s when you start seeing rills, mulch washout, and erosion along edges. A swale breaks up that pattern by moving water across vegetation and taking some of the force out of the flow.
Studies of grassed swales show large drops in peak flow and runoff volume, along with strong nutrient and metal removal when slope, vegetation, and water depth are set up the right way.[14][16][15] In plain terms, the swale needs to stay shallow, vegetated, and evenly graded. Swales are generally not a good fit for maximum flows above about 5 cubic feet per second.[10]
When a Swale Works as Part of a Larger Drainage Plan
On a tough site, a swale usually works best as one part of a larger drainage setup. It can take water from a roof leader or driveway edge, slow it down, filter it, and then move it to a downstream feature such as a rain garden, dry well, or stabilized outlet. The swale deals with surface flow. The other parts handle storage and final discharge.
For more involved grading or downspout tie-ins, Pro Landscapes MD can work the swale into the larger drainage layout. How well it performs comes down to the swale’s cross-section, slope, and outlet detail.
3. Grading and Cross-Section Basics
Once site fit and function are set, grading is what makes the swale work. It takes runoff goals off the plan and turns them into an actual drainage path.
Depth, Side Slopes, and Continuous Fall
For most Maryland homes, a swale depth of 6–12 inches from the lawn grade to the swale bottom is enough for common drainage areas, like one roof plane or a side yard. Bigger drainage areas may need up to 18 inches, but that makes sense only where the soil drains well and the side slopes stay gentle.
The bottom should keep a steady pitch from inlet to outlet. If the slope is under 1%, you can end up with low spots and standing water, which is a common headache in compacted or clay-heavy Maryland soils. Once the slope gets above 4%, the swale starts acting more like a ditch that moves water fast. At that point, it may need erosion control, such as check dams, stone lining, or thick vegetation.[19][21][11]
A shallow trapezoid or a shallow rounded bottom usually works best. Both shapes spread water over more soil than a narrow V-ditch. That slows the flow and helps more water soak in. Side slopes should be at least 3:1, which means 3 feet of horizontal run for every 1 foot of drop. A 4:1 slope is a better pick if the homeowner wants to mow across the swale. Steeper slopes are tougher to maintain and tend to wash out more easily.[22][23]
One small grading mistake can cause a big problem: reverse pitch near the house. Even a short section that tips back toward the foundation can hold water where you don’t want it. The grade needs to keep a positive fall away from the house so runoff never turns back toward the foundation.[19]
Key Dimensions Homeowners Should Know
These ranges are a good starting point for most residential swales in Maryland.
| Design Element | Typical Range | What It Affects |
|---|---|---|
| Bottom slope | 1–3% (up to 4% max)[11][19][21] | Drainage speed and erosion risk; flatter means slower flow and less erosion, but more chance of standing water |
| Bottom width | 1–3 ft for small swales; up to 6 ft for larger areas[11][20] | Flow speed and maintenance access; wider means slower water and easier mowing |
| Side slope (H:V) | 3:1 to 4:1 (flatter preferred)[22][23] | Stability, erosion resistance, and safer mowing across the slope |
| Flow path length | 20–100+ ft depending on lot size[11][20] | Time for infiltration; longer runs can let more water soak in if the grade stays consistent |
| Temporary ponding depth | About 4 in.[18] | Safety and plant health; water should drain within 24–48 hours |
Once the grade is set, the next part is soil prep, planting, and drainage tie-ins. Those details affect how well the swale keeps its shape and how cleanly it drains.
4. Soil Setup, Planting, and Drainage Tie-Ins
After grading and cross-section are set, the next job is building a soil and planting system that can hold up under flow. Once the swale shape is in place, the soil, planting, and inlet details often decide whether it works well or starts to break down.
Soil Preparation and Infiltration Support
Soil plays a big role in whether the swale soaks water in or leaves it sitting on the surface. One common reason a swale falls short is compacted subsoil, which cuts down infiltration.[32][33]
Before adding any planting media, loosen the subgrade to at least 12–18 inches by tilling or ripping it. Do this only when the soil is not saturated. If you work wet clay, you can smear the pores shut and make compaction worse.[4]
Instead of reusing native excavated soil, use a soil mix amended with sand and compost. Maryland guidance often calls for a mix like this:[6][17]
- 50–60% sand
- 20–30% leaf compost
- 20–30% topsoil
Adjust pH to 5.5–7.0.[6][17] Keep clay content low so the bed drains within 48 hours after a storm.[12]
It also helps to fence or flag the swale footprint before grading so heavy equipment stays out.[34]
Plant Selection and Erosion Control
Vegetation is what keeps the swale in place over time. It isn’t just there to look nice. It’s part of the drainage system. Plants need to handle both short-term ponding after storms and dry periods between rain events. Dense native grasses, perennials, and shrubs help hold soil in place and cut down washout.[27][29][26]
In the bottom zone, space plants about 2 feet on center so the cover gets thick enough to trap sediment and slow flow.[26] On side slopes, turf-type grass can work where mowing is practical, but it needs to get established soon after grading. Until plant cover fills in, erosion-control blankets or coir matting can protect the slope during the first season.[28][27][29]
Where runoff enters at one point – like a downspout mouth, pipe end, or driveway edge – add a stone pad or river cobble apron to take the hit before water reaches bare soil.[24][29]
That plant cover matters, but it only does its job if water enters and exits the swale without scouring the bed.
Connecting Downspouts, Pipes, and Downstream Outlets
The last step is managing how water gets in and out. Bad inlet or outlet details can undo the swale’s erosion control. If a downspout empties straight onto bare soil or a steep swale slope, it can cause scour. A better move is to extend the downspout to a rock splash pad or a short grass-lined channel that spreads the flow before it reaches the swale bottom.[24][25]
For driveway runoff or other hard-surface drains, use a shallow trench drain or a similar diversion so sheet flow enters the swale at a gentler angle.[24] From there, the swale can pass flow to a rain garden, bioretention cell, or basin downstream.[9][30][31] If it feeds a downstream rain garden or bioretention cell, set that treatment area a few inches lower than the swale invert. That way, ponding happens where it’s supposed to, instead of backing water up into the swale.[17]
At the outlet, whether it leads to a drain, buffer, or lower yard area, make sure flow speeds stay low enough to avoid erosion. Usually that means pairing dense vegetation with any grade controls or check structures needed under Maryland Stormwater Design Manual requirements.[4] Proper inlet and outlet details help the swale stay in shape and stop scour.
5. Inspection, Maintenance, and Closing Notes
Once the swale is planted and connected to drainage, maintenance helps protect the slope, outlet, and infiltration capacity. If nobody checks it, a swale can stop working the way it should. Most of the work is pretty simple: inspect it, clear debris, and fix small problems before they turn into bigger ones.
What to Check After Storms and During the Growing Season
Walk the swale within 24–48 hours after storms. Start with the big thing first: standing water. If water is still sitting there after 48 hours, that usually points to clogging, compaction, or a blocked outlet.[37][13][28]
Check low spots, inlets, and outlets for standing water, erosion, and blockages. Look over the side slopes and bottom for new erosion scars, rills, rutting, or bare patches where soil has moved. Then check each inflow and outflow point – downspout connections, surface inlets, curb cuts, and discharge pipes – for leaf litter, mulch, trash, or sediment that could slow or stop flow.[35][37][13][28] Make sure plants are still rooted in place and that no large bare areas have opened up since the last rain.
During the growing season, inspect the swale at least seasonally – spring, midsummer, and fall – with quick checks after large storms.[37][13] Watch for thin vegetation, weeds, and sediment buildup in low areas or around inlets.
Routine Upkeep vs. Warning Signs
Routine care helps you stay ahead of the stuff that causes trouble.
| Type | Task or Sign | Notes |
|---|---|---|
| Routine Task | Mow turf swales as needed | Keep grass at about 3–4 inches; never mow on saturated soil.[37][13] |
| Routine Task | Remove leaves, litter, and debris | Check inflow and outflow areas monthly and after major storms.[35][37][13] |
| Routine Task | Reseed or replant thin spots | Do this each spring or early fall to keep dense cover.[37][13][28] |
| Routine Task | Clean sediment from low points and pretreatment areas | Remove buildup when it goes past about 3 inches.[1][3][42] |
| Warning Sign | Standing water beyond 48 hours | Check grading, compaction, sediment clogging, or outlet blockage.[37][13][28] |
| Warning Sign | Rills, gullies, or exposed soil | This means flow is moving too fast or the vegetation has failed.[37][13] |
| Warning Sign | Chronic sediment returning after cleanup | Find and fix the upstream source instead of cleaning the same spot again and again.[39][40][42] |
| Warning Sign | Water bypassing the swale or reaching the foundation | This calls for professional evaluation.[4][36][5][38][13] |
Don’t drive vehicles or heavy equipment over the swale when the soil is wet. That can compact the soil, cut down infiltration, and damage the bed.[3][41][43] It’s also smart to keep fertilizers, herbicides, and pesticides to a minimum – or skip them in the swale altogether – so you don’t damage vegetation or reduce treatment performance.[40][3][42]
If the same problem keeps coming back, the issue is often grading, compaction, or outlet failure – not routine upkeep. If warning signs stick around, such as ponding, repeated erosion, cracked pipes, or sinkholes, bring in a professional. Pro Landscapes MD handles grading, stormwater management, drainage installation, and yard repair across central Maryland.
FAQs
Do I need a permit for a swale in Maryland?
Permit rules depend on where you live and how much work the project involves. In many cases, requirements vary by county and can hinge on a few site-specific details, such as the amount of land being disturbed, whether the project changes existing drainage patterns, and how close the work is to protected buffers.
Because swales are part of stormwater management, they can also fall under local grading or sediment control rules. Pro Landscapes MD can help you understand what applies to your specific site.
How do I know if my soil is suitable for an infiltration swale?
Check if your soil drains well enough to soak up water instead of letting it sit on the surface. Good stormwater management depends on that drainage rate.
Some soils make drainage harder and can even lead to structural failure. That’s why a professional site assessment matters. It helps identify soil composition and infiltration rates before problems show up.
When should I call a professional for swale design or repair?
Call a professional if you notice persistent pooling, repeat water damage, or erosion that shows your swale is no longer handling runoff the way it should.
A pro can fix grading problems, clear blocked drainage paths, and help protect your landscape from more damage. Pro Landscapes MD provides drainage repair, grading, and stormwater management services.
Chat with Us