


- bhavya gada
- No Comments
Modular block walls are a reliable choice for retaining soil, managing slopes, and adding structure to outdoor spaces. These walls are made from precast concrete blocks that interlock for stability and can be reinforced for taller or more demanding applications. They’re often used for landscaping, erosion control, and even flood barriers.
Key points:
- Primary Uses: Retaining walls, erosion control, seawalls, and safety barriers.
- Materials: Concrete blocks with compressive strengths of 3,000–5,800 psi, depending on climate.
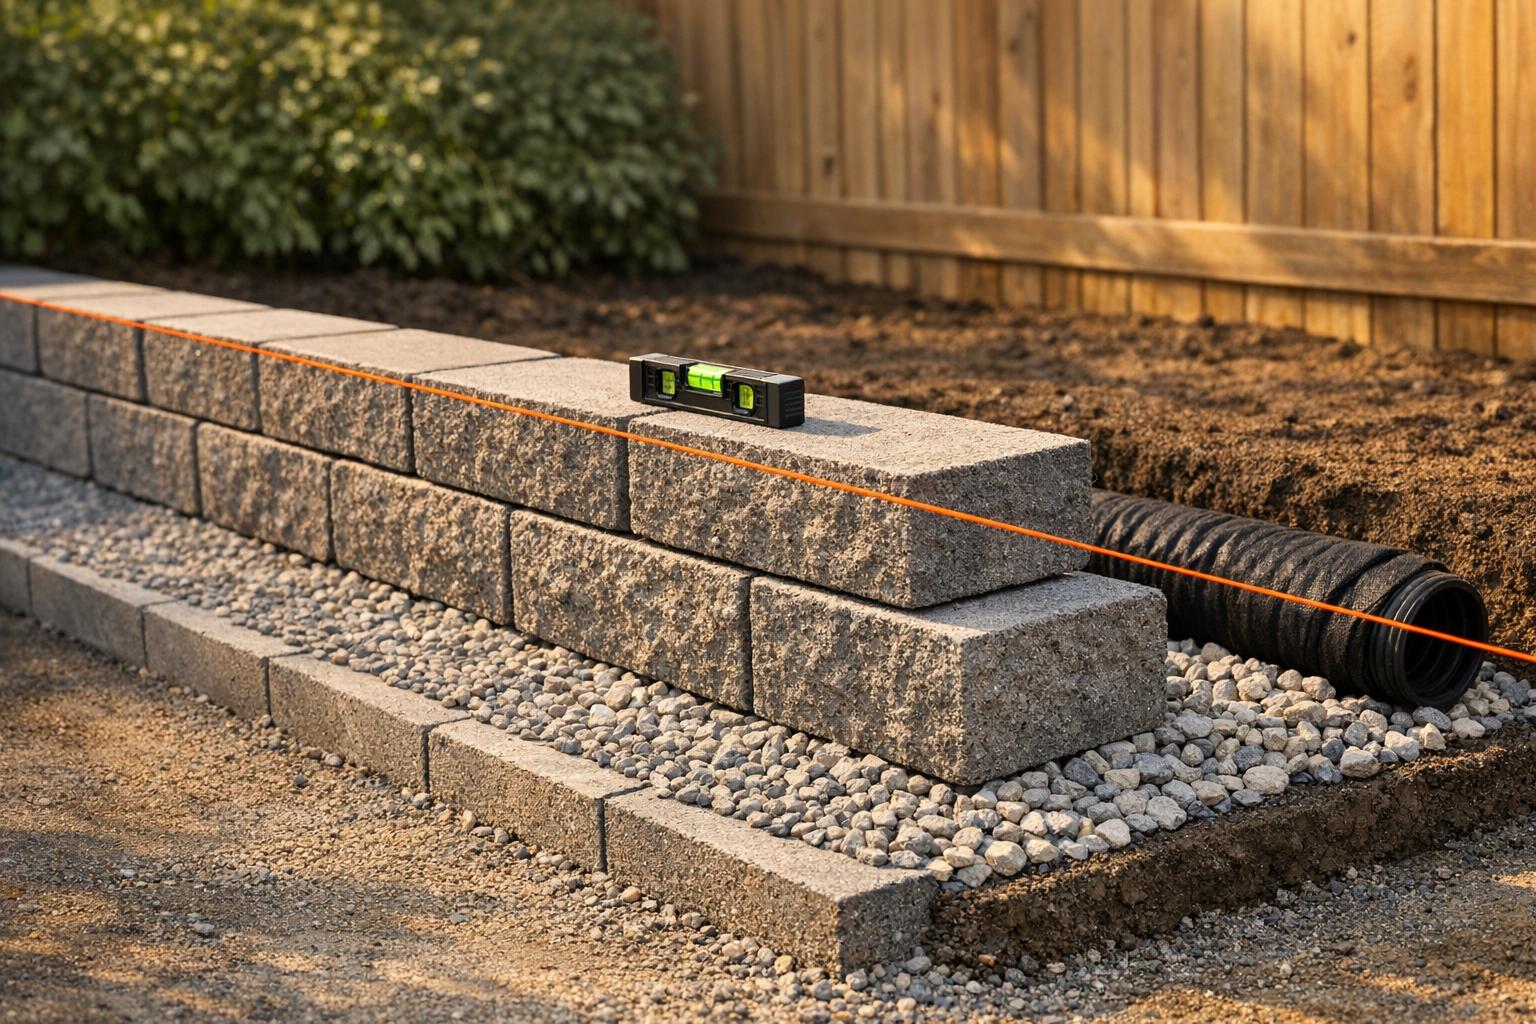
- Construction Essentials: Proper excavation, a compacted gravel base, and drainage systems are critical for stability.
- Design Features: Interlocking systems, drainage integration, and options for curved or corner layouts.
- Finishing Touches: Caps and planter blocks enhance both durability and appearance.
For lasting results, focus on a solid foundation, effective drainage, and precise block placement. Whether for a small garden wall or a large commercial project, these walls combine strength with visual appeal.
Industry Partners Series: Modular block retaining wall, design and build
sbb-itb-843f8be
Choosing Materials for Modular Block Walls
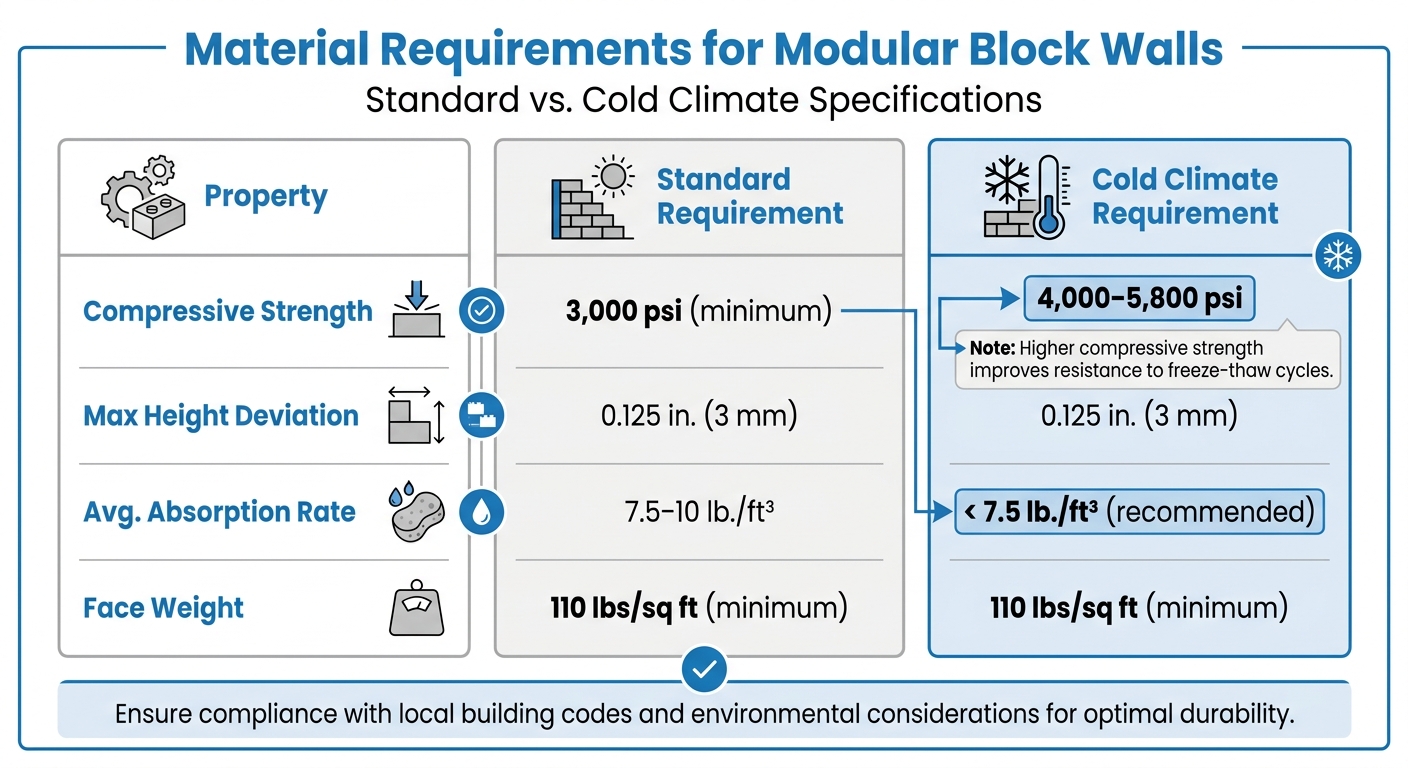
Modular Block Wall Material Requirements: Standard vs Cold Climate Specifications
Selecting the right materials is crucial for building modular block walls that last. The blocks need to handle the weight of the soil they retain while standing up to local climate challenges. This ensures the wall remains stable and resistant to wear over time.
Block Types and Interlocking Systems
Most modular block walls use hollow-core concrete blocks designed for strength and stability. These blocks are typically filled with compacted aggregate, ranging in size from 0.25 to 1.5 inches. This fill not only adds weight but also creates a mechanical interlock between the blocks. For gravity-based stability, standard modular units should provide a minimum weight of 110 lbs per square foot of wall face area [2].
Interlocking features, like raised front lips or specially shaped edges, help ensure proper alignment and consistent setback during construction. Unlike cast-in-place concrete, modular blocks offer flexibility, allowing you to make adjustments as you build. To get the best results, sweep away any loose stone from the top of each block before placing the next layer. Lay the blocks in a "running bond" pattern, ensuring at least a 3-inch offset from the seams below. This method enhances the wall’s structural integrity [2].
Concrete Block Properties and Finishes
Concrete blocks must meet specific strength requirements to handle weight and withstand environmental conditions. The minimum compressive strength after 28 days should be 3,000 psi, but in colder climates, blocks rated between 4,000 and 5,800 psi are recommended. This higher strength improves resistance to freeze-thaw cycles, which is critical in areas where de-icing salts might otherwise degrade the blocks over time [2].
In addition to strength, surface finishes play a role in blending the wall with its surroundings. Modular systems often include blocks of varying heights, such as 18-inch and 36-inch XL blocks, to create a design that fits the scale of your landscape. You can also incorporate "planter" blocks to add vegetation, softening the concrete’s appearance. Finishing touches like "Coping" and "Caps" give the wall a polished edge, hiding the internal locking systems. For walls that curve or follow natural contours, some systems offer radial corners and adjustable radius options [1].
| Property | Standard Requirement | Cold Climate Requirement |
|---|---|---|
| Compressive Strength | 3,000 psi (min) | 4,000–5,800 psi |
| Max Height Deviation | 0.125 in. (3 mm) | 0.125 in. (3 mm) |
| Avg. Absorption Rate | 7.5–10 lb./ft³ | < 7.5 lb./ft³ (recommended) |
| Face Weight | 110 lbs/sq ft (min) | 110 lbs/sq ft (min) |
These material considerations lay the groundwork for more advanced structural techniques covered in the following sections.
Site Preparation and Base Requirements
Getting the site ready is a critical step when working with modular block walls. A solid, level, and well-drained foundation is the backbone of a stable wall. Rushing through or skipping these steps can lead to costly issues like shifting or cracking later on.
Excavation and Trench Design
The depth of your trench depends on the wall’s height and the type of soil at the site. A general guideline is to bury 10% of the wall’s total height, plus an extra 4–6 inches to accommodate the gravel base [3]. The table below outlines excavation needs based on different wall applications.
Soil type plays a big role here. For example, sandy gravel, which is more stable, may need less digging than clay, which tends to require deeper excavation and a thicker gravel layer to prevent sinking or rutting. The trench width should be twice the depth of the wall block (front-to-back measurement) to allow space for blocks, gravel, and drainage systems [4].
Be cautious not to over-excavate. Even an extra inch can increase costs due to more soil disposal and gravel requirements. Keep the trench depth consistent and level. If your design calls for water to flow toward a specific drainage area, you can slope the bottom of the trench by 1–2% [4].
Once the trench is properly measured and excavated, the next step is to build a strong, well-drained gravel base.
Gravel Base and Leveling Techniques
The gravel base acts as the foundation for the entire wall. It spreads out the weight of the blocks and the retained soil while ensuring water drains away from the structure. For walls taller than 2 feet, installing a perforated drain pipe behind the base layer is essential to manage water pressure and avoid buildup [4].
To keep soil from mixing with the gravel and destabilizing the base, lay down landscape fabric between the soil and gravel. Compact the gravel in layers using a vibratory rammer or plate compactor. This step-by-step compaction is crucial to prevent the wall from shifting over time [4].
Here’s a quick reference table for typical excavation and base requirements:
| Wall Application | Typical Excavation Depth | Gravel Base Thickness | Buried Block Depth |
|---|---|---|---|
| Residential Modular Wall | 10 inches | 6 inches | 4 inches |
| Commercial/Reinforced Wall | 12 inches | 6 inches | 8 inches |
| 3-Foot Retaining Wall | 10–12 inches | 6 inches | ~4–6 inches |
Some systems may call for a concrete leveling pad instead of gravel [1]. Check the manufacturer’s "Leveling Pad Options" for guidance [1]. If you’re building on a slope, step footings can help transition the foundation while maintaining a stable, level base for the blocks [1].
Structural Design Principles
Once the foundation is solid, the next focus is ensuring the wall’s strength through precise structural design. A properly designed modular block wall achieves a balance between stability, load distribution, and external factors like water pressure and soil movement, ensuring it performs well over time.
Batter Angle and Setback Calculations
The batter – a slight backward tilt of the wall – helps resist lateral forces from soil and water. Modular systems incorporate a built-in setback per course to create this lean naturally. Most setbacks range between 3/4 inch and 1 inch per course, depending on the block type and manufacturer guidelines. For instance, a wall with 8 courses and a 3/4-inch setback per course will lean back approximately 6 inches from base to top. Steeper batters are often advantageous for taller walls or when soil conditions exert higher lateral pressure.
Height Limits and Reinforcement Options
For residential walls up to 3–4 feet, gravity alone is typically sufficient for stability. However, taller walls require additional reinforcement. In areas prone to seismic activity (Category D0 or D1 zones), horizontal and vertical reinforcement must meet specific standards. The combined cross-sectional area of reinforcement in both directions should equal at least 0.002 times the wall’s gross cross-sectional area, with each direction contributing no less than 0.0007 times the gross area for balanced strength [5].
Solid grouted walls require reinforcement spacing of no more than 48 inches in high-seismic zones. In lower-seismic areas, spacing can extend to 120 inches. For shear walls, spacing should not exceed the smallest of these three: one-third of the wall’s length, one-third of its height, or 48 inches [5][6]. Designing walls in standard modular increments also helps maintain structural integrity by minimizing on-site adjustments [6]. These reinforcement techniques work hand-in-hand with interlocking block systems to enhance durability and functionality.
Drainage Integration and Pipe Placement
Proper drainage is critical to prevent water buildup and hydrostatic pressure behind the wall. A perforated drain pipe should be installed at the base, positioned behind the first course of blocks, and surrounded by gravel. If necessary, wrap the gravel in landscape fabric to keep it clean. The pipe should slope 1–2% toward an outlet, such as a daylight drain or stormwater system. For walls taller than 2 feet, backfill the area with free-draining gravel to create a drainage zone. This reduces pressure and helps maintain the wall’s stability over time.
Wall Layout and Construction Process
Once the structural design is finalized and drainage systems are in place, it’s time to start building. The placement of each block is critical, as it directly impacts both the wall’s strength and its appearance. Starting with precision ensures the wall is both durable and visually appealing.
Bottom Course Installation
The first course of blocks is placed directly on the compacted gravel base. It’s crucial to ensure every block is level and free of debris. Check alignment after every 3–4 blocks to catch any potential issues early on [7][8]. For retaining walls taller than 4 feet, most municipalities require a building permit and approval from a certified engineer, so confirm local regulations before beginning [7].
Once the base layer is in place, start stacking the blocks, keeping a consistent offset to enhance stability.
Stacking and Offsetting Blocks
After establishing a solid bottom course, blocks should be laid in a running bond pattern. This means each course is staggered by half a block over the one below, similar to brickwork [7]. This method distributes weight evenly and avoids continuous vertical seams, which could compromise the wall’s integrity. Many modular systems use features like rear lips, grooves, or fiberglass pins to lock the blocks together [7].
It’s also essential to keep the joints between blocks as tight as possible. Gaps can let water seep in, potentially causing chipping or damage from freeze-thaw cycles. As Building Products Corp explains:
"The joint between retaining wall blocks have to be as tight as possible. if you have large gaps, then water might be able to seep into the wall" [7].
As you build, add gravel backfill in layers of 8–10 inches behind each course, compacting thoroughly to eliminate voids [7].
Handling Curves, Corners, and Steps
For tight curves, pinned systems provide better flexibility than lipped designs [7]. When constructing corners, use an interlocking pattern to maintain stability. If specialized corner blocks aren’t available, standard blocks can be cut in half using a masonry chisel or a diamond-blade saw. Many blocks come with pre-molded grooves to make cutting easier and cleaner [7][8].
For tiered wall systems, ensure there’s enough horizontal distance between tiers. A good rule of thumb is to maintain a setback of at least twice the height of the lower wall – for instance, a 2-foot wall should have a 4-foot setback before the next tier begins [7]. This spacing reduces soil pressure and allows each wall to function independently, adding to the system’s overall stability.
Finishing and Appearance
Adding the finishing touches is what ties a retaining wall into its surroundings. With the right caps and proper backfill work, you can turn a purely functional structure into an attractive element of your outdoor space.
Capping Options and Top Course Design
Caps do more than just finish the look – they help shield the wall from moisture. Many people opt for large concrete slabs with textured surfaces. These are popular because they resemble natural stone while offering the strength and durability of concrete. Their design, often textured on three or more sides, makes them a versatile choice for both retaining and freestanding walls [9].
To attach caps securely, use high-strength construction adhesive on the top course. This not only keeps the caps in place but also adds stability over time [10]. If you’re working on corners, you’ll need to cut the caps at a 45-degree angle. A masonry saw with a diamond blade works best for this task [10]. For curved walls, the process is a bit different: position two caps with a small gap, place a third cap on top to mark the overlap, and then cut the center cap to fit snugly between the others [10].
Beyond aesthetics, caps act as a barrier against water infiltration, which is crucial for the wall’s longevity [11].
These steps ensure the wall is ready for its final backfill and grading, reinforcing its durability for years to come.
Backfill and Soil Finishing
Proper grading is key to making your wall last. Even the best sealing or finishing won’t save a wall if water isn’t directed away from it. Always grade the soil away from the wall to channel water elsewhere, reducing the risk of moisture buildup that can compromise the structure [12].
Once the grading is done, consider applying a penetrating sealer to the blocks. These sealers are more effective than latex-based ones because they let the wall "breathe" while still preventing water from seeping in [12]. This extra step can significantly improve the wall’s resistance to moisture, ensuring it remains strong and stable over time.
Conclusion
Building durable modular block walls comes down to thoughtful design, smart material choices, and careful construction techniques. It all starts with a stable foundation: excavate a trench that’s the right width and depth, install a leveling pad that extends beyond the first course of blocks, and compact a crushed aggregate base to create a solid footing.
Water management is equally important. Use free-draining aggregate behind the blocks, install low-set drain tiles, and backfill with soil that has low permeability. These steps help reduce hydrostatic pressure, which can compromise the wall’s stability over time.
The blocks themselves matter, too. Choose modular blocks that meet ASTM standards for compressive strength and water absorption – this ensures they can handle environmental stress without breaking down.
Finally, precision during construction makes all the difference. Compact the backfill after each course, and make sure every block is perfectly aligned to maintain the wall’s intended slope (or batter). This attention to detail not only strengthens the wall but also enhances its appearance. For projects involving curves, corners, or reinforcement grids, hiring a professional can take both the quality and aesthetics to the next level.
FAQs
Do I need an engineer or permit for my wall?
When building retaining walls taller than 4 feet or those that support structures, a permit is usually necessary. For walls over 5 feet or in challenging conditions – like poor soil or steep slopes – an engineered design is often required. Some local rules may even demand involvement from a registered design professional. Always review your local regulations to stay compliant.
How do I prevent my wall from leaning or failing?
To keep a modular block wall stable and in good shape, it’s all about getting the design and construction right. Start by using geogrid reinforcement properly – make sure it’s placed at the correct intervals, with the right length, and securely connected to the wall. This helps the soil mass stay intact and supports the wall.
You’ll also need to tackle common failure risks like sliding, overturning, and bearing issues by meeting all stability standards. Don’t skip the basics either: assess the site thoroughly, dig a foundation that’s deep enough, and steer clear of any utility lines that might interfere. These steps are key to making sure your wall stands strong for years to come.
What block strength should I use in freeze-thaw areas?
For regions experiencing freeze-thaw cycles, it’s important to use high-strength block materials paired with proper drainage systems. This combination helps reduce potential damage caused by repeated freezing and thawing. The exact strength of the blocks should be determined based on local engineering expertise and the specific conditions of the site.
Chat with Us