


- bhavya gada
- No Comments
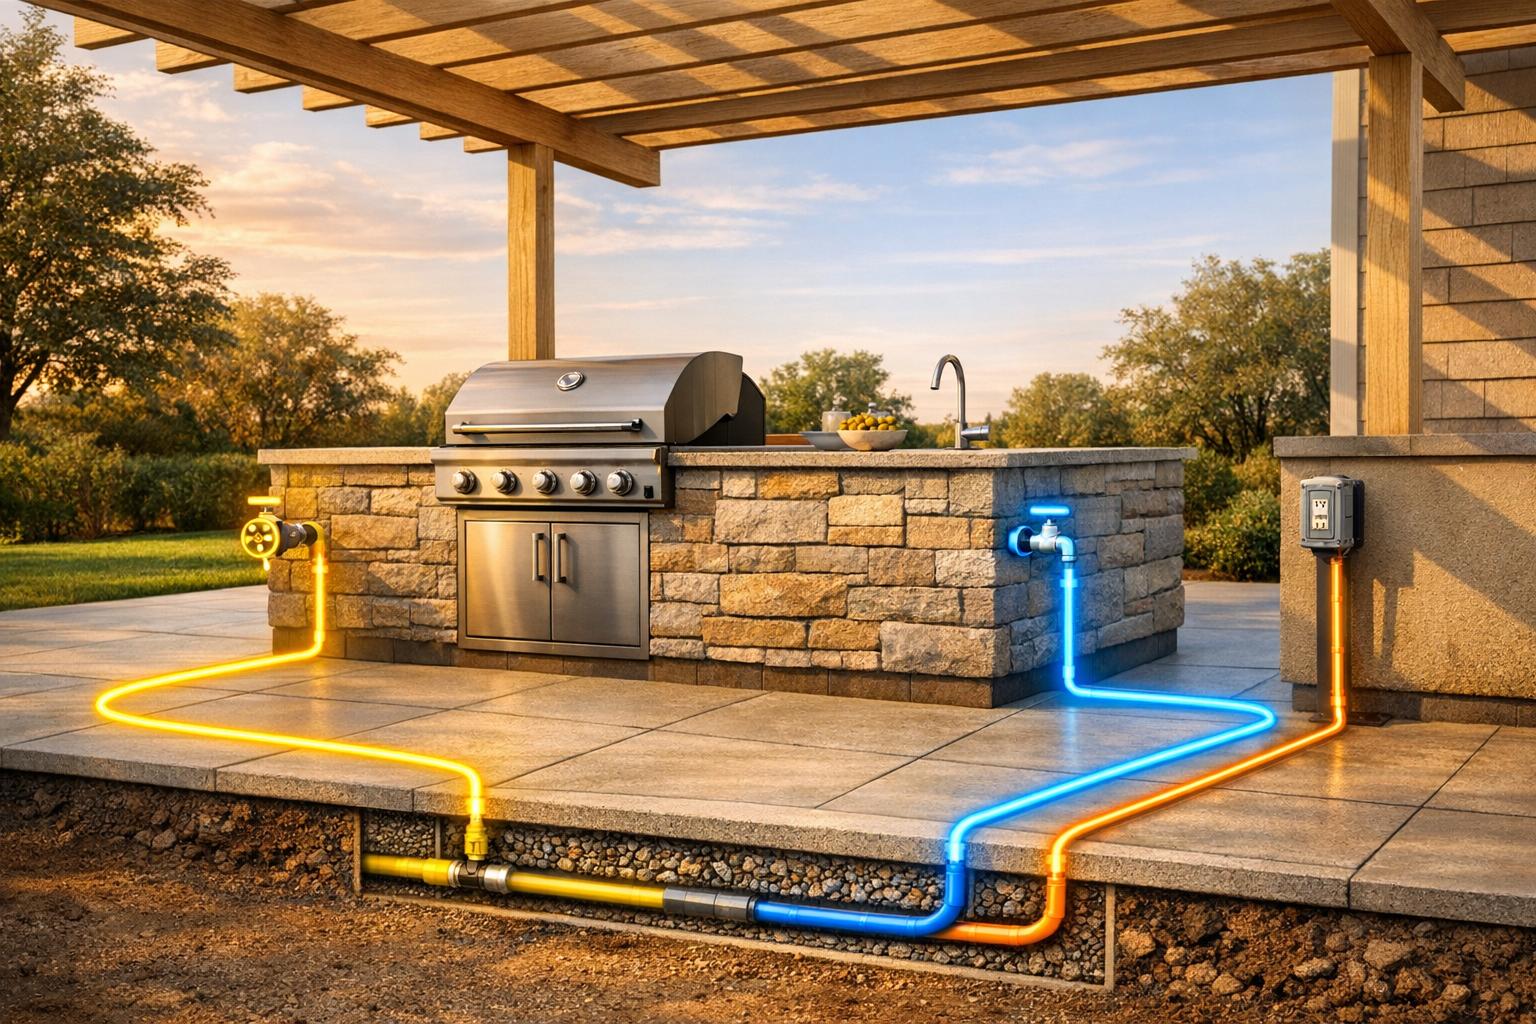
When building an outdoor kitchen, utility planning for gas, water, and electricity is the key to avoiding costly mistakes and delays. Here’s what you need to know:
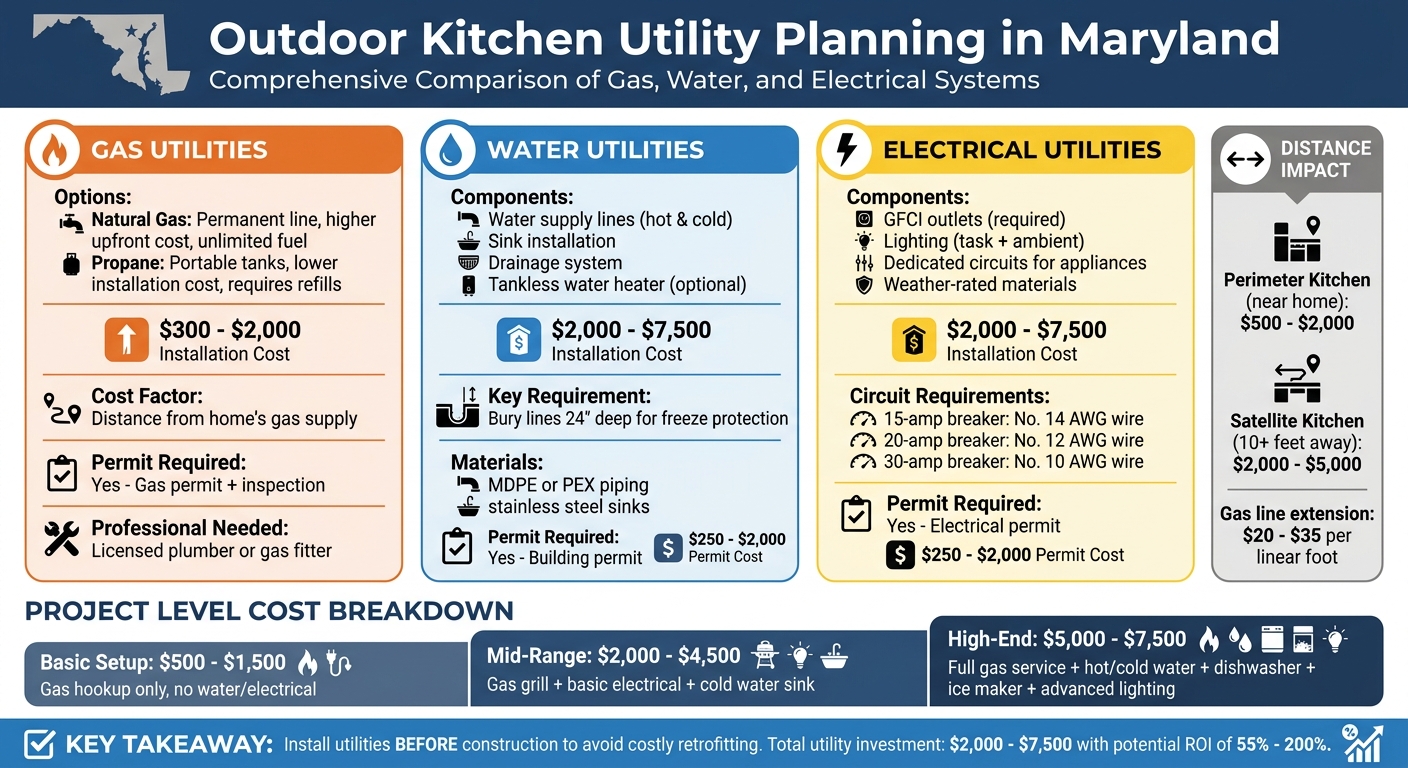
- Gas Options: Choose between natural gas (permanent line, higher upfront cost) or propane (portable, lower installation cost). Costs range from $300 to $2,000 for gas line installation, depending on distance.
- Water Supply: Adding a sink and drainage system costs $2,000 to $7,500, with extra care needed for Maryland’s freeze-thaw cycles to prevent pipe damage.
- Electrical Setup: Install GFCI outlets, lighting, and circuits for appliances, costing $2,000 to $7,500. Ensure your electrical panel can handle the load.
- Permits: Permits for gas, water, and electrical work cost $250 to $2,000 and are required by Maryland law to ensure safety and compliance.
Start utility installations early to avoid retrofitting costs and ensure a smooth construction process. Proper planning not only saves money but also ensures your outdoor kitchen is safe, functional, and ready for year-round use.
Outdoor Kitchen Utility Costs and Requirements Comparison Chart
Outdoor Kitchen Utilities Guide | In-Depth Look at Gas Lines, Electrical Requirements, & More
sbb-itb-843f8be
Planning Gas Utilities for Outdoor Kitchens
Choosing the right gas setup for your outdoor kitchen is a decision that affects both your upfront investment and long-term convenience. If you go with natural gas, you’ll need to install a permanent line from your home’s main supply. While this comes with higher installation costs, it offers the advantage of unlimited fuel. On the other hand, propane provides flexibility with portable 20-pound tanks or larger permanent tanks installed on your property. Many built-in grills are designed for propane but include conversion kits, giving you the option to switch to natural gas later. Deciding between these options depends on your site’s layout and your budget.
Natural Gas vs. Propane: Which Works for You?
The choice between natural gas and propane often comes down to location, budget, and how you plan to use the kitchen. Natural gas is ideal if your outdoor kitchen is close to your home and you already have gas service. It ensures you won’t run out of fuel during a cookout, and it generally costs less to operate. Propane, however, is a better fit for kitchens that are farther from the house or in areas without access to natural gas. While you’ll need to keep an eye on tank levels and arrange for refills, propane’s lower installation cost – typically just the price of the tank – makes it appealing for smaller projects costing between $6,000 and $15,000.
Permits and Safety Regulations
In Maryland, installing or extending a gas line requires a gas permit, and the work must be completed by a licensed plumber or gas fitter [3]. Before you can use the line, the installation must pass an official inspection [3]. If your property is within the Chesapeake Bay Critical Area, additional permitting steps may be required, potentially impacting both the timeline and the routing of the gas line [2]. Skipping the permitting process can lead to hefty daily fines, stop-work orders, and even denied insurance claims in the event of a fire [3].
Installation Costs and Distance Considerations
The distance between your outdoor kitchen and your home’s existing gas supply plays a major role in the overall cost. Installing a professional gas line typically costs between $300 and $2,000, with longer distances increasing both material and labor expenses [1]. Positioning your kitchen closer to the house can help reduce trenching costs and simplify the process. If possible, it’s best to plan and install the gas line early in the project. This avoids the added expense of demolition and retrofitting later on. Once the gas setup is in place, you can shift focus to water and electrical layouts, ensuring a well-coordinated design.
Water Supply and Plumbing Requirements
Adding running water to your outdoor kitchen takes it from a simple grilling area to a fully functional cooking space. To make this happen, you’ll need a few key components: water supply lines for both hot and cold water, a sink, and a drainage system to handle wastewater [4]. If you want hot water, tankless water heaters are a great option since they provide it on demand [4]. Once you’ve got these basics, the next step is planning where to place the sink and how to set up the drainage system.
Installing Sinks and Drainage Systems
To get your sink up and running, connect the water supply lines to your home’s main system. For drainage, ensure the pipes tie into your sewer system and are installed with a slight slope to prevent water from pooling. Maryland’s climate can be tough on materials, so it’s smart to go with stainless steel sinks and weather-resistant fixtures – they can handle everything from the humid summers to freezing winters [2]. Good drainage is especially important in Maryland’s humid summers to keep odors and pests at bay [6].
Winterizing Outdoor Kitchen Plumbing
Maryland’s freeze-thaw cycles can wreak havoc on plumbing, so winterizing is a must. Burying water lines at least 24 inches deep is one way to protect them, and using materials like MDPE (medium-density polyethylene) or PEX piping is another – they’re much better at handling temperature extremes than standard PVC [6]. Your plumbing system should also include shut-off valves and be designed to drain completely during the winter months. These steps can help prevent frozen or burst pipes and keep your system in good shape year-round [2].
Plumbing Costs and Permit Requirements
Adding water lines to your outdoor kitchen can cost anywhere from $2,000 to $7,500, depending on the complexity of the project [2]. In Maryland, you’ll also need a building permit for any plumbing work, with fees ranging from $250 to $2,000 based on your project’s scope and location [2]. If you’re building in coastal areas, Chesapeake Bay Critical Area regulations may add extra requirements [2]. To save on costs, it’s a good idea to install water and drainage lines before building the patio or kitchen structure – this avoids the higher labor costs of retrofitting later [2]. For context, mid-range outdoor kitchens with basic water utilities usually cost between $15,000 and $30,000, while high-end setups with full utilities can go beyond $60,000 [2].
Electrical Wiring and Power Requirements
Once you’ve sorted out your gas and water plans, the next crucial step for your outdoor kitchen is a well-thought-out electrical system. A solid setup ensures both safety and convenience. To start, have a licensed electrician confirm that your electrical panel can handle the extra load from appliances like refrigerators, grills, and heaters [4]. Running new electrical lines typically costs between $2,000 and $7,500, depending on the distance and complexity of the project. Additionally, permit fees in Maryland can range from $250 to $2,000. It’s best to install these lines before construction begins to avoid costly retrofits later [2].
GFCI Outlets and Lighting Setup
Outdoor outlets must include GFCI (ground-fault circuit interrupter) protection for 120-volt, single-phase, 15- and 20-amp outlets to prevent electrical shocks [7]. Maryland’s humid summers make it especially important to use weather-rated, outdoor-approved outlets. For lighting, consider a combination of task lighting over cooking areas and softer, ambient lighting for dining spaces. While custom lighting systems might stretch your budget, they greatly improve safety and usability after dark [2]. Be sure to evaluate the specific circuit needs for each appliance to ensure everything operates safely.
Power Requirements for Outdoor Appliances
To match appliances with the correct circuits, use the formula Amperes = Watts/Volts [7]. Small appliances often require around 1,500 watts, and electrical codes generally recommend at least two 20-amp circuits for kitchen appliances [7]. Larger items, like electric grills or outdoor heaters, will likely need dedicated circuits. Here’s a quick guide to wire sizes: a 15-amp breaker uses No. 14 AWG wire, a 20-amp breaker needs No. 12 AWG, and a 30-amp breaker calls for No. 10 AWG [7]. Always choose weather-rated materials and protective covers to keep your electrical components safe from Maryland’s challenging weather conditions [2].
Electrical Load Calculations and Permits
Accurate electrical load calculations are critical for a safe and code-compliant installation. Your electrician will calculate the total load to ensure the system can handle the demand without overheating or creating fire hazards. For outdoor general lighting, the minimum load is calculated at 3 watts per square foot. When applying for permits, the electrician must submit an architectural-electrical plan along with the service load calculations [7]. If your project is near the coast or within Chesapeake Bay Critical Areas, additional permits may be required [2]. To protect your investment and ensure everything is up to code, always hire a licensed and insured professional [4].
Combining Gas, Water, and Electric in Your Design
Once you’ve outlined your individual plans for gas, water, and electrical systems, the next step is to integrate them effectively. These utility lines are the backbone of your project, and their placement needs to ensure smooth operation without creating safety risks. In Maryland, where summers are humid and winters bring freezing temperatures, poorly planned connections can lead to damage. It’s wise to set aside 10–15% of your total budget to deal with any unexpected utility routing challenges [2].
Utility Routing and Preventing Construction Issues
Before breaking ground, map out the routes for all three utility lines. To prevent hazards, keep gas lines well away from electrical conduits – this reduces the risk of sparks near flammable materials. Similarly, water lines should be sloped to handle Maryland’s heavy rainfall and snow effectively [2]. As Clarksville Construction points out:
Gas, water, and electric lines are easiest and most cost-effective to install before other elements are built [2].
If your property is near the coast or within Chesapeake Bay Critical Areas, make sure your utility routing complies with local environmental regulations [2]. A well-thought-out routing plan not only ensures safety but also sets the stage for a smooth installation process.
Site Preparation and Installation Order
To avoid unnecessary expenses and delays, install underground utilities before starting any structural work. This approach eliminates the need to dig up newly completed masonry or decking to run utility lines later. Begin by finalizing your utility plan and securing all required permits – plumbing and electrical work often require separate permits in Maryland, so include this in your timeline to prevent delays [2]. Following this sequence ensures the safety and efficiency emphasized in earlier sections on gas, water, and electrical systems. Once permits are in place and utilities have been tested, you can move forward with Baltimore hardscaping and patio construction and appliance installation.
Cost Breakdown for Outdoor Kitchen Utilities in Maryland
When planning an outdoor kitchen, understanding utility costs upfront can save you from expensive changes down the line. In Maryland, installing new gas, water, and electrical lines typically costs between $2,000 and $7,500, depending on factors like the complexity of the setup, the distance from your home’s main utilities, and the number of appliances involved [2]. Additionally, permits for plumbing, electrical, or structural work can range from $250 to $2,000, influenced by the project’s scope [2]. Below, we’ll break down these costs by project level to help you better anticipate expenses.
Utility Costs by Project Level
The cost of utilities depends on how complex your outdoor kitchen setup is. Here’s a quick breakdown:
- Basic setup: If you’re only adding a gas hookup for a grill, with no water or major electrical work, expect to spend between $500 and $1,500 [8].
- Mid-range project: For a setup that includes a built-in gas grill, basic electrical wiring for a fridge and lighting, and a cold-water sink, utility costs can range from $2,000 to $4,500 [8].
- High-end installations: A fully equipped kitchen with gas service for a grill and pizza oven, hot and cold water, a dishwasher, an ice maker, and advanced lighting or AV power can run between $5,000 and $7,500 [2, 13].
Labor costs also play a big role in the budget. In central Maryland, plumbers charge between $45 and $200 per hour, while electricians typically charge $50 to $150 per hour [9]. Specific utility components can quickly add up:
- Gas line installation: $500 to $2,500
- Electrical wiring and GFCI outlets: $200 to $1,500
- Sink and plumbing fixture installation: $215 to $630 [13, 14]
How Permits and Distance Affect Costs
Two major factors that can significantly impact your total costs are permit requirements and the distance between your outdoor kitchen and your home’s utility connections. Distance, in particular, can make a big difference. According to Range Outdoor Living:
"A ‘perimeter’ kitchen that shares a wall or sits near your back door cuts utility costs dramatically compared to a standalone ‘satellite’ setup in the middle of the yard." [8]
For example, a perimeter kitchen – one close to your home – typically costs $500 to $2,000 for utility hookups. In contrast, a satellite kitchen located 10 feet or more away can cost $2,000 to $5,000 [8]. Extending a natural gas line adds $20 to $35 per linear foot, meaning even small increases in distance can quickly add to your budget [8].
To keep costs manageable, consider placing your outdoor kitchen near existing utility access points. This not only helps control expenses but also ensures your design remains practical and efficient.
Maryland Utility Codes and Installation Standards
Planning an outdoor kitchen in Maryland involves adhering to specific safety codes and regulations. Knowing your county’s permit process and factoring in Maryland’s climate can help you create a durable, compliant design. Here’s what you need to know about permits and utility design.
Permit Processes in Central Maryland Counties
Permit requirements for outdoor kitchens vary across central Maryland. In Montgomery County, the Department of Permitting Services (DPS) oversees permits and offers digital tools via its eServices portal. This system allows you to submit applications and upload plans online, making the process more convenient. For some projects, the "Residential Fast Track" option can speed up approvals [12]. In Howard County, permits are managed by the Inspections, Licenses & Permits Division, which enforces technical standards through specialized boards. Like Montgomery County, Howard County also provides an online portal for submitting and tracking applications [11][12].
When it comes to gas line installations, these require specific permits and inspections to ensure safety [5]. As MADE BY DESIGN explains:
Outdoor kitchens in Maryland usually need building permits, especially once gas, water, and electrical are involved [5].
Permit fees typically range from $250 to $2,000, depending on the complexity of your project [2]. Additionally, if your property is located near the Chesapeake Bay or other waterways, you may need to comply with the Chesapeake Bay Critical Area regulations, which can add extra steps to the process [2].
Designing Utilities for Maryland’s Climate
Maryland’s weather – hot, humid summers and cold winters – demands thoughtful utility design to ensure year-round functionality [2]. As Clarksville Construction points out:
Maryland’s mix of hot, humid summers and cold winters means your outdoor kitchen needs to be built for year-round durability [2].
To handle Maryland’s freeze-thaw cycles, include features like shut-off valves and drainage points for your plumbing. These precautions help prevent pipe bursts during freezing temperatures [2]. MADE BY DESIGN highlights:
Maryland’s freeze-thaw cycles, humidity, and summer heat are hard on outdoor materials [5].
For materials, prioritize stone, granite, and stainless steel for countertops and cabinetry. These materials are better suited to handle the state’s humidity and temperature swings compared to less durable options [2]. Adding protective features like pergolas or pavilions can further shield your kitchen from sun and rain, extending the lifespan of appliances and utility connections [2].
Looking ahead, Montgomery County is moving toward all-electric building codes under Bill 13-22. By 2027, most new constructions will need to use electric heat pumps and water systems [10]. However, gas-fired outdoor grills and fireplaces remain exempt, so natural gas can still be part of your design if it aligns with your vision [10]. This shift highlights the importance of planning for both current needs and future regulations.
Conclusion
Thoughtful planning of your outdoor kitchen’s utilities is key to creating a safe, functional space that can also boost your home’s value. Getting gas, water, and electrical systems mapped out early in the design process helps you avoid expensive changes later. As Clarksville Construction emphasizes:
Gas, water, and electric lines are easiest and most cost-effective to install before other elements are built [2].
While adding utilities to an outdoor kitchen can cost between $2,000 and $7,500, the return on investment can range from 55% to 200%, thanks to improved functionality and increased home value [1][2]. The National Association of Realtors Remodeling Impact Report highlights outdoor kitchens as one of the most popular outdoor upgrades [2].
Make sure to work with licensed professionals to meet code requirements and avoid safety risks. For Maryland homeowners, climate resilience is especially important – features like shut-off valves and proper drainage help protect against freeze-thaw damage during winter [2].
Identifying existing utility access points early ensures smoother installation and keeps your project on schedule. Don’t skip the necessary permits for gas, electrical, and plumbing work; they’re essential for a safe and legal setup [1]. Whether you’re starting with a simple propane grill or planning a full-scale natural gas and plumbing system, careful utility planning allows you to build in phases while keeping the design cohesive and professional. This integrated approach not only simplifies the process but also ensures your outdoor kitchen performs well for years to come.
For expert assistance with planning and installing outdoor kitchen utilities in Maryland, Pro Landscapes MD is ready to help you create a safe and functional space.
FAQs
How do I choose the best location to minimize utility costs?
To keep utility costs in check, position your outdoor kitchen close to existing utility connections such as gas, water, and electricity. This way, you can avoid the expense of extending utility lines over long distances. Look for a level area to sidestep added costs for grading or drainage work, and consider placing the kitchen near your home for easier access. Thinking ahead about future utility needs can also help you avoid costly upgrades down the road.
What’s the right order to install gas, water, and electric?
When setting up utilities for an outdoor kitchen, the installation should follow this order: gas first, then water, and finally electric. This approach prioritizes safety, ensures proper connections, and minimizes the need for corrections later.
- Gas lines come first. They need to be installed and tested before moving on to other systems. This step is crucial for safety and functionality.
- Water lines are next. These are essential for sinks or any water-related features and should be properly set up after the gas lines.
- Electrical wiring is the final step. This includes adding outlets, installing lighting, and connecting appliances to complete the setup.
By sticking to this sequence, you’ll streamline the process and reduce the chances of needing to redo work.
Do I need to upgrade my electrical panel for outdoor appliances?
If you’re considering whether to upgrade your electrical panel, it largely depends on the capacity of your existing system and the power needs of your outdoor appliances. Adding high-demand features like an outdoor kitchen or extensive lighting can push your system beyond its limits. To avoid overloading, it’s best to consult a licensed electrician. They can assess your current setup and confirm whether it can safely handle the additional load from your planned additions.
Chat with Us