


- bhavya gada
- No Comments
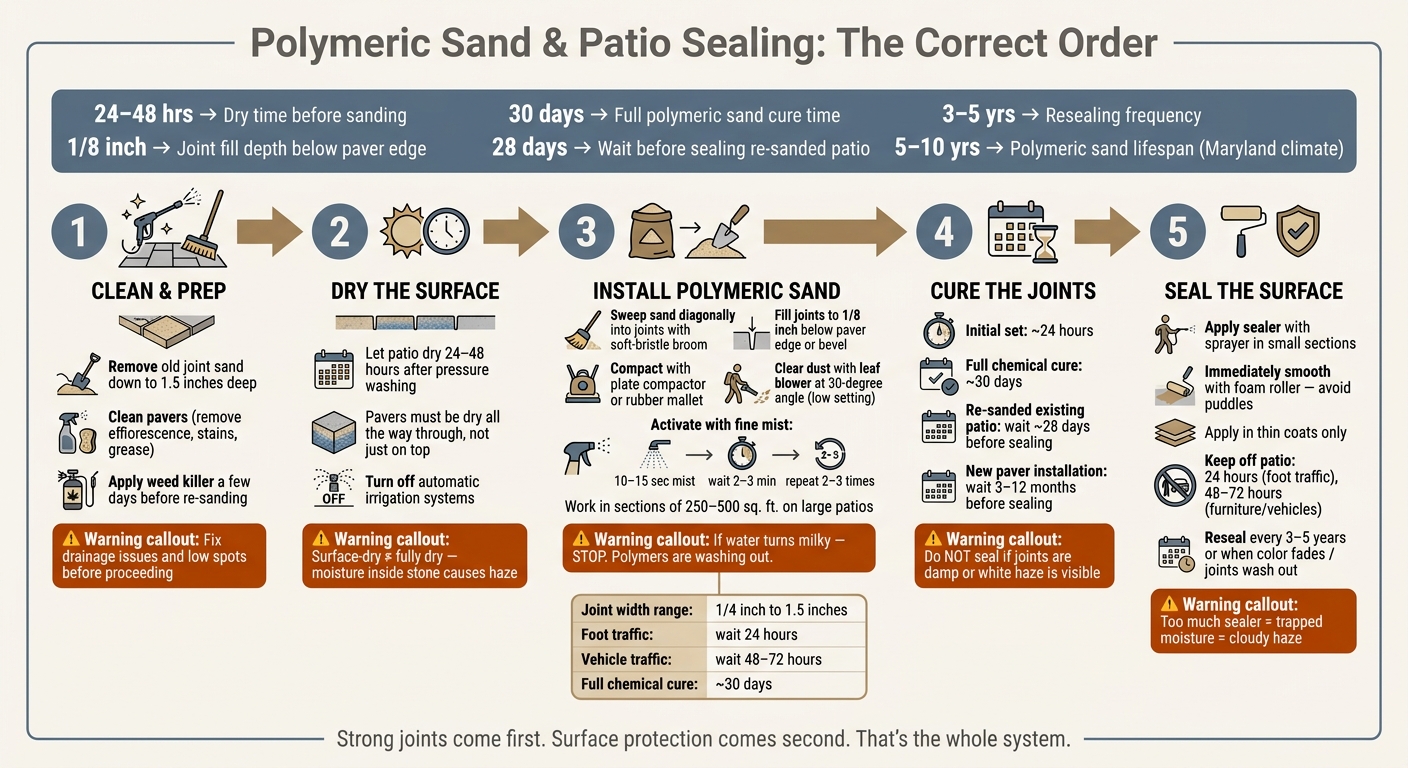
If you do these steps out of order, your patio can trap moisture, turn hazy, or lose joint sand early. I’d keep it simple: clean the patio, refill joints with polymeric sand, let it cure, then seal only after the surface is fully dry.
Here’s the short version:
- Polymeric sand locks joints and helps cut down on washout, weeds, and insect activity.
- Sealer protects the paver or stone surface from stains, fading, moss, and mildew.
- Do not seal too soon. Polymeric sand may harden in about 24 hours, but full cure can take about 30 days.
- After re-sanding an older patio, it’s common to wait about 28 days before sealing.
- In Maryland weather, polymeric sand often lasts about 5 to 10 years, while many patios need resealing every 3 to 5 years.
- Joints are usually filled to about 1/8 inch below the paver edge.
- Dry weather matters. I’d want at least 24 to 48 hours without rain after sanding so the joints can set.
A few things matter most before you start:
- Remove old joint material and clean the surface well
- Let the patio dry all the way through, not just on top
- Fix spots where water sits or runs across the patio
- Mist the sand lightly instead of flooding it
- Check for haze or damp joints before sealing
If I were explaining it to a friend, I’d put it this way: strong joints come first, surface protection comes second. That’s the whole system.
This guide walks through the job in that order, with the dry times, fill depth, and sealer choices that matter most.
Polymeric Sand & Patio Sealing: Step-by-Step Process Guide
Stop Polymeric Sand Callbacks: How to Seal & Lock Paver Joints (No Polymeric Needed
sbb-itb-843f8be
Prepare the Patio Before Adding Polymeric Sand
Good prep helps keep polymeric sand in place instead of letting it wash out. Clean, dry joints also give the sealer a solid base.
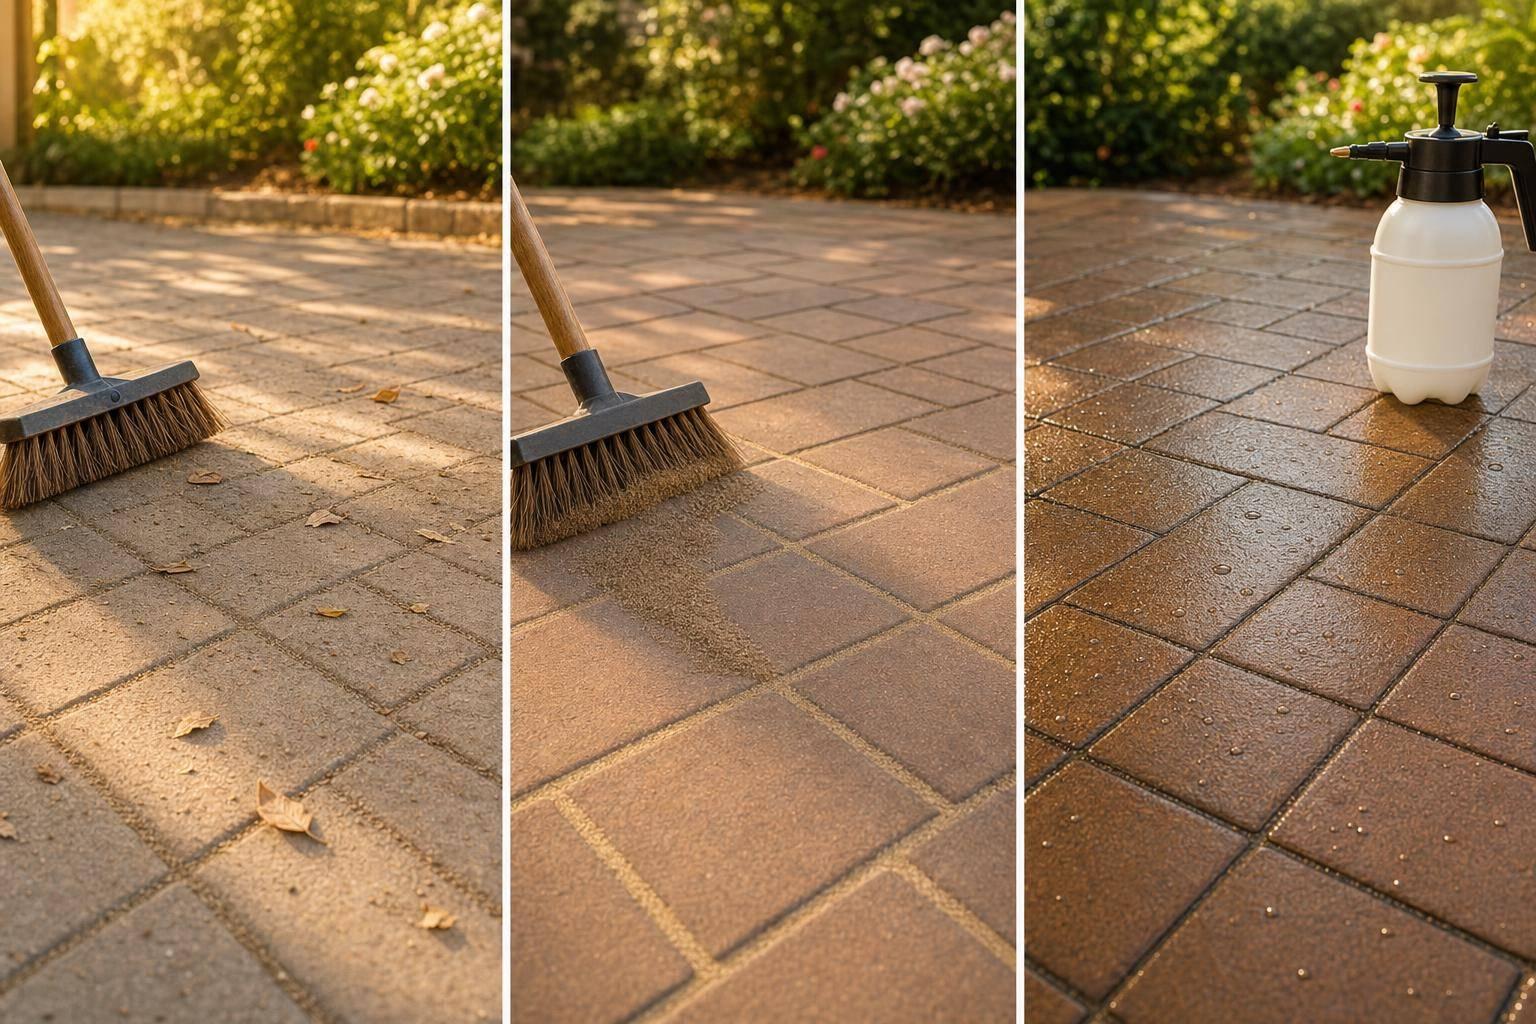
Clean the Surface and Remove Old Joint Material
Start by removing the old sand down to the full joint depth, at least 1.5 inches [7]. A pressure washer is usually the fastest way to knock old sand loose, though hand tools can do the job on smaller patios.
After the joints are empty, clean the pavers with paver-safe products to remove efflorescence, organic stains, and grease before you add new sand [8][4]. Leftover residue can weaken the joint and cause problems when you seal the surface later.
If weeds are growing between the pavers, use a weed killer a few days before removing the old sand so the roots die off before you re-sand [7].
Check Weather, Drainage, and Surface Dryness
After pressure washing, let the patio dry for 24 to 48 hours. The pavers need to be dry all the way through, not just dry on top [2][7]. If moisture is still sitting inside the stone, it can move up during installation and leave haze or stains [7].
Check the weather before you begin. You need at least 24 to 48 hours of dry conditions after installation so the sand can cure the right way. It also helps to turn off any automatic irrigation systems during that time [2]. In Maryland, summer storms can cut that curing window short, so timing matters.
It’s also smart to watch how water moves across the patio. Low spots, poor grading, and downspouts that empty onto the surface can push new sand out of the joints [4][7]. If water keeps pooling in one spot, the joints may stay wet too long and form a thin crust over loose sand [4][6]. Fixing drainage issues now also lowers the chance of moisture getting trapped under the sealer later.
Once the patio is clean, dry, and draining the way it should, you’re ready to fill and compact the joints.
How to Install Polymeric Sand Correctly
Stick to the fill, compaction, and misting sequence in that order. If you rush it, you can end up with haze, weak joints, or sand washing out.
Fill Joints to the Right Depth and Compact the Surface
Pour the sand over the patio and sweep it diagonally into the joints with a soft-bristle broom. That diagonal pass helps the sand fall into the gaps instead of skating across the surface. Keep filling until the joints are packed to 1/8 inch below the paver edge, or to the bottom of the bevel if the pavers are chamfered.
Then compact the surface with a plate compactor or a rubber mallet to settle the sand and close any gaps [2][5]. After compacting, check the joints again. They should still sit about 1/8 inch below the paver edge or bevel [2][5][7].
Before you add water, clear off all dust. This part matters more than people think.
Remove Excess Sand and Activate with Water
Dust left on the surface can cause haze once it gets wet [2][7].
Use a leaf blower on a low setting and hold it at about a 30-degree angle. That lets you clear fine dust without pulling sand out of the joints [2][7]. Around edges and tight corners, a shop vacuum is a good option. Once the patio looks clean, check it one more time. Polymeric dust is easy to miss.
When the surface is clean, activate the sand with a fine mist from your garden hose. Mist the area lightly for 10–15 seconds, wait 2–3 minutes so the water can soak in, then repeat that cycle 2–3 times [2]. The goal is to wet the joints evenly to about 75% of their depth without flooding them [6]. If the water starts to look milky, stop right away. That means the polymers are washing out, and they can stain the pavers [7].
On larger patios, work in sections of about 250–500 sq. ft.. That helps the water reach the bottom of the joint before it evaporates [6].
Polymeric Sand Installation Variables: A Comparison
Use this table as a quick jobsite reference.
| Variable | Requirement | Why It Matters |
|---|---|---|
| Joint Fill Depth | 1/8" below paver edge or bottom of bevel [2][5][7] | Prevents edge wear and spillover |
| Compaction Tool | Plate compactor or rubber mallet [2][5] | Closes air pockets and settles sand evenly |
| Water Activation | Fine mist in 2–3 gradual passes [2][7] | Activates binders without washing them out |
| Foot Traffic Cure | 24 hours minimum [2][7] | Lets joints reach initial hardness |
| Vehicle Traffic Cure | 48–72 hours minimum [2][7] | Prevents joint disruption under heavier loads |
| Full Chemical Cure | Approximately 30 days [6] | Sand reaches maximum stability |
Polymeric sand works best in joints between 1/4 inch and 1.5 inches wide [7]. If you’re working with textured pavers or red clay brick, be extra careful. Those surfaces can hold dust and stain more easily, so use a product rated for them [5][7].
After installation, let the joints cure all the way before sealing.
Let the Joints Cure Before Sealing
Give the polymeric sand time to cure before you seal the patio. If you seal too soon, you can trap moisture in the joints and end up with a weaker finish.
Why Full Curing and Dry Conditions Matter
A joint can feel hard long before it’s fully cured. Polymeric sand usually reaches its initial set in about 24 hours, but full chemical cure takes around 30 days. On top of that, new paver installations may need 3 to 12 months before they’re ready for sealer [5][6][1].
If you’ve re-sanded an existing patio, wait about 28 days before sealing [7]. And don’t judge dryness by the surface alone. The pavers need to be dry all the way through, not just dry to the touch [7].
Signs the Patio Is Not Ready for Sealer
Hold off if you notice either of these:
- Damp joints
- White haze on the paver face, which is polymeric residue that will stay visible if sealed in [4]
Once the joints have fully cured, use a breathable sealer and apply it in thin coats.
Seal the Patio and Keep the Surface in Good Shape
Once the joints are fully cured and dry, sealing acts as the last barrier against moisture.
Choose the Right Sealer for Finish and Moisture Behavior
Pick a sealer that fits the patio material, the look you want, and how the surface needs to handle moisture. A breathable sealer helps protect cured joints without locking water underneath.
Choose the sealer based on surface type, finish, and breathability.
| Sealer Type | Finish | Moisture Behavior | Best Use Case |
|---|---|---|---|
| Natural Look (Penetrating) | No change to color or texture [3] | Highly breathable; protects from within the pores [2] | Natural stone, travertine, or flagstone where drainage is a priority [3][2] |
| Wet-Look Film Sealer | Enhances and deepens color [3][2] | Creates a protective film on the surface [1] | Faded pavers needing color restoration or a more vibrant appearance [3][1] |
| Glossy Urethane | Shiny, reflective finish [2] | Strong stain resistance [2] | High-traffic areas or decorative pool decks [2] |
| Joint-Stabilizing | Varies; often enhances color [9] | Binds sand particles while sealing the surface [6] | Heavily textured pavers where sand can lodge in texture [5][6] |
Always test the sealer on a small, out-of-the-way area first. That quick check helps confirm the finish and make sure the product works well with the surface, especially on textured or coated pavers [9].
Apply Sealer in Thin Coats and Respect Dry Time
Apply sealer with a sprayer in small sections for even coverage, then go over it right away with a foam roller to smooth puddles and remove extra product [1]. Too much sealer is where problems start. It can trap moisture below the surface and leave a cloudy or white haze behind [1].
After sealing, keep people off the patio for at least 24 hours. Wait 48 to 72 hours before putting furniture back or allowing vehicle traffic on the surface [1][2].
Conclusion: The Right Order Protects Patio Stability and Water Resistance
Once sealing is done, the focus moves from installation to upkeep. The order matters: clean and dry the patio well, install polymeric sand to the right depth, let the joints cure all the way, and then seal only when the surface is completely dry. Do that, and you set up the patio for steadier joints, less washout, and better water resistance over time.
Plan to reseal when the color starts to fade or the joints begin to wash out. If pavers are uneven, cracked, or need lifting and leveling at the base, or if an old sealer has failed or turned cloudy, it may be time to call a pro. If you need help with patio installation or repair in central Maryland, Pro Landscapes MD can help.
FAQs
Can I seal right after adding polymeric sand?
No. Polymeric sand needs time to cure and settle before you apply sealer. In most cases, that means waiting six to twelve months after new pavers are installed.
If you seal too early, you can trap moisture or leftover residue in the joints. That can lead to a cloudy finish or cause the sealer to fail.
Before sealing, check that the joints are fully cured, clean, and free of debris.
How do I know the patio is dry enough to seal?
The patio must be clean and completely dry before sealing. If you apply sealer over moisture, dirt, or organic debris, you can trap that material under the surface. That often leads to a cloudy finish that fails before it should.
The pavers also need to be dry below the surface, not just on top. If it rained recently or you pressure-washed the area, give the patio time to dry out all the way. And don’t seal on the same day you clean the patio or install polymeric sand.
What causes haze after sanding or sealing?
Haze after sanding or sealing usually shows up when polymeric sand dust stays on the paver surface before activation. It also happens when the sand gets too much water during wetting.
There are a few other common causes too. Some sands have too much binder, which can leave a film behind. And if you seal over haze or dirt that’s already there, the sealer can trap that residue and leave a cloudy layer on the surface.
That’s why careful cleaning matters so much. Before wetting the sand, remove dust from the pavers well. If dust stays behind, it can bake into the surface and turn into that dull, cloudy look nobody wants.
Chat with Us