


- bhavya gada
- No Comments
Want to manage stormwater effectively while upgrading your outdoor space? Combining rain gardens with permeable patios is a smart way to reduce runoff, prevent flooding, and improve drainage without compromising aesthetics. Here’s the gist:
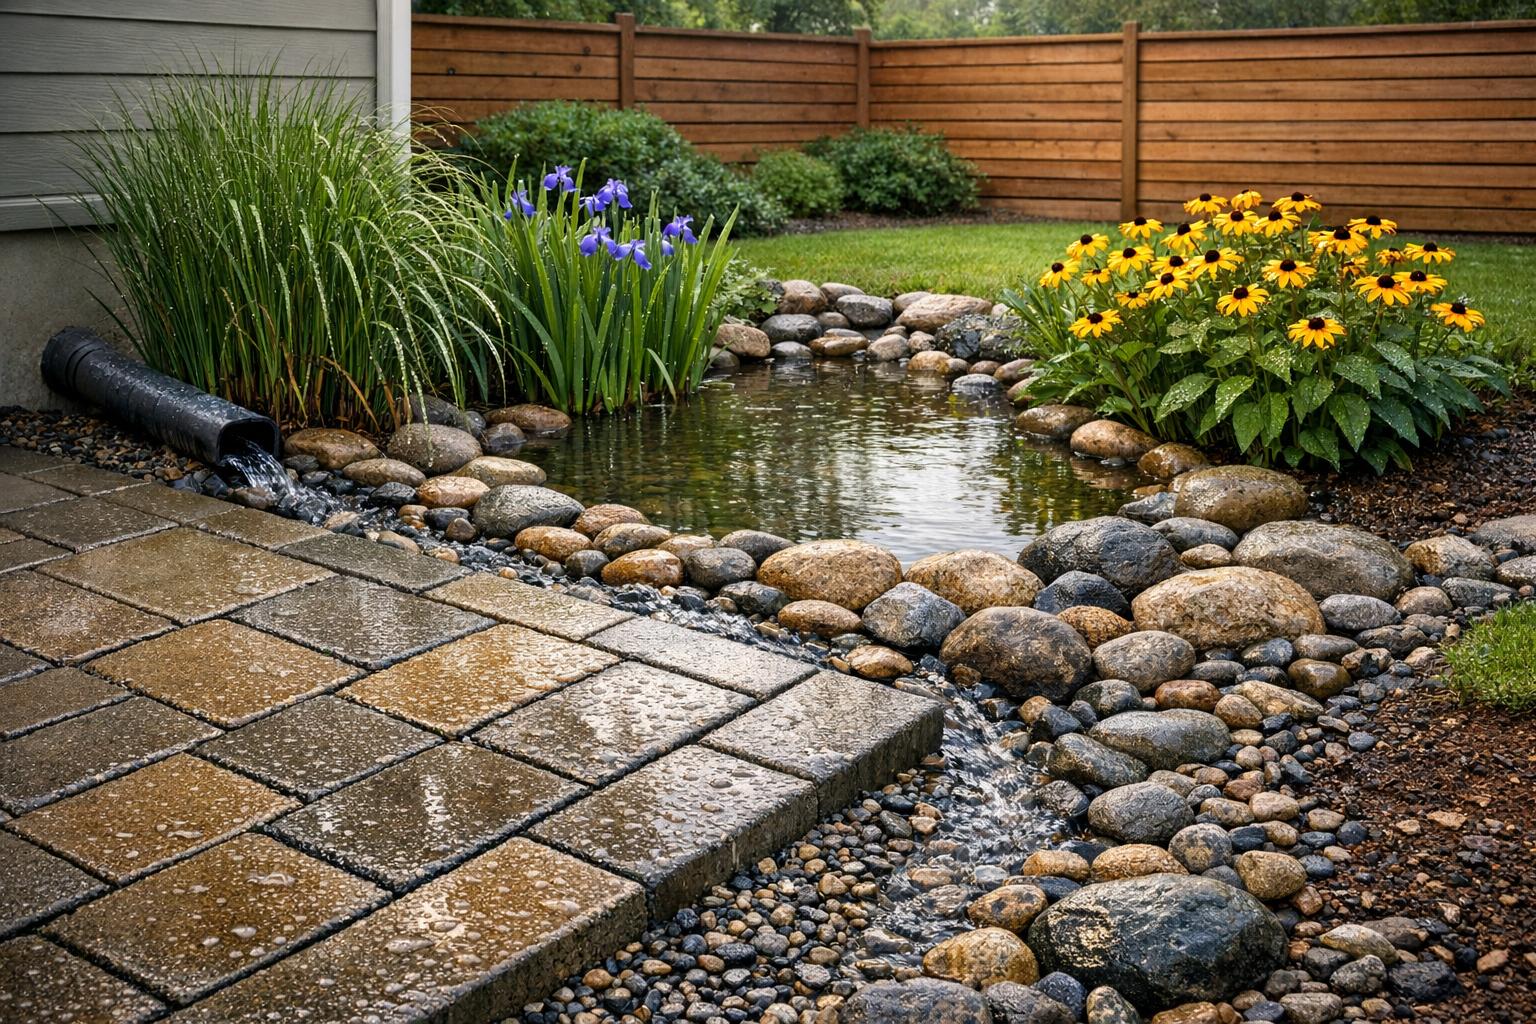
- Rain Gardens: Shallow, planted areas that collect and filter runoff, reducing pollution and erosion while supporting local wildlife.
- Permeable Patios: Surfaces made with materials like gravel or interlocking pavers that let water seep into the ground, preventing pooling and keeping soil hydrated.
- The Combo: Together, they reduce stress on drainage systems, lower flood risks, and create a functional, visually appealing yard.
Steps to Get Started:
- Assess your property’s water flow and soil drainage.
- Choose native plants for rain gardens, organized by moisture levels.
- Use permeable materials like interlocking pavers for patios.
- Direct patio runoff into the rain garden and plan for overflow during heavy rains.
Pro Tip: Test soil drainage before digging and ensure your setup complies with local regulations. The right design not only handles water better but can also increase property value and protect your home’s foundation.
For a deeper dive into site prep, material choices, and maintenance tips, keep reading.
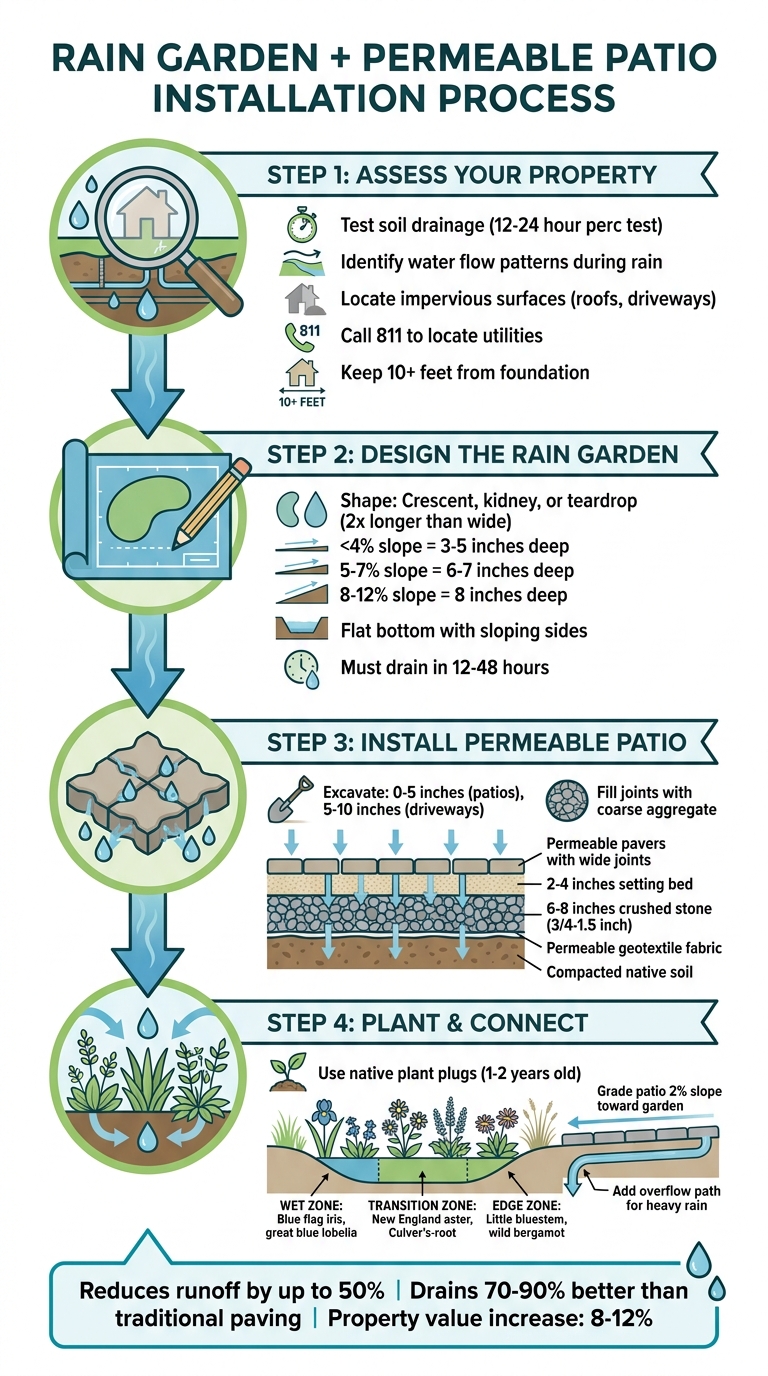
Rain Garden and Permeable Patio Installation: 4-Step Process Guide
Rain Garden and Permeable Pavement at Willoughby Farms Helps with Storm Water

sbb-itb-843f8be
Site Selection and Preparation
Choosing the right site is key to ensuring your rain garden and permeable patio work together effectively. Before installation, you’ll need to evaluate water flow and soil capacity. Why is this so important? Stormwater runoff is a major source of water pollution in urban and suburban areas [2]. A well-chosen site can significantly improve how your system handles runoff.
Evaluating Your Property’s Drainage Needs
Start by identifying areas on your property with impervious surfaces, like rooftops, driveways, or existing concrete patios. These surfaces block water from soaking into the ground, causing runoff to build up. During a rainstorm, observe where water flows, where it pools, and whether it moves toward your home’s foundation.
Place your rain garden in an area that naturally collects runoff or where you can redirect a downspout to it. But remember: keep it away from foundations, septic systems, and wells to prevent structural issues or contamination. Also, plan for an overflow path to direct excess water safely away from your home and neighboring properties. And before you start digging, call 811 to locate underground utilities – it’s not just smart, it’s the law.
Once you’ve chosen a general area, it’s time to test your soil’s ability to absorb water.
Testing Soil Infiltration Rates
Good soil absorption is the backbone of a functional rain garden. Sandy or loamy soils are ideal because they drain well, while clay-heavy soils may require amendments to improve drainage [2]. To check your soil, perform a simple perc test: dig a 12-inch hole, fill it with water, and measure how long it takes to drain. If it empties within 12 to 24 hours, you’re all set. If water lingers for days, you’ll need to amend the soil with materials that improve drainage or consider a different spot.
"A percolation test (perc test), filling a dug hole with water, and timing how fast it drains, confirms whether the soil can handle the system." – Sustainable Design Group [2]
Sizing and Positioning the Design
Once drainage and soil conditions are assessed, focus on sizing and positioning your rain garden and patio. The rain garden should be large enough to handle runoff from impervious areas like your roof or driveway. Properly designed rain gardens allow far more water to soak into the ground compared to a standard lawn [2]. The patio, on the other hand, should only manage its own footprint.
When positioning both elements, think about how water will flow between them. If your property has a slope, you might need features like retaining walls or berms to control water movement – we’ll dive into that later. For now, make sure to check local setback requirements and permitting rules. Laying this groundwork ensures your system will function efficiently for years to come.
Designing the Rain Garden
Once you’ve chosen your site and checked the soil, it’s time to design a rain garden that both manages water effectively and adds beauty to your space. A well-thought-out rain garden works hand-in-hand with permeable patios, helping to control runoff while enhancing the overall landscape. Its shape, depth, and plant choices are all key to its success.
Choosing the Right Shape and Depth
Shapes like crescents, kidneys, or teardrops are ideal for spreading water evenly. Aim for a design that’s about twice as long as it is wide, with the length positioned perpendicular to the flow of water. This setup slows runoff and maximizes water absorption.
The depth of your rain garden depends on the slope of your property. Here’s a quick guide:
- For slopes under 4%, dig 3 to 5 inches deep.
- For slopes between 5% and 7%, go 6 to 7 inches deep.
- For slopes ranging from 8% to 12%, aim for a depth of 8 inches [6].
Make sure the garden has a flat bottom with sloping sides, much like a pie tin. This design ensures water spreads evenly at the base while providing varying moisture levels along the slopes [6]. To work efficiently, the garden should drain completely within 12 to 48 hours [4].
Selecting Native Plants for the Garden
Using native plant plugs is a smart choice for a rain garden. These plants have deep roots that pull water into the soil, create underground storage spaces, and stabilize the soil to fight erosion. Opt for established plugs (1 to 2 years old) instead of seeds, as they’re less likely to get washed away during heavy rain [6].
"Native plants tend to be the best performers in rain gardens, and have been tested extensively." – Friends of the Rouge [3]
For drier areas, consider plants like black-eyed Susans, purple coneflowers, and butterfly milkweed. In wetter spots, species such as fox sedge, swamp milkweed, and blue flag iris thrive. To keep the garden looking tidy and intentional, use design elements like evergreen hedges, boulders, stone borders, or clean mulch. As Friends of the Rouge explains:
"The stronger and cleaner that you frame a native plant garden, the messier the plants can be and still look great to most people" [3].
Once you’ve selected your plants, organize them into zones based on moisture levels for maximum efficiency.
Creating Planting Zones for Different Water Levels
Divide your rain garden into three zones to match varying water conditions:
- Wet zone: This is the lowest area where water collects and may linger for up to 48 hours. Use wetland plants like great blue lobelia or blue flag iris here.
- Transition zone: Found along the sloping sides, this area experiences fluctuating moisture. Plants like New England aster and Culver’s-root thrive in both wet and dry conditions.
- Edge zone: The upper perimeter stays mostly dry but handles occasional overflow. Choose hardy species like little bluestem, wild bergamot, and false indigo for this zone [5][6].
When planting, dig holes twice as wide as the plug and deep enough to keep the plant’s crown level with the soil surface [6]. Avoid placing trees directly in the basin, as they can absorb too much water. If you want taller plants, go for moisture-tolerant shrubs like buttonbush or summersweet clethra instead [4][5].
With your rain garden ready to manage water and enhance your yard, the next step is installing a permeable patio to direct runoff seamlessly into your garden.
Installing a Permeable Patio
A permeable patio complements your rain garden by allowing water to seep through its surface rather than running off. To make it work effectively, you’ll need to choose the right materials and prepare the base properly to ensure both drainage and stability.
Selecting Permeable Paver Materials
One of the most popular options for permeable patios is Permeable Interlocking Concrete Pavers (PICP). These pavers come in a variety of finishes, making them adaptable to different home styles. Their wide joints, filled with coarse gravel, allow water to flow through while providing a durable walking surface. The drainage capacity varies by product: for instance, Holland Permeare offers an 8.7% open area, while Camino Permeare ranges from 5.8% to 6.7% [2][12].
Another option is open-grid pavers, also known as turfstone. These have rigid cells that can be filled with grass or gravel, offering a more natural look [2][9]. If you’re aiming for a seamless surface, pervious concrete or porous asphalt might be worth considering. These materials have open-pore structures across their entire surface but require specialized installation [2][10]. For added visual appeal, architectural or textured pavers can provide color variation and depth while handling high-traffic areas effectively [9][11].
Beyond aesthetics, a well-designed permeable patio can boost property value by 8% to 12%, and concrete pavers, when installed correctly, can last for 25 to 30 years or more [11]. Once you’ve chosen your materials, it’s time to prepare the base.
Preparing the Base Layers
Before you dig, call 811 to locate utility lines and perform a perc test to check soil drainage [2]. For patios, excavate 0–5 inches; for driveways, go deeper – 5–10 inches [8]. Once the area is cleared, compact the native soil until it’s stable, then lay down a permeable geotextile fabric to separate the layers. Avoid using impermeable membranes, as they block water infiltration and defeat the purpose of the system [7].
Next, add 6–8 inches of coarse crushed stone (sized between 3/4 inch and 1.5 inches), layering no more than 4 inches at a time and compacting thoroughly after each layer. Top this with a 2–4 inch setting bed made of finer clear aggregate [8][13]. This gravel reservoir can hold 30% to 40% of its volume in water, helping manage runoff effectively [12].
Use angular crushed stone rather than rounded gravel, as the interlocking edges prevent shifting under pressure [8]. To secure the patio’s edges, install metal edging, low walls, or vertical pavers [7][8].
Ensuring Long-Term Durability
For lasting performance, fill the paver joints with coarse aggregate rather than fine or polymeric sand, which can block water infiltration [12][13]. The wide joints between pavers are designed to create a 5% to 10% open area, allowing the system to handle heavy storms and reducing surface runoff by 70% to 90% compared to traditional paving [12].
To maintain efficiency, schedule annual cleaning, such as vacuuming or pressure washing, to remove sediment from the joints that could reduce water flow [12][2]. While permeable systems cost $15 to $25 per square foot – higher than the $10 to $18 for traditional pavers – the initial cost is often offset within 5 to 7 years through savings on drainage repairs and lower de-icing expenses [13]. After installation, you can connect the patio runoff directly to your rain garden for even better water management.
Integrating Rain Gardens with Permeable Patios
Once your permeable patio is in place, you can enhance its effectiveness by linking it to a rain garden. This setup helps manage water runoff naturally, reducing the risk of flooding and protecting your property.
Directing Water Runoff from Patio to Garden
To ensure water flows properly, grade your patio with a slight slope toward the rain garden instead of toward street drains [1]. A slope of 2% (or 1/4 inch per foot) is ideal for directing water efficiently [15]. Another option is to use shallow, vegetated channels called bioswales. These planted pathways slow down water as it moves from the patio to the rain garden, filtering out pollutants along the way [2][16].
If your property has downspouts or areas where water flow is concentrated, stabilize the entry points to the rain garden with river rocks or limestone pavers. This prevents soil erosion where water enters [17]. Avoid non-porous materials without proper drainage, as they can increase runoff by up to 50%. Directing water to the garden’s edges is key for effective management [1].
Once routine runoff is managed, it’s important to prepare for heavy rain events with overflow controls.
Adding Overflow Control Features
Overflow controls are essential for managing excess water during intense storms. Create an overflow path that channels water toward a lawn, planting area, or another drainage option [15]. For added capacity, you can install channel drains along the patio’s edge to capture runoff and connect them to a subsurface drainage system [14]. If your property is flat or water needs to move uphill, a sump pump with a protected discharge line can help ensure safe water removal [14].
Rain gardens typically absorb water into the soil within an hour after a storm. Overflow features are there to handle rare instances when rainfall exceeds the garden’s capacity [15].
Using Retaining Walls or Berms for Sloped Areas
On sloped properties, managing water flow can be tricky. To ensure even infiltration, keep the bottom of the rain garden level [17]. For steeper sites, use soil excavated from the uphill side to build a berm on the downhill side, creating a natural dam [17].
You can also incorporate small retaining walls or seat walls. These not only help control water flow but also add aesthetic appeal and functional seating to your outdoor space. Make sure to position the rain garden at least 10 feet away from your home’s foundation, fences, or other structures to avoid any potential damage [17].
Maintenance Tips for Long-Term Performance
Taking care of your drainage systems regularly can save you from costly problems like sediment buildup, which can clog soil pores and paver joints. Routine maintenance is much easier – and cheaper – than dealing with pooling water down the line. Here’s a handy checklist to help keep things running smoothly.
Regular Maintenance for Rain Gardens
To keep your rain garden effective, make sure to weed it regularly and add fresh mulch as needed. Skip fertilizers and pesticides; native plants thrive without them and adding chemicals could pollute the water your garden filters. Once a year, test how well your garden drains by digging a small hole about 6 inches deep, filling it with water, and timing how long it takes to drain. If water sits for more than 24 hours, you might need to improve the soil’s drainage. Also, check that the overflow path is clear so excess water flows safely away from your home’s foundation. [2]
Caring for Permeable Patios
Permeable patios need a little attention to stay in top shape. At least once a year, clear debris from the paver joints to keep fine particles from blocking water flow. For interlocking concrete pavers, make sure the wide joints filled with angular gravel remain unobstructed. If you notice water pooling on the surface, it’s time for a deep cleaning or more intensive fixes. Regularly sweeping and occasionally power washing can also help keep debris from building up in the joints. [2]
Working with Professional Services
Sometimes, maintenance issues go beyond what you can handle on your own. Persistent standing water, surface cracks, or completely clogged systems are signs it’s time to call in the pros. Pro Landscapes MD offers a range of drainage solutions in central Maryland, including installation, repairs, and stormwater management. Their team uses specialized tools to remove sediment, perform inspections, and handle more involved repairs like excavation or regrading. And remember – before digging for any major maintenance, contact 811 to locate underground utilities. [2]
Wrapping It Up
Combining rain gardens with permeable patios offers an effective way to manage stormwater, cutting runoff by up to 50%. This approach helps prevent flooding, filters out pollutants, regulates temperature, and even increases property value – all while safeguarding your home’s foundation from potential damage [1].
However, success lies in the details. Start by testing your soil’s infiltration rate, picking the right permeable materials, and positioning the rain garden to catch runoff from the patio. While simpler setups can be DIY-friendly, more challenging projects – like those on sloped terrain, in areas with poor drainage, or involving high-traffic driveways – often call for professional help.
That’s where Pro Landscapes MD comes in. They specialize in designing and installing comprehensive drainage solutions throughout central Maryland. From soil testing and grading to installing permeable pavers and crafting custom rain gardens, their team ensures your project meets local building codes and delivers lasting results.
For a sustainable, functional, and visually appealing landscape, integrating rain gardens and permeable patios is a smart move. Need expert guidance? Visit Pro Landscapes MD at prolandscapesmd.com to bring your vision to life.
FAQs
How do I size a rain garden for my roof or patio runoff?
To figure out the size of a rain garden, start by measuring the total area that will drain into it – this could include your roof, patio, or other surfaces. Then, choose a rainfall depth to collect; 1.2 inches is a standard choice. To calculate the runoff volume, multiply the drainage area (in square feet) by the rainfall depth (converted to feet). Finally, determine the garden’s surface area based on the soil type and ponding depth. For residential runoff, this typically comes out to about 48–50 square feet.
What if my soil drains too slowly for a rain garden?
If your soil struggles with slow drainage, you might want to explore solutions like dry wells or permeable paving. These options are great for improving water infiltration and preventing water from pooling in your yard. Dry wells help redirect excess water into the ground, while permeable paving allows water to pass through surfaces more easily.
Another option is to incorporate native Maryland plants that thrive in wet conditions. While these plants can handle soggy soil, improving your drainage infrastructure is often the most effective way to manage runoff and maintain a healthier landscape.
Do permeable pavers clog in winter or with leaf debris?
Permeable pavers can lose their effectiveness if their pores become blocked by sediment, leaf debris, or other materials. This reduces their ability to absorb water properly. To keep them functioning well, it’s important to perform regular maintenance, such as removing debris and sediment buildup. This is especially crucial during periods like winter or heavy leaf fall when clogging is more likely.
Chat with Us