


- bhavya gada
- No Comments
Retaining wall backfill is critical for stability and proper drainage. Without it, walls can fail due to pressure from soil and water. Here’s what you need to know:
- Purpose of Backfill: Supports the wall, prevents soil seepage, and reduces water pressure.
- Hydrostatic Pressure: The main cause of retaining wall failures, managed by proper drainage.
- Best Materials: Use 3/4-inch washed gravel for drainage, native soil for stability, and geotextile fabric to prevent clogging.
- Installation Tips: Compact backfill in layers, add perforated drain pipes, and ensure proper grading.
- Maintenance: Inspect walls twice a year, ensure drainage systems work, and address cracks or bulges early.
Proper backfill and drainage ensure your retaining wall lasts for years, preventing costly repairs. Learn how to choose materials, install layers, and maintain the structure below.
Essential Drainage Methods to Prevent Retaining Wall Failure
Proper drainage is a cornerstone of professional hardscaping services, ensuring that structures remain stable and visually appealing for years.
sbb-itb-843f8be
Selecting Backfill Materials
Choosing the right backfill materials is crucial for ensuring your retaining wall remains stable and drains properly. Together, these materials create a system that prevents water buildup while supporting the structure effectively.
Backfill Material Options
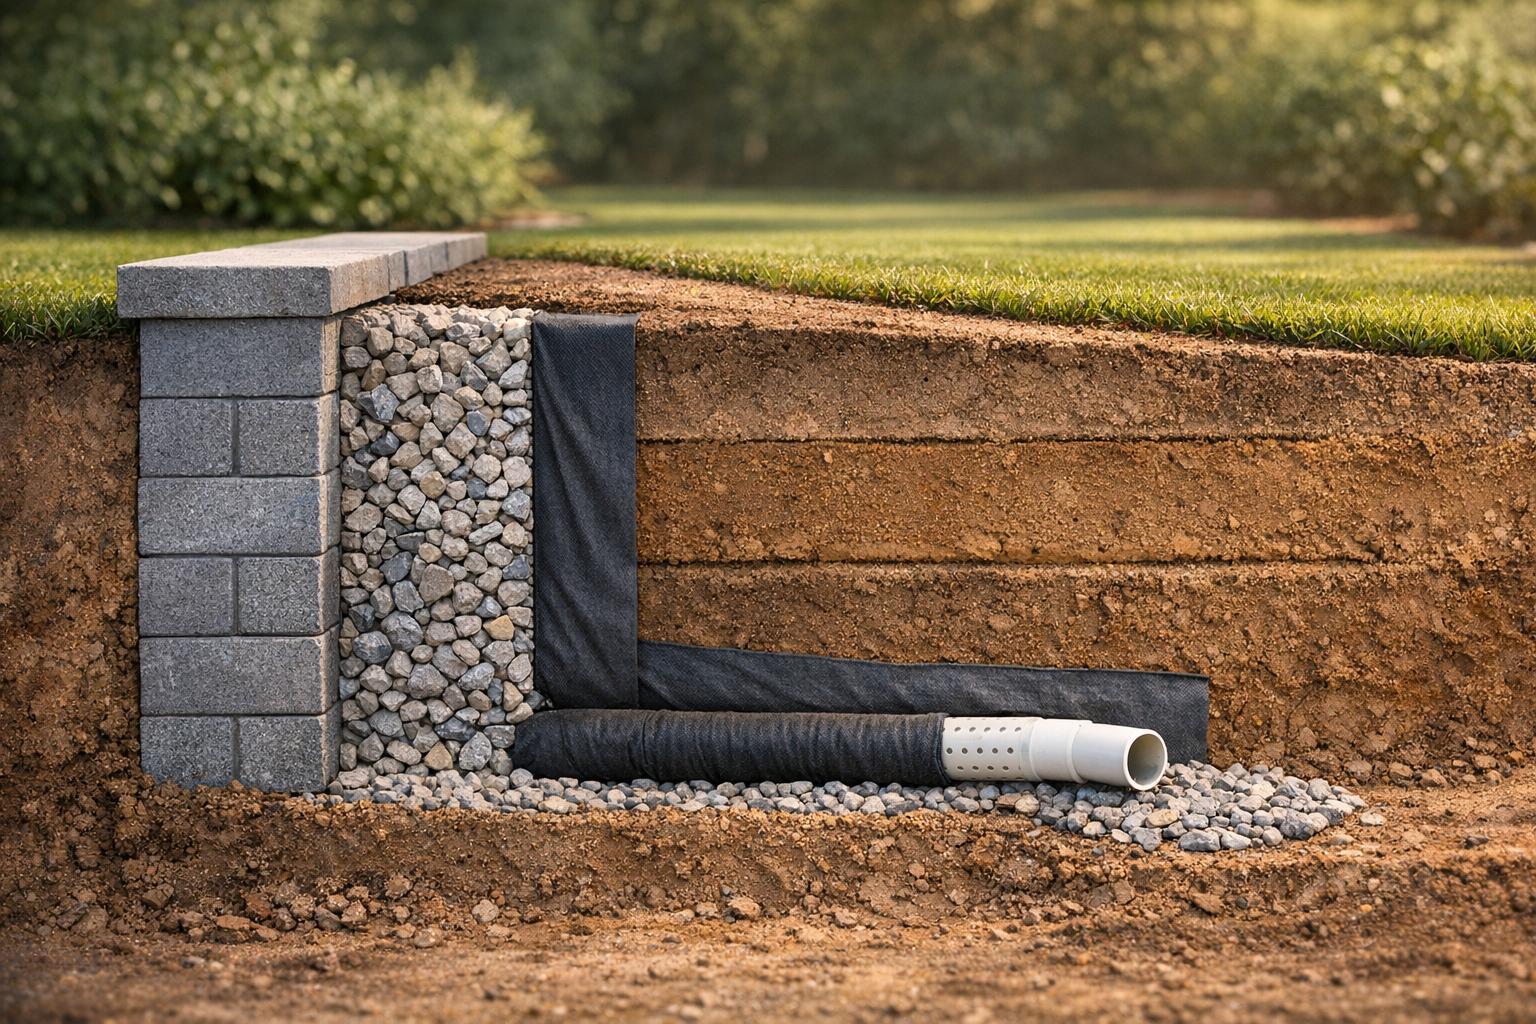
3/4-inch clear gravel serves as the primary drainage material. This crushed stone is placed in a 12-inch wide column directly behind the wall, allowing water to flow downward and relieving pressure on the structure [3]. For maximum strength and drainage, granular backfill classified as AASHTO A-1-a is widely recommended [2].
Native soil provides a solid foundation and is used for the base and surface layers. While gravel manages drainage, native soil supports vegetation and adds stability [1].
Geotextile filter fabric acts as a barrier, preventing fine soil particles from clogging the gravel. This permeable material ensures that the drainage system remains functional over time by keeping soil and gravel separate [3].
Geogrid reinforcement is essential for taller walls, generally over 3–4 feet. This synthetic mesh strengthens the structure by anchoring the wall to the soil behind it. Landscape expert Peter Solti of Green Apple Landscaping explains:
"Geogrid is a high-tensile mesh that locks the wall to the soil behind it… Without it, taller walls will lean and eventually collapse" [3].
Perforated drain pipe, also known as weeping tile, is installed at the base of the gravel backfill. It collects and channels water away from the wall, connecting to a drainage outlet like a front-facing drain or soakaway pit for efficient water removal [3].
| Material | Primary Function | Placement Location |
|---|---|---|
| 3/4" Gravel | Drainage & Pressure Relief | Behind the wall (12" wide column) |
| Native Soil | Stability & Vegetation Base | Base layer (3") and top surface layer (6") |
| Geotextile Fabric | Filtration | Between gravel and native soil |
| Geogrid | Structural Reinforcement | Layered horizontally in taller walls |
| Perforated Pipe | Water Evacuation | At the base of the gravel backfill |
How to Choose the Right Material
Proper material selection is the foundation of a well-built retaining wall, ensuring both drainage and structural integrity. Start by considering your wall’s height and the load it needs to support. For walls under 4 feet, use 3 inches of compacted native soil at the base, followed by 6–12 inches of 3/4-inch gravel for drainage, and finish with a 6-inch top layer of native soil. Heavier loads, such as vehicles or structures, will require thicker gravel layers and additional geogrid reinforcement [1] [3].
While soils with friction angles above 34 degrees can suffice in reinforced zones, granular backfill generally offers a more dependable solution [2]. A 12-inch layer of 3/4-inch clear gravel behind the wall is a must for effective drainage [3]. To maintain long-term functionality, always place geotextile fabric between the gravel and native soil. Additionally, compact the backfill in thin layers, ensuring each layer is thoroughly compressed to avoid future settling or wall movement [4].
For timber walls, backfill works alongside "deadmen" and tiebacks – cross members anchored into the slope every 8 feet on alternating courses (starting from the third course). This anchoring system relies on well-compacted backfill to remain effective [3].
If you’re unsure about material selection or installation, consider consulting professionals like Pro Landscapes MD for expert advice on your retaining wall project.
Next, we’ll cover the step-by-step process for efficient backfill installation.
How to Install Backfill
Retaining Wall Backfill Installation Process: Step-by-Step Guide
Installing backfill correctly is essential for keeping your retaining wall stable and durable over time. By carefully preparing the site, layering the backfill, and finishing with proper grading, you can ensure your wall is well-drained and built to last.
Preparing the Site and Base
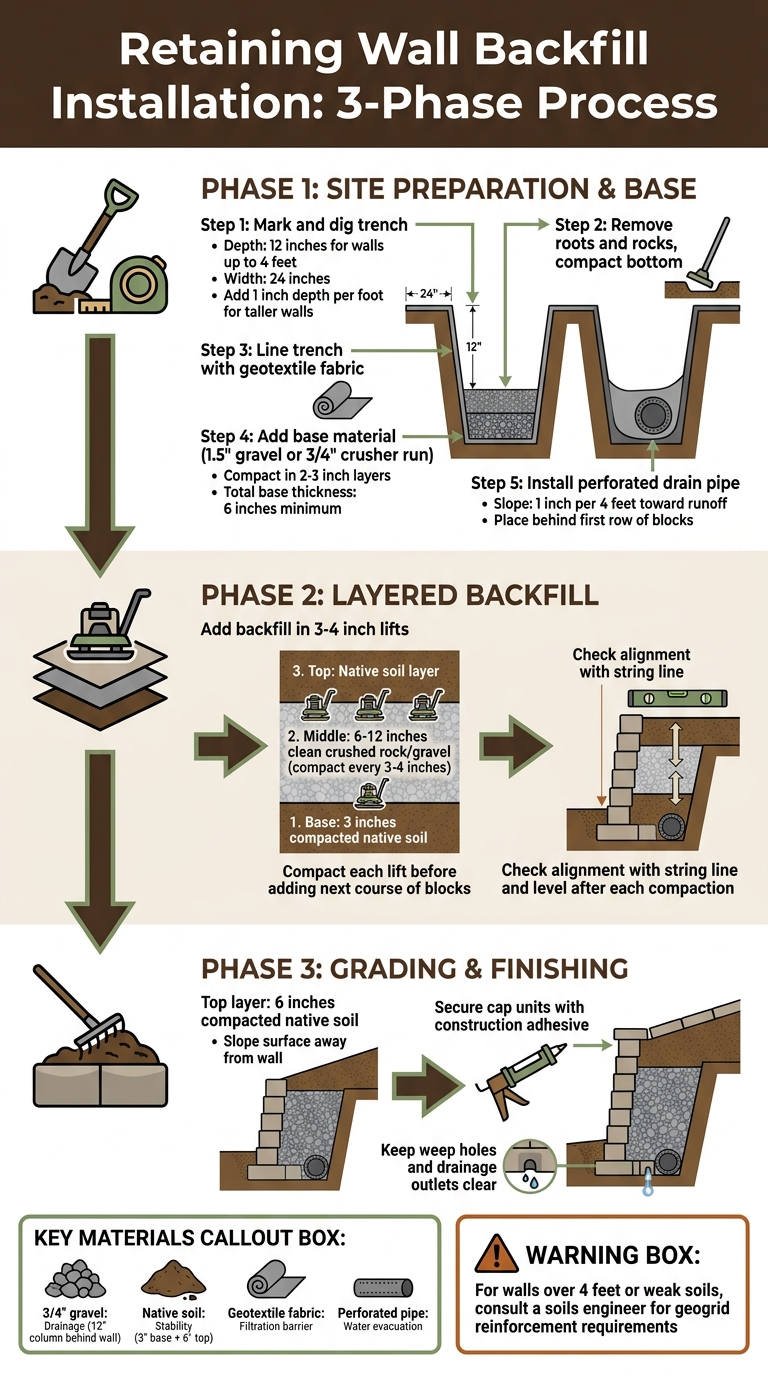
Start by marking the area where the wall will be built. Dig a trench that’s 12 inches deep and 24 inches wide for walls up to 4 feet tall. For taller walls, increase the depth by 1 inch for every additional foot in height. Remove any roots or large rocks from the trench, then compact the bottom to create a solid foundation.
Next, line the trench with geotextile landscape fabric. This prevents the native soil from mixing with your drainage stone. Add a base material such as 1.5-inch processed gravel, 3/4-inch crusher run, or 5/8-inch minus crushed rock. Compact the material in 2- to 3-inch layers until you have a base that’s at least 6 inches thick. Use a string line to ensure the base is level and aligned. Begin placing the first course of blocks at the lowest point of the wall to maintain an even installation as you build upward.
Install a perforated drain pipe behind the first row of blocks, ensuring it slopes 1 inch per 4 feet toward a runoff area. Marty from Mutual Materials emphasizes the importance of this step:
"The weight of the block is what determines the strength and you really don’t want to exceed that."
With the base ready, you can move on to adding and compacting the backfill.
Adding Backfill in Layers
Backfill should be added in layers, or "lifts", of 3 to 4 inches at a time. Compact each layer using a tamper or compactor before adding the next course of blocks. This method helps prevent soil from seeping through the wall and reduces pressure buildup from water. After compacting, check the alignment of the wall using a string line and level, as tamping can sometimes shift the blocks.
For each layer, follow this process: Start with about 3 inches of compacted native soil at the base. Then, fill the area directly behind the blocks with 6 to 12 inches of clean, crushed rock or washed gravel, compacting every 3 to 4 inches. Add and compact native soil as the top layer of each lift. Avoid waiting until the wall is fully built to backfill; compacting after each course ensures stability as you go.
Grading and Final Touches
Once all backfill layers are compacted, finish the installation with proper grading. The topmost layer should include about 6 inches of compacted native soil to support vegetation and direct water away from the wall. Firmly tamp this layer to prevent settling and erosion. Secure the cap units on the top course using construction adhesive to finalize the structure.
Drainage remains critical. Keep weep holes and drainage outlets clear of debris to ensure water flows freely. Proper surface grading not only integrates the wall into your landscape but also helps with erosion control. For walls higher than 4 feet, or for sites with weak soils or steep slopes, consulting a soils engineer is a smart move. These conditions may require geogrid reinforcement or additional engineering solutions.
Next, explore how to maintain your backfill to ensure long-term stability.
Setting Up Proper Drainage
Once your backfill layers are in place, the next critical step is ensuring proper drainage. Without it, water can accumulate behind the wall, leading to hydrostatic pressure that may cause bulging, cracking, or even a complete collapse. In fact, poor drainage is often the main reason retaining walls fail [3]. By installing the right drainage components and grading the surrounding landscape, you can help safeguard the wall’s longevity and stability for decades.
Installing Drainage Components
To effectively manage water, you’ll need to incorporate four key drainage elements:
- 3/4-inch clean crushed stone: This material is ideal for backfill because it allows water to flow freely while minimizing pressure buildup. Make sure the drainage backfill extends at least 12 inches behind the wall for adequate coverage [5][3].
- Geotextile filter fabric: Place this fabric between the native soil and the drainage aggregate. It helps maintain a steady flow of water behind the wall by preventing soil from clogging the drainage system [5][3].
- 4-inch perforated drain pipe: Wrap this pipe in the filter fabric and install it behind the lowest course of blocks. The pipe should slope downward at a rate of at least 1 inch per 4 feet, directing water to a safe outlet [5].
- Weep holes: Space these small openings every 6 to 10 feet along the base course of the wall. They provide an immediate escape route for trapped water. As Peter Solti, Owner of Green Apple Landscaping, puts it:
"Water is the silent killer of retaining walls. You either control it – or it controls you" [3].
Additionally, avoid letting roof downspouts drain directly behind the wall. Instead, connect them to solid pipes that carry water away from the structure. In colder climates, opt for smooth-walled pipes to reduce the risk of ice blockages [5][3].
When these components are properly installed, they create a system that works together to reduce water pressure and protect the wall.
Grading for Water Control
Managing surface water is just as important as installing subsurface drainage. Grading ensures that water flows away from the wall, preventing it from pooling at the base or saturating the backfill. Slope the finished landscape away from the wall face to minimize runoff entering the drainage zone [5][3].
For more thorough water management, consider adding features like swales, catch basins, and downspout tie-ins to direct water safely away from the area [5]. If you’re dealing with clay-heavy soils, which retain water and drain poorly, you’ll need more robust drainage solutions [5].
If the project involves challenging soil conditions or complex grading, companies like Pro Landscapes MD can help. They specialize in drainage installation, grading, and stormwater management in central Maryland, including Howard and Montgomery counties. Their expertise in French drains, land leveling, and yard repair can address water-related concerns that might compromise your retaining wall.
Maintaining Your Retaining Wall Backfill
Keeping your retaining wall in good shape takes regular attention. Problems can arise over time, and poor drainage is often the main culprit behind retaining wall failures [8]. Spotting and addressing issues early can save you a lot of money – repairing a wall in time costs far less than a full replacement, which can be 4 to 5 times more expensive [8].
Regular Checks and Repairs
Make it a habit to inspect your retaining wall twice a year and after heavy rainstorms. Pay close attention to visible cracks, especially horizontal ones near the base. These often indicate the wall is starting to shear or tilt due to excessive pressure [8]. If you notice the wall leaning forward or bulging outward, it’s usually a sign of water saturation or poorly compacted backfill [6][8].
During rainfall, check weep holes to ensure water is draining properly. If they’re not active, the drainage system might be clogged [8]. Look for damp spots, water trickles, or efflorescence (white, chalky residue), as these suggest moisture buildup [6][7][8]. Additionally, watch for depressions or sinkholes forming behind the wall – these could mean backfill material is washing out through gaps or failed drainage pipes [8].
If you spot areas where backfill has settled or eroded, add and compact new material in layers. Use a shovel and tamper to add aggregate in 6- to 12-inch increments, compacting each layer thoroughly before moving to the next [1]. The top 6 inches of native soil should also be compacted to stabilize the surface [1]. For more serious problems, like horizontal cracks or bulging, structural reinforcement using tie-backs or geogrid can often be installed at about 25% of the cost of rebuilding the wall entirely [8].
In addition to these structural checks, managing the vegetation around your wall is equally important.
Managing Plants and Surface Growth
Plant management is crucial for maintaining the stability of your retaining wall. Large roots or water-thirsty shrubs close to the wall can destabilize the backfill and increase pressure on the structure [8]. Avoid planting trees with aggressive root systems directly behind the wall, as these can shift soil and damage drainage components [8]. Also, make sure that downpipes, gutters, and the overall site grading direct water away from the top of the wall to prevent backfill saturation [8][1].
If you need professional advice, you can reach out to experts like Pro Landscapes MD for tailored retaining wall and drainage solutions.
Conclusion
The durability of a retaining wall heavily relies on the often-overlooked elements of backfill and drainage. These hidden components are essential for maintaining stability and managing water over time. Using the right materials and installing them correctly – such as compacting backfill in 6- to 12-inch layers, incorporating well-placed drain pipes, and using geotextile fabric – ensures the wall remains secure. Opting for 3/4-inch clean crushed stone for drainage and compacted native soil for the top layer helps prevent hydrostatic pressure from compromising the wall’s alignment [9][1].
Ongoing care is just as important as proper installation. Conducting biannual inspections and checking after storms can catch minor problems early, preventing costly repairs. Look out for bulging sections, confirm that weep holes are functioning as intended, and control vegetation growth to avoid root interference with the backfill.
FAQs
How do I know if my wall needs geogrid?
If you’re building a reinforced retaining wall or a taller structure, you’ll probably need geogrid. This material helps stabilize the backfill, reducing the risk of failure caused by soil movement or water pressure. Geogrid is placed within the backfill, where it’s carefully tensioned and compacted to ensure proper support. On the other hand, shorter or simpler walls that don’t require reinforcement might not need geogrid. To be sure, it’s always a good idea to consult a professional about your specific project.
Where should the drain pipe outlet go?
The drain pipe outlet needs to channel water away from the retaining wall, ensuring it flows into an appropriate drainage area like a dry well, storm drain, or natural runoff path. This approach helps control water runoff, preventing it from pooling or creating pressure behind the wall, which could jeopardize its stability.
What are early signs of backfill or drainage failure?
Some early warning signs of backfill or drainage problems include horizontal cracks, bulging or outward movement of the wall, and areas where the wall leans forward or separates. These are often caused by water accumulating or too much soil pressure building up behind the wall.
Chat with Us