


- bhavya gada
- No Comments
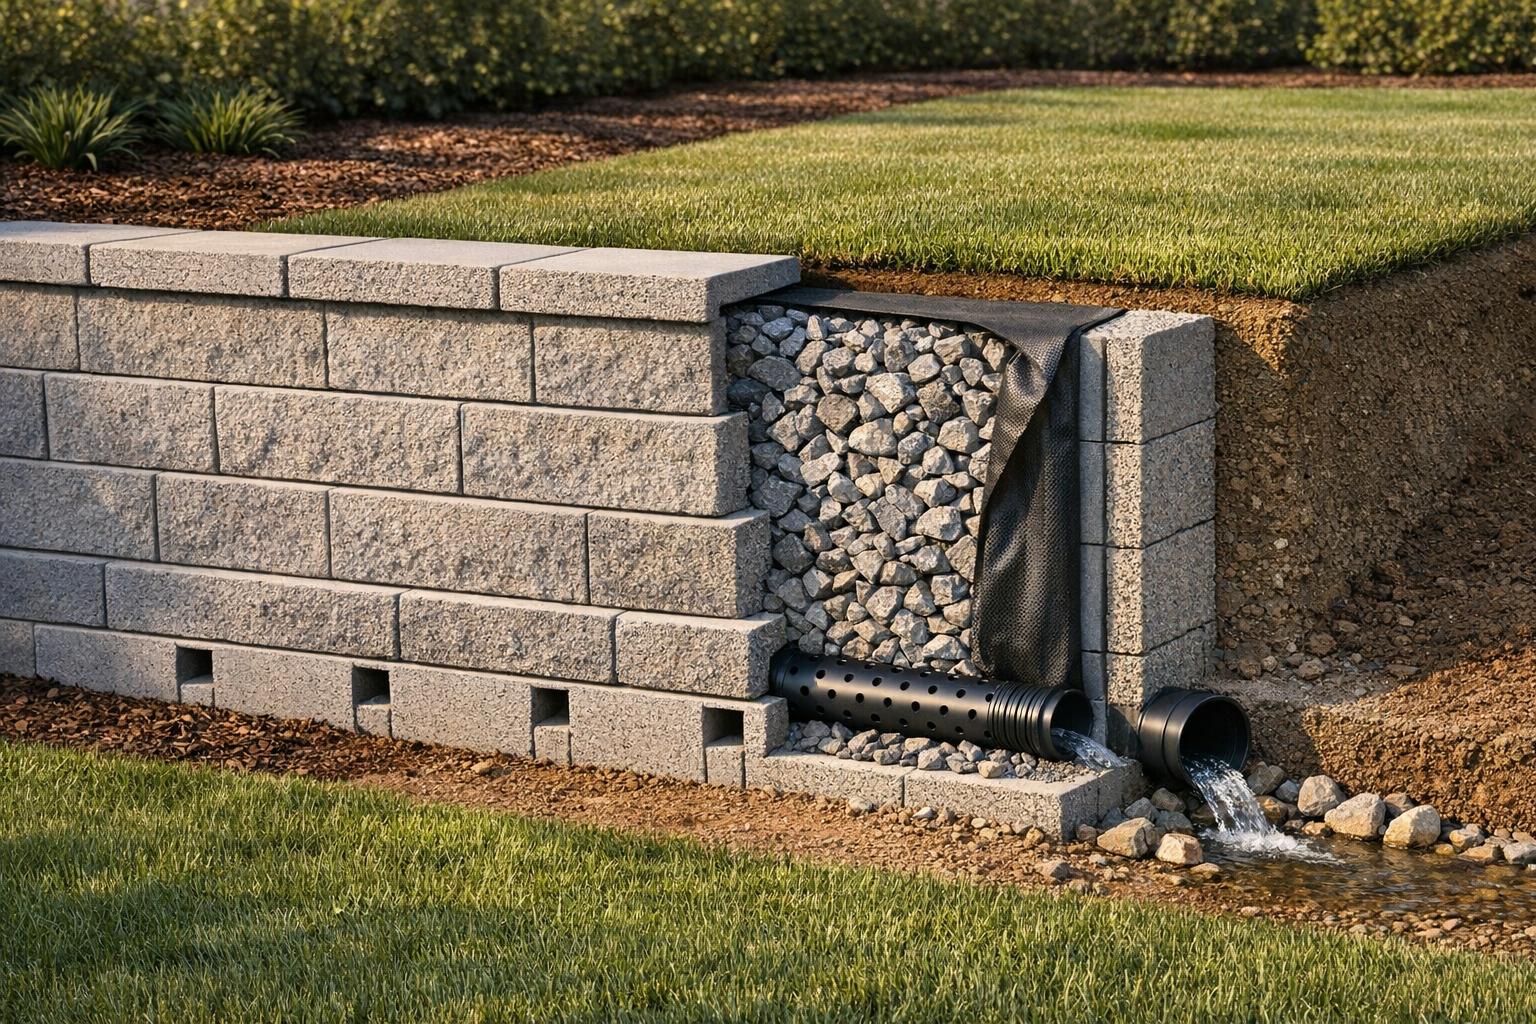
Ignoring proper drainage can ruin your retaining wall. Water buildup leads to cracks, bulging, or even collapse. Here are the top five mistakes to avoid when designing a retaining wall drainage system:
- Wrong Backfill: Using soil instead of clean, angular gravel traps water, increasing pressure behind the wall.
- No Filter Fabric: Skipping geotextile fabric allows soil to clog the gravel, blocking drainage.
- Improper Drain Pipe Placement: Pipes should be at the wall’s base, sloped downward, with perforations facing down.
- Missing Weep Holes: Without these, water accumulates and stresses the wall.
- Poor Grading: If the ground slopes toward the wall, water collects and causes damage.
Key Tip: Maryland’s clay-heavy soils make drainage even more critical. Proper installation and professional guidance can prevent costly repairs. Read on for detailed solutions to these common issues.
10 DUMB Retaining Wall Mistakes That Will Cause Failure
sbb-itb-843f8be
1. Skipping Clean Angular Gravel Backfill
Using native soil or the wrong fill material instead of clean angular gravel behind retaining walls can lead to serious problems, including wall tilting, cracks, and even collapse. As McCluskey Contracting puts it, "Improper backfill can lead to wall tilting, cracking, and eventual collapse" [1].
Clean angular gravel is key because it creates open spaces that allow water to drain freely downward, preventing water from building up behind the wall. The difference between using well-graded crushed stone and regular soil is like the difference between a functional drainage system and a water trap [1]. Choosing the right material is just the first step – proper installation is equally important to ensure the drainage system works effectively.
For installation, begin with a compacted gravel base of 4–6 inches. The trench depth for a 3-foot wall should be 10–12 inches, with a width that’s twice the depth of the retaining blocks. Compact the gravel in layers using a vibratory compactor to avoid settling and shifting over time. McCluskey Contracting highlights that "proper backfill supports and helps with drainage, reducing the risk of wall failure" [1].
Without clean angular gravel, water can accumulate, leading to increased pressure and a higher likelihood of wall failure. It’s a critical step you can’t afford to skip.
2. Omitting Filter Fabric Between Gravel and Soil
Skipping filter fabric in your retaining wall drainage system can create major headaches. This fabric acts as a crucial barrier, preventing native soil from mixing with the clean gravel backfill. Without it, soil particles gradually fill the spaces in the gravel, clogging the drainage layer. When this happens, water can no longer flow freely, leaving the system waterlogged.
This clogging causes water to collect behind the wall, increasing hydrostatic pressure. Over time, this pressure can lead to bulging or even structural failure of the wall. Repairs in such cases can be expensive, sometimes requiring the entire drainage system to be excavated and replaced. Installing filter fabric correctly from the start is essential to avoid these problems and ensure proper placement of the drain pipe.
The standard material for this purpose is non-woven geotextile fabric. Unlike landscape fabric, which is made for weed control, drainage fabric is specifically designed to allow water to flow while filtering out soil particles. Its permeability is often measured in gallons per minute per square foot. For most home retaining walls, 4-oz or 8-oz fabric works well, but larger projects may require heavier-duty options.
Installation is just as important as choosing the right fabric. Wrap the entire gravel column with the fabric, making sure to overlap the edges by 12–18 inches. Secure the fabric with landscape staples – 6-inch staples for normal soil or 12-inch staples for softer ground. During backfilling, keep the fabric smooth and wrinkle-free to create an effective interface between the soil and gravel.
Another mistake to avoid is opting for cheap, thin fabrics instead of professional-grade drainage fabric. High-quality fabric, when buried under at least 3 inches of gravel, can last 20 to 30 years, with some specialized types lasting more than 50 years. Always cover the fabric promptly after installation to protect it from UV damage [3].
3. Misplaced Perforated Drain Pipe
Placing a perforated drain pipe incorrectly is a frequent and expensive error. Many homeowners install the pipe too high, too shallow, or with the wrong orientation. The pipe should always sit at the base of the wall, where water naturally collects. If it’s positioned elsewhere, water can pool and build hydrostatic pressure, potentially undermining the stability of the wall [2]. Proper placement is just the first step – ensuring the pipe’s slope and orientation is equally critical.
Pipe Slope and Orientation
The slope of the pipe is essential for effective drainage. A backward slope causes water to stagnate, defeating the pipe’s purpose. To avoid this, make sure the pipe is installed with a downward slope that promotes smooth water flow.
Orientation matters too. The perforations on the pipe should face downward. While this might seem counterintuitive, it’s the most effective setup. As Nuclear Hoagie explains:
"Counterintuitively, you usually want the holes in drainage pipe to point down, not up. This way, water from below can get forced up into the pipe from underneath, which then has a low-resistance path to flow away" [4].
If the holes face upward, the pipe won’t efficiently collect water from below and is more likely to clog with silt. In practice, downward-facing holes remain clear for years, while upward-facing ones quickly become blocked [4].
Use Gravel, Not Soil
Surround the pipe with clean angular gravel, not soil. Gravel creates a low-resistance path for water to flow into the pipe and away from the wall. Vicente Outdoor Living highlights the importance of this:
"A retaining wall must have drainage rock and a perforated drain pipe behind it. Water pressure is often stronger than the soil itself – and it destroys walls from the inside out" [2].
Gravel ensures water is guided efficiently, reducing the risk of pressure buildup behind the wall.
For retaining walls taller than 3–4 feet, the drain pipe should be part of a broader system that includes engineered reinforcement [2]. Additionally, coordinate the pipe’s placement with weep holes and proper grading to handle runoff effectively.
4. Ignoring Weep Holes
Weep holes are a small but crucial detail that can make or break the integrity of a retaining wall. These openings act as a backup drainage system, especially for walls under 10 feet tall. Even if you’ve installed a perforated drain pipe, water can still collect in the gravel backfill. Over time, this buildup can create hydrostatic pressure, leading to bulging, cracks, or even wall failure.
Weep holes allow trapped water to escape through the wall’s face rather than accumulating behind it. For standard gravity walls, they should be spaced every 4 feet horizontally along the bottom row. Typically, 1-inch diameter PVC or cast iron pipes are used, positioned at the base to drain water from the lowest point of the backfill.
If you’re working with concrete block walls, there’s another option: leave every fourth vertical joint in the first row ungrouted. This approach works well for walls under 8 feet tall, offering effective drainage without the need for additional pipe installations.
To maximize their effectiveness, weep holes should be part of a broader drainage system. This includes a perforated drain pipe sloped at 2%–3%, clean angular gravel for backfill, and proper waterproofing. Together, these elements act like a safety net, preventing water pressure from building up during heavy rainfall.
For retaining walls taller than 10 feet or those requiring engineered reinforcement, it’s best to consult a geotechnical professional. They can design a drainage system tailored to handle the additional challenges of larger structures.
5. Poor Grading and Surface Runoff Control
Even the most effective drainage system can fail if the ground’s slope, or grading, directs water toward your retaining wall. When the land slopes toward the wall instead of away from it, water collects and builds pressure, which can eventually lead to bulging or even collapse. Proper grading works hand-in-hand with drainage to ensure water flows in the right direction – away from the wall.
To address this, the ground should slope away from the wall with a grade of 2% to 4%. A slope under 2% lets water pool, while anything steeper than 4% can cause fast-moving water that erodes the soil and displaces backfill [5]. On steep hillsides, swales – shallow, vegetated channels with a width-to-height ratio of 3:1 – are effective for redirecting runoff [5].
If grading alone isn’t enough, a French drain can help. This system uses a perforated pipe wrapped in filter fabric and gravel to catch and divert water before it reaches the wall. For it to work effectively, the pipe needs to be installed at the right depth and should slope toward an outlet [5]. Paired with well-placed drain pipes and weep holes, a French drain becomes part of a comprehensive drainage solution. In paved areas like driveways, catch basins or swales can also help prevent pooling and soil erosion.
Proper Drainage Checklist Table
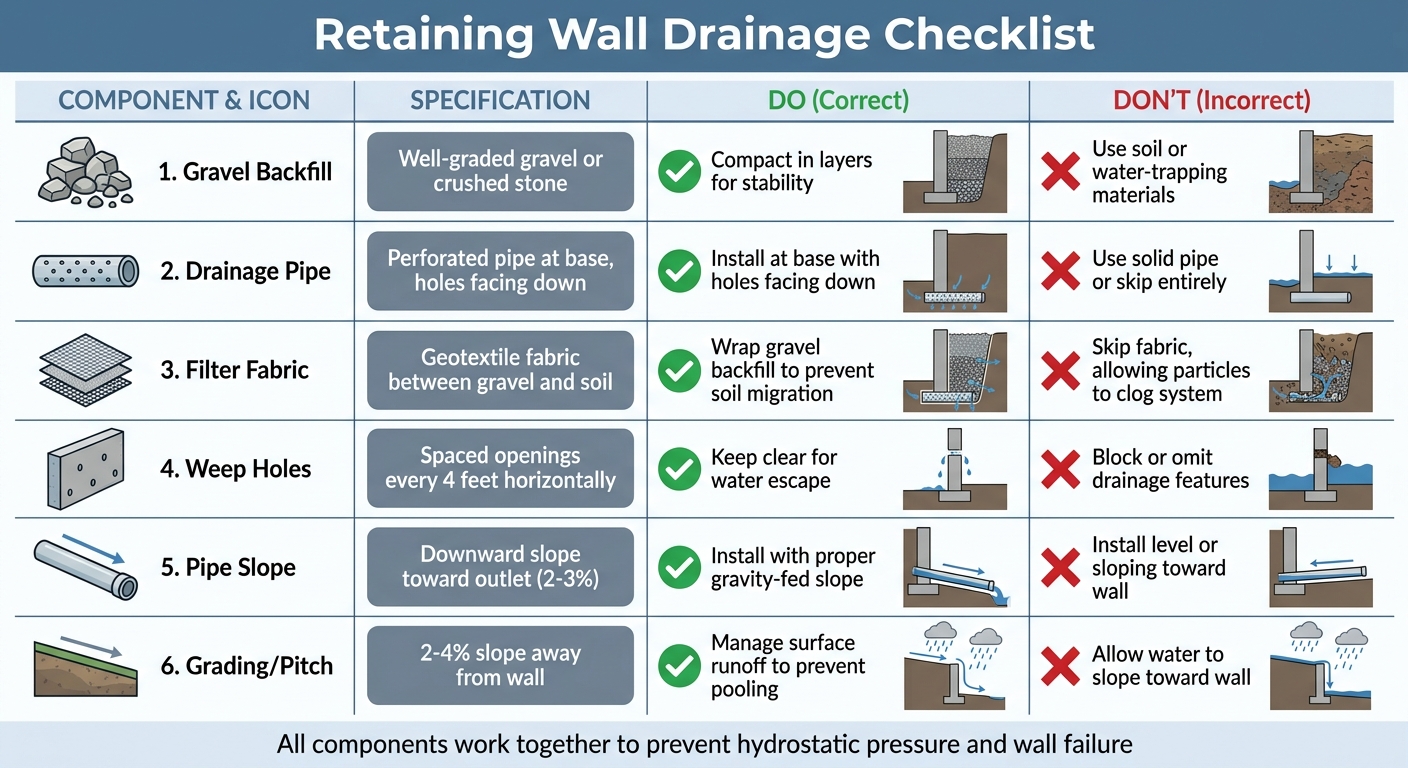
Retaining Wall Drainage Components: Do’s and Don’ts Checklist
Here’s a quick-reference guide to ensure each drainage component meets its specifications. These elements work together to direct water away from the wall, helping to prevent expensive repairs down the line.
The table below highlights what you should do and what to avoid for each key drainage component:
| Component | Specification | Do | Don’t |
|---|---|---|---|
| Gravel Backfill | Well-graded gravel or crushed stone [1] | Compact in layers to ensure stability and support [1] | Use soil or materials that trap water [1] |
| Drainage Pipe | Perforated pipe at base with holes facing down | Install at the base with holes facing down [1] | Use a solid pipe or skip the pipe entirely [1] |
| Filter Fabric | Geotextile fabric between gravel and soil [2] | Wrap gravel backfill to prevent soil migration into the drainage layer | Skip the fabric, allowing fine particles to clog the system |
| Weep Holes | Spaced openings in the wall face [1] | Keep them clear to allow water to escape [1] | Block or omit drainage features [1] |
| Pipe Slope | Maintain a downward slope toward the outlet | Install with a proper slope for gravity-fed drainage | Install level or with a slope toward the wall |
| Grading/Pitch | Pitch away from the wall | Manage surface runoff to prevent pooling [1] | Allow water to accumulate or slope toward the wall |
Key Reminders:
- Check spacing and depth requirements for all components.
- Make sure the gravel backfill extends adequately and is compacted in layers as outlined [1][2].
- Confirm proper spacing and functionality of weep holes.
- Install the perforated drainage pipe at the wall’s base with holes facing downward to efficiently move water away [2].
Why Maryland Homeowners Need Expert Help
When it comes to retaining walls, understanding Maryland’s local soil and drainage conditions is essential for long-term success.
The state’s clay and silty soils, especially in central areas like Howard, Montgomery, and Frederick Counties, are known for their seasonal shifting. These soils expand and contract throughout the year, creating a challenge for retaining wall stability. Without proper professional design and reinforcement, these ground movements can lead to cracking, bulging, or leaning walls [2].
For walls over 3–4 feet tall, specialized engineering and geogrid reinforcement are crucial to maintaining structural integrity [2]. As Vicente Outdoor Living puts it:
"A retaining wall is a structural system designed to hold back thousands of pounds of soil, water pressure, and shifting earth" [2].
Adding to the complexity, Maryland’s local building codes introduce another layer of difficulty. According to McCluskey Contracting, these codes are in place to guarantee the safety and durability of retaining walls [1]. However, navigating the requirements – like permits, height restrictions, and drainage specifications – can be overwhelming. Skipping these steps not only risks fines and legal troubles but could also mean tearing down and rebuilding non-compliant structures [1].
Pro Landscapes MD specializes in drainage solutions tailored to Maryland’s tricky soils and strict regulations. From installing French drains and precise pipe systems to ensuring proper grading, they handle every detail. Their expertise covers everything from geogrid reinforcement and material selection to managing permits and engineering calculations. By relying on professionals, homeowners can ensure their retaining walls stand strong for decades instead of failing after just one season.
Conclusion
Poor drainage can seriously undermine the stability of retaining walls. To protect your wall, it’s essential to avoid the five common drainage mistakes highlighted earlier. As Vicente Outdoor Living puts it, "Water pressure is often stronger than the soil itself – and it destroys walls from the inside out" [2].
Each drainage error adds to the buildup of hydrostatic pressure, increasing the risk of structural failure. A compromised wall can lead to expensive repairs and potential water damage. On the other hand, a well-designed drainage system ensures your retaining wall stands the test of time. The secret lies in understanding how hydrostatic pressure works and directing water away efficiently.
If your wall is already showing signs of trouble – like leaning, cracking, or bulging – it’s crucial to avoid temporary fixes that merely cover up the problem. Quick patches, such as adding extra blocks or applying concrete, often make things worse. Instead, consult a professional to assess and address the root cause of the drainage issue.
For Maryland homeowners, challenges like clay-heavy soils, seasonal ground shifts, and strict building codes make professional expertise even more critical. Pro Landscapes MD offers comprehensive solutions, including French drain installations, precise pipe placements, grading, and stormwater management, to ensure your retaining wall stays durable year-round.
FAQs
How can I tell if my retaining wall has a drainage problem?
If your retaining wall has drainage issues, there are a few clear signs to watch for. These include water pooling behind the wall, visible cracks, leaning or bulging, soil erosion, and efflorescence – those white, chalky deposits caused by excess moisture.
Out of these, water pooling is a major red flag. It adds pressure to the wall, which can eventually lead to structural failure. To avoid bigger problems, make it a habit to inspect your retaining wall regularly for these warning signs. Catching issues early can save you a lot of trouble down the line.
Do I need a permit or engineering for my retaining wall in Maryland?
In Maryland, if you’re planning to build a retaining wall, you’ll need a permit and engineering approval if the wall exceeds specific height or structural limits. For example, walls taller than 4 feet or those designed to support heavy loads must adhere to local building codes. It’s crucial to consult your local authorities to confirm that your project complies with all applicable regulations.
What’s the best way to add drainage to an existing retaining wall?
To improve drainage for an existing retaining wall, you’ll need to install a proper system behind it. Start by excavating the area behind the wall to create enough space. Then, place a perforated drain pipe at the base of the wall. Surround the pipe with gravel or drainage rock to help channel water away effectively. This setup prevents water pressure from building up, which could otherwise lead to bowing, cracking, or even failure of the wall. Proper drainage ensures the wall remains stable and lasts longer.
Chat with Us