


- bhavya gada
- No Comments
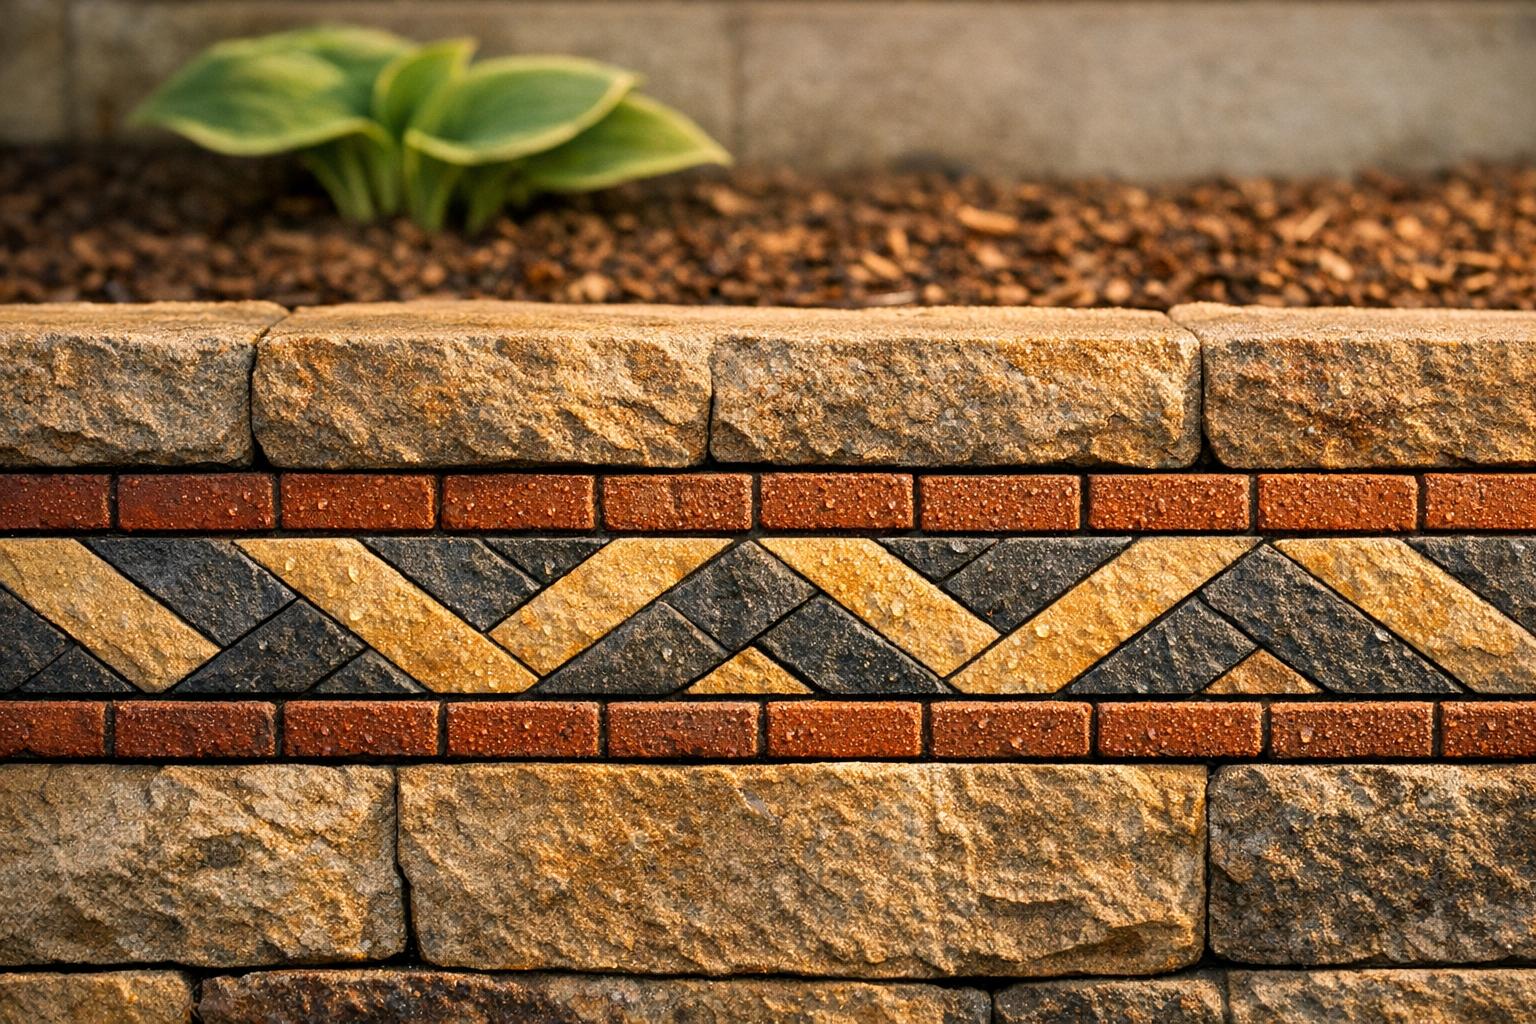
A retaining wall doesn’t have to be just a functional structure – it can also be a design feature that enhances your outdoor space. Inlays, which are contrasting materials, colors, or textures embedded into the wall, can add visual interest, tie together other landscape elements, and improve curb appeal. Here’s a quick breakdown of what you need to know:
- What are inlays? Contrasting materials like stone, brick, or metal accents added to a wall for decorative purposes.
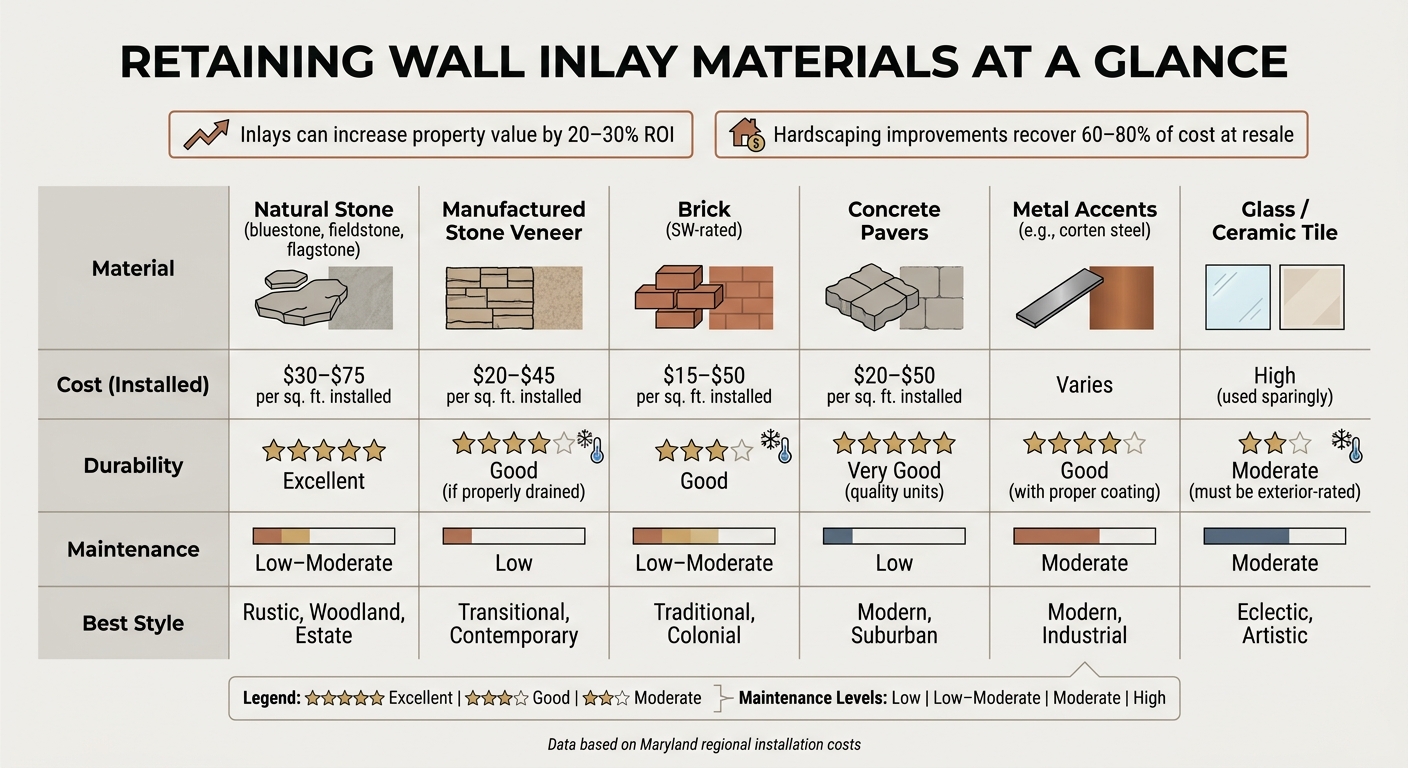
- Why use them? They break up the bulk of large walls, create a polished look, and can increase property value with an ROI of 20–30%.
- Material options: Natural stone (durable but costly), brick (classic and affordable), manufactured stone veneer (lightweight), concrete pavers (budget-friendly), and even metal or glass for modern designs.
- Patterns: Horizontal bands, herringbone, mosaic, or random ashlar can influence the wall’s style and feel.
- Installation tips: Ensure proper drainage, use freeze-thaw-stable adhesives, and plan patterns carefully.
- Maintenance: Regular cleaning, sealing, and seasonal inspections keep inlays looking great and functioning well.
Whether you’re designing for a modern home or a rustic landscape, inlays can elevate the appearance of your retaining wall. For complex projects, professional help ensures durability and a flawless finish.
🤫 My Secret to Paver Inlays 🧱 #hardscape #hardscapedesign
sbb-itb-843f8be
Materials and Patterns for Retaining Wall Inlays
Retaining Wall Inlay Materials: Cost, Durability & Style Guide
Common Materials for Inlays
The materials you choose for retaining wall inlays play a huge role in shaping the wall’s appearance, lifespan, and upkeep.
Natural stone – like bluestone, fieldstone, flagstone, or river rock – is a top-tier option. It’s incredibly dense, holds up well against UV rays, and develops character over time. But it comes at a premium, costing between $30–$75 per square foot installed. Its irregular shapes also require skilled craftsmanship for proper installation. Brick is another timeless choice, particularly for homes with existing brickwork. It brings warmth and structure, complementing traditional Maryland architecture, and is more affordable. Just make sure the brick is SW-rated to handle Maryland’s freeze–thaw cycles.
Manufactured stone veneer mimics the look of natural stone but is lighter, easier to cut, and offers consistent color options. Installation typically costs $20–$45 per square foot. However, poor drainage or wall movement can lead to cracks or detachment. Concrete pavers are a budget-friendly and flexible option, available in a wide range of colors and patterns. They’re durable when you opt for high-quality, freeze–thaw-tested products, though lower-grade pavers may fade or chip over time.
For a sleek, modern look, metal accents like corten steel strips can create sharp, clean lines. If you’re after something bold and artistic, glass or ceramic tile can make a statement. Just ensure the tile is rated for outdoor use and can handle Maryland’s winters.
Popular Pattern Styles
The pattern you choose doesn’t just influence how the wall looks – it impacts how it feels, too. Certain designs can make a wall seem taller, shorter, or more relaxed.
Horizontal bands are practical for taller walls. Adding a contrasting stripe at one-third or two-thirds of the wall’s height helps break up the visual bulk, making the structure feel less overwhelming. Herringbone patterns add dynamic, diagonal lines that draw the eye along the wall, especially when using brick or pavers. For a more natural and laid-back vibe, random ashlar (a mix of rectangular stone sizes) or organic mosaic layouts work beautifully on wooded or sloped properties.
Simple patterns like running or stack bonds are best for tall or busy walls, while intricate mosaics or medallions should be reserved for key focal points. Sticking to two or three colors ensures the wall doesn’t look too chaotic, especially if you’re working with stone that already has a lot of variation.
Material Comparison Table
| Material | Installed Cost (per sq. ft.) | Durability in MD Climate | Maintenance | Best Style Match |
|---|---|---|---|---|
| Natural Stone | $30–$75 | Excellent | Low–moderate (sealing optional) | Rustic, woodland, estate |
| Manufactured Stone Veneer | $20–$45 | Good (if properly drained) | Low | Transitional, contemporary |
| Brick | $15–$50 | Good (SW-rated only) | Low–moderate | Traditional, colonial |
| Concrete Pavers | $20–$50 | Very good (quality units) | Low | Modern, suburban |
| Metal Accents | Varies | Good (with proper coating) | Moderate | Modern, industrial |
| Glass/Ceramic Tile | High (used sparingly) | Moderate (must be exterior-rated) | Moderate | Eclectic, artistic |
For areas like entryways or outdoor living spaces, natural stone or high-quality stone veneer is worth the investment. For longer accent bands on larger walls, manufactured veneer or concrete pavers can deliver a striking look while staying within budget. Pro Landscapes MD specializes in aligning materials and patterns to fit Maryland’s unique climate and aesthetic, ensuring your walls are both sturdy and stylish.
Design Planning for Maryland Properties
Site-Specific Considerations
Before choosing patterns or materials, take a close look at your site’s slope, soil type, and drainage. Maryland’s clay-heavy or compacted soils tend to hold water longer than sandy soils, which can worsen freeze–thaw cycles in the winter. This can lead to cracks or loosened inlays over time.
For taller, load-bearing walls, simpler inlays are a safer choice. The increased soil pressure and gradual movement can strain decorative elements. On the other hand, low garden walls – under 3 feet – offer more room for creativity, allowing for pattern bands, mixed-material panels, or stone accents. If your wall supports a steep slope, stick to shallow, securely bonded inlays and avoid placing them near key drainage paths.
"Retaining walls help direct and manage water flow, preventing pooling and water damage." – Pro Landscapes MD
It’s crucial to integrate grading and drainage solutions early in the process. Companies like Pro Landscapes MD combine retaining walls with French drains, stormwater management, and grading to ensure the decorative elements don’t compromise the wall’s structure.
These site-specific factors help you choose inlay patterns that work with, not against, your landscape.
Matching Inlays to Your Landscape Style
Once you’ve assessed the site, focus on aligning the inlay design with your home’s architectural style. This keeps the overall look cohesive and visually appealing.
For modern homes with clean lines, geometric inlay patterns, smooth stone, or concrete accents in neutral tones work well. Rustic or wooded properties, on the other hand, pair beautifully with irregular fieldstone, reclaimed brick, or mixed-texture inlays in earthy tones. If you have a traditional or colonial-style home, symmetrical patterns and consistent materials – like a brick accent band – offer a polished and intentional look.
Consistency is key. If your patio features flagstone, consider using the same material in the wall inlay. Similarly, if your walkway is made of pavers, incorporating a matching paver band into the wall creates a unified design. Avoid mismatched materials, as they can disrupt the harmony of the space.
Eco-Friendly Design Tips
Small, eco-conscious decisions can make a big difference. Reclaimed stone or brick is a great option for Maryland properties. Not only do these materials add character and reduce waste, but they also align with the traditional Mid-Atlantic aesthetic. Locally sourced stone is another smart choice – it reduces transportation emissions and weathers more predictably in Maryland’s climate.
Modular planning is another way to minimize waste. By sizing inlay pieces to reduce cutting and offcuts, you can make the most of your materials. If your retaining wall is part of a larger drainage or grading project, consider incorporating features like dry riverbeds or rain gardens into the surrounding landscape. These additions help manage runoff and protect nearby plantings – especially important given Maryland’s wet seasons. Choosing eco-friendly options not only makes your wall more sustainable but also enhances its overall look and functionality.
How to Install Retaining Wall Inlays
Preparing the Wall Surface
Once your design is finalized, it’s time to bring your retaining wall inlay to life. Start by ensuring the wall is structurally sound. Look for cracks, loose mortar, or water damage, and address any issues before moving forward. A clean and level surface is key to achieving both durability and the aesthetic you’re aiming for. Clear away any surface buildup, then check the wall with a level. If needed, grind down high spots and fill in low areas to create a smooth, even base.
For smooth concrete or block walls, you’ll want to apply a bonding agent or scratch coat to improve adhesion. In areas prone to dampness or poor drainage, use a breathable waterproofing membrane that works with your adhesive system. This helps prevent moisture from becoming trapped behind the inlay, which could lead to bond failure.
Placing and Securing Inlay Materials
Start by dry-laying your pattern. Use a laser level or chalk to mark horizontal lines, ensuring proper spacing, color placement, and clean cuts – especially around curves and corners. This step ensures consistent rows across the entire wall.
When it comes to cutting, a wet saw with a diamond blade is your best bet for precise, clean cuts on materials like stone, brick, or pavers. Plan your cuts so that smaller or partial pieces are positioned near corners or less visible areas. For securing the materials, use an exterior-grade, polymer-modified thin-set mortar or a masonry adhesive that’s freeze-thaw stable and compatible with your wall material. Back-butter each piece (apply adhesive to both the wall and the inlay) to eliminate voids where water could collect and freeze. Use spacers to maintain even joints, and check the level frequently as you work. Allow the adhesive to cure fully – typically 24 to 72 hours, depending on the product – before grouting or exposing the wall to heavy moisture. For complex projects, such as curved walls or those requiring integrated repairs, consider consulting a professional.
When to Hire a Professional
While skilled DIYers can handle many aspects of inlay installation, some situations call for professional help. If your wall is taller than 4 feet, curved, aging, or showing signs of drainage or settlement issues, the risks of improper installation increase. This is also true for projects involving multiple materials, integrated lighting, or waterproofing repairs alongside decorative elements.
"When built properly using quality materials, retaining walls can last for several decades." – Pro Landscapes MD [1]
For larger or more intricate projects, professional installation ensures your design vision is executed flawlessly. For Maryland homeowners, working with a contractor like Pro Landscapes MD is especially beneficial when the inlay ties into a broader hardscaping or drainage plan. Their team handles everything from permitting to coordinating drainage solutions, ensuring materials are suitable for the Mid-Atlantic’s wet winters and freeze-thaw cycles. As they explain: "Our team will help determine if any permits are needed and handle the process for you." [1]
Maintaining Your Retaining Wall Inlays
After your retaining wall inlays are installed, keeping them in good condition ensures they stay both functional and visually appealing over time.
Cleaning and Sealing Your Inlays
Regular cleaning is essential to avoid moisture buildup and staining. Sweep away leaves and debris weekly, as they can trap moisture that leads to discoloration. For deeper cleaning, use a garden hose, a soft brush, and a pH-neutral cleaner. If needed, a pressure washer with a fan tip can be used, but keep it at least 12 inches from the surface to avoid damaging joint sand or sealers.
The type of cleaning product matters. Avoid acidic cleaners like vinegar or muriatic acid, as they can damage natural stone surfaces such as bluestone or limestone. If white mineral deposits (efflorescence) appear, opt for a specialty efflorescence remover. For organic stains from leaves or algae, choose a masonry-approved cleaner instead of household bleach, especially on colored concrete or natural stone.
Sealing your inlays is a key step, especially in Maryland’s climate with its wet winters and humid summers. For natural stone and vertical masonry, a penetrating, breathable silane/siloxane sealer is ideal – it helps reduce moisture absorption while allowing vapor to escape, which minimizes spalling during freeze-thaw cycles. For concrete pavers, you might consider a film-forming sealer to enhance color, though penetrating sealers are often safer for vertical surfaces. Reseal every 2–5 years or when water no longer beads on the surface. Always apply sealer to a clean, completely dry surface to prevent whitening or peeling caused by trapped moisture.
Fixing Damaged Inlays
Beyond cleaning and sealing, addressing damage quickly is crucial to maintaining the wall’s integrity.
Common problems include cracks, loose inlays, efflorescence, and surface spalling. Cracks often result from freeze-thaw cycles or wall movement, while loose inlays usually point to adhesive or mortar failure due to water infiltration. Spalling on concrete or brick is often caused by de-icing salts or overly aggressive pressure washing.
For cracked or loose pieces, carefully remove the damaged unit, clean off old mortar or adhesive, and check for voids or settlement underneath. Reset the inlay using exterior-grade thin-set mortar. If you notice bulging, leaning, or large structural cracks in the wall itself, it’s time to call a professional. These issues often indicate deeper drainage or foundation problems that require more than surface-level fixes. Pro Landscapes MD can evaluate whether the problem is superficial or structural and provide solutions that address the wall’s drainage system.
Seasonal Care for Maryland Climates
Maryland’s wet winters and freeze-thaw cycles make seasonal maintenance especially important for preserving your inlays.
Before winter, inspect the wall for cracks, failing sealers, and deteriorating joints. Repair or reseal any vulnerable areas, clear away leaves and debris, and ensure weep holes and drain pipes are unobstructed to allow water to escape during snowmelt. During winter, avoid using rock salt near decorative inlays, as sodium chloride can accelerate scaling and spalling. Instead, use calcium magnesium acetate or sand. Also, never use metal tools to chip ice off inlay surfaces, as this can cause damage.
When spring arrives, inspect the wall after the last hard freeze. Check for new cracks, efflorescence, or signs of movement. Refill joint sand or touch up mortar as needed, clean organic stains with gentle methods, and trim back any vegetation growing against the wall. Plants can trap moisture and encourage moss or algae growth, which can work into the joints and compromise the inlays over time.
Conclusion: Getting the Most from Retaining Wall Inlays
A thoughtfully designed inlay can turn an ordinary retaining wall into a standout feature that ties your outdoor space together. By carrying the same stone band or color accent through patio borders, step risers, or seat walls, you create a cohesive look that enhances the overall design of your yard.
However, before focusing on aesthetics, ensure the wall is structurally sound. A wall with drainage problems or poor construction won’t support the upgrades you envision. Once the basics are solid, you can explore options like contrasting bands, accent panels, mixed materials, or intricate patterns to transform a simple wall into a stunning focal point. Beyond improving curb appeal, a well-built and visually appealing retaining wall can also increase your property’s value.
Hardscaping improvements, like retaining wall inlays, can recover 60–80% of their cost at resale. In competitive Maryland markets such as Ellicott City, Columbia, and Bethesda, a custom inlay can make your property stand out in listing photos and signal quality craftsmanship to potential buyers.
For more complex projects, such as those on sloped lots or near structures, professional expertise is crucial. Local companies like Pro Landscapes MD specialize in retaining walls, stone veneers, seat walls, and paver installations across central Maryland. Their understanding of the area’s unique conditions ensures a durable and attractive result. As one satisfied client shared:
"They came through with everything promised. I love the stacked stones we placed around our trees and flowerbed."
To get started, evaluate your wall’s condition, gather design ideas that complement your home’s style, and establish a realistic budget for materials, labor, and maintenance. Scheduling a site visit with a hardscaping expert is the first step toward turning your vision into a plan that works perfectly for your property.
FAQs
Do inlays weaken a retaining wall?
Decorative inlays do not compromise the strength of a retaining wall when designed and installed correctly by professionals such as Pro Landscapes MD. By using top-notch materials and proven techniques, they ensure the wall remains sturdy and long-lasting. Their dedication to quality craftsmanship guarantees that your retaining wall stays both structurally sound and visually attractive, adding beauty to your outdoor space without sacrificing durability.
What inlay materials hold up best in Maryland winters?
For retaining wall inlays that can handle the tough Maryland winters, using long-lasting materials is key. Pro Landscapes MD suggests options like Techo-Bloc, Allen Block, El Dorado Stone, and Nickel Block. Additionally, natural stone, brick, and concrete blocks are solid choices. These materials provide the strength and durability needed to endure harsh weather while keeping the design both practical and visually appealing.
How much do retaining wall inlays add to total cost?
The price of retaining wall inlays can differ greatly because Pro Landscapes MD tailors every project to match your specific landscape and design preferences. For a precise quote that considers the materials and the complexity of your project, reach out to Pro Landscapes MD to share your ideas and needs.
Chat with Us