









- bhavya gada
- No Comments
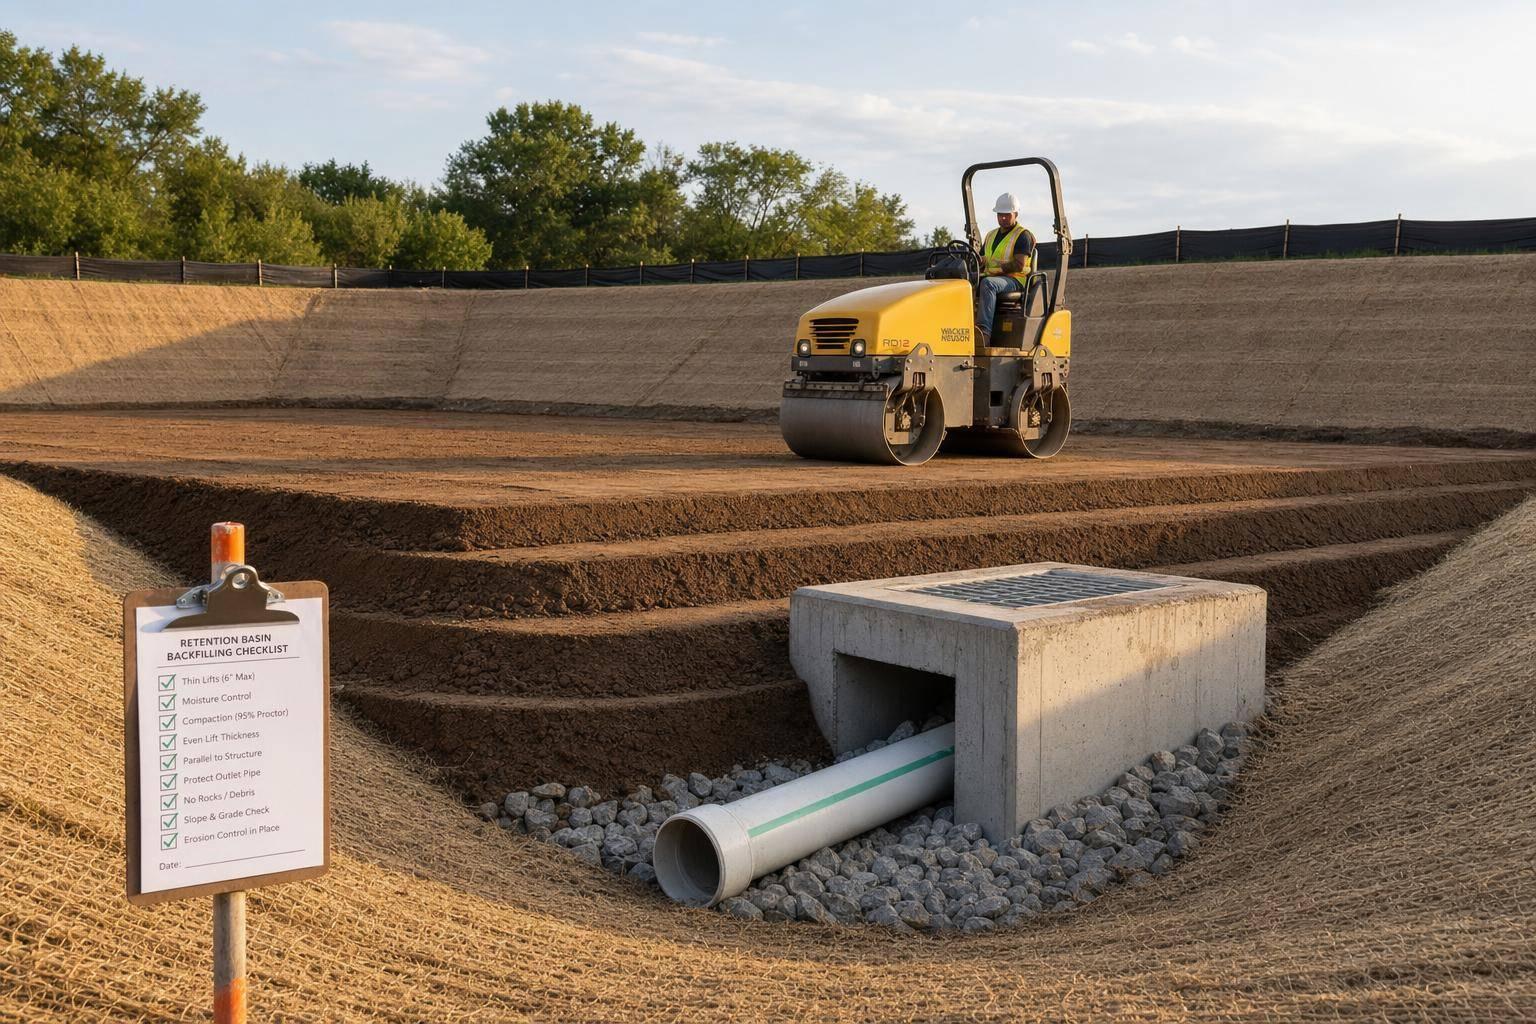
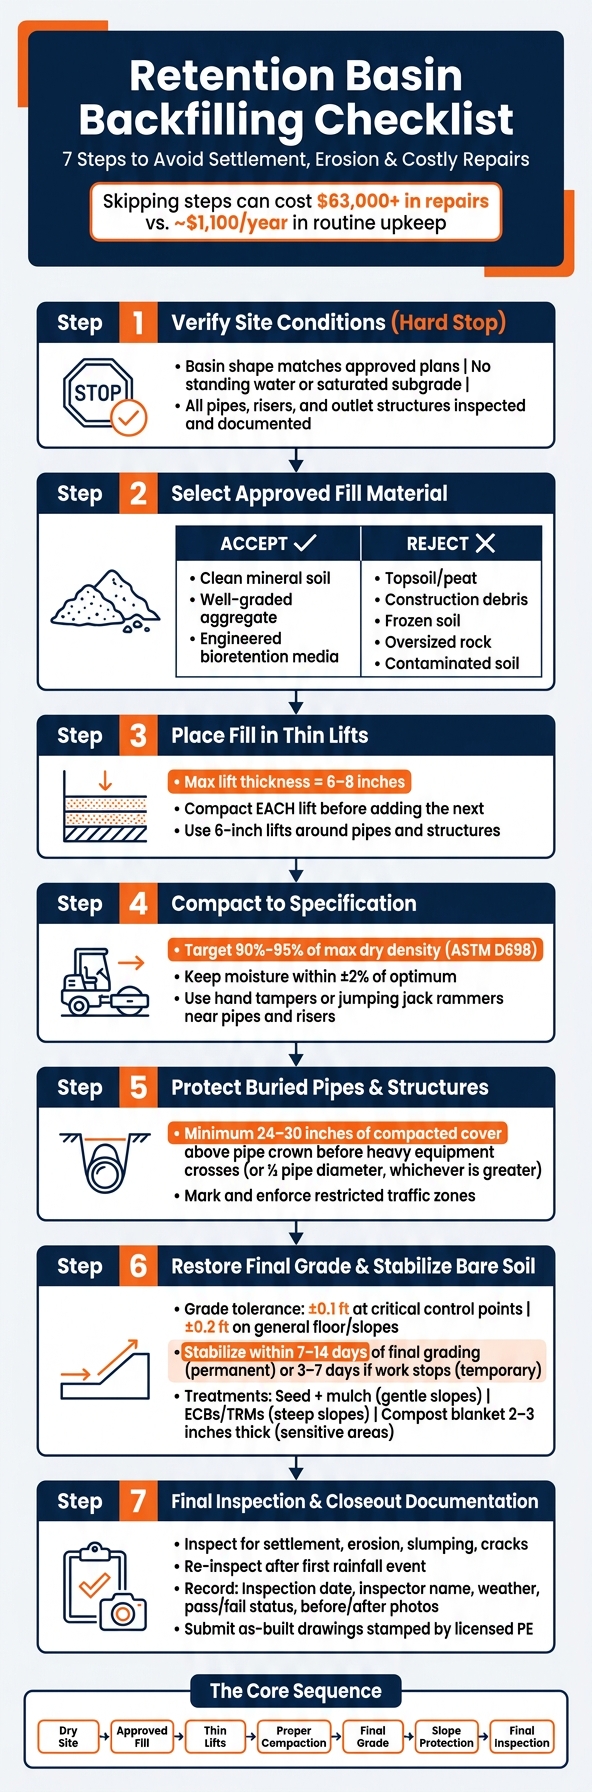
Bad backfilling can turn a working basin into a repair job. If you want to avoid settlement, erosion, pipe damage, and drainage problems, the job comes down to a short list: check site conditions first, use the right fill, place it in thin lifts, compact each layer, protect buried structures, restore grade, stabilize bare soil fast, and document the final work.
Here’s the short version of what I’d verify before calling the job done:
- Stop before backfilling if the basin is off-grade, wet, soft, or missing structure checks
- Use only approved clean fill and reject debris, organics, frozen soil, and polluted material
- Place fill in lifts no thicker than 6 to 8 inches and compact each lift
- Target 90% to 95% compaction for berms and structural fill under ASTM D698
- Keep heavy equipment off shallow pipe cover until you have at least 24 to 30 inches of compacted cover, or half the pipe diameter
- Hold finish grade tightly at control points, often within ±0.1 ft
- Stabilize bare soil within 7 to 14 days after final grading, and sooner if work stops
- Inspect again after rain, because dry-weather checks can miss washouts and settlement
- Keep records with photos, pass/fail notes, inspection dates, and as-built data
A few numbers in this checklist stand out. Major basin BMP repairs average about $63,000 per case, while routine yearly upkeep runs about $1,100. That gap shows why backfill work needs close attention.
If I were using this in the field, I’d treat it like a step-by-step control list: dry site, approved fill, thin lifts, proper compaction, final grade, slope protection, final inspection. That’s the core of the article in plain terms.
Retention Basin Backfilling Checklist: 7 Steps to Prevent Costly Repairs
Backfilling The Catch Basin And Placing Rip Rap
sbb-itb-843f8be
1. Verify Site Conditions Before Placing Any Backfill
Treat this as a hard stop. If the plans, drainage setup, or structure inspections don’t match the design, don’t backfill. These checks protect the basin’s shape, storage volume, and outlet performance. Once the site clears this checkpoint, you can move to approved fill and controlled placement.
Confirm Basin Shape, Grades, and Structure Locations
Walk the basin and compare field conditions to the approved stormwater plans. Check the footprint, side slopes, embankment dimensions, inlet and outlet locations, and finished elevations. Make sure the basin geometry didn’t drift during excavation and that all structures are where the drawings show them.[3][7][9]
If something is off, flag it, document it, and fix it before backfilling. That includes issues like the wrong bench width, the wrong crest elevation, or over-excavation. If field changes are needed, coordinate them with the design engineer and get approval first.
Confirm the Basin Is Dewatered and the Subgrade Is Stable
The basin floor and side slopes must be free of standing water, saturated muck, and soft slurry before backfill starts. A simple field check works well here: walk the basin floor and slopes and watch for sheen, seepage, or soft spots that compress underfoot. If the ground pumps or deforms under foot traffic or light equipment – with rutting, smearing, or displacement – the subgrade is not ready.
Dewatering discharge needs control too. Water pumped from the basin should be passed through sediment control before discharge, using filter bags, sediment basins, or vegetated buffers.[11][6] Skip that step, and you may end up in conflict with state and federal stormwater rules. Only cover buried structures after the basin is dry and the subgrade is stable.
Inspect Pipes, Risers, and Outlet Structures Before Burial
Inspect pipes, risers, anti-seep collars, outlet structures, trash racks, and filter diaphragms before placing cover. Confirm that each part is installed, aligned, and connected as the design requires, including the correct material, size, wall thickness, joints, and orientation.[4][5][8][10]
Check joints and connections for damage, gaps, or misalignment. Pay close attention to improper slope, offset joints, incomplete connections, and risers that don’t match the design elevation. NRCS standards require anti-seep collars to lengthen the seepage path along the pipe by at least 15%, so collar placement and spacing are not small details.[4][8][10] Document the condition now so the next backfill step starts with a clean field record.
After these checks pass, move to approved fill selection and lift placement.
2. Select and Place Backfill Material Correctly
After the site passes the pre-backfill checks, fill quality and placement control how the basin performs.
Use Only Approved, Clean Fill Material
Once the basin is dry and inspected, the next step is checking the fill itself. Use clean mineral soil or the specified structural fill, and keep out roots, debris, organic matter, frozen clods, and oversized rock. Every load should protect storage volume, slope stability, and outlet performance. If it falls short, reject it.
Accept:
- Clean mineral soil or structural fill that meets project specs
- Well-graded fill verified by lab testing for gradation, plasticity, and contamination limits
- Clean, uniformly graded aggregate such as No. 57 stone where specified for drainage zones
- On-site soils that meet compaction, plasticity, and contamination limits in the geotechnical report
- Engineered bioretention media that meets stormwater manual gradation requirements
Reject:
- Topsoil, peat, or high-organic soils in structural zones
- Construction debris such as brick, concrete, rebar, or asphalt
- Frozen soil clods or ice that will thaw and leave voids
- Rocks larger than the specified maximum size
- Petroleum-contaminated or otherwise polluted soils
Place Soil in Thin Lifts and Compact Each Layer Before Adding the Next
Once approved fill is on site, placement matters just as much as the material. To limit settlement and protect buried structures, place embankment fill in lifts no more than 8 inches thick, and compact each lift before adding the next.[3] Missouri detention pond guidance calls for 6- to 8-inch lifts, with each lift compacted using equipment that achieves uniform density.[1]
Why does this matter? Thin lifts let compaction equipment densify the full depth of each layer instead of just the top surface. For structural fills and basin berms, target 90% to 95% of maximum dry density under ASTM D698 testing.[16][17][18] Around pipes and outlet structures, use 6-inch lifts of fine, easy-to-compact material and smaller equipment such as small plate compactors, jumping jack rammers, or hand tampers.[12][13][15]
Keep Heavy Equipment Away From Sensitive Areas
Buried pipes and outlets need protection before heavy equipment moves in. Dozers, loaders, and haul trucks can crack pipes, shift joints, and damage outlet structures if the soil cover is too shallow. Maintain at least 24 to 30 inches of compacted cover above the pipe crown, or half the pipe diameter, whichever is greater, before letting heavy equipment cross.[13][14]
Near risers, outlet boxes, underdrains, and headwalls, switch to hand tampers, jumping jack compactors, or small vibratory plates.[12][13][15] Compact evenly around these structures. Don’t shove soil hard against one side, because that can crack or move the structure.[3][12][13] Mark restricted traffic zones until cover depth is confirmed, and keep the area closed to traffic until the required cover is in place.
3. Check Compaction, Final Grading, and Surface Stabilization
Compact Carefully Around Pipes and Control Structures
After each lift is placed, check support around buried structures before you move into final grading. Look closely at buried pipes, risers, and outlet structures to make sure they have full support. Each pipe needs even support on both sides up to the springline, and compaction passes should alternate so loading stays balanced.
Moisture should stay within about 2% of optimum. If you see voids under pipe haunches, depressions over a pipe run, or a riser that looks even a little out of plumb, stop right there and excavate. Don’t compact over it and hope for the best. Also make sure pipe-zone compaction meets project specs. [24][12][28]
Restore Final Grades and Remove Erosion-Prone Areas
Once compaction checks out, fine grading brings the basin back to the approved design elevations. Survey the finished grades against the approved plan. At critical control points – like basin floor low points, inlet and outlet inverts, and overflow weirs – hold to a tolerance of ±0.1 ft. General basin floor areas and side slopes usually allow ±0.2 ft, unless the project specs call for tighter limits. [22][23]
Before finishing grading, walk the full disturbed area. Look for tire ruts, low spots outside the planned pool area, and sharp grade breaks at the toe of slopes or near access points. Those small flaws can channel runoff and start gullies fast. Re-grade and smooth those areas, compact any fill you add, and make sure water drains cleanly toward inlets and outlet structures. There shouldn’t be reverse slopes or flat spots that could leave standing water. [22][25]
Stabilize Bare Soil Right After Backfilling
Once final grades are set, stabilize bare soil before the next rain. In many U.S. stormwater programs, permanent stabilization is required within 7–14 days of final grading. If work stops, temporary stabilization may be required in as little as 3–7 days. Start with the spots most likely to wash out first: side slopes, inlets, spillways, and outfalls. [26][27]
A few common treatments:
- Gentle basin floor slopes: Seed with fertilizer and mulch – such as straw, wood fiber, or hydromulch – over properly prepared soil.
- Steeper side slopes or channels: Install erosion control blankets (ECBs) or turf reinforcement mats (TRMs). Anchor them at the top in an anchor trench 6–12 inches deep and wide, and overlap upslope sections over downslope sections by at least 3–6 inches. [20][21]
- Highly erodible or water-quality-sensitive areas: Apply compost blankets 2–3 inches thick for immediate 100% ground cover. This improves erosion resistance and stormwater quality compared with straw mulch alone. [19]
Washington County, Maryland’s stormwater ordinance explicitly requires verification of "permanent stabilization of basin floor, side slopes, and berm" as part of stormwater management inspections. [2]
4. Complete the Final Inspection and Closeout Steps
Inspect for Settlement, Erosion, and Damage
Once stabilization is done, inspect the basin before sign-off. Check for settlement, erosion, and structural damage. That means looking for depressions, soft spots, slumped slopes, and cracks in embankments or concrete structures. Also check the inlet and outlet parts closely. Risers, orifices, weirs, and trash racks should be clear, lined up, and free of damage. [35][37][39]
Then do the walkthrough again after the first rainfall event. Dry weather can hide problems. Even a light rain can expose drainage issues, erosion rills, or settlement around buried structures that you may not catch otherwise. [29][32]
Confirm As-Built Conditions and Record Any Corrections
Survey the finished basin against the approved design and document any deviations and corrections. Confirm that the basin bottom elevations, embankment crest, emergency spillway, and pipe inverts match the plan. [30][33][36]
Your record should include:
- Inspection date
- Inspector name and qualifications
- Weather conditions
- Pass/fail status
- Photos of deficiencies before and after correction
Many jurisdictions also require certified as-built drawings stamped by a licensed professional engineer, plus an as-built certification statement, to close out the permit. [36][38]
Before final sign-off, make sure the responsible party gets the as-built plans, inspection records, and a recommended maintenance schedule. Annual inspections and post-storm reviews are commonly recommended under stormwater permit programs. The closeout record then serves as the baseline for future checks. [31][34][40]
Conclusion: Key Steps That Prevent Rework
Each part of this checklist supports the next. Start by confirming dry, stable conditions. Use only approved fill. Place and compact it in lifts. Protect pipes and control structures. Restore final grades. Stabilize bare soil right away. Then document the whole job before turnover.
Skip one step, and the problems tend to show up fast: settlement around pipes, erosion on side slopes, or a basin that does not drain the way it was meant to.
Pro Landscapes MD can handle final grading, stabilization, and post-construction corrections for central Maryland retention basin projects.
FAQs
What happens if a basin is backfilled while the subgrade is still wet or soft?
Backfilling a retention basin over a wet or soft subgrade can weaken the basin and lead to structural trouble.
If parts of the subgrade are soft or too wet, they should be undercut and replaced with compacted soil rather than gravel. Contractors should also use pumps and sumps to keep the excavation dry, which helps reduce the risk of structural damage and long-term maintenance problems.
How do I know if a fill material is approved for basin backfilling?
Check that the fill material matches the specs in your project’s approved plans and contract documents. That includes the required soil classification and material properties. Also make sure the site has been cleared of organic matter and other harmful debris before any fill goes in.
To confirm approval, review supplier certifications, save invoices and delivery tickets, and check with the Engineer-in-Charge or a qualified geotechnical engineer. They can verify that the material meets Maryland NRCS MD-378 or any project-specific requirements.
What should be checked after the first rain following backfilling?
After the first rain, inspect the retention basin for erosion at the inlets, outlets, side slopes, and wetlands. Look for rills, gullies, or signs that runoff is starting to cut channels through the basin.
Also make sure the basin is draining the way it should within 48 hours. While you’re there, check overflow inlets, pipes, and underdrains for any blockages, sediment, or debris.
Chat with Us