









- bhavya gada
- No Comments
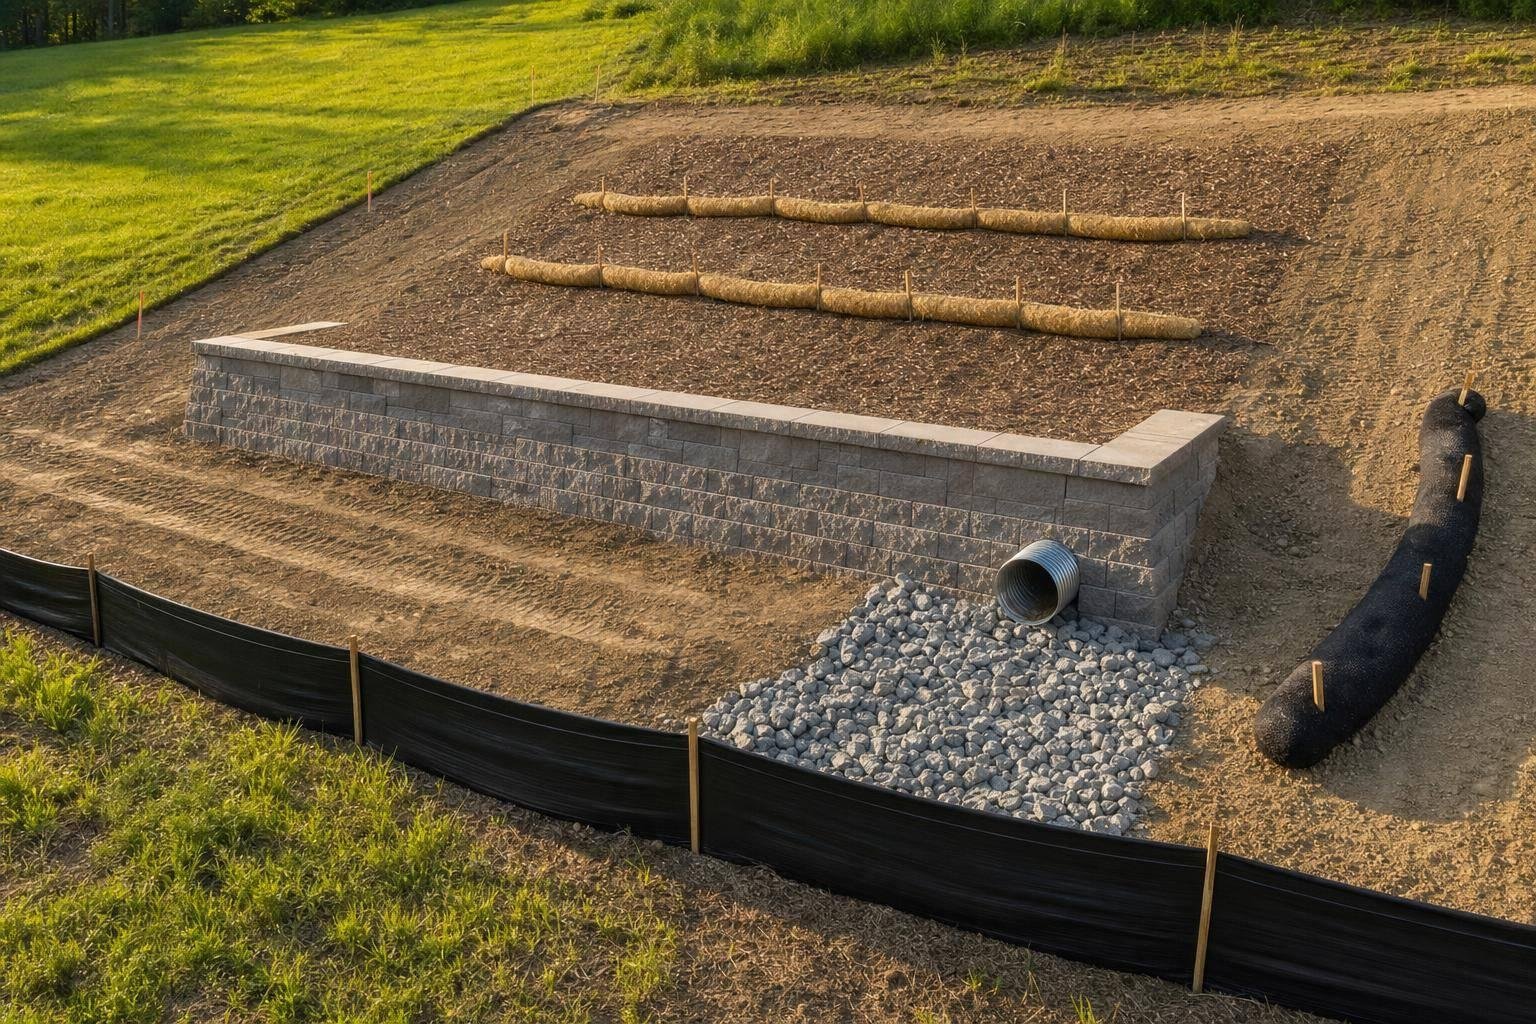
If you’re building a retaining wall, the best sediment barrier depends on where the water flows. For most wall jobs, silt fence or compost socks fit perimeter runoff, straw wattles and mulch berms help on slopes, and rock filters belong where water has already gathered into a channel.
I’d boil the whole article down like this:
- Use silt fence at the downslope edge for small sheet-flow areas
- Use wattles on contour to break up runoff on backfilled slopes
- Use mulch berms for light sheet flow on gentler grades
- Use compost socks where the ground is uneven or the wall line curves
- Use rock filters at low points, swales, or outlets where flow is concentrated
- Inspect after storms and clean out sediment when it reaches about one-third to one-half of barrier height
- In Maryland, jobs disturbing 5,000 sq. ft. or moving 100 cubic yards of soil may need a formal plan
The main point is simple: no single barrier works everywhere. You need one setup for perimeter flow, another for slopes, and another for outlets. A barrier that works on shallow sheet flow can fail fast once water starts acting like a small stream.
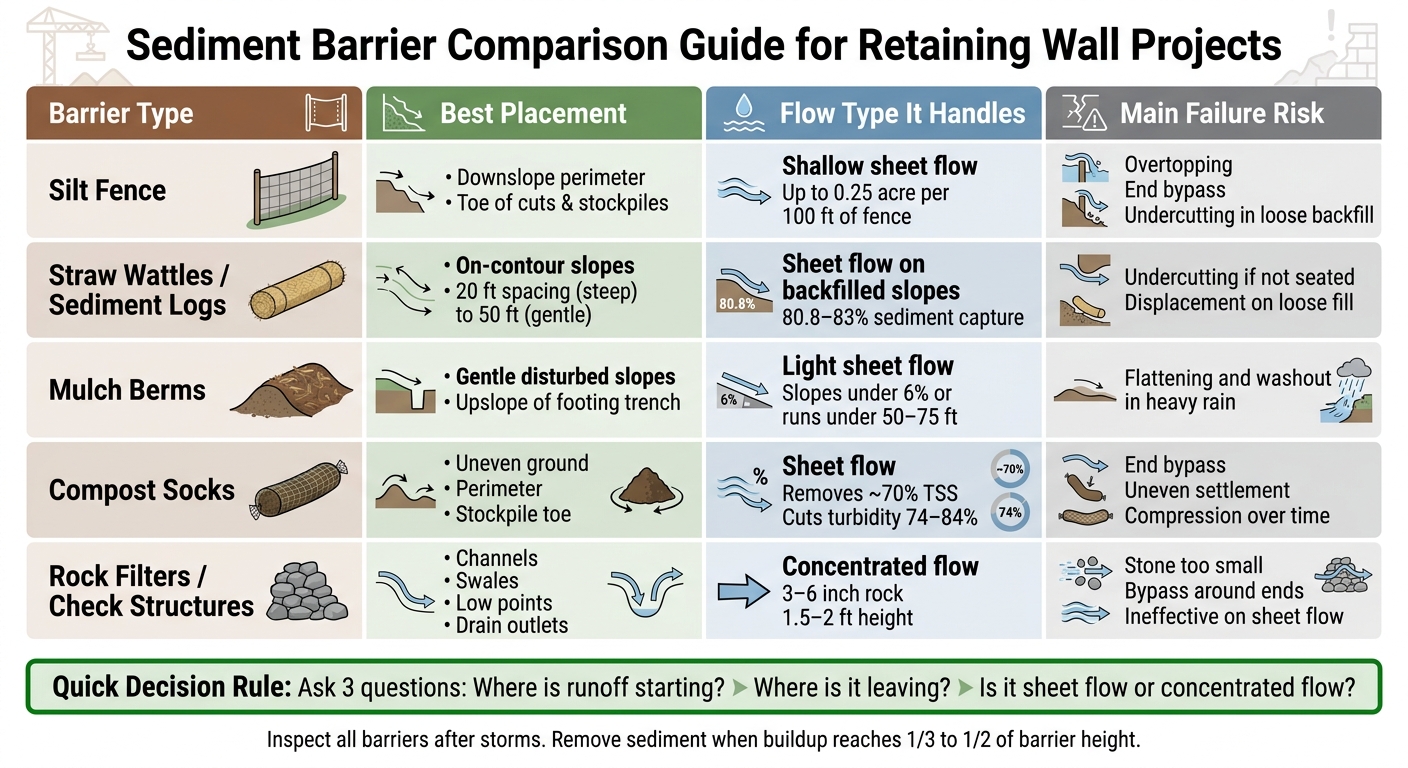
Sediment Barrier Comparison Guide for Retaining Wall Projects
Purpose of a Silt Screen for Retaining Walls and Landscaping
sbb-itb-843f8be
Quick Comparison
| Barrier | Best spot | Best for | Main weak point |
|---|---|---|---|
| Silt fence | Downslope edge | Small sheet flow | Fails when flow concentrates |
| Straw wattles | On-contour slopes | Breaking slope length | Undercutting if not seated well |
| Mulch berms | Gentle disturbed slopes | Light runoff | Washout in heavy rain |
| Compost socks | Uneven ground, perimeter | Filtering and ponding | End bypass and settling |
| Rock filters | Channels, swales, outlets | Concentrated flow | Poor at trapping fine sediment |
If I were sizing up a wall project fast, I’d ask just three questions: Where is runoff starting? Where is it leaving? And is it sheet flow or concentrated flow? Those answers usually point to the right barrier setup right away.
1. Silt Fence
Silt fence is one of the most common temporary sediment barriers on residential job sites. It uses filter fabric stretched on posts to slow sheet flow and trap sediment in the water that ponds behind the fence.[9][8]
Control Point Fit
On retaining wall projects, silt fence works as a downslope control at excavation areas, backfill zones, and lower property lines. Put it along the downslope edge of footing excavation, around stockpiles, and at the lower property line or near an inlet. It performs best when the drainage area is small – about 0.25 acre per 100 feet of fence – and when runoff shows up as shallow sheet flow, not a concentrated stream.[3][6]
This is why short runs at specific control points usually work better than one long continuous line.
Always turn the fence ends upslope in a J-hook or U-shape so water can’t slip around the sides.[5][6] And run the fence along the contour, not straight up and down the slope.[6][5][1]
Runoff Handling
With silt fence, installation is where things usually go right – or go sideways fast. Bury the fabric 6–12 inches, compact soil against the uphill side, and drive posts 18–24 inches into undisturbed soil with spacing no more than 6 feet apart.[6][7]
When installed the right way, silt fences can remove about 36% to 86% of suspended solids.[8] That said, fine clay particles are tougher to hold back, so some can still pass through.
Backfill Protection
During backfilling, place silt fence along the downslope face of the backfill zone to slow sheet flow and keep fines out of drainage gravel and pipe.[6] It can also help keep mud off finished wall faces, patios, and walkways.
Storm Maintenance
Inspect silt fence weekly and after every major rain event.[6][4] Remove built-up sediment when it reaches about one-third of the fence height.[4][2]
After heavy storms, check the ends first. That’s usually where bypass flow starts. If overtopping or undercutting keeps happening, shrink the drainage area with another short segment or pair the fence with a rock check.
Where runoff concentrates instead of moving as sheet flow, a different barrier is usually a better fit.
2. Straw Wattles / Sediment Logs
Where silt fence feels too stiff or the run gets too long, wattles can do the job better. Straw wattles, also called fiber rolls or sediment logs, are mesh tubes filled with straw or fiber. They slow shallow sheet flow, hold back sediment, and work well as small check barriers on disturbed slopes.[21]
Control Point Fit
Install wattles on contour and perpendicular to flow, never downhill.[16][20] A simple way to think about it: they should interrupt runoff, not guide it.
Place them uphill of footing trenches so runoff gets stopped before it reaches the excavation. Below the wall, run a wattle along the downslope edge of the disturbed area to catch fines before they wash onto driveways, sidewalks, or into storm drains. Wattles tend to work best on shorter slope segments, uneven ground, and areas where runoff needs to be interrupted again and again. If the slope is long, use multiple rows for staged control.[20]
For spacing, use about:
- 50 feet on gentle grades
- 30 feet on moderate slopes
- 20 feet on steep slopes
- 10 feet on very steep slopes [12][13]
Turn the ends upslope in a U-shape to help stop water from slipping around the sides.[15][20]
Runoff Handling
Installation quality makes a big difference here. Dig a shallow trench 2 to 5 inches deep, set the wattle into the trench, and compact the excavated soil firmly against the upslope side.[11][18] When wattles are installed the right way, studies found they captured about 80.8% to 83% of sediment.[14][19]
Backfill Protection
Along the top and toe of a backfilled slope, wattles help cut down on rilling and keep fines out of drainage stone, gravel, and planting beds.[15][20][22] Before staking, clear away rocks and clods so the wattle sits flush against the ground with no gaps.[17][18]
Storm Maintenance
Inspect wattles after each 0.5-inch rain event within 24 hours.[16] Clear out sediment when deposits reach about one-third to one-half of the wattle height. Also check for undercutting, overtopping, displaced stakes, and torn mesh casing. Replace wattles that have lost their cylindrical shape or show heavy casing damage.[16]
When runoff starts spreading more broadly across the site, mulch berms offer a different level of control.
3. Mulch Berms / Slash Mulch Berms
Mulch berms work best during footing excavation and early backfill, especially where runoff moves as sheet flow. A slash mulch berm uses coarser woody material from clearing and grubbing, so it tends to hold its shape better than finer mulch during light-to-moderate rain. In plain terms, it has a bit more backbone. That makes it a good fit where runoff is broad, shallow, and still easy to slow down.
Control Point Fit
Place mulch berms upslope of the footing trench so they intercept runoff before it reaches exposed soil. At the downslope edge, they help shield driveways, lawns, drains, and neighboring properties. Run them along the contour so water spreads out instead of bunching into a faster stream.
They fit best where flow is dispersed sheet flow on mild-to-moderate slopes, not in concentrated channels. Once water starts acting more like a small stream than a thin sheet, this control loses a lot of its edge. On slopes steeper than 6% or longer than 50 to 75 feet, use more than one berm down the slope to break up flow and cut velocity.[24]
Runoff Handling
Mulch berms can handle light sheet flow and small storm events fairly well when they are properly sized, continuous, and maintained. They slow water by adding surface roughness and creating a shallow barrier, which helps sediment settle close to the disturbed area.
Studies show mulch berms can retain most sediment in light-to-moderate storms when they are properly sized and maintained. Performance drops on steep slopes, in concentrated flow, or when the material is loose or too fine. On wall projects, this matters most before backfill is compacted and bare soil is still exposed.
Backfill Protection
A berm placed upslope of the backfill zone can cut down the amount of sediment-laden water that washes into exposed backfill while the wall is being built and compacted.[23][25] That matters because sediment can clog drainage stone and the interfaces behind the wall.
Mulch berms do their best work here as a support measure, not a stand-alone fix. Pair them with good construction sequencing, such as:
- Keeping excavation open for as little time as possible
- Covering stockpiles
- Restoring final grading soon after wall installation
Their value also depends on fast cleanup after each storm.
Storm Maintenance
After each rain, rebuild flattened sections and remove sediment buildup so the berm is ready for the next storm. Check for overtopping, breakage, and any sections moved by wind or equipment. If part of the berm is compromised, shore it up before the next rain hits.
4. Compost Socks
Compost socks, also called filter socks, are mesh tubes filled with compost. Crews set them perpendicular to flow to slow runoff and filter sediment before it leaves disturbed soil. They’re a good fit when a wall line curves or the ground is rough and uneven.
Control Point Fit
Compost socks do their best work on shallow sheet flow. Put them along the downhill edge of footing excavation, around soil stockpiles, and at the edge of temporary work zones. The big upside is simple: they bend with the site and sit well on uneven ground without deep trenching.
Set them at least 5 feet from the toe of the slope or wall face. That gap gives water room to pond and drop sediment before it moves farther downslope. Turn the ends upslope to cut bypass flow. On steeper grades, use more than one row – one near the top, one mid-slope, and one near the toe – so runoff slows down in steps.
Runoff Handling
Compost socks slow runoff and trap sediment as water moves through them. Tests show 12-inch and 18-inch socks can remove about 70% of total suspended solids and cut turbidity by 74% to 84%.[27][26]
There’s a catch, though. Once flow gathers into a rill or small channel, a compost sock loses much of its effect. Match the sock diameter to the flow you expect – 8 to 12 inches is common for residential sites – and stay within the recommended capacity of about 4 to 10 gallons per minute per linear foot to help prevent overtopping.[28]
Backfill Protection
During backfill, loose material can wash out fast. A compost sock along the downhill side of the work area or near the wall toe can catch sediment before it moves off-site.
Storm Maintenance
After rain, check for flattening, undercutting, tears, and end bypass. Remove sediment buildup when deposits get heavy enough to reduce how well the sock works. If a sock has shifted, been overtopped, or buried, move it back into place or add another control before the next storm. If runoff starts concentrating into channels, rock filters and check structures are a better fit.
5. Rock Filters / Check Structures
When runoff stops moving as sheet flow and starts to gather into a channel, rock filters step in. They’re used in temporary swales, construction ditches, and drainage channels where water is already concentrated. On a retaining wall site, that usually means the lowest edge of the work area, where sediment-heavy runoff could otherwise head toward a storm drain or spill onto nearby property.
Control Point Fit
Use these structures at the downhill edge of the work zone, where runoff collects before it leaves the site. Good spots include toe-of-slope locations, trench outfalls, and other downhill discharge points. The goal is simple: slow the water down, cut gully erosion, and help shield downslope property. Most standards limit their use to small drainage areas, often about 10 acres or less.[30][31]
Runoff Handling
A well-built check structure slows water velocity, creates a small pool upstream, and lets flow pass through and over the rock. Set the center crest about 6 inches lower than the sides so water stays in the armored middle instead of slipping around the edges.[32][34][35][36]
Typical construction details include:
Place nonwoven geotextile fabric under the stone, and key the rock into the bed and banks. That helps stop undercutting and bypass flow, which matters even more when bare-soil channels form during active excavation.[29][31][32][34][36]
There’s one catch: rock filters don’t do much for fine sediment. Their main job is to slow flow and keep gullies from forming, not to trap small particles. For that reason, they work best as part of a layered setup with upstream erosion controls and downstream sediment traps.
Backfill Protection
After backfill, place rock checks where runoff leaves the disturbed area so they can intercept fines before those materials reach storm drains or nearby properties. Pairing them with a stabilized outlet or a vegetated swale adds another level of protection.
Storm Maintenance
Inspect rock check structures at least every 7 days during active construction and within 24 hours after any rain event of 0.5 inches or more.[33][35][37] Check for:
- displaced stone
- scour around the edges
- debris buildup
- undercutting at the base
Remove sediment once it reaches one-third to one-half of the dam height. After that, the structure loses storage space, and overtopping becomes more likely.[30][32][33][35]
How Each Barrier Performs at Key Control Points
The best way to compare these barriers is to look at where the runoff actually goes: above the cut, at the trench, below the wall, and at outlet points.
Start with flow direction. Silt fence and mulch berms work best on the downslope side. Wattles can break up flow when they’re set on contour. Compost socks can work upslope or downslope of the work zone. Rock filters belong only where runoff is already concentrated.
At the footing trench, wattles and compost socks give you more room for error. They handle shifting flow better. Silt fence tends to struggle once runoff starts to concentrate, and rock filters should sit farther downslope instead of at the trench itself.
Once backfill is in place, the priorities change. Keep barriers outside the drain zone and focus on the toe of the wall. Inside the drainage system, protect the wall drain with clean gravel and filter fabric. Silt fence should go downslope of the wall toe. Compost socks can help filter discharge near daylighted outlets. Loose mulch berms should stay well away from gravel backfill and drain openings.
The matrix below pulls those differences into a fast field check.
| Barrier Type | Control Point Fit | Runoff Handling | Backfill Protection | Storm Maintenance |
|---|---|---|---|---|
| Silt Fence | Downslope perimeter; toe of cuts and stockpiles | Ponds sheet flow; weakens where flow concentrates | Place downslope of wall toe; keep away from gravel backfill | Inspect after storms; remove sediment before it reaches about half the fence height [7] |
| Straw Wattles / Sediment Logs | Upslope flow interrupter and downslope perimeter; 20–30 ft spacing on contour [38] | Slows flow and creates small ponds; most effective on contour | Use at the toe of slopes above drain outlets; do not bury in backfill | Check stakes and J-hooks after storms; remove sediment when it reaches about half the wattle height [38] |
| Mulch Berms | Built on the contour; downslope of disturbed areas | Works best on gentle slopes and lighter runoff | Keep away from gravel backfill and drain outlets | Re-shape and add fresh mulch after storms; less reliable on steep lots |
| Compost Socks | Upslope or downslope perimeter; stockpile toe; pavement edges | Filters and ponds; effective on either side of the work zone | Place near drain outlets as a peripheral filter; keep a few inches away from the outlet opening | Remove sediment when it reaches about half the sock height; patch torn mesh and clear blockages [39] |
| Rock Filters / Check Structures | Downslope channels and swales; low points below cuts | Slows concentrated flow; not effective against fine sediment | Best at daylighted drain outlets; rock aprons help disperse flow | Inspect after storms; shovel sediment from the upstream basin and reset displaced rock |
Post-storm maintenance stays pretty similar across all barrier types: inspect soon after storms, remove built-up sediment before it reaches about half the barrier height, and fix any undermining or shifted material before the next storm [7]. Those differences set up the pros-and-cons comparison in the next section.
Pros and Cons of Each Barrier Type
Each barrier has a lane where it works well, and a lane where it falls apart. The tradeoff is pretty simple: pick the barrier that fits the flow path, slope, and outlet.
On retaining wall jobs, that usually comes down to a few on-site questions. Can the barrier handle runoff from uphill excavation? Will it control downhill perimeter flow? Can it stay in place around backfill? And after a storm, is cleanup going to be easy or a total mess?
Silt fence tends to fail when water starts to concentrate. Once that happens, it may overtop, let water slip around the ends, undercut if the trench is too shallow, or pull out in loose backfill behind a new wall. It also should not be used as a ditch check or in channels and swales.[10][42][43]
Straw wattles and sediment logs work well for breaking up slope length and slowing runoff on freshly backfilled slopes. But this is one of those details that can’t be done halfway. If the trench seating is skipped or the uphill side isn’t tamped, water can cut underneath the tube or roll the wattle downhill. On the loose, uncompacted fill common behind a new wall, stakes need to be long and driven in firmly.
Mulch berms are simple to shape around uneven contours, which makes them handy on awkward sites. The catch is that, without containment like netting, stakes, or some kind of backing, they flatten, come apart, and wash out in heavy rain. They’re best as a support measure on gentler slopes, not as the only downhill perimeter barrier on a steep or saturated site.[43]
Compost socks sit well on uneven ground and filter through the full sock instead of only across a fabric face. They can work on contour or as perimeter control. Their weak spot is usually end bypass. On soft backfill, heavier socks can settle unevenly and create low spots where overtopping starts. Replace socks when they’ve compressed below 80% of their original height.[30]
Rock filters and check structures make sense where flow is concentrated, like swales, drainage channels, and wall drain outlets. They are not a good fit for sheet-flow perimeter control. The two failure points that show up most often are stone that’s too small for the flow and ends that aren’t keyed into stable banks.[41][43]
The table below condenses those differences.
| Barrier Type | Best Use | Main Failure Modes |
|---|---|---|
| Silt fence | Downhill perimeter; small sheet-flow areas | Overtopping, bypass at ends, undercutting, post failure in loose backfill |
| Straw wattles / sediment logs | Contour lines on newly backfilled slopes | Rilling beneath wattle, bypass at gaps, displacement on loose fill |
| Mulch berms | Gentle slopes; secondary perimeter control | Flattening and scatter in heavy rain; limited strength |
| Compost socks | Perimeter and contour-line use on uneven ground | Bypass at ends, uneven settlement, compression over time |
| Rock filters / check structures | Concentrated flow in channels and swales | Bypass around ends, stone too small for the flow, ineffective on sheet flow |
Conclusion
The choice usually comes down to three things: perimeter, slope, and outlet.
For perimeter sheet flow, silt fence and compost socks are usually the best starting point. On slopes, straw wattles and mulch berms help slow runoff. And where flow starts to concentrate near excavation areas or outlets, rock filters and check structures make more sense.
Mulch berms and straw wattles usually need the most reshaping after storms. Silt fence needs sediment cleared out before buildup reaches one-third to one-half of the fence height.[44][2][40][45] Compost socks and rock controls usually need less repair, but they still need debris checks after heavy rain.
No single barrier works for every retaining wall site. On bigger or steeper jobs, it often makes sense to use layered controls: perimeter capture, contour slowing, and excavation interception. The site’s slope and drainage area will tell you how much layering the job needs.
For retaining wall and garden wall projects in central Maryland, Pro Landscapes MD can coordinate wall construction, grading, drainage, and sediment control from the start.
FAQs
How do I tell if runoff is sheet flow or concentrated flow?
Watch how water moves across the site when it rains. Sheet flow moves in a thin, even layer across a broad surface, without forming a clear path.
Concentrated flow gathers into a visible channel, like a ditch, gully, or swale. If you map low spots and natural drainage paths, it becomes much easier to see which pattern is happening.
Can I use more than one sediment barrier on the same wall project?
Yes. On more involved retaining wall jobs, using more than one sediment barrier is standard practice for erosion control.
You can combine systems like silt fences, berms, swales, and rock check dams to control water flow and trap sediment at different points across the site. The key is proper sequencing and overlap, so runoff doesn’t slip past one measure and bypass the next. That setup also helps support compliance with local stormwater rules.
When do retaining wall jobs in Maryland need a sediment control plan?
In Maryland, you need a sediment control plan for projects that disturb 5,000 square feet or more or move more than 100 cubic yards of soil.
That rule can kick in sooner than many people expect. Even a mid-sized grading or excavation job may cross the line.
A permit is also required for work in sensitive areas, including wetlands, floodplains, watercourses, or the Chesapeake Bay Critical Area, no matter the size of the project.
Because rules can change from one county to the next, check with your local permitting office or Soil Conservation District early. A quick call up front can save time, paperwork, and headaches later.
Chat with Us