


- bhavya gada
- No Comments
If water leaves a hardscape job carrying mud, sand, or mulch, the site plan failed. I’d boil this whole topic down to four moves: plan drainage early, limit exposed soil, install controls before digging, and keep checking them after storms.
For a homeowner or property manager, that means looking at slopes, runoff paths, drain inlets, and bare soil before work starts. It also means using the right mix of tools: silt fence, inlet protection, check dams, sediment traps, vegetated strips, stone swales, and permeable pavers with pretreatment. In Maryland, projects that disturb more than 5,000 sq. ft. or move more than 100 cubic yards of soil need an approved erosion and sediment control plan before work begins.
Here’s the short version:
- Hard surfaces increase runoff because water cannot soak in.
- Sediment control deals with soil after it starts moving.
- Erosion control helps keep soil from breaking loose in the first place.
- Perimeter controls must go in first, not after excavation starts.
- Vegetated strips work best with sheet flow, about 20 feet of length, and slopes under 5%.
- Permeable pavers clog fast if runoff brings in fines, so pretreatment matters.
- Storm checks and seasonal cleanup keep the system working over time.
- Sediment should be removed early – for example, at about 25% of silt fence height or 50% of trap/storage depth, depending on the control.
A hardscape project does not just need to look clean on day one. It needs to move water the right way for years. That’s the point of good sediment control.
Sediment Control 101 – Best Management Practices & Solutions
sbb-itb-843f8be
Plan the Site to Keep Sediment on the Property
Start with a preconstruction walkthrough. Map where runoff travels, where soil is exposed, and where water leaves the site. Then use that map to place grading, swales, and pretreatment areas before excavation starts.
Check Slopes, Soil Conditions, and Downhill Drainage Paths
Walk the property during rain or right after it. Watch for standing water, fast-moving flow, and the spots where runoff leaves the site. Pay close attention to storm drain inlets, swales between homes, low areas near foundations, and fence lines that push water toward nearby lots. This matters even more on suburban lots in central Maryland, where drainage corridors can be tight.
Soil matters just as much as slope. Clay-heavy soil can shed water fast once equipment compacts it. Loose or newly disturbed soil can wash away even on mild grades. If you see rills, muddy patches, or bare subsoil, treat that area as a problem spot before digging starts.
Slope is the main driver of runoff speed and sediment movement. The steeper the grade, the more force water has to break soil loose and carry it downhill. Trace the natural flow path from the work area to the nearest stable outlet, then plan how to intercept that flow before it runs across bare ground.
Use Grading, Swales, and Pretreatment Areas to Slow and Filter Runoff
Finish grades should move water gently toward stable collection points, not send it across exposed soil. Broad, shallow sheet flow across lawn or planted areas is much easier to filter than concentrated flow carving a channel through bare ground.
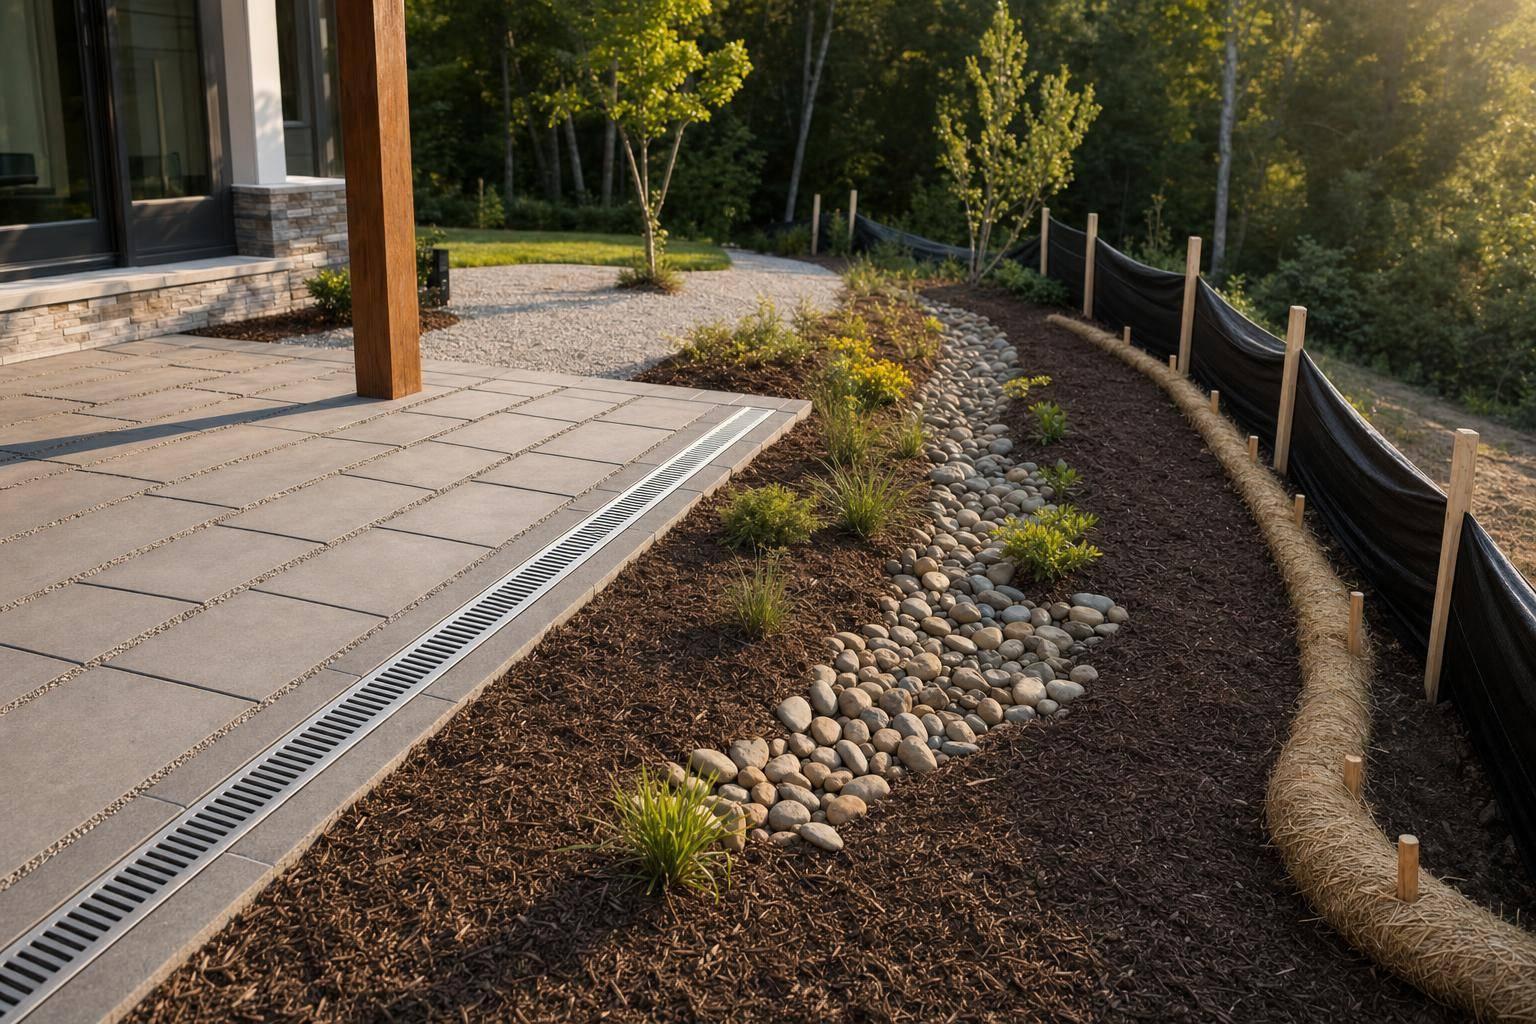
Vegetated filter strips along driveway and patio edges can slow sheet flow and trap sediment before water reaches a drain or leaves the site. For the strip to work well, it should be at least 20 ft long, the slope should stay under about 5%, and runoff should enter as even sheet flow instead of a concentrated stream.[4][5] A 3–6 inch drop from the hardscape edge to the filter strip surface helps reduce flow energy and gives sediment time to settle before water moves farther downslope.[3]
If a vegetated strip won’t fit, use a stone forebay. This small stone pretreatment area can catch heavier particles before water enters a drain inlet or permeable pavement base. That takes pressure off downstream systems and helps them last longer.
Limit Disturbance and Coordinate Drainage Features from the Start
Keep the disturbed area as small as possible, and phase the work so only one section is open at a time. Plan the hardscape layout, grading, and drainage as one system. That way, swales and grade breaks intercept runoff instead of sending it across bare soil.
Good planning up front also makes perimeter controls easier to install once excavation begins.
Sediment Controls to Use During Construction
Once the site plan is set and drainage paths are mapped, install physical controls before excavation starts.
Install Perimeter Controls Before Excavation and Grading
With the drainage plan in place, put controls in before the first dig. Start with perimeter controls so disturbed soil stays on site. If excavation begins before barriers are up, the first storm can wash sediment off the property.[6][16]
Silt fence is one of the most common perimeter controls. Place it along the contour below the disturbed area. Trench the fabric 6 to 8 inches into the ground and backfill it so water can’t run underneath. Put posts on the downhill side, space them no more than about 6 feet apart, and turn the ends upslope so runoff doesn’t slip around the fence.[6][17] Silt fence works for sheet flow, not concentrated runoff.
If the site drains toward a street or curb, use curb inlet protection around nearby storm drain grates. That slows water and traps sediment before it enters the inlet.[11][13] Each device should drain no more than about 1 acre so it doesn’t get overloaded.[18] Clear out built-up sediment after each significant rain. If water is still standing after 24 hours, clean or replace the filter.[15]
Slow Concentrated Flow with Check Dams, Rock Bags, and Sediment Traps
When runoff can’t stay as sheet flow, slow it down before it picks up speed. Temporary swales and channels that carry concentrated runoff around the work zone should have check dams. These small barriers can be made from rock bags, gravel bags, sandbags, or fiber rolls. Set them perpendicular to the flow to slow water and help sediment settle out.[7][9][14]
Space the dams so the toe of the upstream dam is about level with the crest of the next dam downstream. That setup helps keep water from cutting around patios, driveways, and retaining walls.
A shallow sediment trap at a low point can hold runoff for a short time, let sediment drop out, and release water in a controlled way. Remove sediment when the basin is about half full, stockpile it behind perimeter controls, and restore the depth so the trap keeps working through the rest of the job.[6][7][9]
Protect Permeable Pavement Bases and Maintain Controls After Storms
Permeable areas need extra care because sediment can reduce infiltration fast. Permeable pavers rely on clean, open-graded stone voids to let water pass through. Once those voids clog with sediment, infiltration is hard to restore.[2][19]
Keep the permeable pavement area fenced or clearly marked so muddy runoff and soil stockpiles stay away from the bed. Also avoid driving or parking equipment on the placed aggregate base. Heavy loads can crush the stone and push fines into the voids.[8][10][12] That protection helps the system keep working after construction wraps up.
After each significant rain, inspect the full site. Check silt fence for undercutting, torn fabric, and loose posts. Remove sediment buildup when it reaches about 25% of the fence height.[15] After each significant rain, inspect controls, clear buildup, and record repairs.
Permanent Sediment-Control Features to Build Into the Hardscape
Temporary vs. Permanent Sediment Control Features for Hardscaping
Temporary controls handle sediment during construction. After the site is stable, the finished hardscape needs to do that work for the long haul.
These permanent features are built into the site itself. They help manage runoff and sediment long after construction wraps up, taking over where temporary controls stop.
Permeable Pavers, Pervious Surfaces, and the Pretreatment They Require
Permeable pavers use open-joint pavers set over clean aggregate and an open-graded stone base that stores water until it soaks in or drains away.[27]
The big issue is clogging. That’s why the drainage area feeding the pavement has to stay under control. A good rule is to keep the contributing area to no more than about 2 times the pavement area, or up to 5 times the pavement area if the incoming runoff carries little sediment and pretreatment is in place.[27]
That pretreatment can be simple. A 2- to 5-foot-wide strip of dense turf or native groundcover along the upslope edge helps slow water and drop out coarse particles before they reach the pavers.[19][22] A shallow grass swale that intercepts roof and lawn runoff can do the same job. It also helps to pair permeable pavement with grading, drain pipes, or French drains so runoff has a safe place to go.
Vegetated Strips, Bioretention Edges, and Stone Swales Beside Patios and Driveways
A narrow planted border along the downslope edge of a patio or driveway can slow sheet flow and trap sediment right at the hardscape edge.[21][5] For a simple filter strip, dense turf-forming grasses or groundcovers tend to work well. The goal is to keep flow slow enough that sediment settles before runoff leaves the strip.
If you have a bit more room, a shallow bioretention edge can do more. These areas sit about 6 to 12 inches below the nearby hardscape and can take sheet flow straight from a patio or driveway.[23] Think of them like rain garden-style beds: mulch on top, engineered soil below, and deep-rooted native plants doing the filtering. They help trap finer particles too. For Maryland homeowners, Mid-Atlantic native sedges, grasses, and flowering perennials fit these edges well.[21][23]
Stone swales and dry creek beds help move runoff from hardscape edges to a stable discharge point without letting water chew through nearby soil.[26][29] A stone-lined channel beside a driveway or patio can keep concentrated flow from cutting into bare ground. The rough stone also slows water enough to let some sediment settle out. If you pair stone swales with planted areas or check-stone segments, they can hold onto even more sediment.
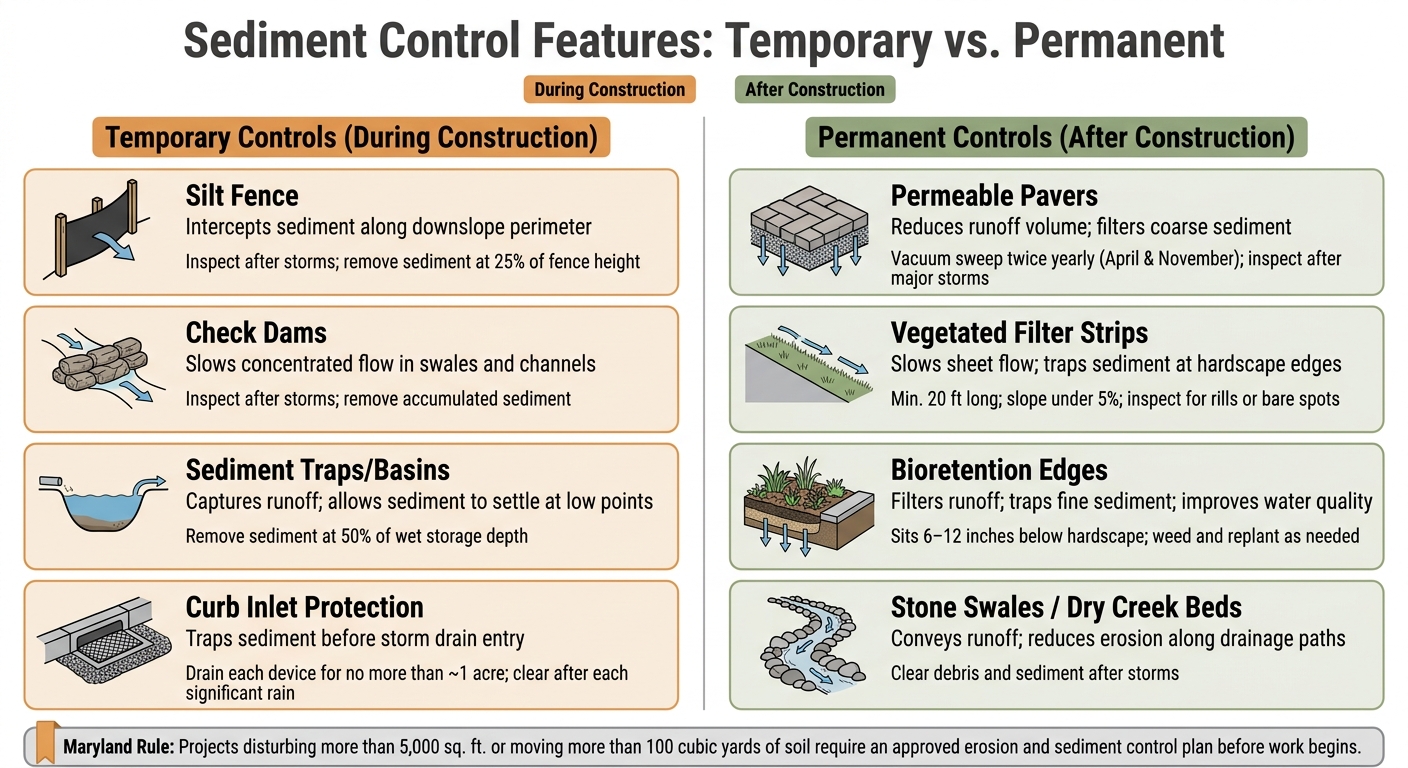
Temporary Controls vs. Permanent Sediment-Control Measures: Comparison Table
Use the table below to match each feature to its role in the finished system.
| Feature | Primary Function | Typical Placement | Maintenance Needs | Best Use on Residential Sites |
|---|---|---|---|---|
| Silt fence | Intercept and retain sediment from disturbed soil | Downslope perimeter of active construction areas | Inspect after storms; remove when stable[20][17] | Construction phase only |
| Check dams | Slow concentrated flow in swales and channels | Temporary swales and drainage channels during earthwork | Inspect after storms; remove accumulated sediment[19][2] | Construction phase only |
| Sediment traps/basins | Capture and hold runoff; allow sediment to settle | Low points on site during construction | Remove sediment at about 50% of wet storage depth[24] | Construction phase only |
| Permeable pavers | Reduce runoff volume; filter coarse sediment through aggregate layers | Driveways, patios, walkways | Sweep periodically; vacuum or power wash joints; inspect after major storms[1][27] | Promoted under Maryland’s ESD stormwater program[25][28] |
| Vegetated filter strips | Slow sheet flow; trap sediment at hardscape edges | Downslope of patios, driveways, and walkways | Inspect for rills or bare spots; replant as needed[30][31] | Effective for residential lots with limited space[21][5] |
| Dry riverbeds / stone swales | Convey runoff; reduce erosion along drainage paths | Alongside driveways, patios, or between hardscape and lawn | Clear debris and sediment after storms[26][29] | Doubles as a landscape feature[26][29] |
| Bioretention edges | Filter runoff; trap fine sediment; improve water quality | Linear beds along downslope hardscape margins | Weed and replant as needed; remove excess sediment from mulch surface[23][28] | Part of Maryland’s ESD toolbox for residential sites[28] |
After installation, these features still need routine checks. Sediment removal and basic upkeep are what keep them doing their job.
How to Maintain Sediment-Control Performance Over Time
Sediment control doesn’t stop when construction ends. Once the hardscape is in place, maintenance is what keeps drainage features working the way they should. Permeable pavers, stone swales, filter strips, inlets, and forebays all need routine care to keep infiltration working, flow moving in the right direction, and surfaces stable.
Inspect Surfaces, Swales, Inlets, and Forebays After Storms and Each Season
Inspect the site after major storms and once each season. In Maryland, it also helps to watch closely after fall leaf drop, winter grit, snowmelt, and heavy summer storms.
Storms tend to show the first signs of trouble. They make clogging, erosion, and ponding easier to spot. After a storm, check for:
- Standing water or ponding on permeable pavers
- Buildup in swales, filter strips, or forebays
- Debris blocking drain inlets
- Washed-out edges near patios, retaining walls, or walkway borders
- Bare soil or rills where runoff is starting to cut channels
Check again after freeze-thaw periods. That’s often when small drainage issues start to turn into bigger ones.
Remove Accumulated Sediment and Restore Infiltration Before Problems Spread
If you see any of those warning signs, clean and restore the system right away. The goal is to act before sediment shifts the drainage path. A small problem is much easier to fix before it clogs the base or sends water somewhere it shouldn’t go.
For permeable pavers, use vacuum sweeping equipment made for permeable surfaces. The equipment needs to pull sediment out of the voids, not just clean the top. Vacuum twice a year, often in April and November.[34] Early cleaning helps preserve infiltration before clogging hardens.[32]
For forebays and sediment sumps, remove deposits before they reach 50% of storage capacity.[33] For swales, put the original grade back after sediment removal so the channel can carry flow at its designed capacity. If bare spots or rills keep showing up in the same place, the fix usually needs to go deeper. That may mean regrading to cut down concentrated flow, adding stone protection, or replanting with denser vegetation.
Conclusion: Key Practices That Keep Hardscapes Functional and Compliant
Good sediment control comes down to a few steady habits: inspect, clean, restore, and document. Keep a simple maintenance log so repeat trouble spots get fixed at the source instead of patched over again and again. Routine upkeep also helps the site stay aligned with drainage and sediment-control rules.
If the same problem keeps coming back, the drainage design likely needs correction. Bring in help when ponding doesn’t go away, erosion returns, or sediment gets under pavers. For property owners in central Maryland, Pro Landscapes MD can help coordinate hardscaping, drainage, grading, and environmental paver systems when routine cleanup isn’t enough.
FAQs
Do I need a sediment control plan for my project?
Yes. If your project includes earth-disturbing work like construction, grading, or landscaping, Maryland law requires a sediment control plan before any soil disturbance starts.
That plan has to be developed, approved, and put in place ahead of time. It should show the site layout, drainage patterns, and the sediment control measures that will be used.
What sediment controls should be in place before excavation starts?
Before any earth disturbance starts, install a stabilized construction entrance and perimeter sediment controls like silt fencing.
These measures need to be in place before clearing, grubbing, or grading begins. The goal is simple: keep sediment-laden runoff contained so it doesn’t leave the site.
How do I keep permeable pavers from clogging with sediment?
Stop runoff before it can wash soil and debris onto the pavers. Pro Landscapes MD suggests using site controls like silt fences, vegetative buffers, and sediment basins to catch runoff before it reaches the surface.
Good grading and drainage also make a big difference. Features like French drains and dry riverbeds can steer water away from the pavers. It also helps to check these drainage areas on a regular basis and clear out sediment before it builds up.
Chat with Us