









- bhavya gada
- No Comments
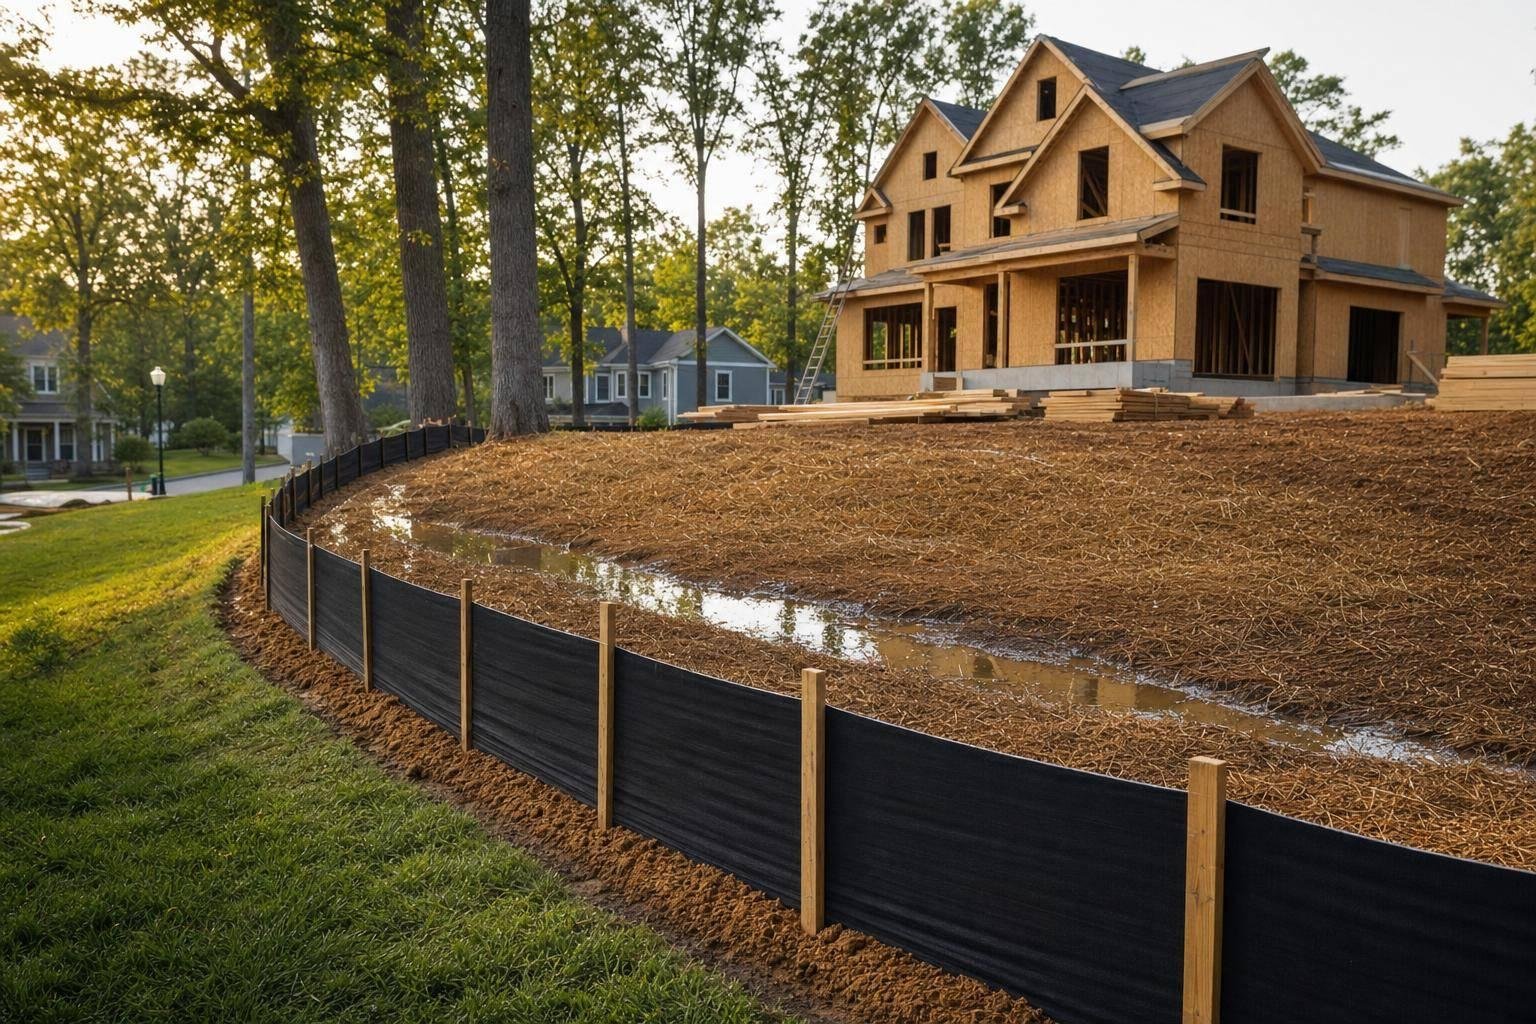
If I disturb soil on a Maryland home site, I use silt fence to keep mud and sediment from leaving the work area. It works best for sheet flow on the downhill side of patio work, grading, planting beds, drainage trenches, driveway jobs, and slope repairs. It does not belong in swales, ditches, trench bottoms, or storm drain inlets.
Here’s the short version:
- Use it downhill of bare soil and stockpiles
- Install it on contour, not just along a property line
- Bury the bottom about 8 inches
- Turn the ends upslope to stop runoff from going around
- Keep drainage small: about 1/4 acre per 100 feet of fence
- Stabilize bare soil fast: within 14 days on level ground and 7 days on steep slopes
- Clean out sediment when it reaches about 25% of fence height
- Remove the fence after the area is stabilized
For steeper ground, I may need more than just silt fence, such as mulch, seeding, blankets, wattles, or a berm. The main point is simple: match the fence to shallow runoff, not heavy concentrated flow.
| Home-site work | Where I’d use silt fence | Main watch-out |
|---|---|---|
| Patio and hardscape work | Downslope of excavation and soil piles | Don’t let runoff go around the ends |
| Grading and yard leveling | Downslope of bare soil | Seed or mulch fast after grading |
| Planting bed work | Along the lower edge near pavement or drains | Keep it out of flow paths |
| Drainage trenching | Downhill of trench spoil | Never inside a trench or swale |
| Driveway work | Along the lower disturbed edge | Keep it back from gutters and inlets |
| Slope and retaining areas | Beyond the slope toe where runoff spreads out | Drainage length drops on steeper slopes |
If I’m planning work on a Maryland lot, this gives me the basic rule set before the job starts.
Silt Fence Uses for Patios, Grading, and Planting Beds
Patio and hardscape installation
Patio, walkway, fire pit, and seat wall projects often leave bare soil exposed during excavation and base prep. Once rain hits, that loose soil can wash off-site fast.
For hardscape work, place the silt fence on the downslope edge of the excavation and any soil stockpiles. It should run parallel to the contour lines so runoff slows down and pools behind the fabric instead of spilling away from the site.[2][3] The ends of the fence line should be turned upslope in a J-hook shape to help stop water from slipping around the sides.[3]
One detail matters a lot here: the bottom edge of the fabric should be trenched, or keyed in, about 8 inches into the soil, then backfilled and compacted.[2][10]
Grading, yard leveling, and planting bed work
Regrading and yard leveling strip away turf and leave broad sections of bare soil behind. That makes runoff and sediment loss much more likely during storms.
Maryland standards say graded areas should be stabilized with seed or mulch within 14 days on level ground and within 7 days on steep slopes.[7] A silt fence set on the downslope side, with the ends extended upslope to prevent bypass, helps catch sheet flow and hold soil before it reaches nearby patios, sidewalks, or lawn areas.[2][3] Maryland guidance also limits the drainage area to about ¼ acre per 100 feet of fence.[3]
Planting beds follow the same basic setup when loosened soil sits close to hard surfaces or drainage paths.
Landscape restoration after soil disturbance
Landscape restoration after soil disturbance, like resodding over a repaired utility trench or replanting beds disturbed by waterproofing, often leaves compacted soil that erodes more easily. In these cases, silt fences work well while seed is germinating or sod is taking root, especially near sidewalks, driveways, or storm inlets.[2][3]
These jobs usually need more than a fence by itself. Straw or wood-fiber mulch, rapid seeding, and a stabilized construction entrance can cut down the amount of sediment that reaches the fence in the first place.[7]
sbb-itb-843f8be
Silt Fence Uses for Drainage Projects, Driveway Work, and Slopes
Drainage improvements and trenching work
For drainage fixes and trenching, place silt fence downhill of the trench and spoil piles so it can catch sheet flow before sediment reaches grass, sidewalks, or pavement.[1][2][3]
One thing matters a lot here: don’t put silt fence inside the trench, in a swale channel, or at a drain inlet. That’s not what it’s made for. Silt fence handles sheet flow, not concentrated flow.[3][13]
Driveway construction and widening
Driveway cuts and wider shoulders create the same basic problem: bare soil sits next to pavement, and runoff can carry that soil away fast.
Set silt fence along the downhill edge of disturbed ground and stockpiles.[5][16][17] On steeper driveways, where runoff hits harder, use super silt fence.[14][5][17] Keep the fence back from curb inlets and street gutters. Its job is to reduce the sediment load before runoff enters city drainage, not to block the flow.
Yard repair near slopes and retaining areas
Slopes and retaining wall areas tend to be the trouble spots on many home sites because water picks up speed as it moves downhill. Silt fence works best on newly cut or filled banks, replanted slopes, and backfill around retaining walls, where loose soil can move fast during rain.
Some manuals say to place silt fence at least 3 feet beyond the toe of the slope. That extra space helps water pond a bit and lowers the chance that runoff will wash under the fence.[18] Maryland guidance also puts limits on how much sheet flow should drain to one fence line: on a 10–20% slope, the maximum is 50 feet; on a 20–50% slope, it drops to 25 feet.[15]
If the slope is steep or the disturbed area is large, silt fence usually works better when paired with other erosion-control steps, such as:
- rapid seeding
- straw mulch
- a diversion berm
That combo helps hold the site in place while vegetation gets started. Still, none of it works well without proper placement, routine inspection, and removal at the right time.
How To Install Silt Fence
Maryland Installation and Compliance Basics for Homeowners
Silt Fence vs. Other Erosion Controls: Maryland Home Site Guide
Once you know where silt fence belongs, the next step is making sure it’s installed the right way. If the setup is off, the fence may not do much when runoff starts moving.
Placement, trenching, and layout basics
The big rule is simple: run the fence on the contour, not just along the property line. If you follow the slope or the lot line without thinking about water movement, runoff can go around the fence or spill over one end.[1][20][3]
Maryland design guidance also puts a limit on how much runoff each section should handle: ¼ acre of drainage area for every 100 feet of fence. If the disturbed area is bigger than that, it should be broken into shorter sections instead of using one long run. At the ends, turn the fence upslope about 45 degrees for at least 5 feet so water doesn’t sneak around the sides.[3][2][9]
The bottom edge needs to be buried in a trench, then backfilled and compacted. That step matters because it helps stop water from slipping underneath the fabric.[24][11][26]
Inspection, sediment removal, and removal timing
Silt fence isn’t something you install and ignore. Check it at least once a week while work is active and after each major rain event. Watch for ripped fabric, leaning posts, and any undermining at the base, then fix issues right away.[19][12][4]
Sediment should be removed once it builds up to about 25% of the fence height.[1][4][8]
Take the fence out only after the disturbed area is fully stabilized and any needed final inspection has been completed.[8][21][25][22][23]
How silt fences compare with other temporary controls
Silt fence works best as a linear sediment barrier below disturbed areas where runoff stays shallow and spread out. Think graded yards, planting beds, patio excavations, and other landscape projects. It’s a poor fit where water concentrates, where slopes are too steep, or where rocky soil makes trenching hard.
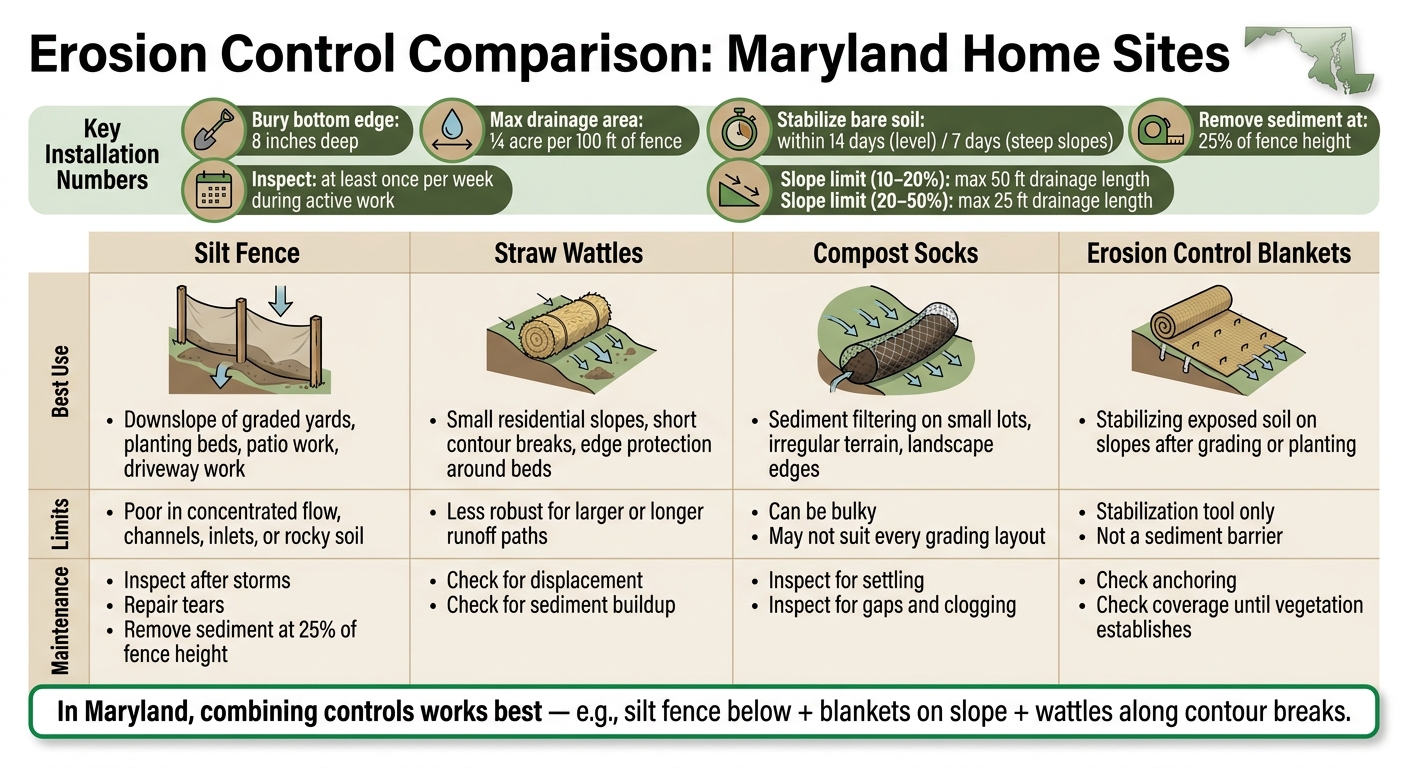
If the site makes silt fence a bad fit, the better move is to match the control to the way runoff behaves. Here’s a side-by-side look:
| Control Type | Best Residential Use | Limits | Maintenance |
|---|---|---|---|
| Silt Fence | Downslope of graded yards, planting beds, patio work, and driveway work | Poor in concentrated flow, channels, inlets, or rocky soil | Inspect after storms; repair tears; remove sediment at 25% of fence height |
| Straw Wattles | Small residential slopes, short contour breaks, and edge protection around beds | Less robust for larger or longer runoff paths | Check for displacement and sediment buildup |
| Compost Socks | Sediment filtering on small lots, irregular terrain, and landscape edges | Can be bulky; may not suit every grading layout | Inspect for settling, gaps, and clogging |
| Erosion Control Blankets | Stabilizing exposed soil on slopes after grading or planting | Stabilization tool, not a sediment barrier | Check anchoring and coverage until vegetation establishes |
In Maryland, a mix of controls often works better than leaning on just one. For example, silt fence below the work area, blankets on the slope face, and wattles along contour breaks can do a better job together.[12][6]
Conclusion: Picking the Right Silt Fence Uses for Your Maryland Home Site
The right silt fence use comes down to one thing: how water moves across the site.
On home projects, silt fences make sense when work exposes bare soil and creates sheet flow – shallow runoff that moves evenly over the ground. That can happen during patio work, grading, planting bed installation, drainage projects, driveway work, and slope repair. The project matters, but placement matters just as much.
Set the fence on contour and keep runoff within the fence’s drainage limit. That way, water can pool behind the fabric instead of slipping around it. And when the control is no longer needed, take it out promptly.
Most of all, think of silt fence for what it is: a temporary control. Its role is to protect neighboring properties, storm drains, and finished landscape elements while the site is being stabilized. Once the disturbed area is stabilized, the fence should be removed.
If you’re planning a patio, drainage project, driveway, or grading work in central Maryland, Pro Landscapes MD handles grading, drainage, hardscaping, and yard restoration across central Maryland.
FAQs
Do I need silt fence for a small home project?
Maybe not by law, if the project disturbs less than 5,000 square feet and moves under 100 cubic yards of soil.
Even so, silt fence is still a smart way to cut sediment runoff on small home-site jobs like patio work, grading, or planting beds.
Rules can still apply in sensitive areas, especially near a stream, wetland, or within the Chesapeake Bay Critical Area.
How do I know if runoff is sheet flow or concentrated flow?
Watch how water moves across your site. Sheet flow is shallow, slow-moving water that spreads across the ground. Concentrated flow starts when that water gathers in channels, ditches, gullies, or swales.
It helps to sketch your slopes and drainage paths before you install anything. That quick step can show you where runoff is spreading out and where it’s already being funneled.
If runoff is already channeled, a silt fence is not the right fit and may fail.
When should I use more than just silt fence?
A standard silt fence is usually enough for small jobs on gentle slopes.
But once you’re dealing with steeper slopes – anything over 2:1 – or larger drainage areas, silt fence alone may not cut it. In those cases, reinforced silt fence with wire mesh backing can handle more water pressure.
Some sites need a different approach altogether. Around tree roots, near inlet protection, or in rocky or compacted soils, compost filter socks can be a better fit.
And in places with high flow or runoff that keeps coming, silt fence is often used alongside other controls, such as:
- Berms
- Swales
- French drains
- Rock check dams
Chat with Us