









- bhavya gada
- No Comments
If your Maryland lawn or garden looks weak even after fertilizer, I’d check soil pH first. In many parts of Maryland, soil runs acidic, and that can block nutrient uptake even when nutrients are in the soil. A basic lab soil test usually costs $11–$30 plus shipping, and for most yards, fall is the best time to test and make pH changes before spring.
Here’s the short version:
- Most Maryland lawns do best around pH 5.8–6.4
- Vegetables and most ornamentals fit best in pH 5.5–7.0
- Azaleas, rhododendrons, and blueberries prefer pH 4.5–5.5
- Lab tests give the best starting point and can include buffer pH, which helps show how much lime to use
- Home kits, strips, and meters are fine for rough checks, but not for big soil changes
- I’d sample each yard zone separately because a lawn, shrub bed, and garden bed can test very differently
- For sampling, collect 10–12 cores per zone, with 4 inches depth for turf and 6–8 inches for beds
- Maryland law says you need a soil test from the last 3 years before using a lawn fertilizer that contains phosphorus
- If lime is needed on a lawn, don’t apply more than 50 pounds per 1,000 square feet in one application
If I wanted one simple rule, it would be this: use a lab test for your baseline, then use home tools only for spot checks.
| Test option | Best for | What you get |
|---|---|---|
| Lab test | First test, lawn fixes, garden changes, Maryland phosphorus rule | pH, buffer pH, nutrients, and lime guidance |
| Home chemical kit | Rough check between lab tests | Current pH only |
| Test strips | Fast small-area check | Current pH only |
| Digital meter | Repeat checks in the same bed or container | Current pH, with mixed accuracy |
Below, I break down the pH ranges, test types, sampling steps, result ranges, and the main Maryland rules in plain language.
Soil Testing
sbb-itb-843f8be
Choose the Right Soil pH Test Method
Not every soil pH test tells you the same story. Some give you a rough read. Others give you the kind of detail you need before you change a lawn, rebuild a bed, or fix a problem area.
The best method depends on what you’re trying to do. If you just want to check an established bed, a home tool may be enough. But if you need a baseline before a big lawn or garden project, a lab test is the better place to start. That matters because lawns, beds, and borders often differ from one zone to the next.
For a first reading, start with the most precise option. After that, use faster tools for spot checks.
Lab Testing for Accurate Baseline Results
For a baseline reading, a professional soil lab is the most reliable option. As the University of Maryland Extension puts it:
"Soil testing labs provide more complete and accurate results than do-it-yourself soil test kits." [1]
Labs also measure buffer pH, which helps show how much lime your soil needs, especially in clay-heavy soil. [2]
You also get more than a simple pH number. Lab reports include phosphorus, potassium, calcium, magnesium, and organic matter content. Home pH-only tests don’t give you that data. [1] In Maryland, the rules matter too: state law requires a soil test within three years before applying any fertilizers that contain phosphorus to a lawn. [3]
Stick with a reputable regional soil lab that reports pH, buffer pH, and nutrient levels. Using the same lab each time helps keep your results comparable. [1]
Home Kits, Test Strips, and Digital Meters
Home kits, strips, and meters are fine for quick checks, not major soil changes. [1]
If all you need is a fast read, these tools can tell you whether a bed is leaning acidic or alkaline. Here’s how the main options compare:
| Test Method | Typical Cost (USD) | Accuracy | Data Provided | Best Use Case for Maryland Yards |
|---|---|---|---|---|
| Professional Lab Test | $11–$30+ (plus shipping) [1] | High | pH, Buffer pH, P, K, Ca, Mg, OM%, lime/fertilizer recommendations [1][2] | New lawns, garden renovations, and meeting MD Fertilizer Law requirements [1][3] |
| Home Test Kits (Chemical) | $10–$20 | Low to Moderate | Current pH only; sometimes N-P-K estimates | Approximate checks on established beds between lab tests |
| Test Strips | $5–$15 | Low | Current pH only | Quick, rough spot-checks of acidity in small areas |
| Digital pH Meters | $20–$100+ | Inconsistent | Current pH; sometimes moisture or light | Frequent monitoring of specific garden beds or containers |
Use a lab test when you’re making big corrections. Save home tools for quick spot checks.
How to Collect Soil Samples Correctly
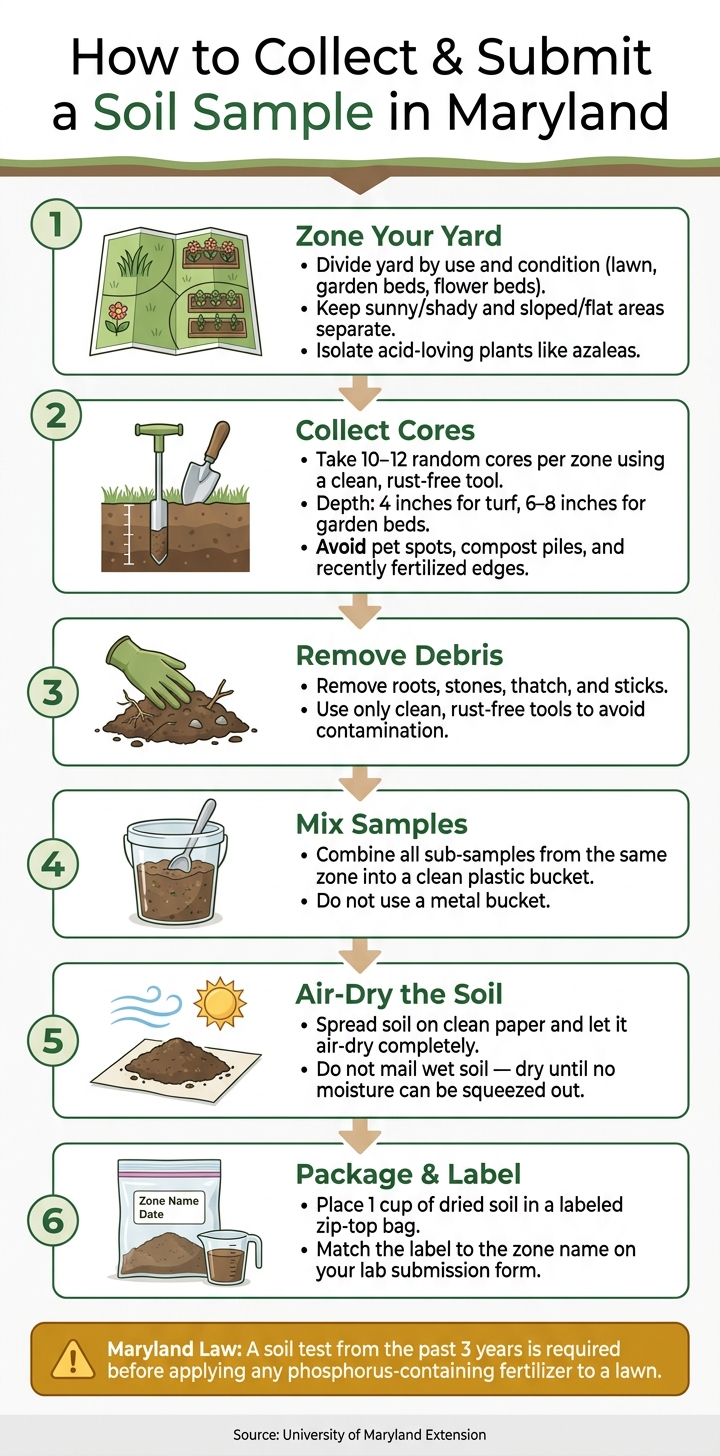
How to Collect & Submit a Soil Sample in Maryland (Step-by-Step)
Once you’ve picked a test method, the next job is simple but easy to mess up: collect samples by zone. If you mix soil from very different parts of the yard, the lab result can turn into a blurry average instead of something you can use.
Divide the Yard into Zones and Sample at the Correct Depth
Take separate samples for areas that serve different purposes, like the front yard, back yard, vegetable garden, and flower beds. You should also split up areas with different growing conditions, such as sunny vs. shady spots or sloped vs. flat ground.
Keep acid-loving plants in their own zone so they don’t throw off results for the rest of the yard.
Skip pet spots, compost piles, and recently fertilized edges. Sample turf to 4 inches deep and beds to 6–8 inches deep. [1][3]
If a raised bed is made up of more than 50% added organic matter, such as compost or peat, treat it as a soilless growing medium and request a saturated media extract instead of a standard soil test. [4]
Mix, Dry, and Label Samples Before Submission
From each zone, collect 10–12 random cores or slices with a clean, rust-free trowel, spade, or soil probe. Put them together in a clean plastic bucket, then remove roots, stones, thatch, sticks, and other debris before mixing. [1][3]
Let the soil air-dry on clean paper before mailing it. Dry it until no moisture can be squeezed out. [1]
Here’s the process at a glance:
| Step | Action | Depth | Maryland-Specific Notes |
|---|---|---|---|
| 1. Zone | Divide the yard by use and condition. | N/A | Separate front, back, garden, and flower-bed areas; keep sunny/shady or sloped/flat spots separate. [1][3] |
| 2. Collect | Take 10–12 random cores or slices per zone with a clean, rust-free tool. | 4 inches (turf) / 6–8 inches (beds) | Avoid pet spots, compost piles, and recently fertilized edges. [1][3] |
| 3. Clean | Remove roots, stones, thatch, sticks, and other debris. | N/A | Use clean, rust-free tools to avoid contamination. [1][3] |
| 4. Mix | Combine sub-samples in a clean plastic bucket. | N/A | Do not use a metal bucket. [1] |
| 5. Dry | Air-dry the soil on clean paper. | N/A | Do not mail wet soil; air-dry until no moisture can be squeezed out. [1] |
| 6. Package & Label | Place 1 cup of dried soil in a labeled zip-top bag. | N/A | Match the label to the zone name on your lab submission form. [1] |
One more Maryland rule matters here: state law requires a soil test from the past three years before applying any fertilizer that contains phosphorus to a lawn. [1][3]
Run the Test and Read the Results
Steps for Using Home Kits, Strips, and Meters
Once your samples are dry and labeled, you’re ready to check pH.
Here’s the big thing to know: lab tests are still the better option because they come with lime and nutrient guidance. Home kits, strips, and meters are more of a quick check.
Also, use distilled water only. Tap water can throw off the reading.
| Method | Tools Needed | Basic Steps | Time Required | Reliability |
|---|---|---|---|---|
| Chemical Kit | Reagent capsules, test chamber, distilled water | Mix soil and distilled water in the vial, add the reagent capsule, let the color develop, and compare it to the chart | 5–10 mins | Low to Medium |
| Test Strips | pH strips, distilled water, clean container | Create a 1:1 soil-to-distilled-water slurry, dip the strip, wait for the color change, and match it to the scale | 3–5 mins | Low |
| Digital Meter | Meter probe, cleaning cloth or sandpaper | Calibrate the meter before first use, insert the probe into slightly moist soil or a soil-water slurry, and wait for the reading to stabilize | 1–2 mins | Medium |
Digital meters are fast, but they need a little care. Clean the probe well after each use to help prevent corrosion. [1]
How to Classify Your Results: Too Acidic, In Range, or Too Alkaline
Read each number by the zone you sampled, not by the whole yard. One area can be fine while another is off, so don’t lump everything together.
For most Maryland lawns, vegetables, and ornamentals, the target range is 5.5 to 7.0. Acid-loving plants like azaleas, rhododendrons, and blueberries do better at 4.5 to 5.5.
| Measured pH | Recommended Range (Maryland) | Action | Retest Interval |
|---|---|---|---|
| Below 5.5 | 5.5–7.0 (Lawns/Veggies) | Too Acidic: Apply lime in split applications; never exceed 50 lbs per 1,000 sq ft at once. | 1–2 seasons |
| 5.5–7.0 | 5.5–7.0 (Lawns/Veggies) | In Range: Maintain organic matter. | 3 years |
| 7.1–7.6 | 5.5–7.0 (Lawns/Veggies) | Slightly Alkaline: Add elemental sulfur or iron sulfate if needed. | 2–3 years |
| Above 7.6 | 5.5–7.0 (Lawns/Veggies) | Too Alkaline: Apply elemental sulfur or iron sulfate. | 1–2 seasons |
| 4.5–5.5 | 4.5–5.5 (Acid-loving plants) | In Range: Maintain with acidic organic matter such as pine needle mulch. | 3 years |
Use that result to plan lime or sulfur before next season’s test.
If your soil needs lime, don’t dump it all on at once. Jon Traunfeld, Extension Specialist at the University of Maryland, puts it plainly:
"Don’t spread more than 50 pounds of lime per 1,000 square feet on a lawn in a single application." [2]
If your soil needs more than that, split the application and test again later. For a new bed you’re tilling, you can mix in up to 70 lbs per 1,000 sq ft directly into the soil. [2]
When the soil reads above 7.6, use elemental sulfur or iron sulfate. Skip aluminum sulfate, since it can become toxic to plants as pH drops. [2]
Conclusion: Putting Your Soil pH Results to Work
Treat each zone’s pH as its own result. One part of your yard doesn’t speak for another. After you get the numbers, use them to decide if that zone needs an amendment, a retest, or no change at all.
Most Maryland lawns, vegetable gardens, and ornamentals do best in a pH range of 5.5 to 7.0. Azaleas, rhododendrons, and blueberries do best at 4.5 to 5.5 [2]. If a zone falls outside its target range, adjust the soil pH for that area only. Before making major lime or sulfur changes, get a lab test [1][2]. Basic lab tests usually cost $11 to $30 [1].
There’s also a legal point to keep in mind. Maryland law requires a soil test from the last three years before you apply any phosphorus-containing fertilizer to a lawn [3].
For fall correction, split large lime applications instead of putting it all down at once. Testing in fall gives the soil time to adjust before spring planting [1]. If you need more than 50 pounds per 1,000 square feet, apply the lime in two rounds, six months apart [2].
FAQs
How often should I test my yard’s soil pH?
Test soil pH every 3 to 4 years for established lawns, landscape plants, and perennial gardens. For vegetable gardens, test every 3 years.
You should also test before a major landscaping project or before starting a new lawn. Fall is the best time to do it because amendments like lime or compost need time to work into the soil before spring planting. If you’re dealing with a problem area, more frequent testing may make sense.
What if different parts of my yard have different pH levels?
Take separate soil samples from each part of your yard that acts differently. If one spot gets full sun, another stays shady, or a section sits on a slope, sample them on their own. The front yard, back yard, and vegetable garden should each be treated as separate sampling zones.
Label every sample clearly so you get recommendations for the right area. That way, you can apply lime or other soil amendments only where they’re needed.
How long does lime or sulfur take to change soil pH?
Changing soil pH takes time. It doesn’t happen overnight.
How long it takes depends on your soil. But in many cases, applying lime or sulfur in the fall works well because it gives the material time to react before spring planting.
If your soil needs a lot of lime, don’t dump it all on at once. It’s often better to split the total recommended amount into two applications spaced about 6 months apart. That approach helps the lime move through the soil more evenly and can reduce sharp pH jumps.
Chat with Us