


- bhavya gada
- No Comments
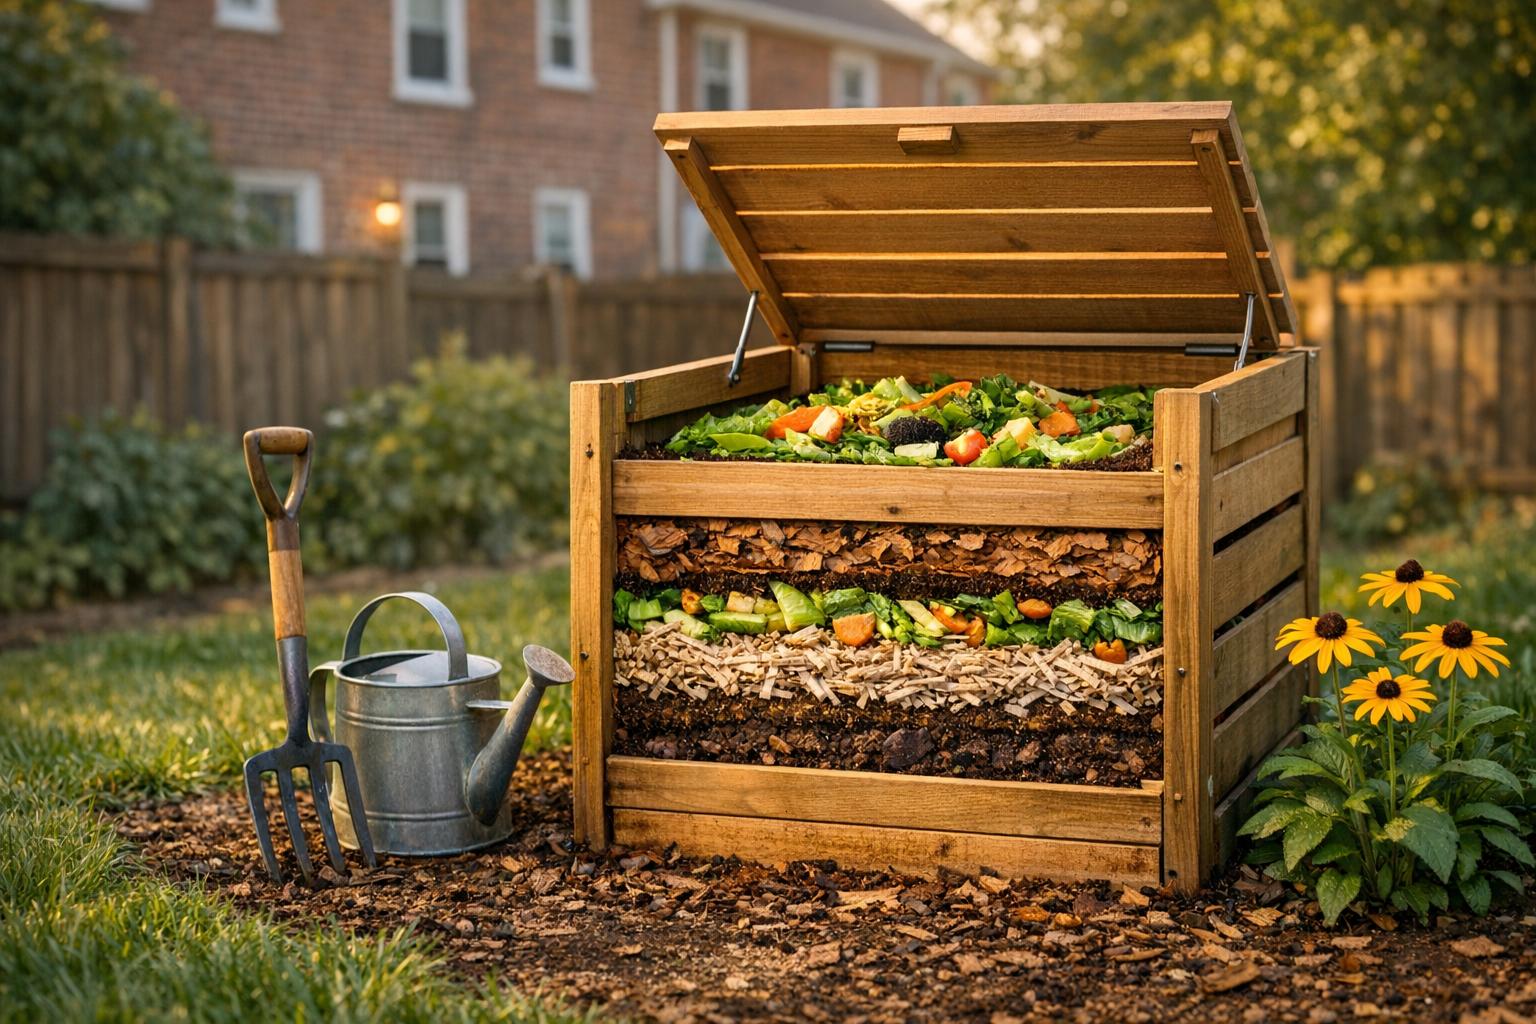
Composting in Maryland is simple and rewarding. It turns kitchen scraps and yard waste into nutrient-rich material for your soil while reducing landfill waste. Here’s how to get started:
- Materials to Use: Combine nitrogen-rich "greens" (e.g., fruit peels, grass clippings) with carbon-rich "browns" (e.g., dry leaves, cardboard) in a 2:1 ratio.
- What to Avoid: Skip meat, dairy, fats, pet waste, and weeds with seeds. Black walnut tree debris is also unsuitable.
- Compost Bin: Choose a bin or build one yourself using materials like pallets or cinder blocks. For smaller spaces, consider vermicomposting with worms.
- Placement: Pick a well-drained, partially shaded spot. Keep the pile moist but not soggy, like a wrung-out sponge.
- Maintenance: Turn the pile every 7–10 days to aerate it. Monitor for smells or issues and adjust materials as needed.
- Application: Use finished compost in garden beds, as lawn top-dressing, or in potting soil. It improves soil structure, water retention, and nutrient levels.
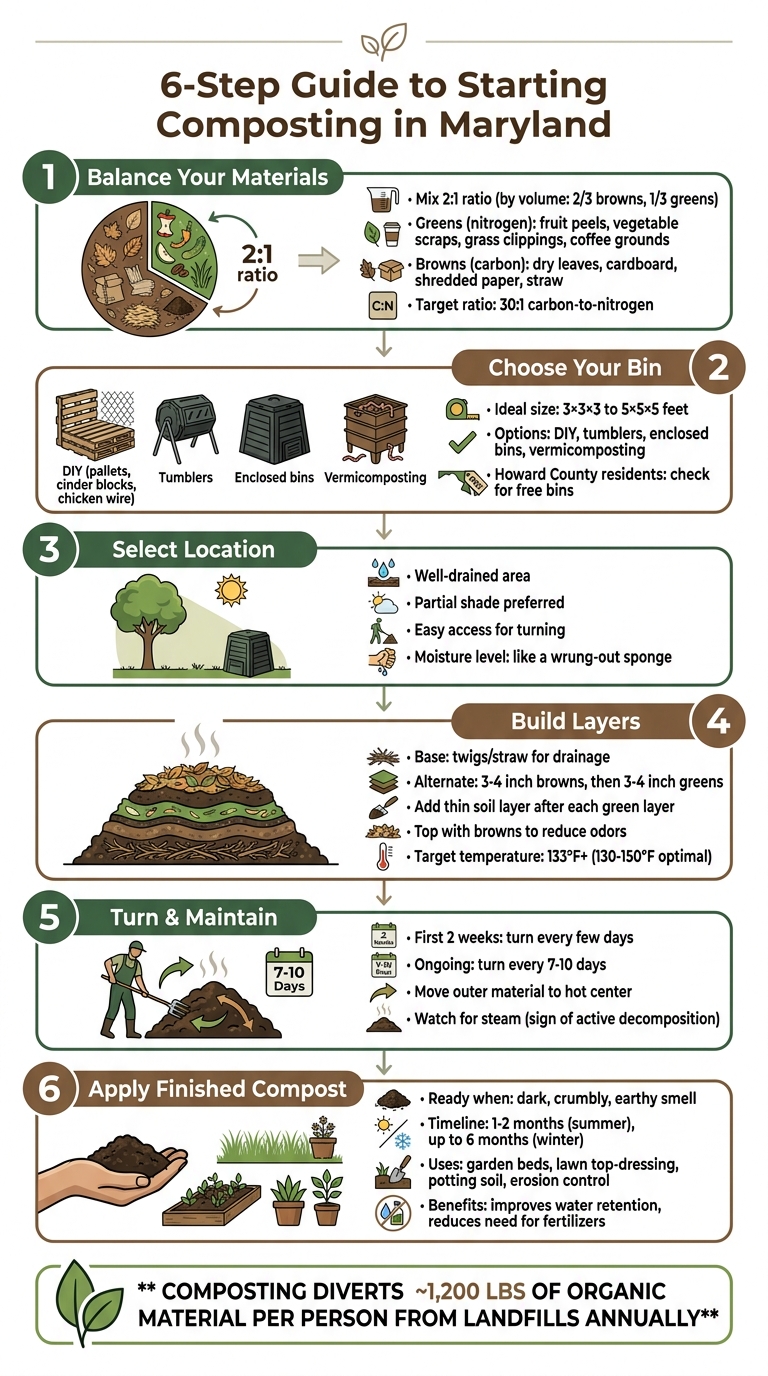
6-Step Guide to Starting Composting in Maryland
How to make Compost – The Simplest Easy Method To Compost Piles!
sbb-itb-843f8be
Selecting Composting Materials
Getting the most out of your compost starts with picking the right ingredients. A successful compost pile relies on a balanced mix of nitrogen-rich "greens" and carbon-rich "browns" to keep the decomposing microbes happy and active.
Balancing Green and Brown Materials
"Greens" are your nitrogen sources, providing essential protein for the microbes. These include things like vegetable scraps, fruit peels, coffee grounds, grass clippings, spent flowers, and manure from herbivores [1][2][4]. On the other hand, "browns" are rich in carbon and serve as an energy source. Examples include dry leaves, straw, shredded non-glossy paper, cardboard, sawdust, wood chips, and even dryer lint [1][2][4].
To keep things in harmony, aim for a carbon-to-nitrogen ratio of about 30:1, which translates to roughly two-thirds browns and one-third greens by volume [1][2][4]. Breaking down larger items by chopping or shredding them can help speed up the decomposition process [1]. If your pile starts smelling like ammonia, it’s a sign to add more browns. A rotten smell? Turn the pile and mix in some dry browns to restore balance [1][4].
Materials to Exclude from Compost
Certain items should never make their way into your compost pile. Meat, bones, dairy products, fats, and oils are big no-nos because they can attract pests and create unpleasant odors [1][3]. Similarly, avoid adding dog or cat feces, as they may carry harmful pathogens that backyard composting can’t eliminate [1].
Stay away from diseased plants and invasive weeds like morning glory, buttercup, and quack grass, especially if the weeds have already gone to seed [1][3]. Maryland residents, in particular, should skip leaves or twigs from black walnut trees, which contain juglone – a natural herbicide harmful to many plants [4]. Treated wood and bioplastics are also unsuitable for backyard compost since they require the high temperatures of commercial facilities to break down safely [1].
Once you’ve chosen your materials, you’re ready to move on to setting up an efficient composting system.
Setting Up Your Compost System
Picking a Compost Bin
To get the best results, keep your compost pile between 3x3x3 and 5x5x5 feet. This size range generates enough heat for decomposition while making it easy to turn the pile when needed [2]. While a bin isn’t absolutely necessary, it helps keep the pile neat and contained, especially in your Maryland yard.
If you’re on a budget, you can build a DIY bin using materials like chicken wire, wooden pallets, cinder blocks, or even snow fencing [2]. Cinder block bins are particularly durable and great at retaining heat, making them a long-term option. For those who want to speed up the process, tumblers or rotating drums are a good choice. They ensure that materials mix thoroughly without requiring manual turning [1].
Worried about pests? An enclosed bin can help. The University of Maryland Extension advises:
If pests (flies or rodents) are attracted to your compost pile, the pile can be enclosed in a bin if adequate aeration levels are maintained [1].
If outdoor space is tight, you can try vermicomposting. This method uses red wiggler worms to break down food scraps indoors efficiently [2].
Residents of Howard County should check if they qualify for free compost bins offered by the county. Demonstration sites run by Master Gardeners are available at Alpha Ridge Landfill and local libraries, such as the Charles E. Miller and Glenwood branches, from March through October [2].
Once you’ve got your bin, the next step is choosing the perfect spot to place it.
Finding the Best Location
In Maryland, where moisture levels can vary, location matters. Choose a well-drained area to avoid water pooling after rain. This is especially important because Maryland’s clay-heavy soils can trap water, leading to unpleasant odors and anaerobic decomposition. You’ll also need enough space to access and turn the pile easily.
Keep the pile moist – think of the texture of a wrung-out sponge. This moisture level is essential for the microbes that break down your compost [2]. A shaded or partially shaded spot works best. Too much direct sunlight can dry out the pile, while full shade might make it too damp. Ideally, aim for a pile temperature of 133°F or higher to kill weed seeds and speed up decomposition [1].
If you’re planning to combine your composting efforts with landscaping, expert advice can help you get the most out of your yard. For more tips on sustainable yard care in Maryland, check out Pro Landscapes MD.
Building and Caring for Your Compost Pile
Once you’ve gathered your balanced mix of materials, it’s time to build and maintain your compost pile properly.
Creating Layers in Your Pile
Start with a base layer of twigs or straw. This helps with airflow and prevents water from pooling at the bottom – especially important in areas like Maryland, where clay-heavy soils can hold onto moisture [4].
From there, alternate layers of materials. Begin with a 3–4-inch layer of brown materials, such as dry leaves, shredded newspaper, or cardboard. Follow this with a 3–4-inch layer of green materials, like fruit scraps, grass clippings, or vegetable waste [4]. After each green layer, sprinkle a thin layer of garden soil to introduce the microorganisms needed for decomposition [4]. For the best results, stick to a ratio of about two-thirds browns to one-third greens [4][1].
As you build, moisten each layer. The goal is to have the pile feel like a wrung-out sponge – not too dry, but not soaking wet either [2][4]. Always top the pile with a layer of browns to minimize odors and keep pests away [4]. A well-maintained compost pile should reach internal temperatures between 130°F and 150°F. This temperature range is hot enough to destroy pathogens and weed seeds, with 133°F being the critical threshold for these benefits [1][4].
Once your pile is layered and moistened, regular turning is essential to keep it active and healthy.
Turning and Managing the Pile
Turning the pile regularly is key to speeding up decomposition. For the first two weeks, turn the pile every few days to get things moving [4]. After that, turning once every 7 to 10 days is enough [4]. Use a pitchfork to move the cooler, outer materials into the hot center of the pile, where the breakdown process is most vigorous [1][4]. If you see steam rising as you turn, that’s a good sign – it means your pile is actively decomposing [4].
If your compost starts to smell bad, it’s a sign something’s off. A rotten smell usually means the pile is too wet or lacks oxygen. To fix it, turn the pile and mix in coarse, dry materials like straw or wood chips [1][3]. An ammonia smell points to too much nitrogen – balance it out by adding more browns, such as dry leaves or shredded paper [3]. On the other hand, if your pile is damp but not heating up, it likely needs more nitrogen. Add materials like grass clippings or manure to get things going again [3]. For tougher, woody materials, chopping or shredding them before adding to the pile will help speed up the process by giving microbes more surface area to work on [1][3].
| Symptom | Likely Problem | Recommended Solution |
|---|---|---|
| Bad odor (rotten egg smell) | Not enough air or too much moisture | Turn the pile; add coarse, dry materials like straw or corn stalks [3] |
| Center of pile is dry | Too little water or too much woody material | Turn and add moisture; mix in fresh green waste [3] |
| Pile is damp/warm only in the middle | Pile is too small to retain heat | Add more material and mix in older compost to build a larger pile [3] |
| Pile is damp and sweet-smelling but won’t heat up | Not enough nitrogen | Add nitrogen-rich materials like grass clippings, fresh manure, or blood meal [3] |
Applying Finished Compost in Maryland Yards
Once you’ve established a composting system, the final step is applying the finished compost to enrich your Maryland yard’s soil. You’ll know your compost is ready when it’s dark, crumbly, has an earthy smell, and no longer contains recognizable scraps of material [2][4]. In Maryland, the time it takes for compost to mature depends on the season – around 1–2 months in summer and up to 6 months during the colder winter months [4].
Make sure the compost has fully cured before use [1]. This curing phase is essential, as it indicates the compost has stabilized and is no longer producing heat when turned. If you notice any large woody pieces, sift them out and add them back to your active compost pile. Once your compost is fully cured, it’s ready to work its magic in your yard.
Improving Soil and Plant Health
Finished compost is an excellent soil conditioner, improving aeration and increasing the availability of nutrients. This is especially beneficial for Maryland yards with sandy or nutrient-poor soil, as compost enhances water retention and boosts fertility. The University of Maryland Extension explains:
Compost mixed with poor or sandy soils can improve water retention and fertility [1].
Beyond nourishing plants, compost plays a key role in binding soil particles, which helps prevent erosion – a common issue during Maryland’s heavy rains. It also fosters the growth of beneficial microorganisms and attracts earthworms, which naturally aerate and improve the soil’s structure. The Chesapeake Bay Program highlights another benefit:
Your compost, once ready, will enrich your garden soils, reduce the need for chemical fertilizers and lower your carbon footprint [4].
Compost Application Techniques
Once your compost is cured, you can apply it in several ways to improve your Maryland yard. For garden beds, mix the compost directly into the soil to enhance its structure and provide slow-release nutrients. This method works well for vegetables, flowers, trees, and shrubs. For lawns, spread a thin layer of compost as a top-dressing – it will boost soil health without smothering the grass [1].
In areas prone to erosion, compost can stabilize the soil while improving water infiltration. If you’re into container gardening, blend finished compost into your potting mix to create a nutrient-rich environment for both indoor and outdoor plants [1]. These techniques ensure your yard gets the full benefits of your hard work.
Conclusion
To sum up, getting started with composting in Maryland is straightforward if you follow a few key steps. Begin by maintaining the right balance of browns and greens to create an effective mix for decomposition [1][4]. Make sure your pile stays as moist as a wrung-out sponge, and turn it every 7 to 10 days using a pitchfork or shovel to keep it well-aerated [2][4]. Aim for a pile size between 3×3×3 and 5×5×5 feet – this helps retain the heat necessary for breaking down organic material [2]. By following these steps, you’ll not only improve your garden but also reduce waste and help the environment.
On average, composting redirects about 1,200 pounds of organic material per person away from landfills each year, significantly cutting down on methane emissions caused by anaerobic decomposition [4]. As highlighted by the University of Maryland Extension:
Composting plays a significant role in mitigating greenhouse gas emissions and reducing the environmental impact of waste [1].
When your compost is fully matured, it provides numerous benefits to Maryland soils. It can improve water retention in sandy areas while helping to loosen heavy clay soil, all while naturally delivering essential nutrients to plants. This reduces the need for synthetic fertilizers and supports healthier, more sustainable gardening practices. Backed by local initiatives, composting is an excellent way for Maryland homeowners to care for their yards and contribute to broader environmental efforts.
Through composting, you’re creating a system that not only nourishes your garden but also aligns with Maryland’s environmental priorities.
FAQs
How do I keep pests out of my compost bin?
To keep pests from invading your compost bin, steer clear of adding meat, dairy, or oily foods. Focus on yard waste and vegetable scraps instead. Use a sealed or closed-top bin to keep critters out, maintain a dry compost pile, and turn it regularly to improve airflow. Make sure to bury food scraps deep in the pile to minimize odors. These simple practices not only deter pests but also help your compost break down efficiently.
What should I do if my compost pile won’t heat up?
If your compost pile isn’t reaching the right temperature, it might need a bit more attention. Start by checking the balance of materials: you’ll want a good mix of green (nitrogen-rich) and brown (carbon-rich) components. Also, make sure the moisture level is just right – aim for the consistency of a wrung-out sponge. Regularly turning the pile helps with aeration, which is key for the microbes doing all the work.
Still not seeing results? Add more green materials, adjust the moisture if it’s too dry, and increase the frequency of turning. These steps can help kickstart microbial activity and get your compost heating up properly.
How can I compost indoors in a Maryland apartment?
Living in a Maryland apartment doesn’t mean you have to give up on composting. With the right setup, you can turn your kitchen scraps into nutrient-rich compost without unpleasant odors or attracting pests.
Start with a small, odor-controlled bin, like a countertop pail. These bins are compact and designed to keep smells contained. To create a balanced compost, layer your kitchen scraps – things like fruit peels, coffee grounds, and eggshells – with dry materials, such as shredded paper or dried leaves. This mix of "green" and "brown" waste is essential for proper decomposition.
Keep the compost moist but not soggy – it should feel like a wrung-out sponge. Stir or turn the contents regularly to promote airflow and speed up the process. If space is tight, you might want to try vermicomposting. This method uses worms to break down food scraps quickly and without any odor. Just make sure to use a sealed bin to keep pests away and maintain cleanliness.
With these simple steps, composting indoors can be both practical and hassle-free.
Chat with Us