









- bhavya gada
- No Comments
If the wall is dirty, sealed, cracked, or weak, stone veneer can fail. In most cases, brick needs more joint repair and coating removal, while concrete block needs more crack, void, and surface checks before mortar goes on.
Here’s the short answer:
- Brick usually needs cleaning, repointing, and a check for paint or sealer.
- Concrete block (CMU) usually needs patching, crack repair, and an absorption check.
- Direct bond works only on clean, rough, unsealed masonry.
- Lath and a scratch coat are often needed when the surface is painted, glazed, sealed, or too smooth.
- After washing, both wall types should dry for at least 3 days before the next step.
- For brick that cannot be stripped clean, metal lath is commonly fastened at 6 inches vertical and 16 inches horizontal, then covered with a 1/2-inch to 3/4-inch scratch coat.
About 1/8 inch of paint or sealer can be enough to block mortar from bonding the way it should. And in places with freeze-thaw weather, trapped moisture can shorten the life of the veneer.
What matters most is not just whether the wall is brick or block. It’s whether the surface is sound, clean, open to moisture, and flat enough to hold the veneer system.
How to prepare surfaces for thin veneer applications
sbb-itb-843f8be
Quick Comparison
| Surface | Main prep issue | Direct bond? | When extra support is needed |
|---|---|---|---|
| Brick | Old coatings and weak mortar joints | Yes, if porous and clean | Use lath + scratch coat on painted, glazed, or sealed brick |
| Concrete block (CMU) | Cracks, voids, open joints, smooth faces | Yes, if rough, clean, and absorbent | Use scarifying, bonding agent, or lath when sealed or smooth |
If I were sizing up a wall for stone veneer, I’d start with four things: cleanliness, bond surface, damage, and moisture behavior. That tells me which prep path makes sense before any stone is set.
Brick Wall Prep: Cleaning, Repointing, and Bonding Issues
Brick prep starts with three things: cleaning the wall, fixing the joints, and checking for coatings that stop mortar from sticking.
Cleaning brick to get a surface mortar can grip
Start by brushing off loose mortar, dirt, and any plant growth. Then pressure-wash the wall with a mild detergent to remove efflorescence and built-up grime. After washing, let the wall dry for at least three days before moving to the next step.
Paint and sealer are the main bond blockers here. A simple test helps: if water beads on the surface, the brick is sealed and needs more prep. Before veneer goes on, the brick should feel rough and gritty to the touch.
Repairing brick joints before veneer goes on
Rake out any deteriorated joints and repoint them with Type S mortar. If any bricks are spalled or cracked, replace them before you continue.
When brick needs lath or a scratch coat
Clean, porous brick can take a direct scratch coat. Painted, glazed, or sealed brick is a different story – it needs lath and a scratch coat.
If the coating can’t be fully removed, fasten galvanized metal lath with masonry pins every 6 inches vertically and 16 inches horizontally [6]. Then apply a scratch coat 1/2 inch to 3/4 inch thick and score it with deep horizontal grooves while it’s still wet [5][6]. Let the scratch coat cure fully before setting stone.
That’s the main call with brick: use a direct bond on sound, porous masonry, or go with lath and a scratch coat when the surface blocks adhesion.
| Brick Condition | Prep Method Required |
|---|---|
| Clean, porous brick | Clean, repoint, direct scratch coat |
| Painted or sealed (coating removable) | Mechanical removal, then direct scratch coat |
| Painted, glazed, or sealed | Metal lath + 1/2"–3/4" scratch coat |
| Spalled or crumbling units | Replace damaged brick, then repoint |
Concrete block changes the prep focus. Instead of joint repair, the next step is patching cracks, voids, and surface bond.
Concrete Block Prep: Surface Repairs, Attachment, and Scratch Coat
Concrete block walls are often simpler to prep than brick if the block is sound, clean, and untreated. But once you add paint, sealers, smooth faces, or leftover residue from manufacturing molds, the job gets a bit more hands-on.
Cleaning block and checking surface absorption
Start by washing off loose residue, oil, and dirt. If you’re working with new CMU, remove any form-release residue before applying mortar [1][4].
After cleaning, let the wall dry for at least three days. Then mist the surface. If the block absorbs the mist, it’s ready for mortar [4]. If it doesn’t, stop there and deal with the surface first. Once the wall passes the absorption test, you can move on to patching and leveling.
Repairing cracks, voids, and open CMU joints
Block walls often come with open joints, uneven faces, and small voids between units. Fill those spots with high-bond masonry mortar so you end up with a flat, sound surface before the scratch coat goes on [4].
That flat base matters. If the wall has dips, gaps, or weak spots, the veneer system starts off at a disadvantage. Once the face is repaired and evened out, the next step is figuring out whether the block can take mortar directly or needs lath.
When block can take direct mortar and when it cannot
Clean, rough, untreated CMU is one of the easiest surfaces for stone veneer. It usually starts with a more even bonding face than brick, so prep is often lighter. A direct scratch coat works well when the surface passes the absorption test and all voids have been patched [1][2]. If the block is smooth but uncoated, it needs mechanical scarification before the scratch coat.
Painted, sealed, or smooth block takes more work. If you can’t remove the coating, use a bonding agent or galvanized metal lath, then apply and cure a scratch coat before setting stone [2][6].
Here’s the simple match-up between wall condition and prep method:
| CMU Condition | Prep Method Required |
|---|---|
| Clean, rough, untreated block | Absorption test, patch voids, direct scratch coat |
| Smooth, uncoated block | Mechanical scarification, then direct scratch coat |
| Painted or sealed (coating removable) | Mechanical removal, then direct scratch coat |
| Painted or sealed (coating not removable) | Bonding agent or metal lath + scratch coat |
| Crumbling or spalled block faces | Patch and repair, then assess bond method |
Brick vs. Block: Side-by-Side Prep Differences
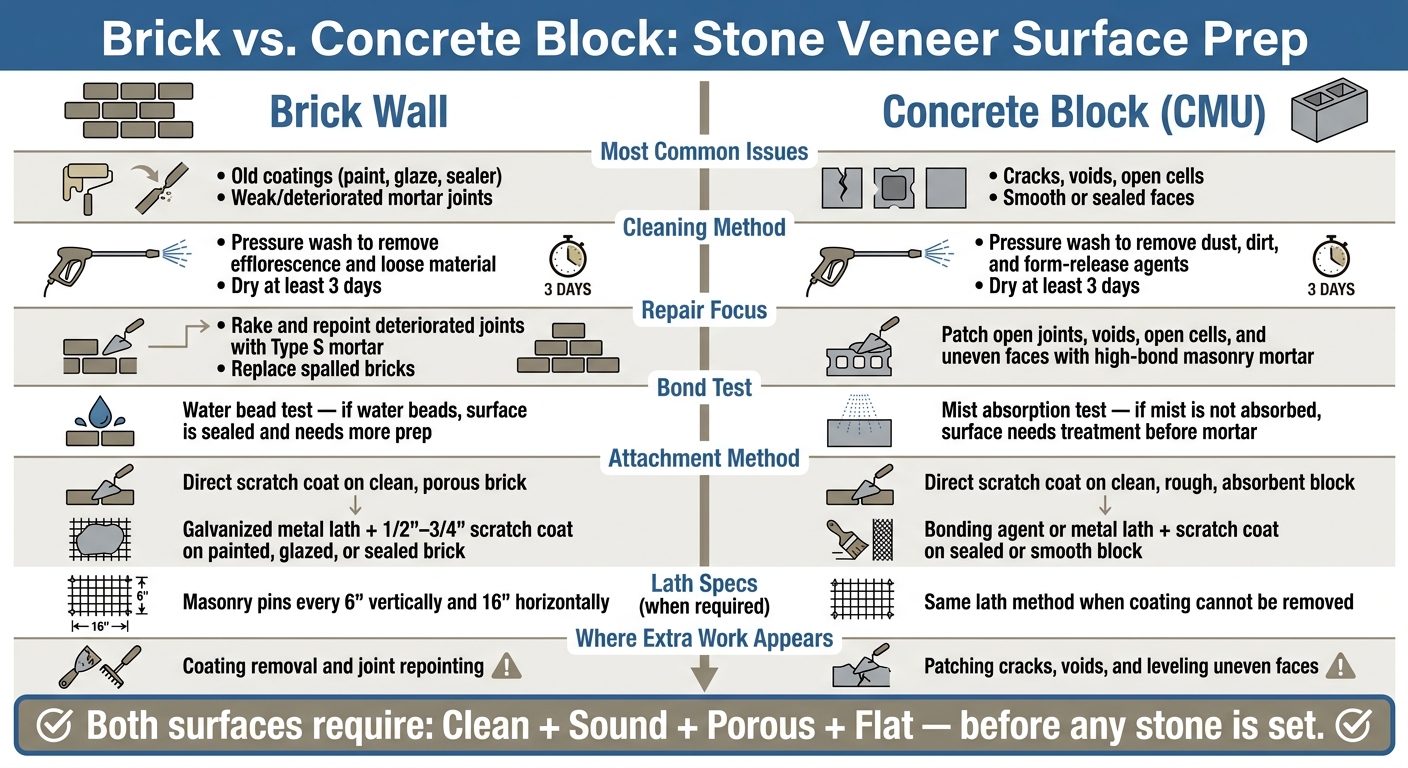
Brick vs. Concrete Block: Stone Veneer Surface Prep Guide
Comparison table: brick wall prep vs. concrete block prep
Brick and block both need the same end result: a clean, sound, porous surface. Where things change is the path you take to get there. Prep isn’t optional for one and optional for the other. The main difference is which problems show up first and which fixes take the most time.
| Feature | Brick Wall Prep | Concrete Block (CMU) Prep |
|---|---|---|
| Condition Checks | Most common issues: coatings and joint failure [5][4] | Most common issues: cracks and voids [7][3] |
| Cleaning | Pressure wash to remove efflorescence and loose material [5][4] | Pressure wash to remove dust, dirt, and form-release agents [7] |
| Joint and Void Repair | Repoint aged or deteriorating joints [5] | Patch open joints, open cells and voids, and loose mortar between units [7] |
| Coating Removal | Remove paint or glaze when possible; if not, use metal lath and a scratch coat [4][2] | Remove coating when possible; if not, use metal lath and a scratch coat [7] |
| Attachment Method | Direct scratch coat on sound, porous brick; lath + scratch coat on coated brick [4][2] | Direct scratch coat on sound, porous CMU; lath or bonding agent on sealed block [7][1] |
| Where Extra Work Appears | Coating removal and joint repointing [5][4] | Structural cracks, open cells and voids, and loose block faces [7][3] |
Use the wall’s condition, not just the material name, to pick the prep method.
Where brick usually adds more prep work
Brick tends to need more work when old coatings have to come off and mortar joints need repointing.
That means the extra labor often shows up in two places: bond-breaking surface layers and worn joints. A brick wall can look fine at a glance, then turn into a bigger prep job once paint, glaze, or aging mortar enters the picture.
Put simply, brick usually eats up time on coating removal and joint repair. CMU, on the other hand, more often uses that time on patching and getting the surface even enough for the next layer.
Where block usually adds more prep work
CMU tends to need more work when cracks, voids, and loose faces have to be patched before the scratch coat.
This is where block can slow a job down. Open cells, loose mortar, and damaged faces may not stop the project, but they do need to be fixed first. If that base isn’t sound, the scratch coat won’t have a good surface to grab onto.
Conclusion: Matching Prep to Wall Type Before Stone Veneer
Wall type sets the prep work. The finish line is the same, but brick and concrete block don’t get there the same way. Brick often needs more joint repair and repointing. Concrete block usually calls for a close look at cracks, voids, and how much water the surface absorbs. That split shapes the prep method.
In Maryland, drainage and waterproofing need attention before installation. If moisture gets trapped behind the veneer, freeze-thaw cycles can break the bond.
Pro Landscapes MD can assess masonry condition and drainage before stone veneer installation.
Key takeaways for homeowners and property managers
Before installation, check these four items:
- Clean masonry is nonnegotiable. Dust and loose material reduce bond strength.
- Paint, sealer, and residue must be removed or bridged with lath.
- Repair brick joints and CMU cracks, voids, and open cells.
- Use direct bond only on clean, rough masonry; use lath or a bonding agent on sealed or smooth surfaces.
FAQs
Can stone veneer go directly over painted brick or block?
No. Paint acts as a bond breaker, so mortar won’t stick the way it should to painted brick or block.
To get the surface ready, you have two solid options:
- Remove the paint fully so raw masonry is exposed
- Install metal lath with corrosion-resistant concrete nails so the scratch coat has a secure mechanical attachment
How do I know if my wall is too sealed for mortar to bond?
Look for paint, sealant, or a smooth, glossy surface. Those finishes can stop mortar from sticking the way it should.
If the wall is painted, sealed, or contaminated, don’t apply stone veneer straight to it. Remove the coating all the way, or install a weather-resistant barrier, metal lath, and a scratch coat to create a stable surface.
What surface damage should be fixed before veneer installation?
Before you install stone veneer, check that the surface is solid and clean. Fix any loose or crumbling brick or block, and repoint cracked or worn mortar joints to help stop water from getting in.
Clear away dirt, dust, debris, flaking paint, sealers, and form-release agents. If the surface is painted or too smooth, you’ll need to sandblast it, mechanically scar it, or etch it so the veneer can bond the way it should.
Chat with Us