


- bhavya gada
- No Comments
Your sump pump’s discharge line is critical for keeping your basement dry and your home safe from water damage. Neglecting its maintenance can lead to clogs, freezing, or check valve failures – causing costly repairs, foundation issues, or even a flooded basement. Here’s what you need to know:
- Why It Matters: A properly maintained discharge line prevents water from flowing back into your home and reduces strain on your sump pump, extending its lifespan.
- Common Problems: Clogs, freezing, and faulty check valves are the main culprits. Warning signs include constant pump cycling, water pooling near your foundation, or unusual noises.
- Maintenance Tips: Inspect for damage, clear debris, and ensure proper slope (1/8 inch per foot). Seasonal care, like winterizing the line, is essential to avoid freezing.
- When to Call a Pro: Persistent issues like recurring blockages, leaks, or drainage problems may require professional help.
6 Things Sump Pump Owners NEED to Know
Proper discharge line maintenance is a critical part of comprehensive drainage and storm water management for your property.
sbb-itb-843f8be
Why Discharge Line Care Matters
Your discharge line is the unsung hero in protecting your home from water damage. When it fails, the consequences can be severe – foundation cracks, mold growth, and sky-high repair bills.
"A correctly installed discharge pipe is not optional; it is the core line of defense against basement water intrusion, mold risk, and costly repairs." – Sump Pump Check [4]
This quote underscores the importance of giving your discharge line the attention it deserves.
Preventing Basement Flooding
The discharge line’s main job is to move water far enough away from your home so it doesn’t sneak back in. To do this effectively, the line should extend at least 10 feet from your foundation [3]. Proper grading is also key – a slope of at least 1/8 inch per foot ensures water flows away using gravity [3]. Keeping the line clear and correctly sloped not only prevents water from pooling around your home but also reduces the workload on your sump pump.
Extending Your Sump Pump’s Lifespan
A well-maintained discharge line doesn’t just protect your home – it also protects your sump pump. When debris clogs the line or a check valve fails, water can flow back into the sump pit, triggering short-cycling. This happens when the pump repeatedly turns on and off to handle the same water, causing unnecessary strain [1][2]. Over time, this can lead to motor burnout and early equipment failure. Ensuring the line’s diameter matches the pump outlet is another critical step to avoid backpressure that could overheat the motor [2].
Avoiding Expensive Repairs
Regular discharge line maintenance can save you from costly repairs down the road. For example, frozen pipes in winter can burst, requiring a full replacement [5]. If water is discharged too close to your home, it can erode soil or cause the foundation to shift and crack, which can cost thousands to fix [1][2]. To avoid these issues, the discharge location should be at least 20 feet from your home [5]. Routine inspections and seasonal upkeep can help you catch potential problems before they escalate [1][3].
Common Discharge Line Problems and Warning Signs
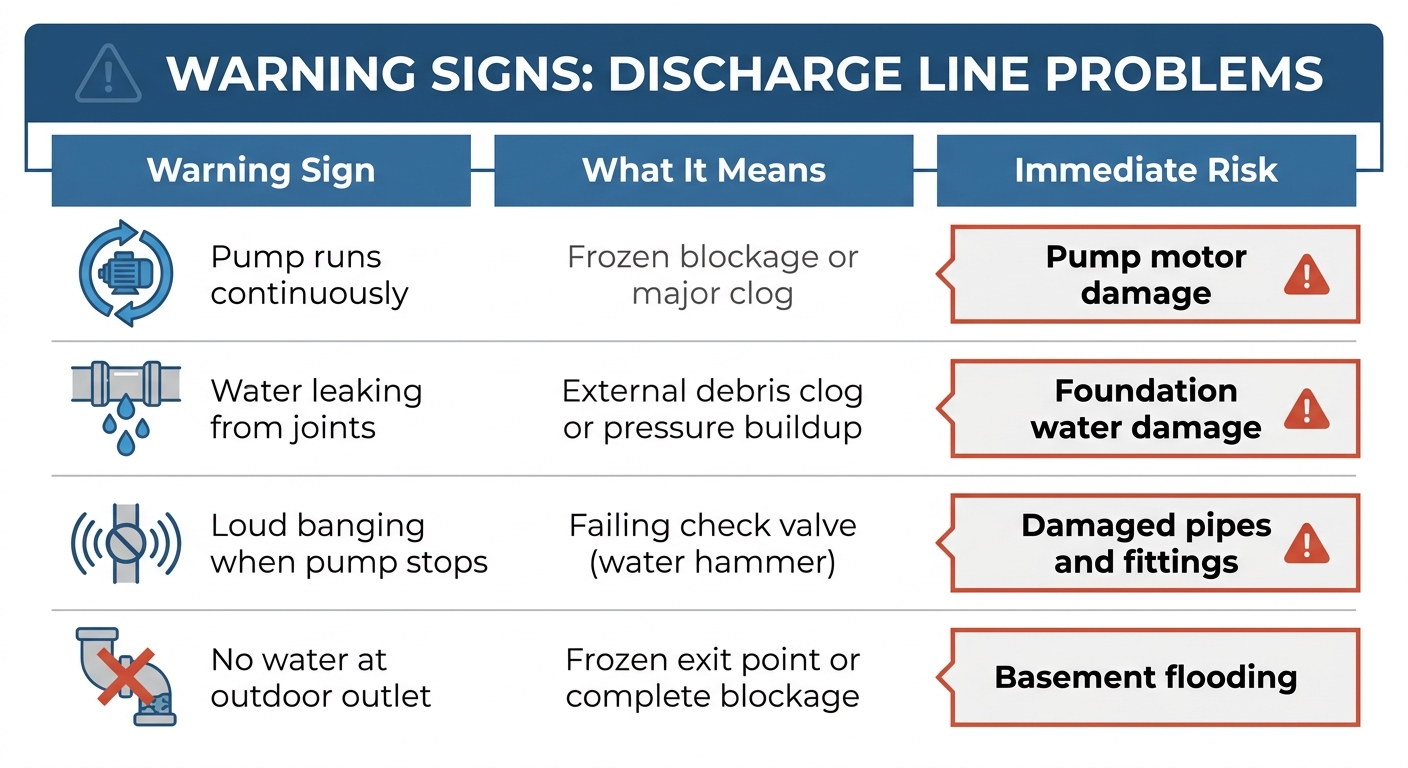
Sump Pump Discharge Line Warning Signs and Risks Guide
Even when installed correctly, discharge lines can develop issues over time that reduce your sump pump’s efficiency. Spotting these problems early can help prevent basement flooding and expensive repairs.
Debris Clogs
Leaves, soil, and mulch often gather at the exterior outlet, blocking water flow. Sediment can also build up in bends or low points in the line, gradually restricting drainage. Signs of a clog include water leaking from pipe joints, the sump pump running more frequently than usual, or water pooling near your home’s foundation. Additionally, unprotected outlets can attract small animals, which may worsen blockages.
Freezing
In colder weather, water trapped in the discharge line can freeze, creating a solid blockage. As Cranney Home Services notes, "A frozen discharge line not only puts your basement at risk, but it can seriously damage your sump pump" [6]. Signs of freezing include the pump running nonstop, little or no water exiting the outdoor outlet, and the motor making grinding or humming noises as it struggles against the ice [7]. Sanders Plumbing HVAC also warns, "Running the pump with a frozen discharge line can damage the motor or other components" [7].
Check Valve Failures
A malfunctioning check valve can cause water to flow back into the sump pit after the pump shuts off, leading to short cycling. This means the pump will turn on again almost immediately. Warning signs include loud banging noises (known as water hammer) when the pump stops, as well as chattering, vibrating, or even hissing sounds that may suggest internal leaks. For elastomer-based check valves, replacement is typically needed every five years, while non-elastomer models can last up to 20 years under optimal conditions [8].
| Warning Sign | What It Means | Immediate Risk |
|---|---|---|
| Pump runs continuously | Frozen blockage or major clog | Pump motor damage |
| Water leaking from joints | External debris clog or pressure buildup | Foundation water damage |
| Loud banging when pump stops | Failing check valve (water hammer) | Damaged pipes and fittings |
| No water at outdoor outlet | Frozen exit point or complete blockage | Basement flooding |
Identifying these warning signs can help you stay ahead of potential issues, setting the stage for the inspection routines covered in the next section.
How to Inspect and Maintain Your Discharge Line
Visual Inspections for Damage and Blockages
Take a good look at your discharge pipe from end to end, paying close attention to cracks, corrosion, or any signs of damage, especially around joints and fittings. If you notice water leaking at these connections, it could mean the fittings are loose or a section has become disconnected [2]. Also, check the outlet outside to make sure it’s clear of dirt, grass, leaves, or mulch. The outlet should direct water at least 20 feet away from your home’s foundation to prevent seepage [5].
While your sump pump is running, take a moment to observe the outlet. If you see water pooling around the discharge pipe, that could be a sign of a clog. To test the system, pour about five gallons of water into your sump pit to activate the pump, then watch the water flow at the outlet [5]. Listen for unusual noises, like banging, which might point to loose supports. After heavy rainfall or significant snowmelt, it’s a good idea to inspect the discharge path and outlet again. Adjust your inspection routine based on the season to stay ahead of potential issues.
Seasonal Cleaning Tips
Debris and sediment can build up throughout the year, especially during certain seasons. In the fall, leaves are the main culprits, while in spring, sediment from melting snow can clog the system. Make it a habit to clear debris from the exterior outlet during these times. You can manually trigger the pump by lifting the float, which will push water through the line to flush out minor blockages and let you check the flow. If your system has a cleanout tee or cross fitting, use it for easier access to remove debris.
Inspect all connections and clamps at least twice a year, and always check them after severe weather to make sure they’re secure. During winter, keep the exit point clear of snow and ice, and seal any gaps where the pipe passes through foundation walls using a weatherproof or concrete-safe sealant [1].
Winterizing Your Discharge Line
Before freezing temperatures hit, disconnect any flexible hose extensions to avoid ice buildup [9]. Add insulation or heat tape to the sections of the discharge pipe that are exposed to cold air. As Sump Pump Check advises:
"Insulation or heat tape may be necessary in freezing climates to prevent line damage" [3].
Consider installing a frost-free outdoor stand or a vented exit to ensure water can escape even if ice blocks part of the line. Throughout the winter, keep an eye on the discharge outlet to make sure it stays free of snow and ice. Also, check that your system’s check valve is working properly to prevent backflow into the pump. To avoid standing water freezing in the line, maintain a downward slope of at least 1/8 inch per foot [3]. After the snow starts to melt, inspect the entire line for cracks or leaks caused by the freeze-thaw cycle. These steps will help protect your pump and prevent expensive water damage during the colder months.
Maintenance Schedule for Discharge Lines
To keep your discharge line functioning properly, it’s essential to have a regular maintenance schedule. The Sump and Sewage Pump Manufacturer’s Association (SSPMA) suggests tailoring this schedule based on how frequently your pump operates. For pumps handling washing machine water, monthly maintenance is ideal. Pumps used for sewage disposal or regular purposes should be checked quarterly, while those used occasionally may only need annual deep cleaning[5].
Monthly Tasks
Start by manually lifting the float switch to activate the pump. Check for a steady and uninterrupted water flow at the exterior outlet[5]. Pay attention to any unusual noises during operation, as these could indicate loose supports or internal issues. Keep the exterior discharge opening clear of grass, leaves, dirt, or mulch. After heavy weather events, inspect the entire discharge line for leaks or drainage problems. In winter, ensure the exit point is free of ice and snow to avoid freezing in the line.
For a deeper inspection, move on to quarterly maintenance.
Quarterly Tasks
Pour five gallons of water into the sump pit to test the pump’s full cycle[5]. This ensures the float switch moves properly and water flows through the discharge line without issues. Clean the debris basin and check the pump screen for sediment or blockages[5]. Tighten all joints and clamps, especially after severe storms[1]. Verify the check valve’s functionality by ensuring water doesn’t flow back into the pit when the pump stops. If the pipe passes through your foundation wall, confirm that weatherproof sealants or gaskets are intact.
Annual Deep Maintenance
Once a year, conduct a thorough inspection to uncover problems that routine checks might miss. Examine the entire discharge line from the pump to the outlet for cracks, leaks, or damage, focusing on connection points. Use a brush to clean the pump intake screen and clear debris from the sump basin[5]. As Rob Paredes from SafetyCulture emphasizes:
"The Sump and Sewage Pump Manufacturer’s Association (SSPMA)… recommends… Yearly– If only occasionally used, annual maintenance should suffice, but be sure to clean the pump and pit during maintenance"[5].
Ensure the discharge line maintains a slope of at least 1/8 inch per foot for proper gravity-driven flow[3]. Verify that the exterior outlet is positioned at least 20 feet away from your home’s foundation[5]. Test the check valve to confirm it allows water to flow in only one direction. Inspect any heat tape or insulation on exposed sections, particularly before winter, and ensure the line is completely drained to prevent freezing. Seal any gaps where the pipe passes through walls using weatherproof or concrete-safe sealants. If you notice rust-colored water, mold-like odors, or strange noises, it’s time to call a professional for a detailed inspection[10].
Sticking to this maintenance schedule not only protects your home from water damage but also helps your sump pump last longer.
When to Call a Professional
Signs of Serious Discharge Line Problems
Sometimes, even the best DIY efforts aren’t enough to fix persistent sump pump discharge line issues. If you notice constant leaks at joints, water flowing back toward the sump pit, or your pump cycling on and off without explanation, it could mean the discharge layout or check valve has a problem [2] [3].
Strange noises like banging, buzzing, or water hammer are often signs of loose supports or mechanical stress within the line [2]. Before inspecting any electrical components, always turn off the power at the breaker to stay safe [1].
In colder months, recurring ice blockages outside might mean it’s time for a professional to evaluate your system. If ice forms despite proper winterizing, you might need advanced insulation or to relocate the discharge point [2]. Similarly, slow drainage after clearing the outlet could signal a major clog or an improper slope that requires regrading [1]. When basic fixes like removing debris or tightening clamps don’t solve the issue, it’s a clear sign to call in a professional to assess the overall system and pump performance [2].
For persistent or complex problems, professional drainage services can provide the expertise needed to resolve the issue effectively.
Pro Landscapes MD‘s Drainage Solutions

If you’re in Maryland and dealing with complex discharge line problems, Pro Landscapes MD offers expert help. They specialize in more than just pipe repairs, offering services like drainage installation, French drain systems, and professional regrading to direct water away from your home. Their service areas include Howard County, Montgomery County, Carroll County, Frederick County, Prince George’s County, and Baltimore County, covering cities like Ellicott City, Columbia, Gaithersburg, Bethesda, and Silver Spring.
Pro Landscapes MD ensures your discharge point won’t create ice hazards on walkways or damage your landscaping [1] [3]. They also verify that discharge lines comply with local building codes, especially for installations involving foundation penetrations or storm sewer connections [1]. Their comprehensive approach includes stormwater management, regrading, and yard repair, addressing water problems while preserving your landscape’s integrity.
Conclusion
Your sump pump discharge line plays a key role in protecting your home from water damage. Without proper upkeep, even the best pump can’t safeguard your basement from flooding or shield your foundation from harm. Regular maintenance isn’t just helpful – it’s necessary to keep water moving away from your home and to avoid expensive repairs down the line.
Stick to a consistent maintenance routine to catch problems early. Ensure the discharge line is positioned and sloped correctly, as discussed earlier. During winter, make sure the line is properly drained and insulated to prevent freezing, which can lead to burst pipes or blockages.
Stay alert for signs of trouble, like water reversing toward the sump pit, recurring clogs, or strange odors and noises coming from the pump. These red flags often signal issues that go beyond simple fixes. If basic maintenance doesn’t resolve the problem – or if your setup involves complex installations, like lines that pass through foundation walls – it’s wise to call in a professional. This ensures your system stays fully functional and meets local building codes.
For homeowners in Maryland dealing with drainage issues, Pro Landscapes MD offers tailored solutions like regrading, French drain installations, and discharge line redesigns. Partnering with experts can help safeguard your home’s foundation and give you peace of mind, especially during heavy rainstorms or spring snowmelt when your system faces its toughest challenges.
FAQs
Where should my sump pump discharge line drain?
Your sump pump discharge line needs to direct water to an outdoor spot where it can flow away safely from your home’s foundation. Typical choices include your yard, a storm sewer, or a specific drainage system. Make sure the line is set up to avoid water pooling near the foundation, as this can help prevent basement flooding, foundation issues, and soil erosion.
How can I prevent my sump pump discharge line from freezing?
To keep your sump pump discharge line from freezing, consider adding a freeze relief device. This device helps reduce pressure and prevents backups in case the line freezes. Make sure the discharge line is routed away from areas prone to freezing. Adding insulation or running the line through heated spaces can also help. During cold weather, check the line regularly and clear any blockages to ensure it keeps working properly.
Do I need a check valve, and how often should it be replaced?
Installing a check valve on your sump pump discharge line is a smart move, even if local codes don’t mandate it. This small device stops water from flowing back into the sump basin, which helps prevent the pump from short cycling and extends its lifespan.
There’s no strict timeline for replacing a check valve, but regular inspections are key. Check it periodically for signs of wear or damage, and swap it out if it’s not working as it should to keep your system running smoothly.
Chat with Us