


- bhavya gada
- No Comments
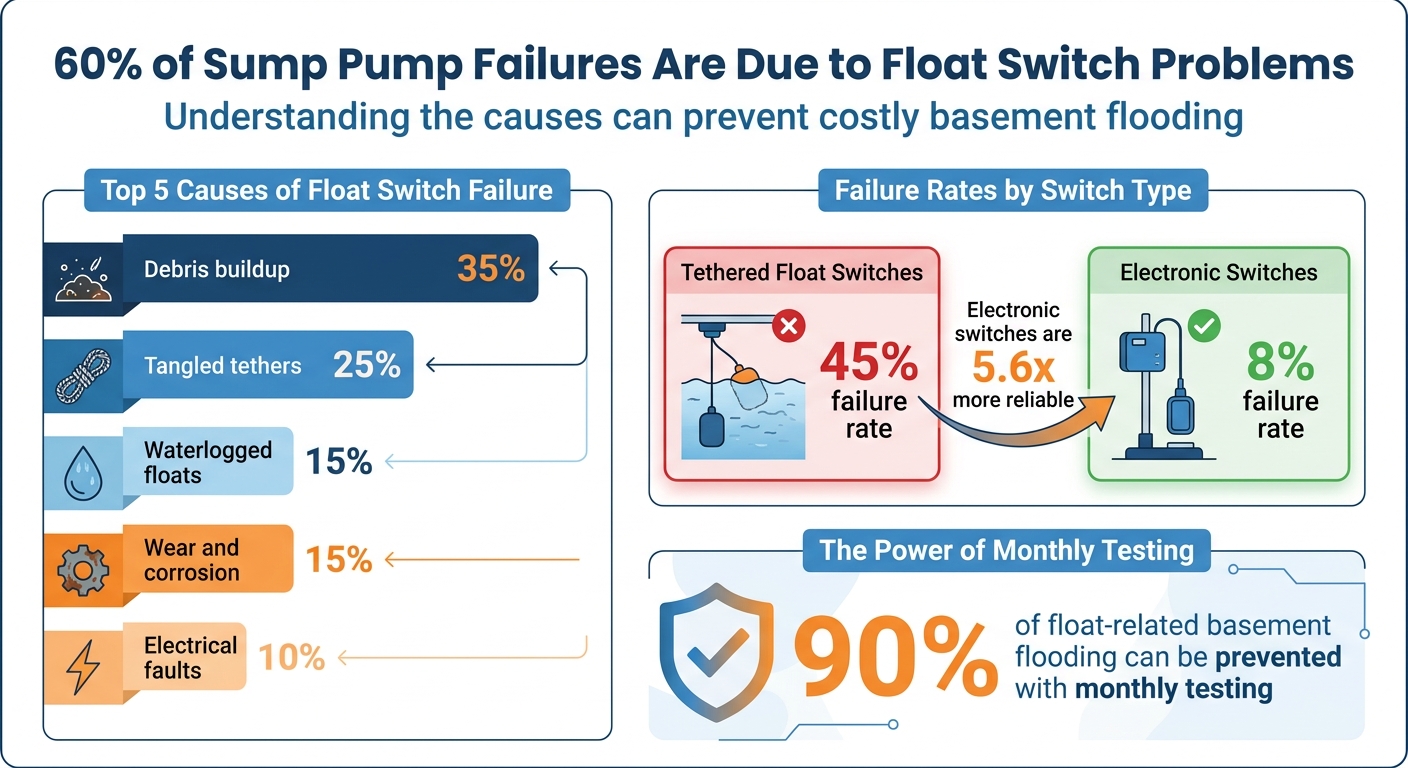
60% of sump pump failures happen due to float switch problems. These small devices control when your pump turns on and off, making them critical for preventing basement flooding. However, they often fail because of debris, tangled tethers, waterlogging, wear, or electrical issues. Problems are especially common during heavy rain or spring thaws when pump activity spikes.
Key failure reasons include:
- Debris buildup (35%): Sticks the float, stopping proper movement.
- Tangled tethers (25%): Prevents the float from rising correctly.
- Waterlogged floats (15%): Makes the float too heavy to work.
- Wear and corrosion (15%): Slows or jams the mechanism.
- Electrical faults (10%): Loose wires or corroded terminals disrupt signals.
Testing and cleaning your pump monthly can prevent 90% of float-related issues. If your float switch is over five years old or shows signs of damage, consider replacing it. For smaller pits, electronic switches (with only an 8% failure rate) are more reliable than tethered ones (45% failure rate). Professional help is recommended for electrical or advanced mechanical problems.
Sump Pump Float Switch Failure Causes and Prevention Statistics
How to Check and Replace your Sump Pump Float
sbb-itb-843f8be
Why Float Switches Fail
Float switches can fail for several reasons, with the main culprits being debris, tangled tethers, waterlogging, mechanical wear, and electrical faults. Here’s how often each factor contributes to failures: debris (35%), tangled tethers (25%), waterlogging (15%), mechanical wear (15%), and electrical issues (10%) [1]. These problems not only hinder proper pump activation but also serve as indicators that maintenance is overdue.
Debris Causing the Float to Stick
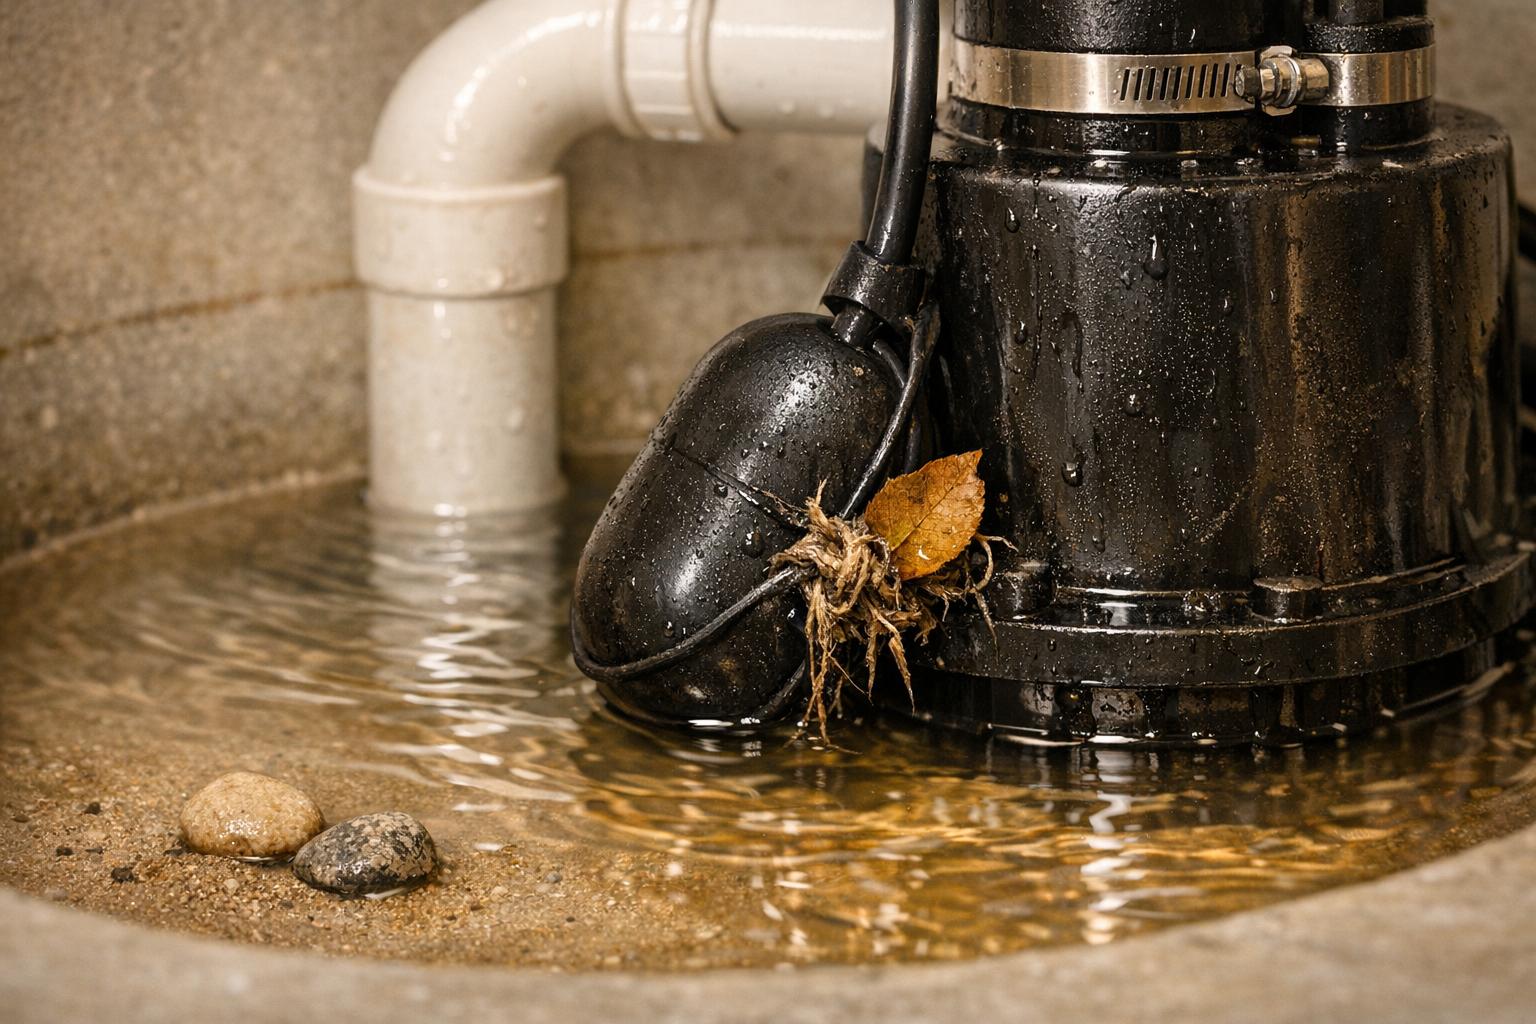
Over time, dirt, small stones, and sediment can gather in your sump pit, making it harder for the float to move freely. When this happens, the float may become stuck and fail to rise with the water level. This is especially common in older homes with clay tile weeping systems, where sediment buildup is a constant issue [1].
Wear and Corrosion Over Time
Constant exposure to water takes a toll on float switches. Rust and mineral deposits can form, slowing down the movement of pivot points and eventually causing the switch to fail. Cleaning the switch with vinegar or CLR and applying silicone spray to the pivot points can help extend its life. However, even with proper care, these components will wear out over time [1].
Faulty Electrical Connections
Electrical issues, such as loose wires, corroded terminals, or damaged connections, can prevent the float switch from signaling the pump to activate. Water exposure accelerates corrosion, which can either increase resistance or completely break the circuit. To pinpoint the problem, manually test the switch to determine whether the fault lies in the electrical system or the mechanical components. A later section will provide detailed troubleshooting steps [1].
Incorrect Float Installation
Improper installation can lead to immediate or eventual failure. For instance, if the tether length is set incorrectly, the pump might not activate until water levels are dangerously high, increasing the risk of overflow [2]. In smaller sump pits (less than 16–18 inches wide), tethered floats can get stuck against the sides due to limited movement space. In these cases, vertical or electronic switches are better suited. Tethered switches, in fact, fail at a much higher rate (45%) compared to electronic switches (8%) [1]. Choosing the right float type for your pit size is crucial to avoid these problems [2].
Age and Environmental Factors
Float switches have a limited lifespan. Seasonal changes, like the spring thaw in March and April, can triple pump activity, pushing older or marginal switches to their breaking point [1]. Environmental factors like temperature swings, humidity, and the natural aging of plastic and rubber components also contribute to failure. If the float ball develops a crack along its seam, water can seep inside, making it too heavy to rise. This accounts for about 15% of float switch failures [1].
Warning Signs of Float Switch Problems
Spotting float switch issues early can save you from the headache (and expense) of a flooded basement. One of the most common signs? Water rising in the sump pit without the pump activating. This problem is often tied to a faulty float switch and accounts for a whopping 60% of sump pump failures [1]. If you notice standing water in the pit or moisture creeping across your basement floor, the float switch is likely the culprit.
Another red flag is when the pump runs continuously, even with no water in the pit. This happens when the float gets stuck in the "on" position, often jammed against the pit wall or discharge pipe. Ignoring this issue can cause the motor to burn out in just a few days, leaving you with no choice but to replace the pump entirely. You might also hear the motor humming without actually pumping water – this indicates the switch is partially engaging but failing to complete the cycle [1].
Intermittent operation is trickier to notice but just as risky. The float switch might pass your monthly manual test with flying colors but fail when it matters most – like during a heavy rainstorm. This inconsistency is often caused by dirty electrical contacts or loose wiring that only acts up under specific conditions [1].
If you manually lift the float and it feels stuck or moves awkwardly, debris may have built up around the mechanism. A waterlogged float ball is another telltale sign – it’ll feel unusually heavy and might make a sloshing sound when shaken. On the electrical side, a burning smell or visible sparking near the switch signals an urgent issue requiring immediate attention.
Monthly testing can prevent 90% of float-related basement flooding [1]. A quick "lift test" is all it takes: manually raise the float while the pump is powered on. If the motor kicks in, the problem is likely mechanical. If it doesn’t, you could be dealing with an electrical issue or a dead motor [1].
In the next section, we’ll walk you through troubleshooting these problems step by step.
How to Troubleshoot Float Switch Issues
If your sump pump’s float switch is acting up, figuring out whether the issue is mechanical or electrical can save you time and money. Before calling a professional, you can perform a few simple checks to diagnose the problem. Often, what seems like a pump failure is something as minor as a tripped circuit breaker or a small mechanical glitch.
Verify the Power Source
Start by checking your electrical panel to make sure the sump pump’s circuit breaker is in the "ON" position. Storms and power surges often trip breakers. Next, confirm the pump is plugged in – sometimes, maintenance work or adjustments to the discharge pipe can accidentally disconnect the cord. If the pump still doesn’t work, turn off the power and inspect the wiring. Look for frayed power cords or visible damage, and ensure all connections inside the junction box are secure. If you recently experienced an electrical storm, check for any signs of surge damage, especially if you’re using an electronic float switch.
Clean the Sump Pit
A dirty sump pit is a common cause of float switch problems. Turn off the pump and clear out any debris, such as gravel, leaves, or sediment, that might have gathered at the bottom. Pay close attention to the area around the float mechanism – small obstructions can easily stop the float from moving freely. If you have a tethered float, make sure the cable isn’t wrapped around the pump housing or discharge pipe. Reposition the discharge pipe if needed to prevent future tangling. For vertical float switches, clean the rod with a damp cloth to ensure it moves smoothly without sticking. Once the pit is clean, you can manually test the float to see if the issue is with its mechanical movement.
Test the Float Manually
After cleaning the pit, manually testing the float helps rule out debris-related issues. Mike Thompson, a Master Plumber at Water Pro, suggests:
"The ‘Lift Test’ is your diagnostic secret weapon. Manually lift the float (or tethered ball) while pump is powered. If the pump doesn’t run, the problem is electrical or the motor has failed" [1].
For vertical floats, lift the float to chest height; for tethered floats, raise the ball until the cable is horizontal. The pump should activate within 2–3 seconds. If it does, the motor is working, and the issue is likely mechanical. If nothing happens, the problem is electrical or the motor may be damaged.
Look for Physical Damage
Remove the float and give it a gentle shake. If you hear water sloshing inside, the float is waterlogged and needs to be replaced immediately. Check the float housing for cracks, especially along seams where water could enter. For vertical floats, inspect the rod for corrosion or mineral buildup. Hard water deposits often appear as a white, crusty coating and can cause the mechanism to seize. Clean the rod with vinegar or an appropriate cleaning solution, then apply silicone spray to the pivot points for smooth movement. Lastly, check the switch contacts for dirt or corrosion, which may look green or brown. A quick spray of electrical contact cleaner can often fix intermittent issues [1]. Addressing these problems quickly can help protect your sump pump from further damage and reduce the risk of flooding.
Maintenance Tips to Prevent Failures
Preventing float switch failures starts with regular testing and cleaning. Proper maintenance plays a crucial role in avoiding the issues outlined earlier. The Sump and Sewage Pump Manufacturer’s Association (SSPMA) recommends a maintenance schedule based on usage: monthly for pumps handling washing machine water, quarterly for regular use, and annually for occasional use [3]. This type of failure is one of the most common causes of sump pump problems, but monthly testing can reduce float-related basement flooding by up to 90% [1]. These proactive steps complement earlier troubleshooting efforts, ensuring your pump operates reliably when needed.
Perform the "Five-Gallon Test"
This simple test can confirm that your sump pump and float switch are functioning properly. Pour five gallons of water into the sump pit and check that the float moves freely. The pump should activate within 2–3 seconds once the water level reaches 6–8 inches [1]. To stay ahead of seasonal changes, perform this test in late February (before spring thaw), early June (before summer storms), and late October (ahead of freezing weather) when pump activity typically increases [1].
Clean the Sump Pit Quarterly
Keeping the sump pit clean is essential for preventing debris buildup. Scrub the intake screen, level the pump, and ensure the sump pit cover fits securely to block debris [3]. For vertical floats, clean the rod with vinegar to remove mineral deposits, then apply silicone spray to the pivot points to maintain smooth movement.
Inspect the Discharge Line
Make sure the discharge line directs water at least 20 feet away from your foundation. Check for clogs caused by dirt or grass, as blockages can create backpressure that jams the float and risks motor damage [3]. During your annual inspection, simulate storm conditions by quickly pouring 20 gallons of water into the sump pit to confirm the float responds correctly under high-flow situations.
Consider Upgrading to an Electronic Switch
If your sump pit is smaller than 18 inches wide or 24 inches deep, mechanical floats may hit the walls and fail to operate properly [3]. In such cases, upgrading to an electronic switch can be a smart choice. These switches have no moving parts in the water, typically last 7–10 years, and have a low failure rate of around 8% [1]. This upgrade is particularly useful for tight sump pits and offers greater reliability.
If these maintenance steps don’t resolve the problem, it might be time to seek professional assistance, as discussed in the next section.
When to Get Professional Help
If your sump pump still doesn’t work after basic troubleshooting, it’s likely time to call in a professional. As Sump Pump Check advises:
"If the pump does not trigger during the test, stop and seek professional evaluation" [4].
Trying to fix more complex electrical or mechanical issues on your own could make the problem worse or even create safety risks.
For smaller or budget-friendly sump pumps, repairs may not be an option. Many of these pumps have internal components, like snap switches, relays, or electrical contacts, that can’t be replaced individually. Instead, the entire pump needs to be swapped out. Licensed electrician Ed Beal explains:
"On the smaller pumps [contacts] are not serviceable… once the contacts start failing a new switch will be needed" [5].
It’s essential to determine whether your specific pump allows for switch replacement or if a complete replacement is necessary.
If your pump frequently malfunctions or requires manual intervention to operate, it may be nearing the end of its lifespan. Pumps that fail every two to three years – even after repairs – are often due for replacement. Paul Logan highlights this point:
"The pump itself may also be nearing the end of its usable life" [5].
A professional can help you decide whether it’s time to upgrade to a more reliable system or address potential installation issues to prevent repeated failures.
Beyond float switch problems, other system issues might require expert attention. Professionals can identify problems like undersized sump pits, poorly installed discharge lines, or unsafe electrical setups. For residents in central Maryland, reaching out to trusted specialists – such as the team at Pro Landscapes MD (https://prolandscapesmd.com) – can ensure a thorough evaluation of your sump pump and drainage system. When it comes to safeguarding your basement, expert help offers both peace of mind and long-term reliability.
Conclusion
Taking care of float switch issues is a smart way to protect your basement from flooding. Did you know that 60% of sump pump failures are linked to float switch problems? [1] Whether it’s debris jamming the float, a tangled tether cable, or wear and tear from age, catching these signs early can save you from expensive water damage.
Simple maintenance, like testing your pump with a five-gallon bucket of water, can prevent most float-related problems [1]. Experts often point out that even a small investment – like a $30 float switch – can make all the difference between a dry basement and thousands of dollars in repairs [1].
Don’t wait for a complete failure. If your float switch is over five years old, shows signs of water damage, or doesn’t move smoothly during testing, it’s time to replace it. Consider upgrading to an electronic switch, particularly if you have a small sump pit. These switches have an 8% failure rate, compared to the 45% failure rate of tethered floats, offering a more reliable option [1].
For more complex issues, like electrical malfunctions, it’s best to call in a licensed technician. They can recommend the right switch for your system, troubleshoot electrical problems, and advise whether your pump needs repairs or replacement. By staying proactive and seeking professional advice when necessary, you can keep your home safe from flooding for years to come.
FAQs
Which float switch type fits my sump pit?
The tethered float switch is a popular choice for sump pits. It consists of a hollow, floating body with a steel ball inside, attached to the pump by a cord. This setup allows the switch to regulate the pump’s operation efficiently, responding to changes in water levels.
How can I tell switch vs pump failure?
To figure out if a switch has failed, inspect the float mechanism. If it’s stuck, tangled, or waterlogged, it won’t be able to activate the pump. On the other hand, pump failure typically points to issues with the motor or other internal components not working as they should.
When should I replace the float switch?
If the float switch keeps sticking, doesn’t activate the sump pump even when it moves correctly, or remains unresponsive after cleaning and troubleshooting, it’s time to replace it. These issues typically point to a faulty or worn-out switch.
Chat with Us