


- bhavya gada
- No Comments
Maryland winters can wreak havoc on poorly installed pavers. Freeze-thaw cycles – where water freezes, expands, and thaws repeatedly – are the primary culprits behind cracked pavers, uneven surfaces, and frost heave. To protect your patio or driveway, proper installation is key. Here’s what you need to know:
- Excavation Depths: 6–8 inches for patios/walkways; 10–12 inches for driveways.
- Permeable Pavers: Allow water to drain, reducing freeze-thaw damage.
- Durable Materials: High-density concrete or granite resists freezing and cracking.
- Drainage Solutions: Well-prepared bases and systems like French drains prevent water buildup.
- Maintenance Tips: Use rock salt sparingly, refill joint sand, and inspect for frost heave after winter.
With a solid base, proper materials, and regular upkeep, you can ensure your pavers withstand Maryland’s challenging winters.
Freeze-Thaw Safe Paver Installation Guide for Maryland
How To Install A Clean Stone Base For A Patio – Jordan Court Project
sbb-itb-843f8be
How Freeze-Thaw Cycles Affect Paver Installations
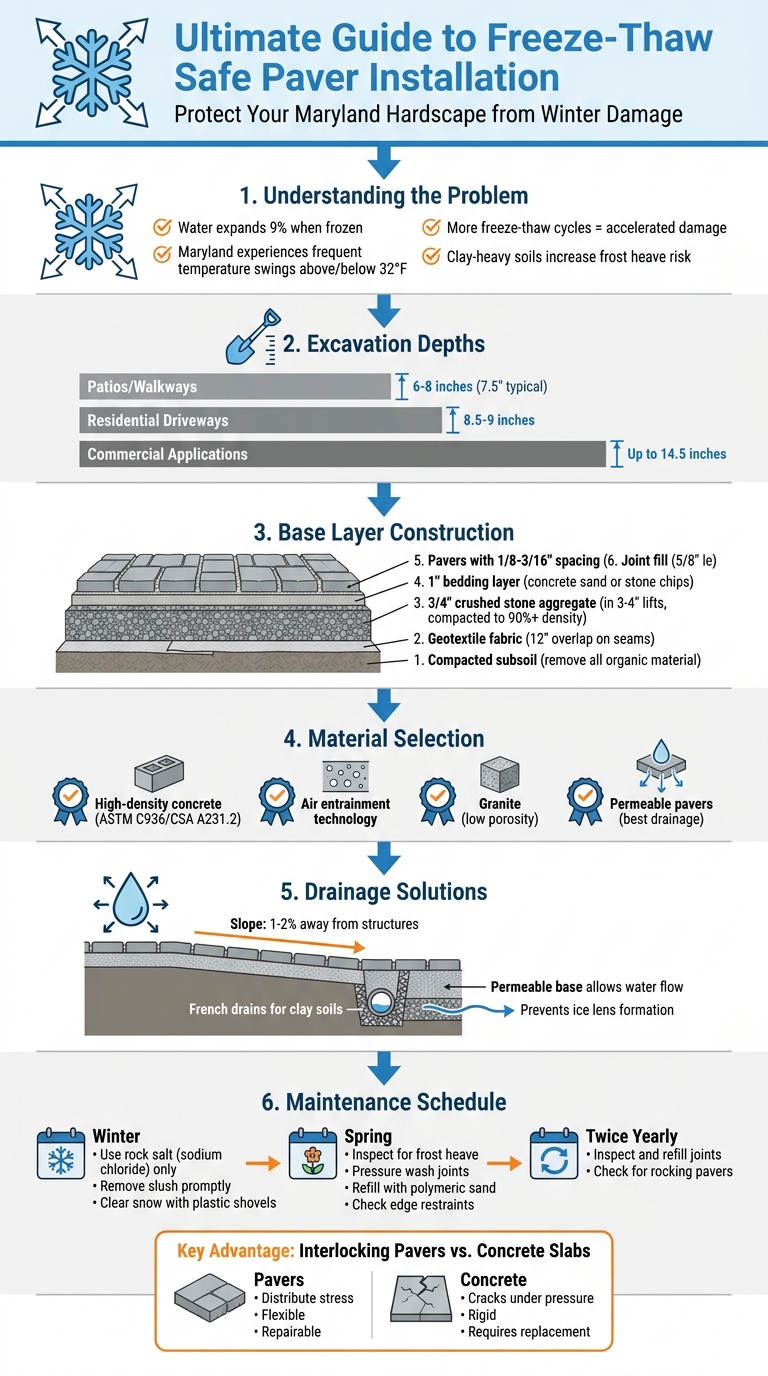
To protect your hardscape investment, it’s essential to understand how freeze-thaw cycles work. When temperatures drop below 32°F, water freezes and expands by about 9%, creating pressure that can stress surrounding materials. As temperatures rise, the ice melts, leaving behind cracks or gaps that allow more water to seep in during the next cycle. This repeated process gradually leads to scaling, flaking, and even structural damage. Over time, hundreds of these cycles can significantly weaken materials, with visible deterioration often appearing within 15–30 years [2].
"Water expands when it freezes. Materials and soils respond to that pressure differently." – Rochester Concrete Products
Below the surface, frost-prone soils can intensify freeze-thaw damage. These soils pull moisture upward, forming ice lenses that lift the pavement in a process called frost heave. When the ice melts, it leaves air pockets that cause uneven settling, creating trip hazards. While rigid surfaces like poured concrete often crack under this stress, interlocking pavers are designed to distribute the pressure across multiple units. This flexibility allows them to adapt to soil movement without breaking apart [2]. These natural processes are especially challenging in regions with harsh winters, like Maryland.
Freeze-Thaw Problems in Maryland
Maryland’s climate makes it a hotspot for freeze-thaw damage. Unlike northern states where winter temperatures stay consistently below freezing, Maryland experiences frequent temperature swings above and below 32°F. These fluctuations result in more freeze-thaw cycles during a single season, which accelerates wear and tear [2].
"Regions that frequently cross above and below freezing, rather than staying steadily cold, experience the highest number of freeze–thaw cycles." – Rochester Concrete Products
Adding to the problem, Maryland’s winters bring plenty of rain and snowmelt, which continuously introduce moisture into pavement joints and cracks. Combined with the state’s clay-heavy soils – known for being frost-susceptible – these conditions speed up surface degradation and subsurface frost heave. Without proper installation, hardscapes in Maryland are at a much higher risk of premature failure [2]. To combat this, solutions like permeable pavers are often recommended, as they’re better equipped to handle these dynamic challenges.
Why Permeable Pavers Work Better in Freeze-Thaw Conditions
Permeable pavers are designed to address the root causes of freeze-thaw damage: water infiltration and pressure buildup. By allowing water to drain through the surface and into an open-graded aggregate base, they reduce the amount of standing water that can freeze and expand [2].
Their modular design is another advantage. Unlike rigid concrete slabs that crack under stress, interlocking pavers can shift independently. If the base needs adjustment, individual pavers can be removed, the base fixed, and the pavers reset – without compromising the overall structure [2].
| Feature | Traditional Rigid Slabs | Interlocking Paver Systems |
|---|---|---|
| Response to Stress | Cracks under pressure | Distributes stress across units |
| Water Management | Traps water | Drains through joints and base |
| Repairability | Requires patching or replacement | Individual units can be reset |
| Winter Durability | Susceptible to cracking | High resistance with flexible joints |
Additionally, pavers made specifically for cold climates often include air entrainment technology. This process creates tiny air pockets within the concrete, giving freezing water room to expand without causing cracks or spalling [2]. These features make permeable pavers an excellent choice for areas prone to freeze-thaw cycles.
Choosing Paver Materials for Freeze-Thaw Durability
When it comes to Maryland winters, choosing the right paver material is critical. The freeze-thaw cycles can wreak havoc on hardscapes, causing cracks and damage if the materials aren’t up to the challenge. High-quality pavers stand out with three key traits: high density to limit water absorption, air entrainment to handle expansion safely, and adherence to strict manufacturing standards. Pairing the right material with a well-prepared base and proper sealing can ensure your hardscape weathers the seasons for years to come.
Density matters. Dense, high-strength concrete pavers are less likely to absorb water, which means there’s less moisture inside to freeze and expand, causing cracks. Look for pavers that meet certifications like ASTM C936 or CSA A231.2. As Lincoln Paiva, a Professional Engineer, notes, "Techo-Bloc pavers… are manufactured at the plant to comply with the highest Canadian standards for strength and durability – they’re heavily monitored during each step in the manufacturing process" [3].
Air entrainment is another crucial factor for concrete pavers. This process creates tiny air pockets within the material, giving water room to expand without causing damage [2]. For natural stone options, granite is the standout choice for freeze-thaw resilience due to its hardness and low porosity. On the other hand, materials like limestone and sandstone can absorb more water and require regular sealing to maintain their durability [4][5]. It’s also worth checking if the material warranty covers the use of de-icing agents, which can impact performance.
Paver Material Comparison
Here’s a quick breakdown of popular paver materials and their freeze-thaw durability:
| Material Type | Advantages | Considerations |
|---|---|---|
| Concrete Pavers | Affordable, durable, and can include air entrainment for added protection. | Ensure they meet standards like ASTM C936 or CSA A231.2 for freeze-thaw reliability. |
| Natural Stone | Aesthetic and long-lasting; granite excels in freeze-thaw conditions. | Limestone and sandstone may require regular sealing to prevent water absorption. |
| Permeable Pavers | Excellent drainage reduces freeze-thaw risks by managing water effectively. | Often comes with a higher upfront cost but offers long-term savings. |
Permeable pavers are particularly effective in freeze-thaw environments because they tackle the root problem: water. These pavers allow meltwater to drain through the surface into the base layer below, minimizing the risk of saturation and subsequent damage. According to a study from the Morton Arboretum, over a 50-year period, the cost of maintaining a permeable pavement system is drastically lower – just $0.02 for every $1 spent on asphalt repairs [3]. By managing water effectively, these materials align perfectly with installation practices designed to withstand winter’s challenges.
Site Preparation for Freeze-Thaw Safe Paver Installation
Creating a stable, well-draining base is key to protecting pavers from the effects of freeze-thaw cycles. Even the most durable pavers can fail if the foundation beneath them shifts or traps moisture. The goal is straightforward: eliminate materials that can trap water or move and construct a base that resists frost heave. Proper site preparation reduces water retention and minimizes stress on the pavers during freezing and thawing periods.
Soil Assessment and Excavation
Start by excavating down to the stable subsoil, removing all organic material. Organic matter breaks down over time, compromising the stability of the foundation. The depth of excavation depends on the project:
- Patios and walkways: About 7.5 inches
- Residential driveways: 8.5–9 inches
- Commercial applications: Up to 14.5 inches [8]
The type of soil on-site also plays a critical role. Sandy gravel, which drains well, may require less excavation. Conversely, clay-heavy soils, like blue or silver clay, hold moisture and often demand deeper excavation. Sam Maerz, Owner of Back 40 Landscaping, explains:
"The thicker the gravel base is, the wider it’s able to disperse the weight, and thus transfers less weight to a single spot. Thicker gravel bases kind of float over poor soil types." [8]
Before adding base material, compact the subsoil thoroughly using a large walk-behind compactor. This step is especially important for recently disturbed or filled areas. Additionally, check your local frost line to ensure that sensitive structures are positioned below 18 inches in colder regions to prevent freeze damage [8]. Once the excavation and compaction are complete, the focus shifts to building a base that can withstand freeze-thaw cycles.
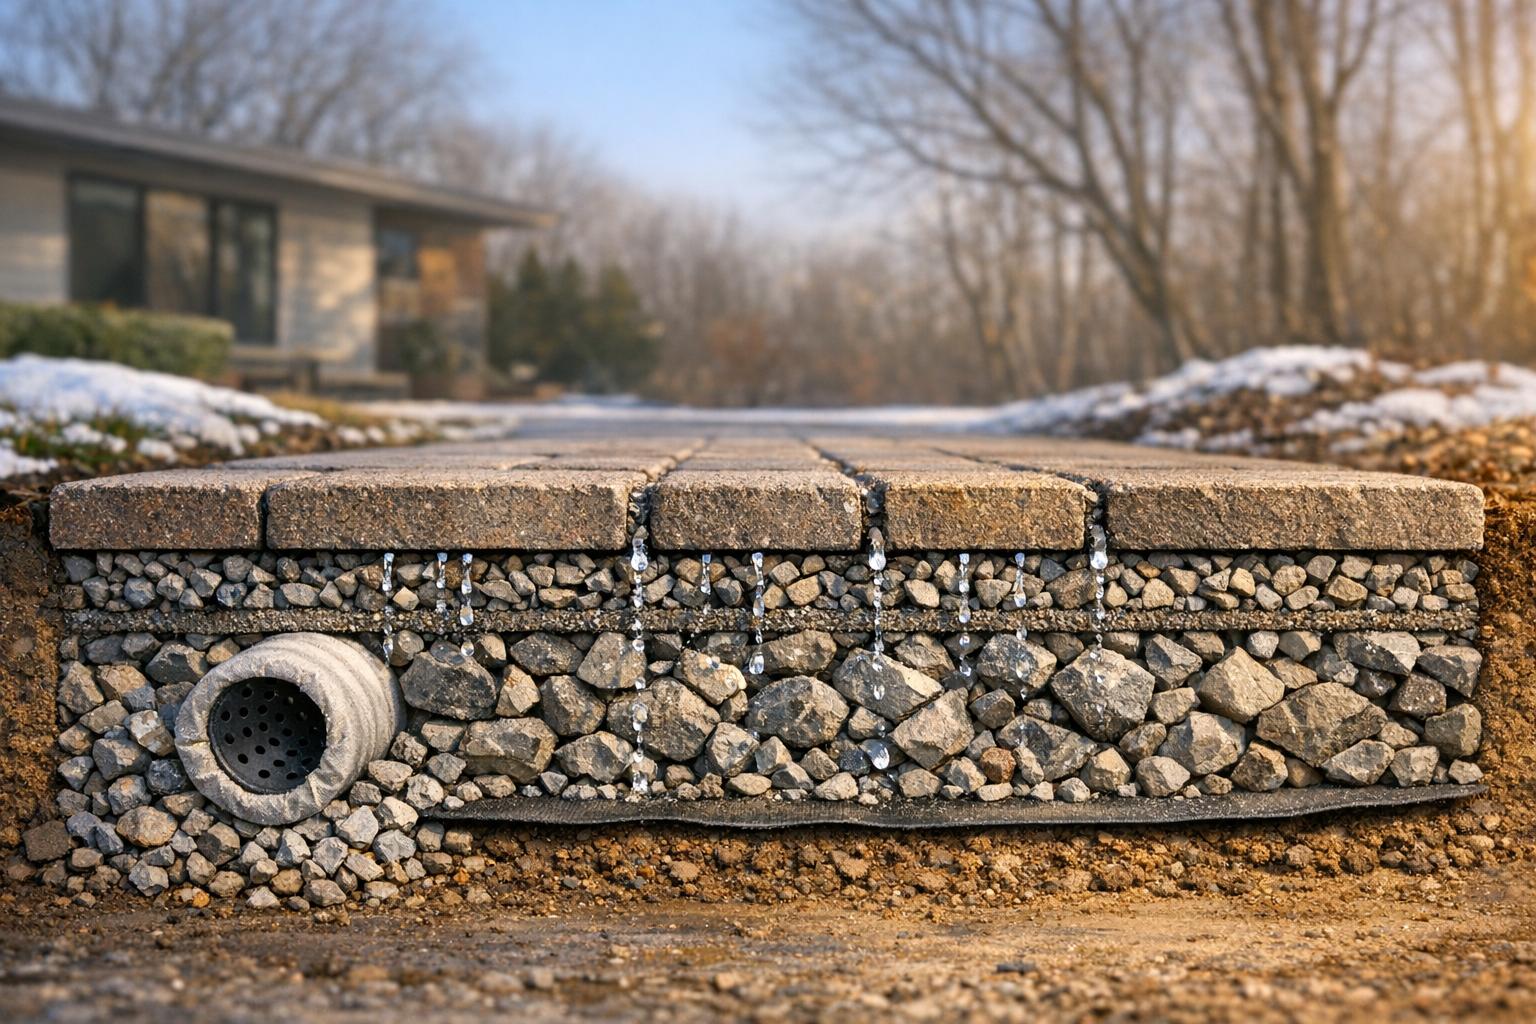
Building a Freeze-Thaw Resistant Base Layer
After excavation, cover the subsoil with a woven geotextile fabric. This fabric prevents the aggregate base from mixing with the soil below and helps block weed growth. For full coverage, overlap the seams by at least 12 inches [6][7].
Next, create the aggregate base using 3/4-inch minus crushed stone. This material compacts well and allows water to drain efficiently. In areas prone to freeze-thaw conditions, it’s wise to add extra aggregate. Belgard advises:
"In colder climates, it may be necessary to add more aggregate base material to allow for the freeze/thaw conditions present there. It doesn’t hurt to add more base material if you are unsure." [6]
Compact the aggregate in 3- to 4-inch layers using a plate compactor with at least 5,000 lbs of force. Avoid compacting more than 6 inches in one pass to maintain a stable base. Each layer should achieve over 90% of its modified Proctor density. As you build up the base, maintain a slope of 1% to 2% (about 1/8 to 1/4 inch per linear foot) away from buildings. This ensures proper water runoff and prevents pooling [6][7].
Finally, screed a uniform 1-inch layer of concrete sand or stone chips over the compacted base. This creates a smooth, even bedding surface for the pavers [6][7].
The table below summarizes the key steps and specifications:
| Installation Step | Recommended Specification |
|---|---|
| Excavation | Remove all organic topsoil until reaching stable subsoil. Depth varies: ~7.5" for patios/walkways; 8.5–9" for residential driveways; up to 14.5" for commercial applications. |
| Geotextile | Lay a woven geotextile fabric over the subsoil, overlapping seams by at least 12 inches. |
| Aggregate Base | Use 3/4-inch minus crushed stone, placed in 3–4-inch lifts and compacted to achieve over 90% modified Proctor density. |
| Compaction | Use a plate compactor with a minimum of 5,000 lbs force for each lift, avoiding more than 6 inches of material per pass. |
| Drainage Slope | Maintain a slope of 1–2% (approximately 1/8 to 1/4 inch per linear foot) directed away from structures to ensure proper water runoff. |
| Bedding Layer | Screed a uniform 1-inch layer of concrete sand or stone chips over the aggregate to create a smooth bedding surface. |
Installing the Permeable Paver System
With a compacted and carefully graded base ready, the installation process focuses on ensuring each paver contributes to a durable, freeze-thaw resistant surface. Interlocking paver systems are specifically designed to handle movement caused by freeze-thaw cycles. As Rochester Concrete Products explains:
"Interlocking pavers start from a different design philosophy: accept movement and control it rather than resisting it." [2]
This modular design spreads stress across hundreds or even thousands of smaller units, allowing for localized adjustments that keep the entire surface intact.
Laying and Leveling Pavers
Once the base is stable, the next step is to lay and secure each paver to maximize resilience against freeze-thaw conditions. Begin by placing the pavers directly onto the screeded bedding layer, starting from a straight edge or corner. Maintain consistent spacing between the pavers – usually 1/8 to 3/16 inch – to create joints that will later be filled with aggregate. These sand-filled joints help absorb shocks and accommodate shifts in the soil caused by frost heave.
Carefully place each paver straight down without sliding it, as sliding can disturb the smooth bedding surface and create low spots. If a paver becomes uneven during placement, lift it, re-screed the bedding layer, and reset it to ensure proper leveling.
To prevent lateral movement, install strong perimeter edge restraints around the entire installation. These restraints – made from materials like heavy-duty plastic, metal, or concrete – are secured with spikes driven into the compacted base. Proper edge restraints are essential to prevent "creeping", which occurs when ground expansion and contraction push pavers outward during winter. Without these restraints, snow removal and freeze-thaw cycles could cause the paved surface to separate over time.
After all the pavers are in place, use a plate compactor to firmly seat them into the bedding layer. This step ensures even load distribution and eliminates any high spots that could interfere with snowplows during winter maintenance.
Filling Joints and Sealing
With the pavers securely in place, the next step is to fill the joints, creating a fully integrated and durable surface. For permeable installations, use clean, angular crushed stone – typically 5/8-inch material – instead of standard sand. The angular stone locks into place under pressure, allowing water to flow through while maintaining a secure interlock. Rounded gravel, on the other hand, shifts too easily and fails to provide the necessary stability.
Sweep the joint material across the surface using a push broom, working it into the gaps with multiple passes to ensure the joints are completely filled. Fully filled joints are essential for maintaining interlock and evenly distributing stress across the surface. Once the joints are filled, run the plate compactor over the surface again to drive the material deeper into the gaps. Add more aggregate and repeat the process until the joints remain full after compaction.
Pavers made with air entrainment technology provide additional protection against freeze-thaw damage [2]. Keep extra joint aggregate on hand for periodic top-ups, as wind, rain, and cleaning can gradually remove some of the material. Regular refills help maintain the interlock that keeps the surface stable through seasonal changes.
Unlike poured concrete or asphalt, interlocking paver systems can be installed in any season – even winter – because they don’t rely on temperature-sensitive curing processes. The only limitation is frozen ground, which can usually be addressed by removing the frozen soil to reach the appropriate base depth.
Drainage Solutions for Freeze-Thaw Conditions
Water trapped beneath pavers can cause serious problems. When temperatures drop and that water freezes, it expands, creating upward pressure. This can shift pavers by several inches over just one winter [9]. To prevent this, proper drainage is critical. It works alongside a well-prepared base to stop moisture from building up, which is the main culprit behind frost heave.
A durable paver installation depends on keeping water from pooling in the base. A well-designed drainage system allows moisture to flow through the paver system and into the surrounding soil instead of lingering. This prevents the formation of ice lenses – horizontal layers of ice that push up and distort the pavement from below. The following drainage techniques can help ensure water doesn’t compromise your paver base.
Drainage Techniques for Paver Installations
Good drainage starts with proper surface grading and effective subsurface strategies. A slope of 1–2% is ideal for directing water away from the base and toward designated drainage areas, all while maintaining a smooth, even surface [2][9].
For areas with heavy clay soils or naturally low spots that collect water, French drains are an excellent solution. These gravel-filled trenches, equipped with perforated pipes, capture groundwater before it reaches the paver base. The water is then redirected to storm drains or dry wells. Depending on the site’s needs, French drains can be installed along the edges of the paved area or directly beneath the base layer. This method actively combats the forces of freezing moisture that cause pavers to lift and shift [2][9].
Another option is dry riverbeds, which not only manage overflow during snowmelt but also add a decorative touch to the landscape. These channels, filled with progressively larger stones, slow down water flow and encourage it to soak into the ground. By reducing runoff volume, they help prevent water from saturating the paver base. In areas where the ground freezes to depths of 4–6 feet, features like these are especially helpful for handling the intense moisture fluctuations that come with spring thaw [9].
Pro Landscapes MD‘s Drainage Management Services

Maryland’s freeze-thaw cycles pose unique challenges, especially with the region’s clay-heavy soils and unpredictable winter weather. Pro Landscapes MD specializes in designing drainage solutions tailored to these conditions. Their services include French drain installation, stormwater management systems, grading, and land leveling – all vital for protecting paver installations from frost-related damage.
What sets Pro Landscapes MD apart is their customized approach. They evaluate each property’s topography, soil type, and existing drainage patterns to create systems that work harmoniously with the natural landscape. For paver installations, this means incorporating drain pipe placement and drainage repairs directly into the base construction process. By giving water multiple escape routes, they ensure the system is ready before freeze cycles begin. Their work across Howard County, Montgomery County, and nearby areas has proven that proper drainage is the key to keeping paver installations intact through Maryland’s challenging winters year after year.
Maintaining Freeze-Thaw Safe Pavers
Once your paver system is installed with proper drainage, regular upkeep becomes essential to keep it resistant to freeze-thaw cycles.
Even the most carefully installed pavers require consistent care to handle Maryland’s challenging freeze-thaw conditions. When water freezes, it expands by about 9%, which can create pressure that lifts pavers or cracks the joints [11]. To ensure durability, it’s crucial to prevent water from seeping into the base layer and to maintain the structural integrity of the paved surface. This helps protect the foundational drainage and base layers from stress and water buildup.
A key part of this maintenance is keeping the joints filled with coarse, washed concrete sand or polymeric sand. Inspect the joints twice a year and refill them as needed to reduce water infiltration. Avoid using fine play sand – it can easily wash away and clog the drainage system [1]. These steps lay the groundwork for seasonal maintenance and long-term performance.
Seasonal Maintenance Tips
Winter care begins with proper snow removal. Start by shoveling or plowing to clear the surface, and use de-icing chemicals sparingly for thin ice layers or freezing rain that can’t be removed manually [10]. If you do need a de-icer, stick to sodium chloride (rock salt). David Smith from the Interlocking Concrete Pavement Institute explains:
"Concrete exposed to sodium chloride experienced only minor, if any, adverse effects, while specimens exposed to calcium chloride, magnesium chloride, or calcium magnesium acetate (CMA) experienced significant deterioration, including scaling, cracking, mass loss, and compressive strength loss" [10].
Promptly clear slush, as letting it sit can harm nearby metal fixtures and landscaping [10]. For permeable paver systems, keeping the joints clear is especially important. Clogged joints can trap water and snowmelt, leading to ice buildup and potential structural damage [10].
Spring is the time for a thorough inspection. After the last freeze, check for any "rocking" pavers or uneven areas. Thanks to the modular design of pavers, individual units can be lifted, the base repaired, and the original pavers reset without replacing the entire surface [2]. Pressure wash the area to remove salt residue and debris, then refill the joints with polymeric sand. Lightly mist the sand with water to create a hardened seal that blocks water infiltration and discourages weed growth [11][1].
| Maintenance Task | Recommended Season | Primary Benefit |
|---|---|---|
| Joint Sand Top-up | Spring / Fall | Keeps structural interlock and prevents water entry [2] |
| De-icing (Rock Salt) | Winter | Melts ice with minimal damage to concrete [10] |
| Slush Removal | Winter | Protects metal fixtures and landscaping [10] |
| Pressure Washing | Spring | Clears salt and debris from permeable joints [2] |
| Base Re-leveling | Spring | Fixes minor shifts from frost heave [2][11] |
Professional Maintenance Services by Pro Landscapes MD
Sometimes, routine maintenance isn’t enough, and professional help becomes necessary to ensure the longevity of your paver system. Maryland’s freeze-thaw cycles can create unique challenges, especially when permeable joints become clogged. If snowmelt has nowhere to drain, water can freeze within the paver layer, leading to structural damage [10]. Pro Landscapes MD provides expert paver maintenance and repair services throughout central Maryland to address these issues before they escalate.
Their services include post-winter inspections to identify frost heave damage, reapplication of polymeric sand to reinforce joint integrity, and resetting edge restraints if pavers start to spread [1]. For pavers showing signs of scaling or cracking from improper de-icing, they offer targeted repairs and complete surface restoration. With their patio repair solutions, you can protect your investment year after year, even with Maryland’s shifting soils and fluctuating moisture levels.
Conclusion
For successful paver installations in Maryland, choosing durable materials and constructing a solid, well-drained base is key. Interlocking pavers are especially effective at handling freeze-thaw cycles. Unlike rigid slabs, which can crack under stress, these modular systems distribute the pressure across individual units as water freezes and expands [2][11].
The foundation plays a critical role. Excavating 6–8 inches for patios and walkways and using compacted crushed gravel ensures proper drainage, preventing water from pooling and refreezing beneath the surface [1]. Adding geotextile fabric, a bedding layer, and polymeric sand helps lock the pavers in place while reducing water infiltration that could lead to frost heave [1][11]. This combination creates a long-lasting and stable hardscape.
Regular maintenance is just as important. Tasks like refilling joints, using appropriate de-icing methods, and conducting spring inspections help keep your pavers in top shape [10][2]. For Maryland homeowners, where temperature swings are common, these steps are essential to avoid expensive repairs down the line.
FAQs
Do I need permeable pavers, or will regular pavers work in Maryland?
In Maryland, permeable pavers are a smart option for handling stormwater and dealing with freeze-thaw cycles. They let water drain through, easing pressure from ice expansion and reducing potential damage. While regular pavers can also perform well if installed on a solid base, they might not be as reliable in preventing cracking or shifting over time. For better water management and durability in this climate, permeable pavers are a solid recommendation.
How can I tell if my soil needs a deeper base to prevent frost heave?
To figure out if your soil needs a deeper base, start by evaluating its drainage and how it handles freeze-thaw cycles. If the soil has poor drainage or a lot of clay, it’s more likely to experience frost heave, which might mean you’ll need to dig deeper. In regions where freeze-thaw cycles happen often, adding a deeper base with materials that drain well can help reduce soil movement and potential damage. Always take your local climate and soil conditions into account when planning your project.
What’s the best de-icer to use so I don’t damage my pavers?
The most effective options for protecting pavers from ice are calcium magnesium acetate and sand. These materials are gentler and less likely to damage the surface than traditional salt-based de-icers. To maintain your pavers’ condition during freeze-thaw cycles, steer clear of harsh chemicals.
Chat with Us