


- bhavya gada
- No Comments
If you leave bare soil exposed in Maryland, you often have just 3 to 7 days to stabilize it. That’s the main takeaway: protect soil fast, match the fix to slope and runoff, and keep temporary controls in place until the site has permanent cover.
Here’s the short version:
- Use temporary stabilization any time disturbed soil will sit idle
- Hit high-risk spots first: steep slopes, swales, ditches, stockpiles, trench backfill, and areas near storm drains
- Follow Maryland timing:
- 3 calendar days for perimeter controls, dikes, swales, ditches, perimeter slopes, and slopes steeper than 3:1
- 7 calendar days for other disturbed areas not under active grading
- Pick the right tool for the job:
- Temporary seeding for short-term bare ground that will sit long enough for grass to establish
- Mulch, blankets, mats, or tarps for fast surface cover
- Silt fence, wattles, check dams, and lined swales to slow runoff and hold sediment
- Inspect at least weekly and within 24 hours after rain of 0.5 inch or more
- Do not remove controls too early; wait until permanent cover is in place, often around 80% vegetative cover
A few points matter most. Surface cover protects the soil. Runoff controls help keep soil from leaving the site. And those are not the same thing. For example, silt fence does not stabilize bare soil by itself, and it should not go in the middle of a drainage channel.
If I were planning site work, I’d keep it simple: cover bare soil fast, secure the edges, check after storms, and treat temporary work as a bridge to the finished site.
| Method | Best for | Main limit |
|---|---|---|
| Temporary seeding | Idle soil for weeks to months | Needs time and the right growing conditions |
| Straw mulch | Flat to moderate areas needing fast cover | Can wash or blow off if not secured |
| Erosion control blanket | Slopes, seeded swales, ditches | Needs careful install and anchoring |
| Tarps/plastic sheeting | Small areas, stockpiles, short waits | Short-term use only |
| Silt fence | Downslope sheet flow | Not for concentrated channel flow |
| Wattles/check dams | Contours and small channels | Need cleanup as sediment builds up |
That’s the full article in plain English: stabilize exposed soil fast, use the right control in the right place, and leave temporary measures in place until the site can handle the next storm on its own.
Introduction to Temporary Erosion Control
sbb-itb-843f8be
When Temporary Stabilization Is Needed on a Site
Temporary stabilization is needed as soon as disturbed soil will sit long enough for rain or wind to move it. On residential and light commercial sites, that usually means any exposed area that is not under active grading already needs some form of protection.
The next job is figuring out which disturbed areas need attention first.
Areas That Need Protection First
Slope, drainage path, and how close the area is to an inlet set the priority. Bare slopes, drainage swales, soil stockpiles, trench backfill strips, and areas near storm drains or curb inlets should move to the top of the list. Why? Because sediment loss happens fastest where runoff moves fastest or where water reaches an outlet.
| Area | Risk Level | Typical First Response |
|---|---|---|
| Steep slope (steeper than 3:1) | High | Blanket or mat; stabilize within 3 days [1][2][6] |
| Drainage swale or ditch | High | Stabilize flow path and outlet |
| Soil stockpile | High | Cover daily [5] |
| Area near storm drain or curb inlet | High | Stabilize upslope soil; protect inlet |
| Recently graded flat yard | Moderate | Seed and mulch within 7 days [1][2][6] |
Trench backfill areas need close attention too. These strips are prone to erosion because they can settle into a narrow channel that concentrates runoff. In plain terms, they can start acting like a small ditch. They should be compacted and then stabilized with seed and mulch or a blanket, especially where they cross slopes or swales.
Once those priority areas are marked, timing and weather decide how fast each one needs treatment.
Timing, Weather, and Maryland Site Conditions
Maryland’s climate doesn’t leave much room to wait. Temporary seeding works best when soil temperatures allow fast germination. If conditions aren’t right, use mulch, blankets, mats, or sheeting for immediate protection.
Maryland standards require stabilization within 3 calendar days for perimeter controls, dikes, swales, ditches, perimeter slopes, and slopes steeper than 3:1, and within 7 calendar days for other disturbed areas not under active grading [1][2][6]. Those deadlines are the outer limit, not the goal.
That timing helps determine what comes first on a site: vegetation, surface cover, or runoff control.
Choosing the Right Temporary Stabilization Method
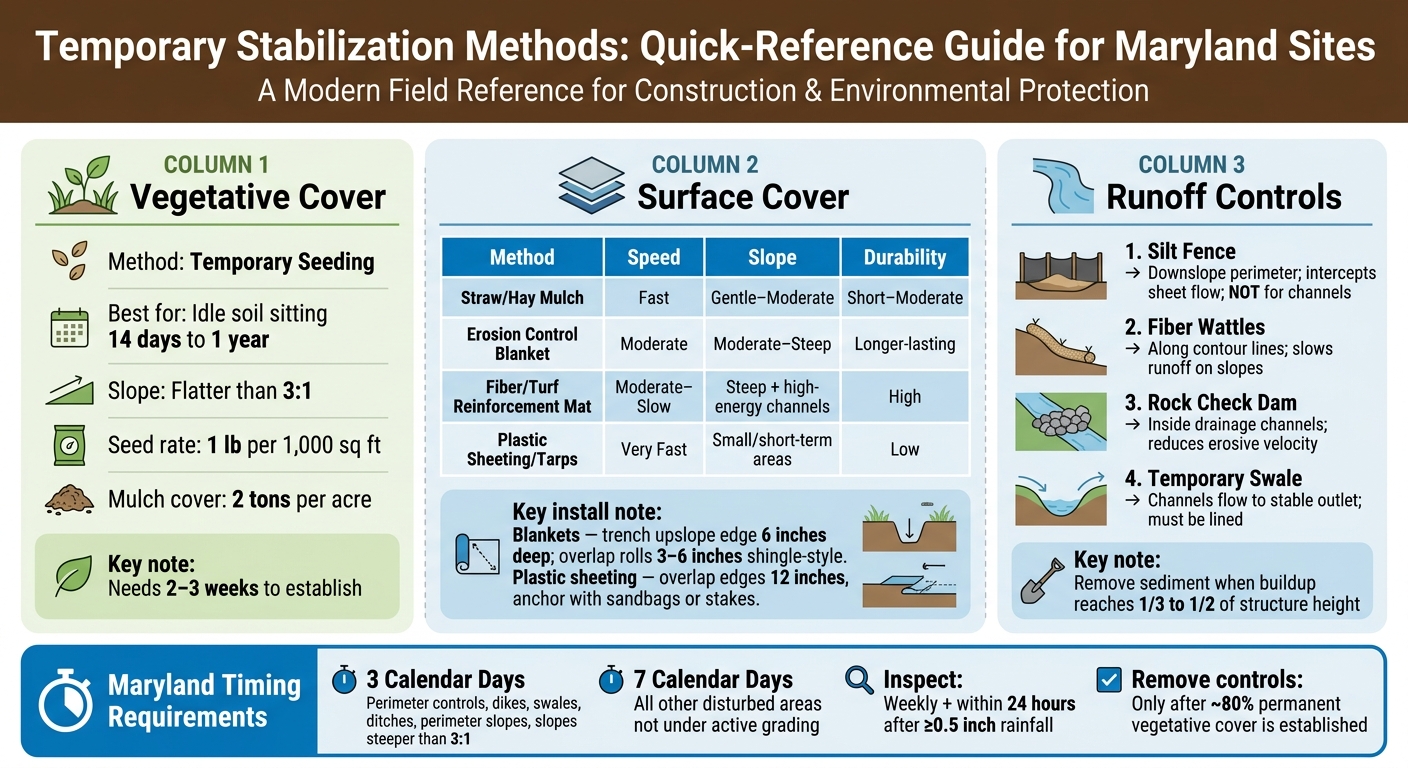
Temporary Stabilization Methods: Quick-Reference Guide for Maryland Sites
Pick the method based on four things: slope, runoff, how long the soil will stay bare, and whether the area will be disturbed again. These options fall into three buckets: vegetative cover, surface cover, and runoff controls. The goal is simple: use the lightest method that will keep the area in place until permanent stabilization starts.
Temporary Seeding for Short-Term Vegetative Cover
Temporary seeding makes sense for areas that will sit idle from 14 days to 1 year. It tends to work best on lightly disturbed soils and slopes flatter than 3:1, where seed can make good soil contact and is less likely to wash away.
In central Maryland, fast-starting cool-season seed works well. That includes annual ryegrass, cereal rye, or quick fescues. Seed in spring or early fall at about 1 pound per 1,000 square feet. Then rake or roll the seed to about 1/4 inch deep and cover it with straw mulch at about 2 tons per acre. That mulch helps hold moisture and cuts splash erosion during the first 2 to 3 weeks[3][9].
If the seed won’t have time to establish before the next phase of work, don’t force it. Use mulch, blankets, or sheeting instead.
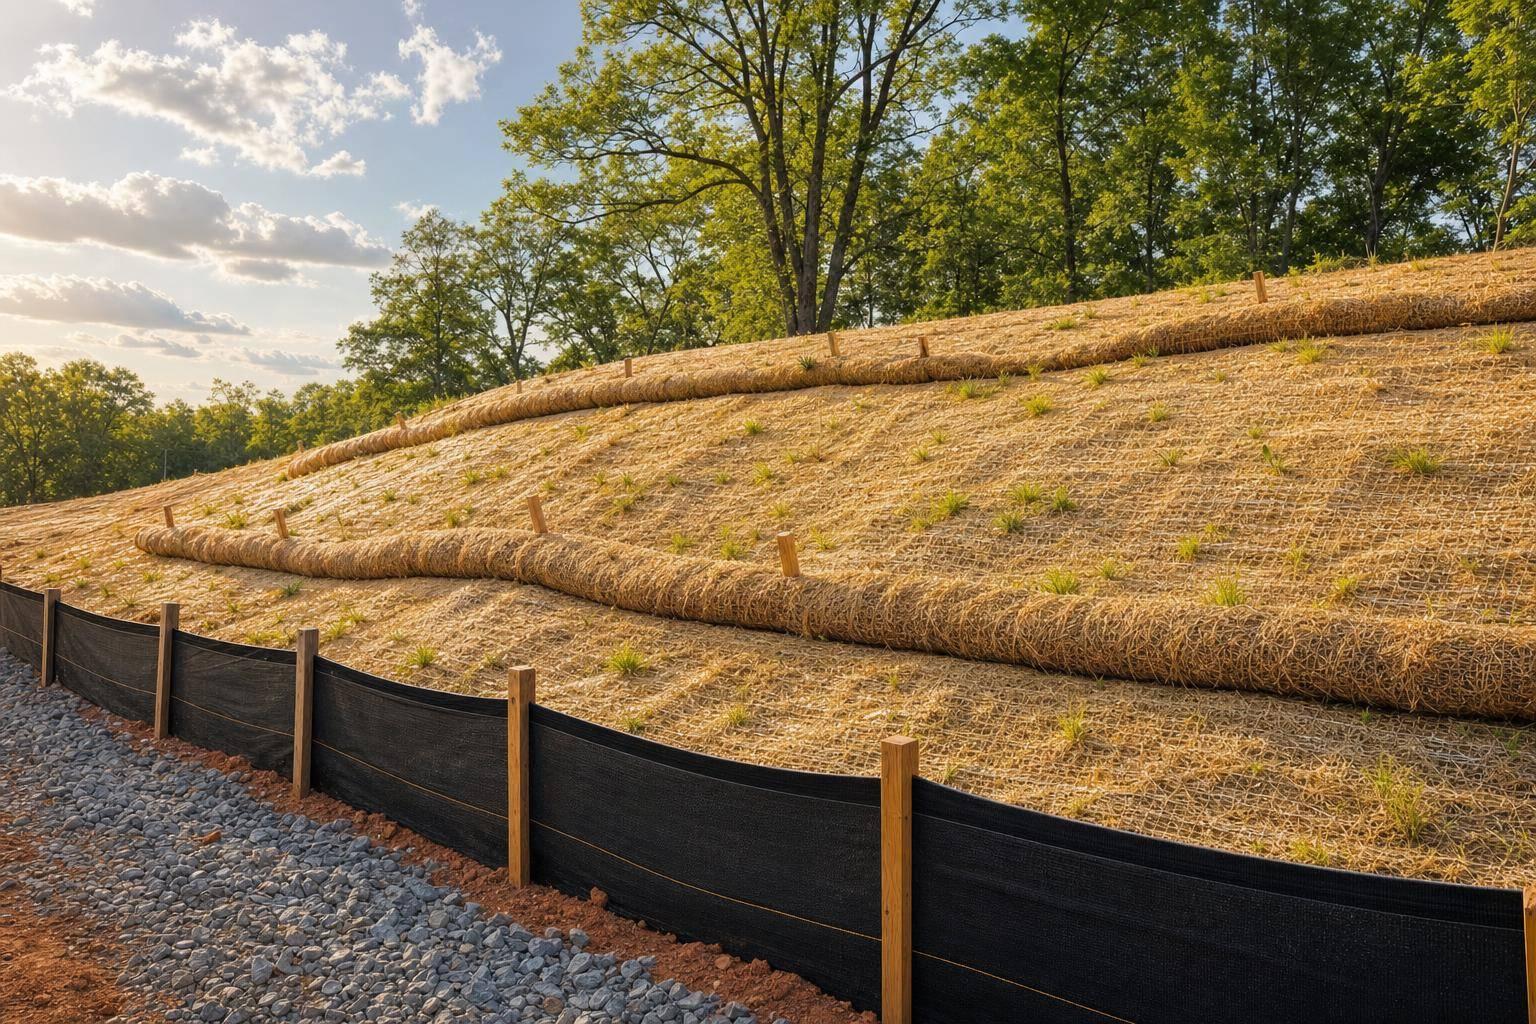
Mulch, Blankets, Mats, and Sheeting for Quick Surface Protection
When seeding doesn’t fit the schedule, or when you need protection right away, surface covers step in fast. The tradeoff comes down to install time, how long the material lasts, and what kind of slope it can handle.
| Method | Installation Speed | Slope Suitability | Durability | Common Use Cases |
|---|---|---|---|---|
| Straw/hay mulch | Fast | Gentle to moderate slopes | Short to moderate term | Over seeded areas, garden beds, and around foundations |
| Erosion control blanket | Moderate; requires trenching, rolling, and stapling | Moderate to steep slopes and seeded swales or ditches | Longer-lasting than loose mulch | Newly seeded slopes, ditches, and pond embankments |
| Fiber/turf reinforcement mat | Moderate to slow | Steep slopes and higher-energy flow channels | High | Culvert outlets, steep ditches, and behind retaining walls |
| Plastic sheeting or tarps | Very fast | Short-term protection on small, accessible areas | Low | Soil stockpiles, trench lines, and areas awaiting concrete or paving |
Blankets should go in from the top down. Trench the upslope edge about 6 inches, backfill it, and staple it down. Roll overlaps should follow the manufacturer’s directions, often 3 to 6 inches[3][7]. For plastic sheeting, overlap edges by at least 12 inches and anchor them with sandbags, stakes, or boards[7]. In Maryland, steep sections often need extra anchoring during summer thunderstorms. It’s a small step that can save a lot of cleanup later.
If runoff is concentrated, surface cover alone usually isn’t enough. Pair it with silt fence, wattles, or check dams.
Silt Fence, Wattles, Check Dams, and Temporary Swales for Runoff Control
These controls deal with runoff and sediment movement. They do not stabilize bare soil by themselves. Think of them as the runoff piece of the system, used after seeding, mulch, or blankets protect the soil surface. They work best in combination.
| Control | Best Placement | Primary Function |
|---|---|---|
| Silt fence | Downslope perimeter of disturbed area | Intercepts sediment-laden sheet flow from small drainage areas |
| Fiber wattles (sediment logs) | Along contour lines; across small drainage paths | Slows runoff and traps sediment on slopes |
| Rock check dam | Inside defined drainage channels or temporary swales | Slows concentrated flow and reduces erosive velocity |
| Temporary swale | Shallow, graded channels leading to a stable outlet | Channels flow away from disturbed areas; must be lined to prevent self-erosion |
One mistake shows up all the time: putting silt fence inside a drainage channel. That’s not what it’s made for. Silt fence is meant for sheet flow over fairly small drainage areas, not concentrated flow. Put it in a ditch, and the next hard rain can blow it out.
A better rule of thumb:
- Put silt fence at the downslope perimeter where runoff spreads out
- Put wattles and check dams in channels and along contours
Remove sediment once buildup reaches one-third to one-half of the structure’s height[8][10][11].
Installation, Inspection, Maintenance, and Removal
Once you’ve picked the right method, the next step is simple in theory and easy to mess up in practice: keep it in place and keep it working. Temporary controls only do their job when they stay tight to the soil and out of the main runoff path.
Installation Steps That Prevent Early Failure
Install temporary controls before grading is fully wrapped up. Start by clearing rocks, branches, clods, and other debris. Then lightly grade the area and loosen compacted soil before placing any blanket, mat, or silt fence.[13][15]
For blankets, the sequence matters: grade, seed, and then install the blanket within 24 hours.[15] Unroll the blanket from the top of the slope downward. Anchor the top edge in a 6-inch-deep slot, then backfill and compact it so water can’t sneak underneath.[15][18]
Where rolls meet, overlap them in a shingle pattern. That means the upper piece goes over the lower piece, so water flows over the seam instead of into it. The overlap should be at least 6 to 7 inches.[15][19][21]
For silt fence, place the fence line along a smooth, prepared contour. Bury the bottom edge in a shallow trench and compact the backfill so there’s no gap at the base.[12][21] Turn the ends upslope to help stop runoff from slipping around the corners.[12][21]
Prepared soil, trenched edges, shingle overlaps, and compacted backfill do a lot of the heavy lifting here. Skip those details, and early failure becomes much more likely.
Proper installation helps, but storms and equipment traffic can still beat up a site. That’s why routine checks matter.
What to Check After Rain and During Active Work
Inspect all controls at least once a week and within 24 hours after any rainfall of 0.5 inch or more.[13][15][16] Also inspect after equipment crosses a slope or when drainage patterns change. The goal is to spot trouble before the next storm does.
Focus first on the spots that tend to fail early:
- Edges
- Seams
- Anchors
- Sediment buildup
Walk the full perimeter and every slope. For blankets, look for lifted edges, areas pulling up between staples, or sections that have slipped downslope. Small lifts can often be fixed by adding staples and pressing the blanket back into contact with the soil. If runoff has washed out the upslope edge, remove that section, regrade the rill, and reinstall the blanket with a trenched upslope edge.[13][15][18]
For silt fence, check for leaning posts, torn fabric, and sediment collecting on the upslope side. Remove sediment when it reaches about one-third to one-half of the fence height. Wait too long, and the fence can overtop or collapse.[12][14][16] Spread the removed sediment on stable ground and stabilize it right away.
Swales and channels need a close check too. A clogged section can push water out of the channel and onto bare banks. Clear debris, patch small scour areas, and if the same section keeps washing out, switch to a tougher lining such as blankets, rock, or turf reinforcement instead of patching the same spot again and again.[4][15]
When repairs stop repeating and cover is in place, it’s time to think about removal.
When to Remove Temporary Measures and Move to Permanent Stabilization
Removal should come after stabilization, not before. Leave temporary controls in place until permanent cover is stable. The idea is straightforward: keep the temporary measure there until the site can handle the next storm on its own.
For vegetative cover, that usually means about 80% surface coverage from an established stand of permanent vegetation.[17][23] For hardscape, it means the final surface is complete and drainage is finished.
Once those conditions are met, remove temporary controls with care. Pull silt fence posts, roll up the fabric, and remove blankets without dragging them across stabilized areas. Spread any sediment trapped behind fences or wattles in a thin layer over stable ground, then cover it right away with seed and mulch.[20][4][22]
Before closeout, check swales, inlets, and drainage paths to make sure they’re clear of debris.
Temporary vs. Permanent Stabilization and Final Takeaways
How Temporary and Permanent Stabilization Differ
After temporary controls have served their purpose, the site moves into permanent stabilization. Temporary stabilization buys time; permanent stabilization finishes the site. Temporary controls shield exposed soil while construction is still in progress. Permanent stabilization is the end state of the site – the condition built to protect soil and handle water over the long haul.
You can see the difference in both timing and function.
| Factor | Temporary Stabilization | Permanent Stabilization |
|---|---|---|
| Purpose | Control erosion and sediment during construction pauses | Long-term soil protection after project completion |
| Service life | Days to weeks, sometimes through one construction season | Long-term; intended to remain as the final site condition |
| Common examples | Straw mulch, erosion control blankets, sheeting, silt fence, wattles, temporary seeding, check dams, temporary swales | Final grading, turf, plantings, and finished drainage or hardscape features |
| Maintenance | Frequent inspection and prompt repairs, especially after storms | Lower upkeep after establishment |
| Removal | Removed once permanent stabilization is complete | Not removed; this is the finished site |
Maryland’s erosion-control guidance puts clear deadlines on that shift. Perimeter controls and slopes steeper than 3:1 must be stabilized within 3 calendar days of disturbance. Other disturbed areas must be stabilized within 7 calendar days.[24][2][22]
Key Points for Maryland Property Owners Planning Site Work
For Maryland projects, the idea is pretty simple: use the right temporary measure for the break in work, then swap it out for permanent cover. Protect exposed soil as soon as grading pauses – not weeks later and not only when the job is done. Pick the method based on slope and runoff risk: blankets and mulch for bare soil, and silt fence or swales where water gathers and moves downhill.[3][25]
Storms are often where things go sideways. Check the site after rain, fix damage fast, and leave temporary controls in place until permanent stabilization is established. Pulling them too soon can lead to fast erosion and sediment leaving the site.
It also helps to think of grading, drainage, erosion control, and restoration as one connected plan.
FAQs
What if I miss the 3- or 7-day deadline?
Missing a critical stabilization deadline can trigger formal non-compliance and force all earthwork to stop.
If the project gets a D rating, the focus shifts right away to fixing erosion and sediment control problems. In most cases, you have 72 hours to make those corrections. Miss that window, and the site can drop to an F rating, along with liquidated damages for each day the project stays out of compliance.
How do I choose between mulch, blankets, and tarps?
Choose based on what your project calls for. For smaller jobs like garden beds or patio installs, standard mulch is a cost-effective, natural way to help protect soil from erosion.
If you’re dealing with steeper slopes or spots that get hit with more water, reinforced options bring added strength. Around trees or near inlets, compost filter socks are a flexible option that doesn’t require trenching. Pro Landscapes MD can help you pick the best fit for your property.
When is temporary stabilization no longer enough?
Temporary stabilization isn’t enough when a project calls for long-term durability – especially in high-flow areas or on steep slopes where a permanent fix is the better fit.
It also falls short when rules call for full site stabilization, often within 14 days for certain channels, or when erosion and sediment control problems create compliance issues that need immediate correction.
Chat with Us