


- bhavya gada
- No Comments
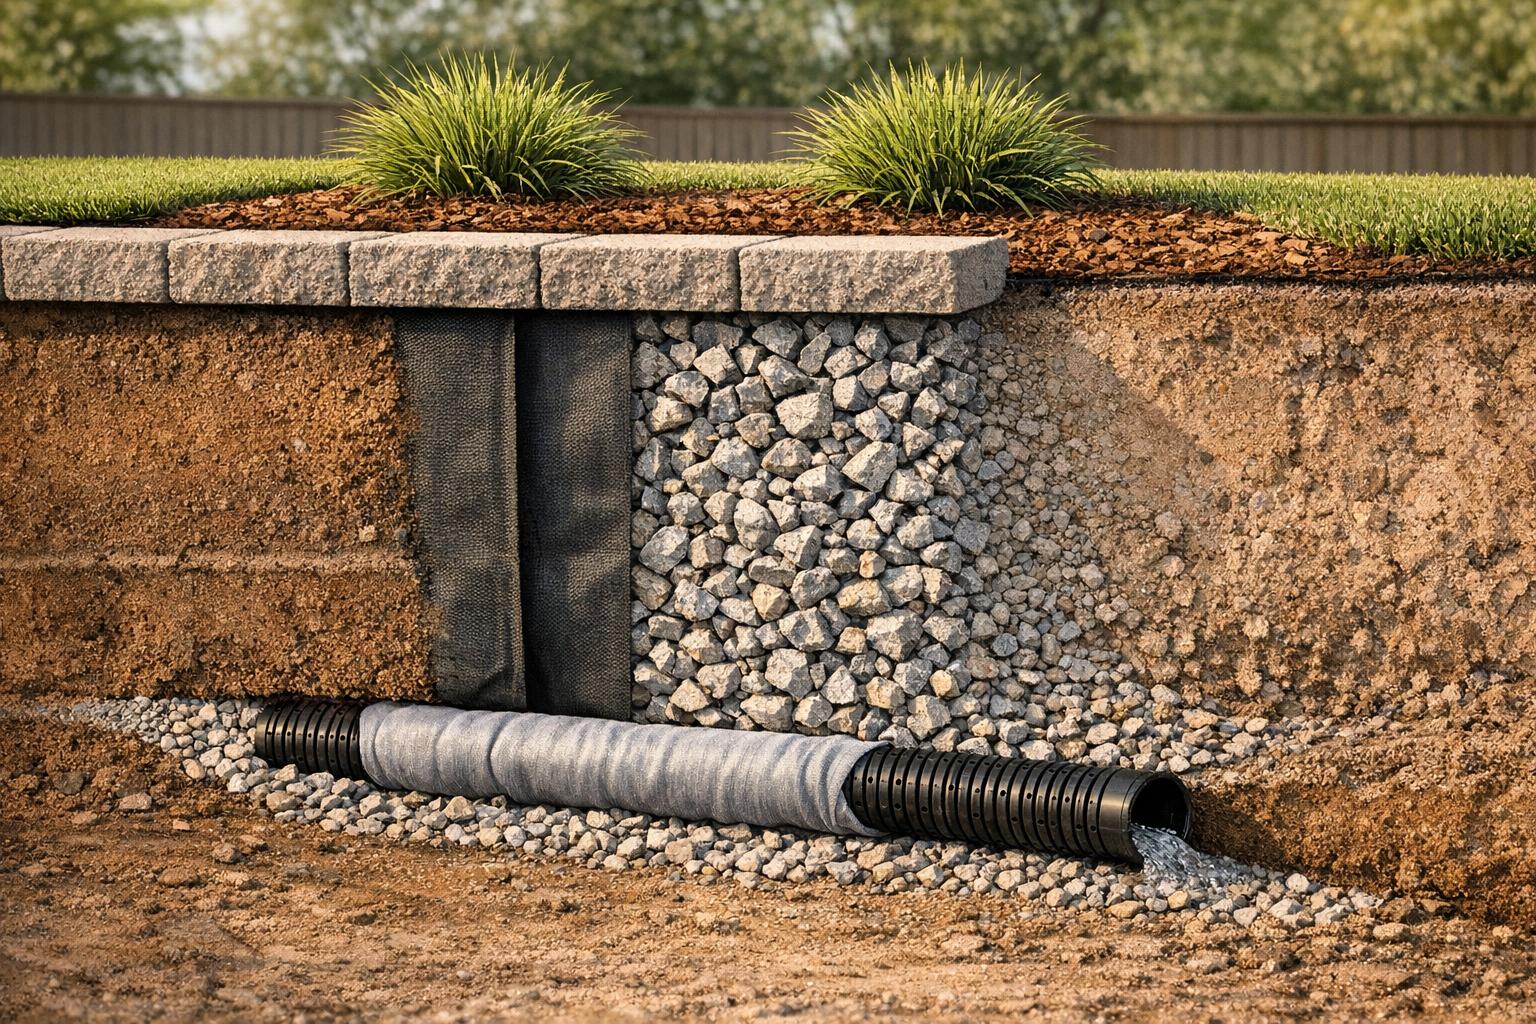
Proper drainage is the cornerstone of a durable retaining wall. Without it, water builds up behind the structure, causing pressure that leads to bulging, tilting, or even collapse. Gravel is key to managing water flow and reinforcing the wall’s stability.
Key Takeaways:
- Gravel Backfill: Use at least 12 inches of angular crushed stone (3/4-inch size recommended) for drainage.
- Drainage Pipes: Install perforated pipes behind the wall with a slope of 1/4 inch per foot.
- Geotextile Fabric: Wrap gravel with fabric to prevent soil clogging and maintain water flow.
- Layered Compaction: Add gravel in 2-3 inch layers and compact to ensure stability.
Avoid common mistakes like using too little gravel, skipping fabric, or improperly sloping pipes. Following these steps ensures your retaining wall remains sturdy and functional for decades.
Essential Drainage Methods to Prevent Retaining Wall Failure
sbb-itb-843f8be
Why Gravel is Necessary for Retaining Wall Drainage
Proper drainage is essential to prevent water buildup, which can lead to dangerous pressure behind a retaining wall. When water accumulates, it increases lateral pressure, potentially causing the wall to bulge, tilt, or even collapse. Gravel plays a key role in avoiding these issues by creating a drainage zone that directs water toward pipes or weep holes, keeping the wall stable.
How Gravel Prevents Water Buildup
Angular gravel is particularly effective at managing water flow. When rain, irrigation, or groundwater enters the soil, it moves through the voids between gravel particles, channeling water away from the wall and into the drainage system. This process reduces hydrostatic pressure, which could otherwise compromise the wall’s structure.
"Water can accumulate behind the wall, exerting pressure that leads to bulging or even collapse. Ensuring proper drainage is critical for a long-lasting retaining wall."
– McCluskey Contracting LLC [2]
Gravel backfill not only aids drainage but also reinforces the wall. For the best results, use 3/4-inch crushed stone and compact it in 2- to 3-inch layers as you build. This approach minimizes settling over time and ensures the wall remains sturdy.
Advantages of Gravel Compared to Other Materials
Gravel outperforms other materials in drainage efficiency and structural support. Standard soil, for example, holds water, which increases its weight and the pressure it exerts on the wall. Clay is even worse, as it traps moisture and significantly raises the risk of wall failure. Sand, though better than clay, tends to wash away under heavy water flow and retains more moisture than crushed stone.
"Clean, angular aggregate – such as ¾" crushed stone – is ideal, as it allows water to drain efficiently into the wall’s drainage system. Avoid materials like pea gravel or sand, which retain moisture and can compromise performance."
– Rochester Concrete Products [3]
Angular crushed stone has another advantage: its irregular edges lock together when compacted, forming a stable base that resists shifting and settling. This mechanical interlock is something rounded materials like pea gravel simply cannot provide. Additionally, the angular shape ensures larger void spaces between particles, allowing water to flow freely even during heavy rains. When paired with geotextile fabric, gravel prevents fine soil particles from clogging the drainage system, ensuring it continues to function effectively for years to come.
Choosing the Right Gravel for Retaining Wall Drainage
Selecting the correct gravel is crucial for ensuring effective drainage and preventing potential wall failure. Using the wrong material can lead to clogging, shifting, or breakdown, which can cause water buildup and compromise the stability of the wall. For the best results, angular crushed stone between 3/4-inch and 1 1/2-inch is recommended, as it provides both strength and efficient water flow.
Recommended Gravel Types and Sizes
The ideal gravel for retaining wall drainage is angular crushed stone sized between 3/4-inch and 1 1/2-inch. The sharp, irregular edges of this material interlock when compacted, creating a stable base that resists movement while still allowing water to flow freely. For optimal drainage, always use washed stone to eliminate dust and fine particles that could clog the system.
Avoid using pea gravel for structural backfill. Its smooth, rounded shape causes it to shift, leading to instability and potential wall failure, such as bulging or collapse. Similarly, materials like limestone, sandstone, or shale should be avoided because they can break down over time, producing fine particles that hinder drainage [4].
Material quality is equally important. Gravel should meet the following standards to ensure durability and efficiency:
- LA Abrasion standards: Less than 40
- Sulfate soundness: Less than 12% loss
- Particle size distribution: 100% passing a 1/2-inch sieve, no more than 10% passing a 2mm sieve, and only 5% passing a 1mm sieve [4].
These specifications are essential for creating a drainage system that will remain effective for decades. To further enhance performance, pair your gravel with geotextile fabric.
Using Geotextile Fabric with Gravel Drainage
Geotextile fabric plays a key role in maintaining long-term drainage efficiency. This permeable material wraps around the gravel drainage column, allowing water to pass through while keeping fine soil particles out. Without this fabric, soil can infiltrate the gravel over time, clogging the voids and reducing drainage capacity. This can lead to hydrostatic pressure buildup, which threatens the wall’s stability.
When installing geotextile fabric, make sure seams overlap by at least 12 inches to prevent soil from entering through gaps. Line the excavated area with the fabric before adding gravel, but do not place the fabric directly over drainage pipes or trenches, as this could block water from entering the system [4]. The fabric is designed to act as a filter, ensuring the gravel maintains a permeability rate of over 20 inches per hour and keeping the drainage system clean and functional for years [4].
How to Install Gravel Drainage for Retaining Walls
Step-by-Step Retaining Wall Gravel Drainage Installation Guide
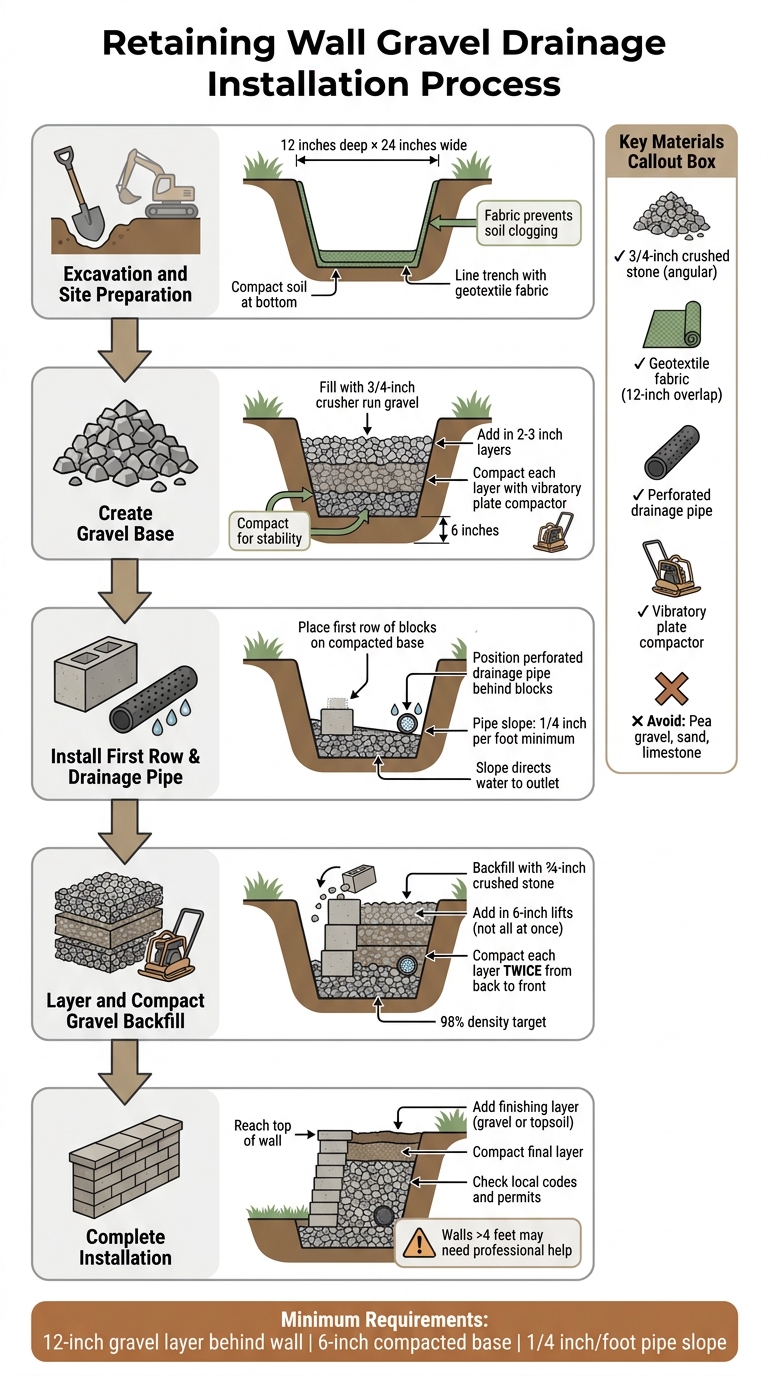
Making sure your gravel drainage system is installed correctly is crucial for keeping your retaining wall sturdy and effective over the years. This process involves precise excavation, layering, and compaction to handle water pressure efficiently.
Excavation and Site Preparation
Begin by digging a trench about 12 inches deep and 24 inches wide along the length of where your retaining wall will be built. Compact the soil at the bottom of the trench to create a stable base that won’t shift or settle unevenly later. Next, line the trench with geotextile fabric. This fabric helps keep soil from clogging the drainage gravel, which is essential for proper water flow.
Once the site is prepped, fill the trench with 3/4-inch crusher run gravel. Add the gravel in 2–3-inch layers, compacting each layer with a vibratory plate compactor until you have a 6-inch thick base. After setting this base, place the first row of retaining wall blocks on top. Directly behind these blocks, position a perforated drainage pipe. Make sure the pipe slopes at least 1/4 inch per foot to guide water toward the designated outlet. With the base and pipe in place, you can begin layering and compacting gravel behind the wall.
Adding and Compacting Gravel Layers
Backfill behind each row of blocks using 3/4-inch crushed stone. Add the gravel in 6-inch lifts instead of filling the entire space at once. This step-by-step approach is essential because compacting in smaller layers prevents the wall from settling unevenly, which could lead to tilting or cracks. Compact each 6-inch layer twice, working from the back of the blocks outward.
After backfilling each row, clear any loose gravel from the tops of the blocks to maintain a level surface before moving on. For added durability, compacting directly on top of the wall blocks can increase strength by up to 30%[5]. The angular shape of crushed stone helps the pieces lock together, forming a strong, interlocking structure that supports drainage. Professionals aim for 98% density[6] to ensure stability, so it’s wise to order about 10% more gravel than you think you’ll need to account for any loss during compaction[1].
Completing the Backfill Process
Once you’ve reached the top of the wall and compacted the final layer, finish by adding either a final layer of gravel or topsoil, depending on your design. If your wall is taller than 4 feet or the soil conditions are weak or overly wet, it’s best to consult a professional. These situations may require additional reinforcement, such as geogrid[2]. Lastly, don’t forget to check local building codes and secure any required permits before starting your project. This ensures your wall is both safe and compliant with regulations.
Common Gravel Drainage Mistakes and How to Avoid Them
Even minor missteps during installation can lead to major headaches later. Poor drainage is one of the top reasons retaining walls fail. When water collects behind the wall, it creates hydrostatic pressure that can cause bulging or even a complete collapse[2]. Knowing the common mistakes can help you avoid them and build a drainage system that works as intended.
Here are the most frequent errors that compromise drainage:
Using Too Little Gravel
One of the most common issues is not using enough gravel. To prevent drainage problems, you need at least a 12-inch thick layer of gravel behind your retaining wall. This allows water to filter through and relieves pressure. Additionally, the base requires a minimum of 6 inches of compacted gravel[7]. Skimping on gravel can weaken the wall’s support and lead to drainage failure, causing the wall to shift or collapse over time[4][7].
Another mistake is underestimating trench depth. Many DIYers forget to plan for both the gravel base and the portion of the wall that needs to be buried. Always make sure your trench is deep enough to accommodate the required 12-inch gravel layer and the buried section of the wall.
Not Using Geotextile Fabric
Skipping geotextile fabric is another common error that can ruin your drainage system. Without this fabric, fine soil particles can seep into the gravel, filling the voids and clogging the drainage path. Over time, this leads to trapped water behind the wall and compromised drainage[8].
To prevent this, use a non-woven geotextile fabric, which offers excellent filtration and water flow. When using multiple sheets, overlap the edges by at least 6 inches and secure them with landscape staples during backfilling. Wrap the entire gravel column and perforated pipe in the fabric to keep the drainage media separate from the surrounding soil. This simple step ensures your drainage system stays effective for the long haul.
Incorrect Drainage Pipe Slope
A poorly sloped drainage pipe is another major issue. For water to flow efficiently, the perforated pipe should have a slope of at least 1/4 inch per foot (a 1% grade). If the slope is too shallow or uneven, water can pool inside the pipe, increasing hydrostatic pressure behind the wall. This standing water creates the very problem your drainage system is supposed to prevent.
Before backfilling, double-check the pipe’s slope using a level and make any necessary adjustments. Always ensure the pipe directs water to an appropriate discharge point – never let it drain toward structures or terminate improperly.
Pro Landscapes MD: Professional Retaining Wall Drainage Installation

Knowing how retaining wall drainage works is one thing, but getting it installed correctly? That’s where expertise comes into play. Pro Landscapes MD specializes in delivering top-tier drainage solutions for retaining walls across central Maryland. They serve areas like Howard County, Montgomery County, Carroll County, Frederick County, Prince George’s County, and Baltimore County.
Using industry-standard techniques, they ensure every installation is done with precision. Their process follows the best practices outlined in this guide – starting with proper excavation, adding geotextile fabric, layering compacted gravel, and installing sloped perforated drainage pipes. This combination of pipes, gravel backfill, and weep holes helps prevent structural issues like wall bulging or failure caused by poor drainage[2]. By sticking to these proven methods, Pro Landscapes MD delivers retaining walls that stand the test of time.
For more challenging projects – such as walls taller than 4 feet, terraced designs, steep slopes, or areas with weak or saturated soils – they take things up a notch. They incorporate geogrid reinforcement and, when needed, consult with soils engineers to ensure stability. Their methodical backfilling process involves compacting material in layers behind each course of the wall, minimizing risks like tilting or cracking. These advanced techniques ensure a durable and reliable retaining wall, no matter the complexity.
From Annapolis to Germantown, Columbia to Potomac, and everywhere in between, Pro Landscapes MD pairs drainage know-how with full-scale hardscaping services. When installed and maintained correctly, their retaining walls are built to last for 30 years or more[2]. To explore their retaining wall and drainage services, visit https://prolandscapesmd.com.
Conclusion
Gravel drainage is the backbone of a durable retaining wall. Without it, water can build up behind the wall, creating hydrostatic pressure that leads to bulging, tilting, or even collapse. As McCluskey Contracting emphasizes, "Ensuring proper drainage is critical for a long-lasting retaining wall" and "Ignoring drainage can lead to wall failure, water damage to any surrounding structures, and increased maintenance costs" [2]. Using well-graded gravel backfill, perforated drainage pipes, and weep holes offers multiple paths for water to escape, reducing the risk of failure.
Selecting the right materials and installing them carefully is non-negotiable. Opt for 3/4-inch crushed stone, compact it in 2–3-inch layers, use geotextile fabric to block soil migration, and ensure drainage pipes are sloped correctly. These steps prevent cracking, tilting, and other structural issues.
For more complex scenarios – walls taller than 4 feet, terraced designs, or tough soil conditions – professional help is crucial. Retaining walls can last for 30 years or more [2], but only if drainage is properly managed from the start. DIY projects often miss critical details like compaction, pipe slope, and compliance with local building codes.
Whether you’re building a new wall or addressing drainage problems, following these guidelines lays the groundwork for success. Proper materials, precise installation, and effective drainage are the keys to ensuring your retaining wall stands strong for decades.
FAQs
How can I tell if my retaining wall has a drainage problem?
Signs of trouble in a retaining wall include visible cracks, leaning or bulging sections, water pooling behind the wall, soil erosion, efflorescence (those white, chalky deposits from moisture), or gaps between the wall and nearby structures. These red flags often point to poor drainage, which can cause water pressure to build up and strain the wall’s structure. Make it a habit to inspect your wall regularly – especially after heavy rain – to spot issues early and save yourself from expensive repairs down the road.
Where should the drain pipe outlet go to avoid new water issues?
To ensure proper water management, the drain pipe outlet should be directed away from the retaining wall and into a designated drainage area. Suitable options include a dry well, storm drain, or any location with adequate drainage. This helps prevent water from pooling, which could lead to further complications.
Do I need geogrid reinforcement, or is gravel drainage enough?
Gravel drainage typically works well for smaller retaining walls or those carrying lighter loads. It efficiently manages water flow and helps reduce hydrostatic pressure. However, when dealing with taller walls or structures under significant stress, geogrid reinforcement might be necessary. Geogrid helps stabilize the soil and evenly distribute pressure. While gravel alone is often enough, pairing it with geogrid adds an extra layer of stability for more demanding projects.
Chat with Us