









- bhavya gada
- No Comments
In Howard County, where annual rainfall is about 44–45 inches, walkway drainage needs to do four jobs: move water away from the house, keep the base dry, stop edge washout, and keep steps and entries less slick.
If I were choosing a fix, I’d keep it simple:
- Check where water sits after a storm
- Tell surface runoff from wet soil below
- Set the walkway slope at about 1%–2%
- Use a gravel base that drains
- Match the drain to the problem
- Send water to a safe outlet away from the house
Here’s the short version of what matters most:
- Surface water on a firm walkway: fix the pitch or add a channel drain
- Soft, soggy soil that stays wet for days: use a French drain
- Broad runoff crossing the yard: shape a swale
- Low spot collecting water: use a catch basin only if it is a true low point
- Discharge point too close to the house: move it farther out, with 4–6 feet minimum and 8–10 feet preferred
A few numbers help narrow the choice:
- Inspect after at least 1/2 inch of rain
- Hose-test problem spots for 5–10 minutes
- In the first 10 feet from the house, aim for about 1/4 inch fall per foot
- Common gravel base depth is 4–6 inches, or 6–8 inches in wetter soil
- French drains often run 8–12 inches deep
- Swales often work with 2%–4% longitudinal slope
The main point: slope and base come first. Drains only work well when water already has a clear path to leave. If you skip that, the puddle often just moves to the next spot.
This guide walks through that order so you can match the fix to the water pattern instead of guessing.
Trying a Natural Fix for Water Pooling Next to My House (Step 1)
sbb-itb-843f8be
Step 1: Assess Water Flow Before Choosing a Drainage Fix
Before you pick a fix, figure out how water moves across the walkway, under it, along the edges, and through the nearby soil.[2][3][4][6][7]
Check for Pooling, Runoff Paths, and Soft Areas After Rain
Inspect the walkway within a few hours after at least 1/2 inch of rain.[13] Walk the entire path, then check the nearby ground for about 5–10 feet toward the house. Mark any puddles, then come back later to see if they drain or stay wet.[2][3][5][6][7][8]
As you walk, press your foot into any soft or spongy spots. If the ground feels firm but has water on top, that often means the water is stuck at the surface. If the ground sinks under your weight, the soil below is likely soaked. Also watch for muddy seams between pavers or flagstones near the edges. That usually means surface water is being funneled through a tight strip.[2][3]
Take photos from the same spot each time, and make a rough sketch of the area. Use arrows for runoff, circles for standing water, and shaded areas for soggy ground. Write down how much it rained and how long the storm lasted.[2][5][6][8]
Run a Hose Test to Confirm Drainage Patterns
On a dry day, run a garden hose over the entry, step landing, or any low area for 5–10 minutes. If the water flows in a sheet toward one side, the grade is off. If it pools against a border, that border is blocking runoff.[2][3][6][7][10][14]
Tell the Difference Between Surface Runoff and Subsurface Saturation
This matters because the right fix depends on the type of water problem.
Surface runoff is easy to spot. You’ll see water moving across pavers, mulch, or soil during rain, and the ground under it usually still feels firm. Subsurface saturation looks different. The soil stays dark and soft for days, and water can seep up between pavers even after the rain stops.[11][15]
A simple percolation test can help confirm what’s going on. Dig a hole about 12 inches deep beside the walkway in a spot that stays wet. Fill it with water and let it drain once. Then fill it again and time the second drain. If the water drains within 1–2 hours, the main issue is usually surface grade. If the hole is still mostly full after several hours, the soil below is saturated, and a French drain or base rebuild will work better than regrading by itself.[7][12]
If the problem is surface runoff, fix the slope. If the problem is saturation, you need subsurface drainage. Once you know which one you’re dealing with, you can match the fix to the water pattern.
Step 2: Set the Slope and Build a Base That Drains
Once you understand how water moves, fix the slope and base first. If Step 1 showed surface runoff, handle those before you add any drains. In many cases, these two parts do more to move water than any pipe or drain you install later.
Pitch the Walkway Away From the House and Toward a Controlled Outlet
Cross-slope is the side-to-side pitch across the width of the walkway. Its job is simple: move water off the surface. Longitudinal slope runs along the length of the path and guides that water downhill toward a lawn, swale, or other controlled outlet instead of letting it sit in low, flat spots. Put plainly, cross-slope sheds water, and longitudinal slope carries it away.
For most residential walkways, a slope of 1–2% – about 1/8 to 1/4 inch of drop per foot – is usually enough to move water off the surface without making the path awkward to walk on.[18][19][21] Within the first 10 feet from the foundation, aim for the full 2% – about 1/4 inch per foot – so water moves away from the house and entry points.[6][21]
Near front entries, stoops, and garage-side walks, the pitch should send water into the yard, not toward a patio, the edge of a driveway, or a planting bed. Otherwise, you’re not fixing the issue. You’re just moving it a few feet away.
Shape and Compact the Subgrade Before Installing the Walkway
The subgrade is the soil layer right below the base, and the base will follow whatever shape that soil has. So this part matters more than it may seem.
Before adding base material, remove soft topsoil, fill low spots, trim down high areas, and smooth the soil so it matches the slope of the planned finished surface. Then compact it. If the subgrade stays loose, it can settle later and form a shallow bowl that holds water or makes pavers rock when you walk across them. Give extra attention to transition areas – where the walkway meets lawns, planting beds, retaining walls, or natural stone steps – because those spots are more likely to settle unevenly.[18][20]
Once the subgrade is shaped and compacted, the base can be built to drain.
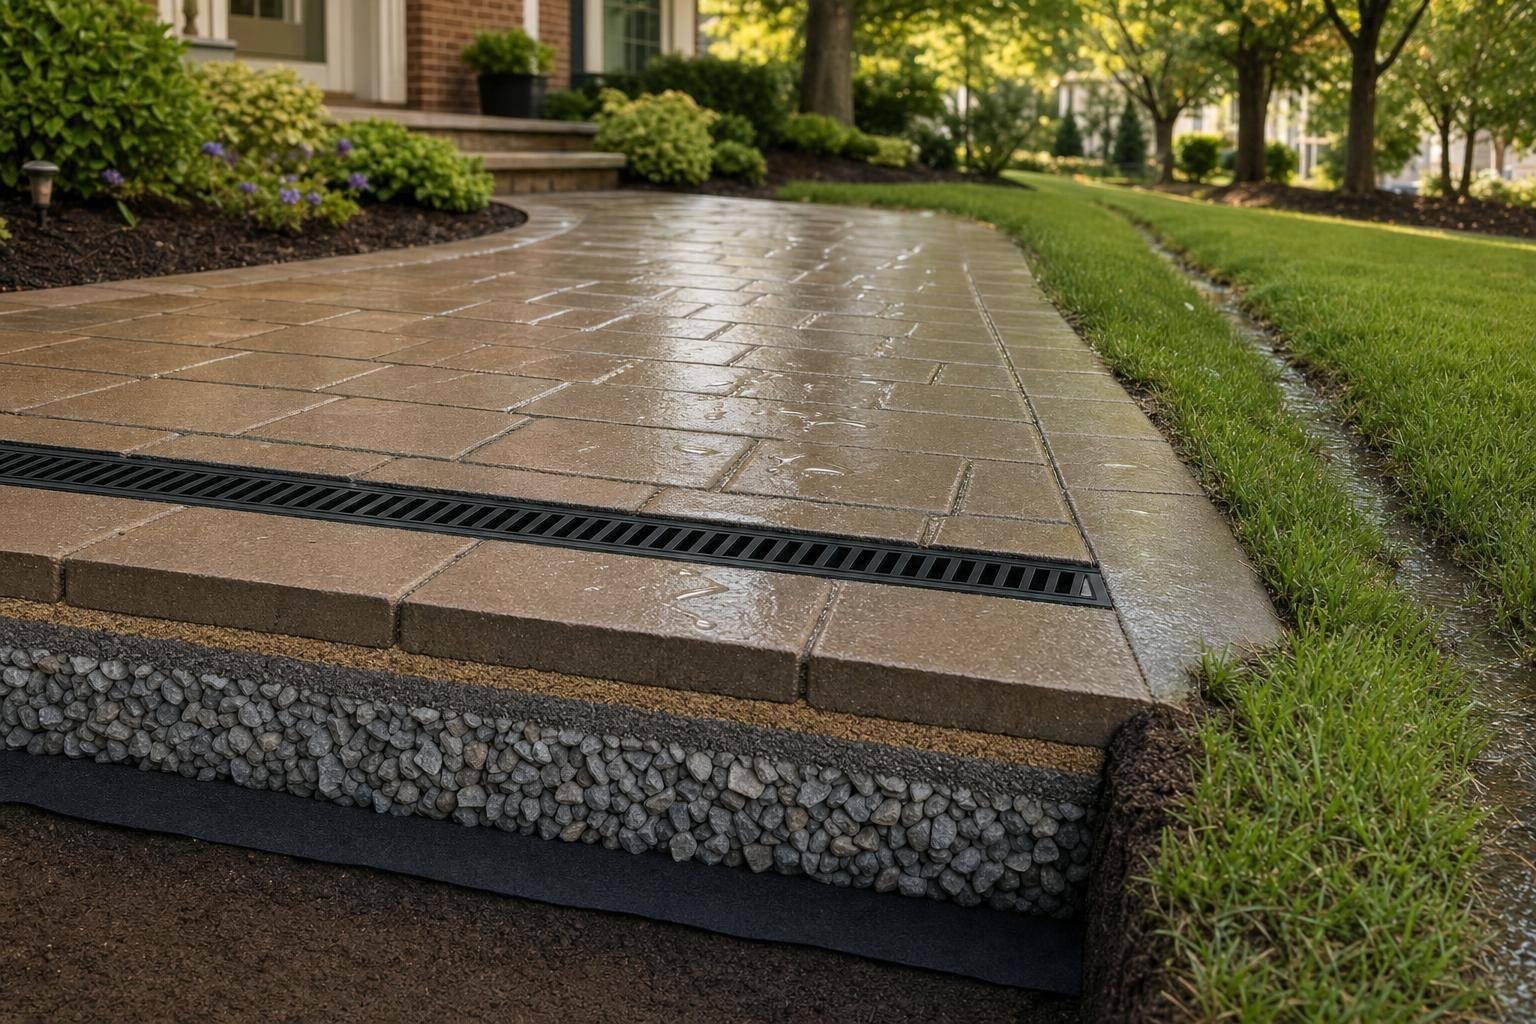
Install a Compacted Gravel Base Under Paver and Flagstone Walkways
A compacted gravel base helps water drain, spreads load, and keeps edges stable.[16][17] For light-use pedestrian walkways on well-drained soil, a 4–6-inch compacted aggregate base is common. In wetter or softer soils, 6–8 inches usually gives better support and can help limit freeze-thaw movement during Maryland winters.[16][17][20]
The base slope needs to match the finished surface. If the base is flat or pitched the wrong way, it can trap water under the pavers even when the top surface looks fine.[4][18] For paver installs, a 1-inch bedding layer of sand is usually placed over the compacted base before the pavers go in, and the whole system should slope away from the house.[18][16] If the base depth, material, or compaction is off, water can still collect below the surface.
If water still pools after this step, the issue is no longer basic base prep. At that point, it becomes a drain placement problem.
When slope and base aren’t enough, the next move is to place drains where water naturally collects.
Step 3: Match the Drainage System to the Problem
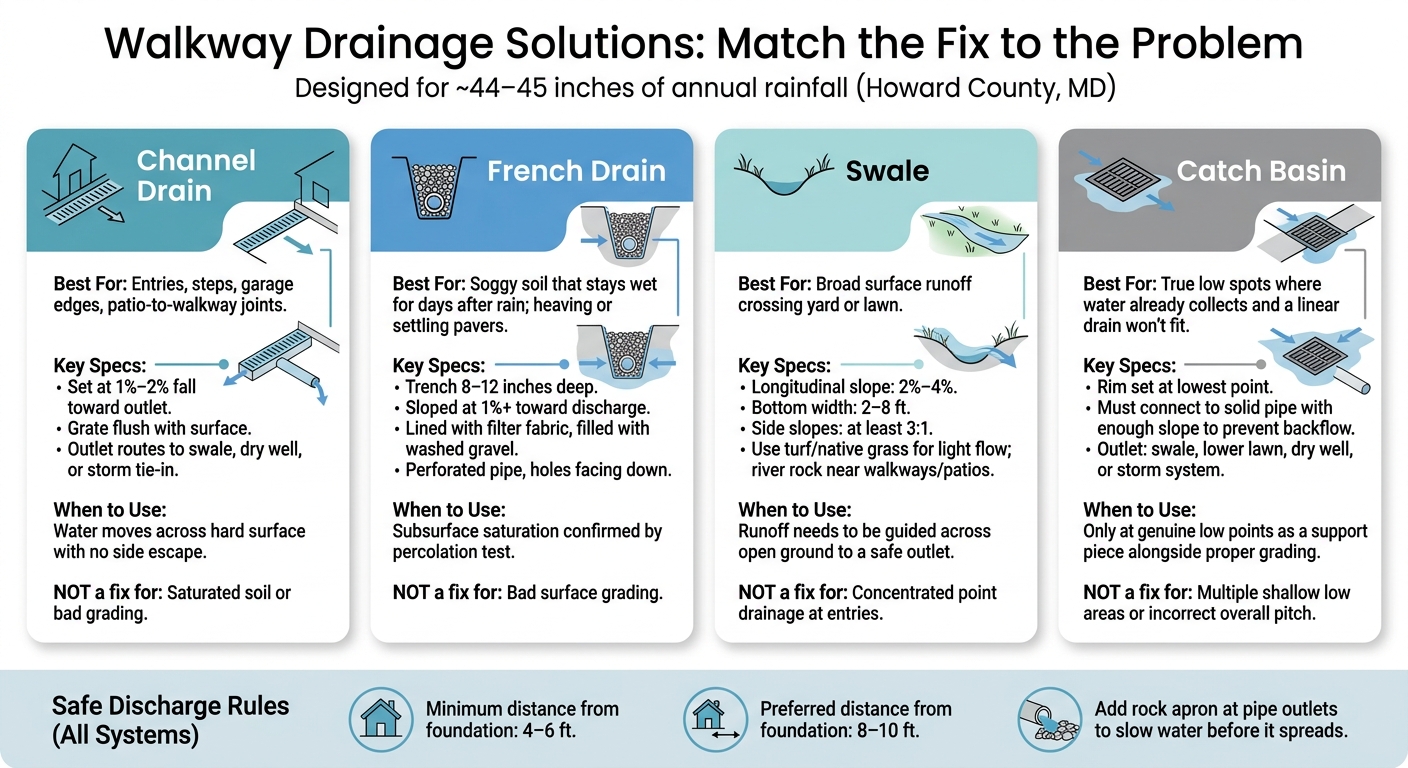
Walkway Drainage Solutions: Match the Fix to the Problem
Once the slope and base are in place, the next step is simple: match the drain to the kind of water issue you have. The goal isn’t to add the biggest system you can. It’s to use the smallest fix that handles what’s left.
Here’s the basic match:
- Channel drain: entries and hard edges
- French drain: saturated soil
- Swale: broad runoff areas
- Regrading: slope correction
Use Channel Drains at Entries, Steps, and Low Hardscape Edges
Use channel drains where water moves across hard surfaces and has nowhere to escape at the side. Common trouble spots include doors, steps, garage entries, and patio-to-walkway joints. Set the channel at 1% to 2% fall toward the outlet, keep the grate flush with the surface, and send the outlet to a swale, dry well, or storm tie-in.[24][25][28]
Near entries and steps, channel drains often make more sense than regrading. Why? They need less horizontal space, and they can often be added to existing pavers or concrete without tearing out and rebuilding the whole walkway.[24][25][28]
Use French Drains and Drain Pipe Placement for Saturated Soil
If the soil next to a walkway stays soft for days after rain, or the pavers start heaving or settling, the issue is usually below the surface. That points to subsurface moisture, not surface runoff. In that case, a French drain is the right tool.[23][26][28]
A French drain helps with soggy soil. It does not fix bad grading. A common setup uses a trench 8 to 12 inches deep, sloped at about 1% or more toward a discharge point. The trench is lined with filter fabric, filled with washed gravel, and fitted with a perforated pipe with the holes facing down before wrapping and backfilling.[26][28] Place it parallel to the walkway and slightly downslope so it intercepts groundwater before that water reaches the base. In some layouts, a perpendicular run under the path is used to reach a better outlet.[23][26]
Place Catch Basins Only at True Low Spots
Catch basins belong only in true low spots where water already collects and a linear drain won’t fit. Set the rim at the lowest point so runoff flows in instead of ponding beside it.[22][26][28]
The basin also needs to connect to solid pipe that runs to a stable outlet, such as a swale, lower lawn area, dry well, or storm system. That pipe needs enough slope to stop backflow.[22][26][28] Catch basins don’t solve grading issues. If a walkway has several shallow low areas or pitches the wrong way, the basin won’t fix that flow pattern.[22][27] They work best as support pieces used with proper grading, not as stand-alone fixes.
After you choose the drain type, route every outlet to a safe discharge point before runoff reaches patios, planting beds, or the house.
Step 4: Control Runoff With Swales, Safe Discharge, and Local Planning
Once water leaves a channel drain, French drain, or catch basin, the job isn’t done. That runoff still needs somewhere safe to go. If the outlet sends water toward a foundation, across a neighbor’s yard, or into a bare spot, you’re just trading one drainage problem for another. The goal here is simple: move water away without causing erosion or backflow.
Use Swales to Move Water Away From Walkways, Patios, and Beds
A swale uses slope to guide surface water away from walkways, patios, and planting-bed edges to a safe discharge point. It should be shallow enough to move water without turning the yard into a ditch.
For Howard County yards, aim for a 2–4% longitudinal slope, a 2–8 ft bottom width, and side slopes of at least 3:1.[29] For lighter flows, use turf or native grasses. Where runoff hits harder near walkways and patios, river rock is often a better fit.[1][29][32] These dimensions help water keep moving without washing out the soil, and they line up with Maryland’s Environmental Site Design approach of slowing, spreading, and sinking runoff.[29][30]
After that, send the flow to a stable outlet.
Pick a Discharge Area That Will Not Cause Erosion or Backflow
Once a swale or pipe collects water, the exit point matters just as much as the drain itself. A good discharge area is a stable grassy spot, like a lower section of lawn or a rain garden. Keep outlets at least 4 to 6 ft from foundation walls, with 8 to 10 ft preferred.[33][34][9] Don’t discharge water at the property edge.[9][31] If a pipe outlet empties onto lawn, add a small rock apron to slow the water before it spreads out.[29]
Conclusion: Key Walkway Drainage Steps for Howard County Homes

A workable drainage plan starts with slope, continues with the right drain type, and ends with a safe outlet. Skip one part, and the water usually shows up somewhere else on the property.
For sites with steep grades or saturated soil, Pro Landscapes MD provides professional drainage design to coordinate slope, drainage, swales, and discharge across Howard County and central Maryland.[32]
FAQs
How do I know if I need regrading or a drain?
Consider professional regrading or drainage repairs if you notice:
- Water pooling near your foundation
- Persistent standing water
- Visible soil erosion
These signs usually mean your grading isn’t pushing runoff away from your home or other drainage areas.
If slopes, walkways, or patios keep sending water where it shouldn’t go, it’s time to take a close look at your drainage plan.
Which drain works best for a wet walkway?
The best fix depends on what’s going on at your site.
Permeable pavers can help when water tends to sit on the surface. They let water pass through the joints and into the stone base below, which cuts down on puddles and runoff.
If the problem is constant dampness or water moving below the surface, French drains are often a good fit. And in spots with heavier runoff, it often helps to pair them with proper grading or swales so the walkway stays dry and stable.
Where should walkway drainage discharge?
Walkway drainage should send water away from buildings and foundations and toward designated drainage areas or natural waterways.
A good rule of thumb is a 2% to 3% slope. That works out to about 2 to 3 inches of drop for every 10 feet. It’s a small grade, but it makes a big difference. Without it, water can linger near the house and cause trouble over time.
In Maryland, drainage should also help preserve groundwater recharge and cut down on runoff that can flood or pollute local water sources. That’s why systems like French drains, bioswales, and dry riverbeds are often used.
Chat with Us