


- bhavya gada
- No Comments
Winterizing your lawn tools and equipment is essential to protect them from damage caused by rust, moisture, and freezing temperatures during the colder months. Proper maintenance not only extends the life of your tools but also ensures they’re ready to perform when spring arrives. Here’s a quick summary of the key steps:
- Clean thoroughly: Remove dirt, mud, grass clippings, and sap from tools to prevent rust.
- Fuel care: Treat gasoline with a stabilizer or drain it completely to avoid clogging.
- Oil and lubrication: Replace old engine oil, lubricate moving parts, and protect metal surfaces with oil or WD-40.
- Sharpen blades: Maintain sharpness for better performance and coat with rust-preventive oil.
- Store properly: Keep tools in a dry, well-organized space; use breathable covers for larger equipment.
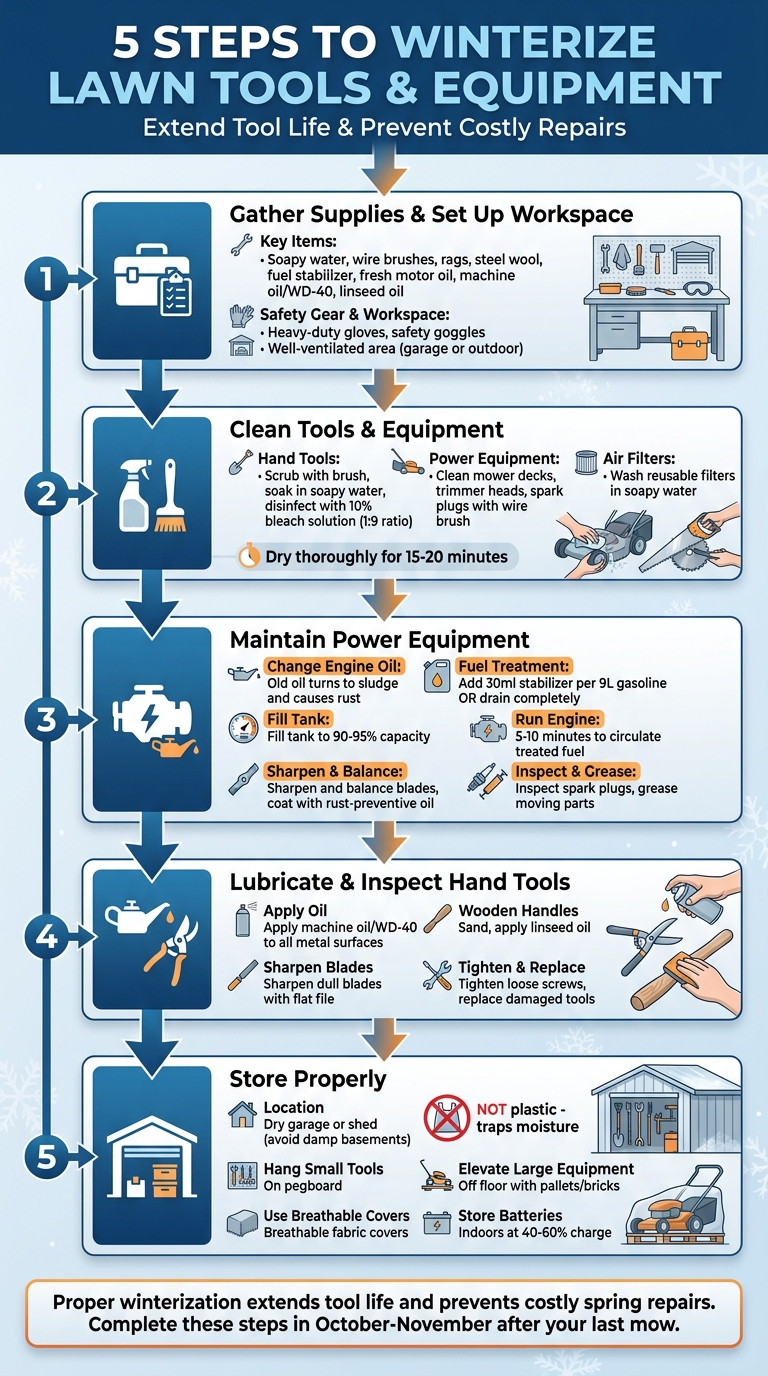
5-Step Guide to Winterizing Lawn Tools and Equipment
How to Winterize Your Lawn Equipment and Get Them Ready for Spring?
sbb-itb-843f8be
Step 1: Gather Your Supplies and Set Up Your Workspace
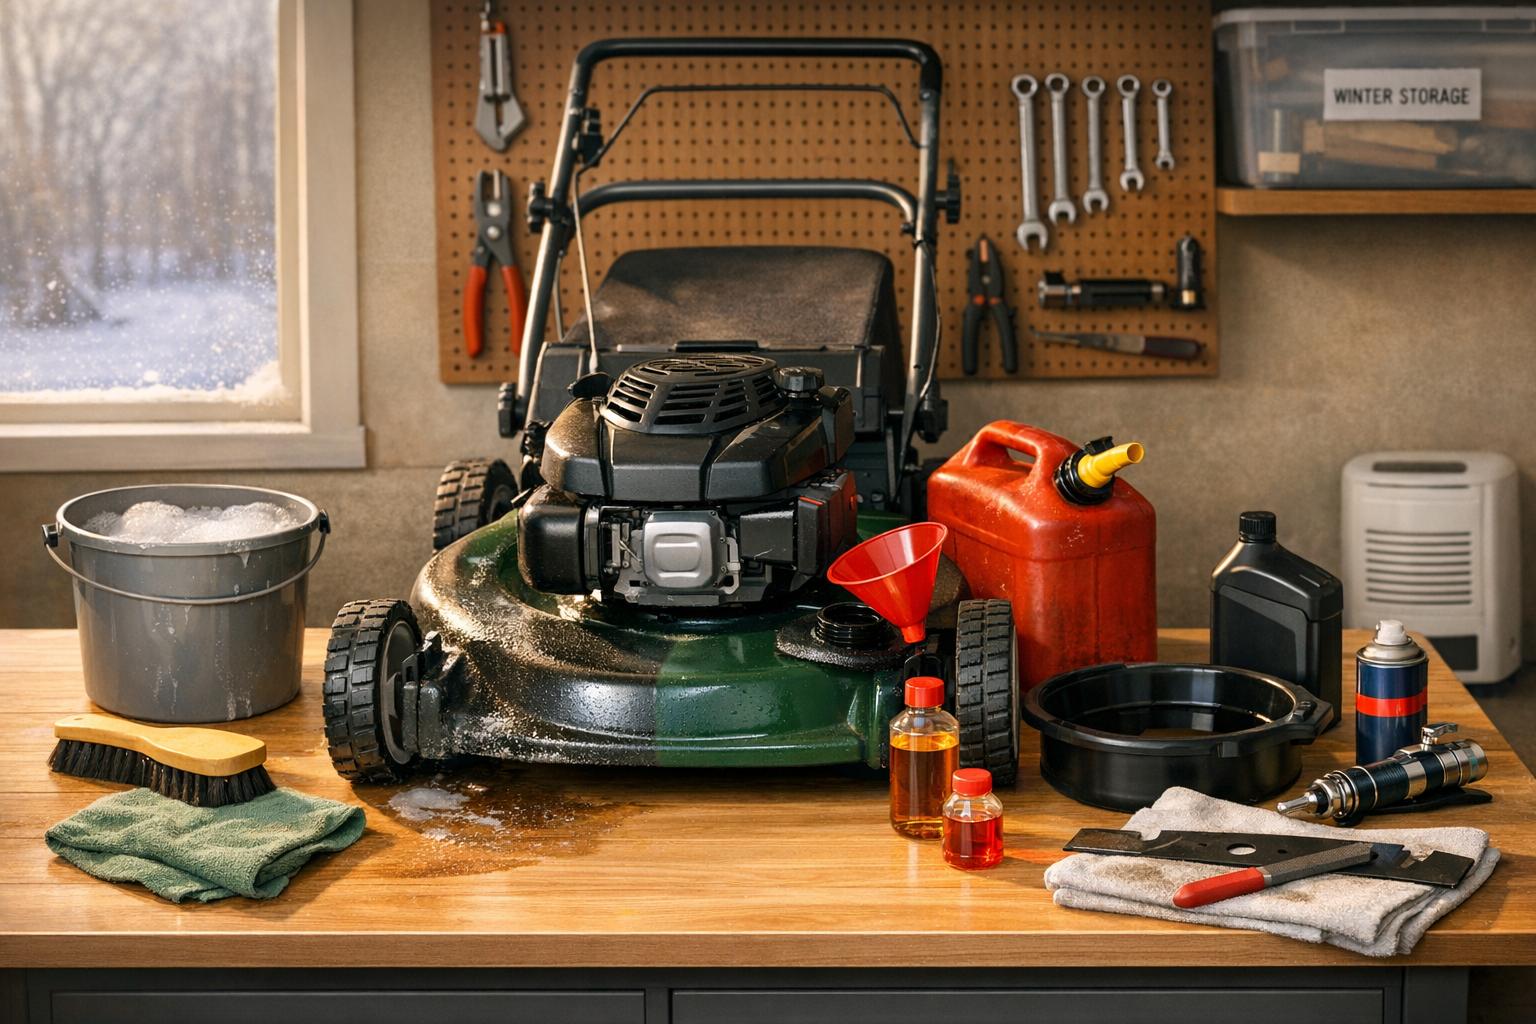
First things first, gather everything you’ll need and get your workspace ready. For cleaning, you’ll need a few essentials: soapy water, wire brushes, stiff brushes, rags, and steel wool to scrub away grass clippings and mud that can lead to rust. On the maintenance side, stock up on a fuel stabilizer to keep gasoline from clogging carburetors, fresh motor oil to replace any old oil that might contain moisture or acids, and machine oil or WD-40 to protect against rust. If your tools have wooden handles, grab some linseed oil to keep the wood from drying out and cracking during the colder months.
Safety is a must. Valerie Smith from Sod Solutions reminds us, "Safety should always be a top priority when handling lawn tools. Wear appropriate safety gear, such as gloves and safety goggles, when performing maintenance." Heavy-duty gloves will protect your hands from sharp edges and chemicals, while safety goggles will guard your eyes from debris when cleaning or sharpening.
Next, set up your workspace. Make sure it’s well-ventilated to avoid dangerous fumes from gasoline vapors or exhaust. A garage with open doors or an outdoor area works perfectly.
Before diving into maintenance, disconnect all power sources. For electric tools, remove the batteries and store them in a cool, dry place. For gas-powered tools, ensure the engine is cool and remove the spark plugs to prevent accidental starts. If you’re draining old engine oil, have a container ready to collect it. And for sharpening blades, secure them in a vise to prevent slipping – always wear gloves for added protection.
Once your supplies are ready and your workspace is safe, you’re all set to start winterizing your equipment.
Step 2: Clean Your Lawn Tools and Equipment
Once your workspace is prepped, it’s time to tackle the dirt and debris that have built up on your tools over the season. This step is key because even a thin layer of grime can trap moisture, setting the stage for rust during winter storage.
How to Clean Hand Tools
Focus first on your hand tools like shovels, rakes, pruners, and shears. Use a brush to scrub off clumps of dirt and dried mud. For tougher, packed-on soil, soak the tools in warm, soapy water for a few minutes, then scrub with steel wool or a stiff-bristled brush until the metal is spotless. Disinfect cutting tools such as pruners and shears with a solution of 1 part bleach to 9 parts water or 70% rubbing alcohol. This 10% bleach mix is highly effective at killing fungal spores and bacteria in seconds [4]. For sticky sap residue, spray on WD-40 or vegetable oil, let it sit for five minutes, and then wipe it clean [4].
After cleaning, dry your tools thoroughly with a towel, then allow any moving parts to air dry for 15 to 20 minutes to prevent moisture from lingering [4]. For an extra time-saving trick, fill a bucket with coarse sand mixed with a small amount of vegetable or motor oil. Plunging your clean tools into the mixture helps remove any remaining particles while coating the metal with a protective oil layer in one step [4].
How to Clean Power Equipment
After the hand tools, turn your attention to power equipment, which needs both exterior and internal care. Scrub the underside of mower decks, trimmer heads, and other areas where grass clippings, mud, and sap tend to gather. These materials can encourage rust if left unchecked [1].
For gas-powered tools, remove the spark plugs and clean off carbon buildup using a wire brush and brake cleaner [2]. If your equipment has reusable air filters, wash them in warm, soapy water to eliminate grease and oil residue. Clogged filters can cause engines to burn more fuel and lose efficiency [2]. Finally, wipe down all exterior surfaces with a clean rag to remove dust and grime, ensuring everything is completely dry before moving on.
With your tools and equipment cleaned, you’re ready to dive into the maintenance steps that will keep them in top shape through the winter.
Step 3: Maintain Your Power Equipment
Once your equipment is clean, it’s time to focus on internal maintenance. Taking care of these steps now can save you from expensive repairs later and ensure everything runs smoothly when spring arrives.
Change the Engine Oil and Filters
Old engine oil can cause serious damage if left sitting through the winter. According to Lush Lawn, "When oil sits in an unused power mower, for instance, over the winter, it can turn into a sludgy substance that coats internal parts of equipment and causes them to rust" [2]. Start by draining the oil into an oil-safe container. Locate the oil drain plug, remove it, and let the oil flow out completely before securely replacing the cap [2]. Refill the engine with fresh oil right away – don’t wait until spring [1].
If your equipment has a reusable air filter, clean it with warm, soapy water to remove grease and dirt. Make sure it’s fully dry before reinstalling it [2]. For disposable filters, simply replace the old one with a new one. Neglecting air filters can force your engine to work harder, burn more fuel, and risk damage from debris [2].
Treat or Drain the Fuel
Gasoline doesn’t last forever – it starts to break down after just 30 days, forming gums and varnishes that can clog carburetors and fuel lines [5][2]. You have two options: drain the fuel entirely or treat it with a stabilizer. If you go the draining route, run the engine until it stalls to empty the fuel lines and carburetor [2][1]. Keep in mind, though, that an empty tank can attract condensation and lead to rust as temperatures fluctuate [5].
For most people, adding a fuel stabilizer is the better choice. Use about 30 milliliters of stabilizer per 9 liters of gasoline, then fill the tank to 90%–95% capacity to limit oxygen exposure [5]. Let the engine run for 5–10 minutes to circulate the treated fuel through the system [5][1]. A good stabilizer can keep your gas fresh for up to 24 months [5]. If you’re storing electric equipment, remove the battery and keep it indoors at a 40%–60% charge in a climate-controlled spot like a basement [5].
Once the fuel system is prepared, you can move on to sharpening and balancing your blades.
Sharpen and Balance the Blades
Dull blades make mowing harder, so take care of them before storing your equipment. Start by disconnecting the spark plug or removing the battery. Secure the blade in a vise, then scrape off any grass clippings or mud using a trowel or stiff brush to prevent moisture buildup [6][1]. If you’re working on a gas mower, tilt it so the fuel tank faces upward to avoid leaks [6].
Use a flat file or whetstone to sharpen the blade, and always wear heavy-duty gloves for safety [1]. After sharpening, apply a light coat of machine oil or WD-40 to protect the blade from rust during storage [6][1]. For extra protection, consider using a silicone-based lubricant, which is more water-resistant [6]. Let the lubricant sit for 15–20 minutes so the solvents evaporate, leaving a protective coating behind [6].
Once the blades are in good shape, it’s time to check the spark plugs and grease the moving parts.
Inspect Spark Plugs and Grease Moving Parts
Take a look at your spark plugs for signs of carbon buildup or wear. If they’re fouled or damaged, replace them – new spark plugs are inexpensive and can improve engine performance noticeably. Next, apply grease to moving parts like wheels, axles, and pivot points. This step helps reduce wear and tear during storage and ensures everything works smoothly when it’s time to use your equipment again.
Step 4: Lubricate and Inspect Hand Tools
After dealing with your power equipment, it’s time to give your hand tools some attention. Even though they don’t have engines or fuel systems, hand tools can suffer from rust and wear, especially during winter storage. Rust is the biggest enemy here, and a little early maintenance can save you from having to replace tools later. Start by ensuring all your tools are thoroughly cleaned and dried.
Protect Metal Parts with Oil
Once your tools are dry, apply a light coat of machine oil or WD-40 to all metal surfaces, such as pruner blades, shears, and trowel heads. This creates a protective barrier that keeps moisture out. For moving parts like hinges and pivot points, an all-purpose lubricant works well to keep them from seizing up over the winter. For extra rust prevention, you can briefly dip blades into a mixture of sand and oil.
Don’t overlook wooden handles. Sand them down to remove rough patches or splinters, then apply linseed oil to keep the wood from drying out or cracking – this is especially important if you live in an area with fluctuating temperatures.
Once you’ve taken care of rust prevention, move on to checking the condition of your tools.
Fix or Replace Tools as Needed
Carefully inspect each tool for loose screws, cracks, or other damage. Tighten any fasteners and sharpen dull blades by securing them in a vise and using a flat file or whetstone. Be sure to wear safety gloves and goggles while sharpening. If a tool is beyond repair – like a handle with deep cracks or a blade that’s bent out of shape – replace it now rather than waiting until spring.
When everything is repaired and oiled, store your tools in a dry place like a garage or shed. Hanging them on a pegboard is a great way to keep them off the ground and away from moisture, ensuring they’re ready to go when you need them.
Step 5: Store Your Tools and Equipment Properly
Once your tools are winterized, the next step is making sure they’re stored correctly. The way you store your equipment can make or break its condition by the time spring rolls around. A little effort now can save you from dealing with rusted or damaged tools later.
Keep Tools Indoors and Well-Organized
Always choose a dry garage or shed for storage, as damp or humid spaces can wreak havoc on metal parts. Even if your basement feels dry, it may still have higher humidity levels that speed up rusting. Garages and sheds typically offer better ventilation and stay drier during winter.
To keep things tidy and protected, hang smaller tools like pruners, shears, and trowels on a wall-mounted pegboard. This keeps them off the floor, away from moisture, and easily visible when you need them. For items like hoses, extension cords, and small attachments, use labeled bins or shelves. Clear labeling saves time and frustration when you’re gearing up for spring.
Cover Power Equipment for Extra Protection
Once your tools are organized, take an extra step to protect your power equipment. Use breathable tarps or fabric covers for items like lawn mowers and trimmers. These covers shield against dust while allowing moisture to escape, reducing the risk of rust. Avoid plastic covers – they trap condensation, which can lead to corrosion. If you’re storing equipment in less-than-ideal conditions, like on a covered patio, breathable covers are especially important.
Elevate and Group Larger Equipment
Larger equipment like lawn mowers needs special attention. Elevate these items off the floor using pallets or bricks to avoid water damage caused by ground moisture or melting snow. This is particularly critical if you’re storing them on a concrete floor or in an outdoor area.
For convenience, group similar items together. Keep trimming tools in one area, watering equipment in another, and store attachments near their corresponding tools. If you’re short on garage space, consider investing in a waterproof, lockable outdoor storage box or a portable storage tent to keep everything secure and dry.
Taking these steps now will help you avoid costly repairs and ensure your equipment is in great shape when spring arrives.
Pro Landscapes MD: Professional Winterization Services

After handling your own winterization, you might want to leave the finer details to the pros for added confidence. Pro Landscapes MD offers seasonal lawn care and maintenance services throughout central Maryland, serving areas like Ellicott City, Montgomery County, Burtonsville, Columbia, and Bethesda.
Their team takes care of the more detailed winterization tasks, offering services that range from fuel management to oil and filter maintenance. These professional services go hand-in-hand with the maintenance steps you can do yourself, ensuring your equipment remains in top shape throughout the colder months.
The specialists at Pro Landscapes MD handle everything with precision, including fuel drainage, blade sharpening, and spark plug disconnection, all while adhering to strict safety standards. For example, properly sharpened blades not only improve equipment performance but also help maintain your lawn’s health when spring rolls around [3].
In addition to winterizing your equipment, they address challenges specific to Maryland. By tailoring maintenance plans to local soil types and weather conditions, they ensure your tools are ready to perform when you need them most [7].
If you’d rather spend your fall weekends enjoying the crisp weather instead of dealing with complex maintenance, Pro Landscapes MD can take the hassle out of winterizing your equipment. Their expert care ensures your tools are protected and ready to go when spring arrives. Visit Pro Landscapes MD to explore their seasonal services.
Conclusion
Getting your lawn equipment ready for winter doesn’t have to be complicated. By following the steps in this guide – cleaning thoroughly, handling fuel correctly, changing engine oil, lubricating parts, and storing everything in a dry spot – you can shield your equipment from rust, corrosion, and expensive repairs. Each step plays a role in keeping your tools in top shape for the next season.
Proper fuel management prevents carburetor issues, and changing the oil eliminates moisture and harmful acids that can damage the engine. These small but essential tasks ensure your equipment runs smoothly when spring rolls around. By tackling each step, you’re setting yourself up for an easy transition from fall maintenance to a hassle-free start in the spring.
If you’re in Maryland, timing matters. Aim to winterize your equipment right after your last mow in October or November to avoid potential freeze damage. Don’t forget to store batteries indoors in a warm, dry place to prevent discharge, and use breathable covers to protect your tools – plastic covers can trap moisture and lead to rust.
Feeling overwhelmed? No problem. Professional services like Pro Landscapes MD can take care of everything for you, from sharpening blades to maintaining fuel systems, so your equipment is ready to go when spring arrives.
FAQs
Should I drain the gas or use a fuel stabilizer?
When preparing lawn equipment for winter storage, it’s a good idea to let the engine run until it uses up all the gas. This helps clear fuel from the carburetor and the rest of the fuel system. Another option is to add a fuel stabilizer, which helps prevent gasoline from degrading and causing problems. For optimal results, you can combine both methods: run the engine until it’s empty and use a stabilizer if any fuel is left in the tank.
How do I store batteries for cordless lawn tools in winter?
To keep your cordless lawn tool batteries in good shape during winter, here’s what you should do:
- Take the battery out of both the tool and the charger, and make sure the charger is unplugged.
- Store the batteries in a dry, dust-free spot, well out of reach of children.
- Maintain a storage temperature between 41°F and 77°F, steering clear of any extreme cold or heat.
Following these steps will help preserve the battery’s performance through the colder months.
What’s the best way to prevent rust while tools are stored?
To keep your tools rust-free during storage, start by giving them a good cleaning. Use warm, soapy water and a stiff brush to remove any dirt, grass, or moisture. Once they’re clean, make sure to dry them thoroughly – any leftover moisture can lead to rust.
For added protection, apply a light coat of oil to the metal parts. If you’re storing hand tools, dipping the blades into a sand-and-oil mixture can also work wonders. These simple steps – cleaning, drying, and oiling – are key to preventing rust and keeping your tools in great shape.
Chat with Us