









- bhavya gada
- No Comments
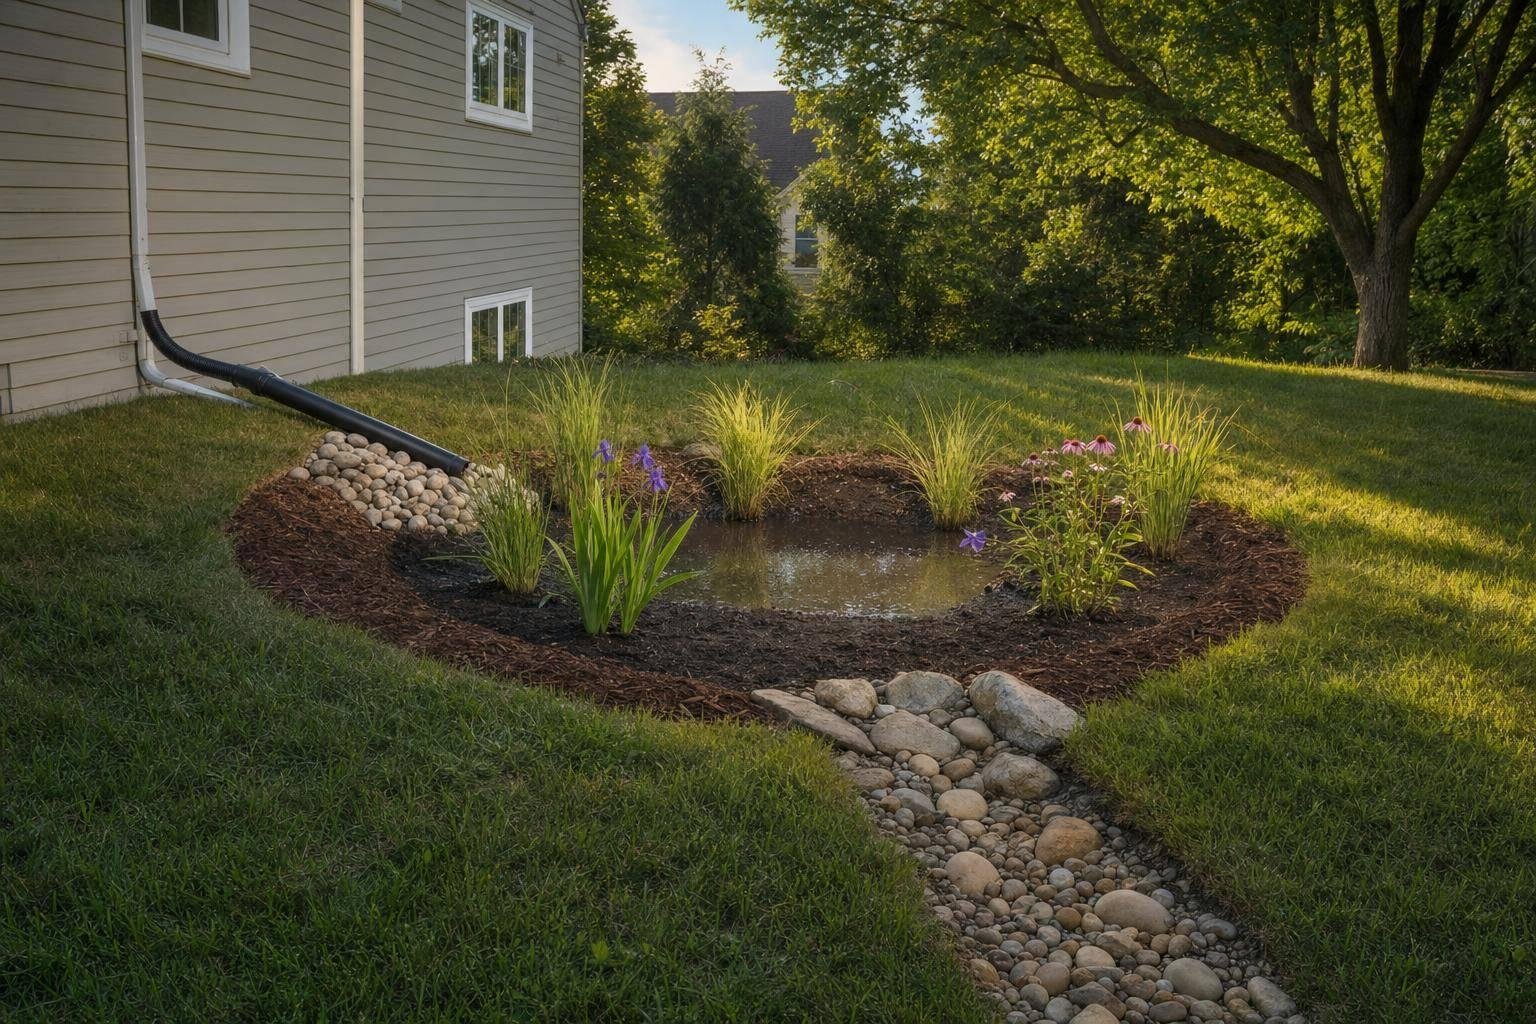
A sump pump can dump a lot of water in one short burst, and if that water lands too close to your house, it can end up right back at the basement wall. If I’m building a rain garden for sump pump runoff, I need to do four things first: place it 10–15 feet from the house, make sure it drains in 24–48 hours, keep the basin shallow at about 6–8 inches, and give overflow a clear path away from the home.
Here’s the short version:
- I place the basin downhill or to the side of the house, never uphill from a basement wall.
- I test the soil before digging, because much of central Maryland has slow-draining clay.
- I route the discharge line about 10–20 feet from the house and protect the outlet with stone.
- I build in an overflow notch around 6 inches above the basin floor.
- I use plants that can handle wet periods and dry periods.
- I check the garden after storms and after pump cycles, especially if water sits longer than 48 hours.
The main point: a rain garden is not just a planting bed. It is a shallow basin built to slow, spread, and filter water so it moves away from the house instead of back toward it.
If I skip the siting, soil test, or overflow plan, the setup can fail even if the garden looks fine on day one.
How to Build a Rain Garden for a Sump Pump Discharge
sbb-itb-843f8be
1. Check the Site Before You Dig
Before you size the basin, make sure the site can move sump discharge away from the house. Pick a spot that drains away from the foundation. If you put a rain garden in the wrong place, it can send water right back toward the basement.
Map the Runoff Path and Confirm the Yard Slopes Away from the House
Start by checking where your sump pump water goes now. On a dry day, run one sump pump cycle and follow the flow. Mark any spots where water collects or where the soil stays wet long after the pump stops.
Your rain garden should sit downslope or beside the foundation, never uphill from a basement wall. If the basin sits uphill, it can push water back against the wall. If your yard does not carry water away from the house on its own, you may need to regrade before you install a rain garden.
Keep Safe Distances from Foundations, Wells, Septic Areas, and Property Lines
Distance matters here. Use these setbacks as a starting point:
| Feature | Minimum Setback |
|---|---|
| House foundation | 10–15 ft |
| Drinking water well | 25 ft or more |
| Septic tank or drainfield | 25 ft or more |
| Property line | 5 ft |
| Public sidewalk | 2–3 ft |
The Chesapeake Bay Trust recommends placing rain gardens at least 10 feet away and downhill from foundations, with overflow directed away from the house and neighboring property. These setbacks protect the foundation before you shape the basin and overflow.[5][6][7][8][10]
Never place the basin directly over septic parts or shallow utilities, even if the ground surface looks fine.[9][10]
Test Soil Drainage and Call 811 Before Digging

Dig a 6-inch test hole in the proposed basin area. Fill it once and let it drain. Then fill it again and time it. The basin should drain within 24 to 48 hours.[3][4] Montgomery County, Maryland’s rain garden manual gives a local benchmark: water should soak in within 24 to 36 hours.[3]
If the test hole still holds water after a full day, the site may need a different plan before it works for a rain garden. If it drains within the target window, you can move on to basin design.
Before you dig anything, even a shallow trench for a discharge line, call 811. This helps mark buried gas, electric, water, communications, and sewer lines so you do not hit them. Reach out a few days before you plan to start, wait for the utility marks, and hand-dig with care near any flags.
2. Design the Basin, Pipe Route, and Overflow
Size the Rain Garden for Your Drainage Area and Sump Pump Output
Once you’ve checked the site, the next step is to size the basin and sketch the pipe route. The basin should fit two things: how much water your sump pump sends out in each cycle and how fast your soil can soak that water in.
A good starting point is to size the basin around both soil drainage and pump output. Clay soils usually need a larger basin than sandy or loamy soils because water moves through clay much more slowly. If you’re dealing with clay, a bioretention backfill mix can improve drainage a lot.[12][14]
Route the Discharge Line to the Basin and Protect the Inlet from Erosion
Run the discharge pipe 10–20 feet from the foundation and keep a steady downhill slope the whole way.[16][17] That gives water a clear path to the basin instead of letting it linger near the house.
At the inlet, add a stone splash pad or riprap. This simple step helps prevent incoming water from digging a hole, scouring the basin, or washing away the planting mix.[15][18][19]
Plan a Clear Overflow Path for Storms
Every rain garden needs a planned overflow route. During a big storm, the basin can fill faster than the soil can absorb water, and if that extra water has nowhere to go, it can make a mess in a hurry.
A low notch in the berm set at the target ponding depth works well. In most cases, that means about 6 inches above the basin bottom.[11][4][13] Line the spillway and the downslope area with compacted soil, filter fabric, and cobble or river rock so water can leave the basin without eroding the edge.[11][4]
The overflow path should send water farther downslope and away from the foundation, sidewalks, and property lines. That might mean directing it across lawn or into a shallow swale where local rules allow.[11][4][13] With the layout set, build the basin and inlet protection next.
3. Prepare the Soil and Build the Rain Garden
Excavate a Shallow Basin and Shape the Berm
With the layout marked and utilities cleared, you can start digging. Aim for a basin depth of 6–8 inches. A deeper basin of 10–12 inches only makes sense if a percolation test shows the soil can handle that much water.[23][21]
Keep the side slopes at 3:1 or flatter. That makes planting easier and helps cut down on erosion. As you excavate, save the soil for the berm. Build that berm along the downhill edge so overflow moves away from the house, not back toward it. Compact the soil in thin 2–4 inch lifts so it holds its shape. And don’t pile extra soil near the foundation. Even a small ridge there can send water toward the basement.
Before you move on, check the grade between the house and the basin with a string level or laser level. The basin floor should be level across, without low spots that trap water in one corner. At the same time, the full area should still slope gently away from the house. If you spot any dips, fix them now before adding the planting mix.
Once the basin is shaped, the next step is getting the soil ready to absorb and drain water well.
Loosen Compacted Subsoil and Add a Well-Draining Planting Mix
A lot of Maryland yards have compacted subsoil, and that can slow drainage in a hurry. After rough excavation, loosen the basin subgrade by tilling or ripping 6–12 inches deep. Skip this step if the soil is saturated. Working wet clay can smear and seal the pores, which makes drainage worse instead of better.
After loosening the subgrade, add the planting mix. Blue Water Baltimore recommends a Maryland-friendly blend of 50% coarse sand, 30% compost, and 20% low-clay topsoil.[22] Use coarse sand only. Masonry sand or play sand can cause problems here.
Install the mix in 4–6 inch lifts. Lightly water each layer, then tamp it gently. Finish the basin 2–3 inches below lawn grade so it can hold shallow ponding during storms.
Then retest the drainage. The basin should drain within 24–48 hours.[1][20][2] If water is still sitting there after 48 hours, mix in more coarse sand and test again before you plant anything.
With the soil rebuilt, it’s time to protect the spots that take the hardest hit when water rushes in or spills out.
Protect the Inlet and Overflow with Stone
The inlet takes a beating every time the sump pump discharges, so it needs protection. To prevent scour, build a stone apron at the pipe outlet. Start with geotextile fabric, then add 2–4 inches of 1–3 inch angular stone in a shallow, slightly depressed pad that extends several feet into the basin. Put larger stone right at the inlet and smaller stone farther downstream. That setup spreads out the force of the water and shields the planting mix.
Treat the overflow notch the same way. Use a geotextile base and top it with angular rock or river stone so heavy storms don’t cut into the berm edge.
With the basin in place and the high-impact areas armored, the next piece is picking plants that can handle both soggy stretches and dry weather.
4. Choose Plants That Handle Wet and Dry Swings
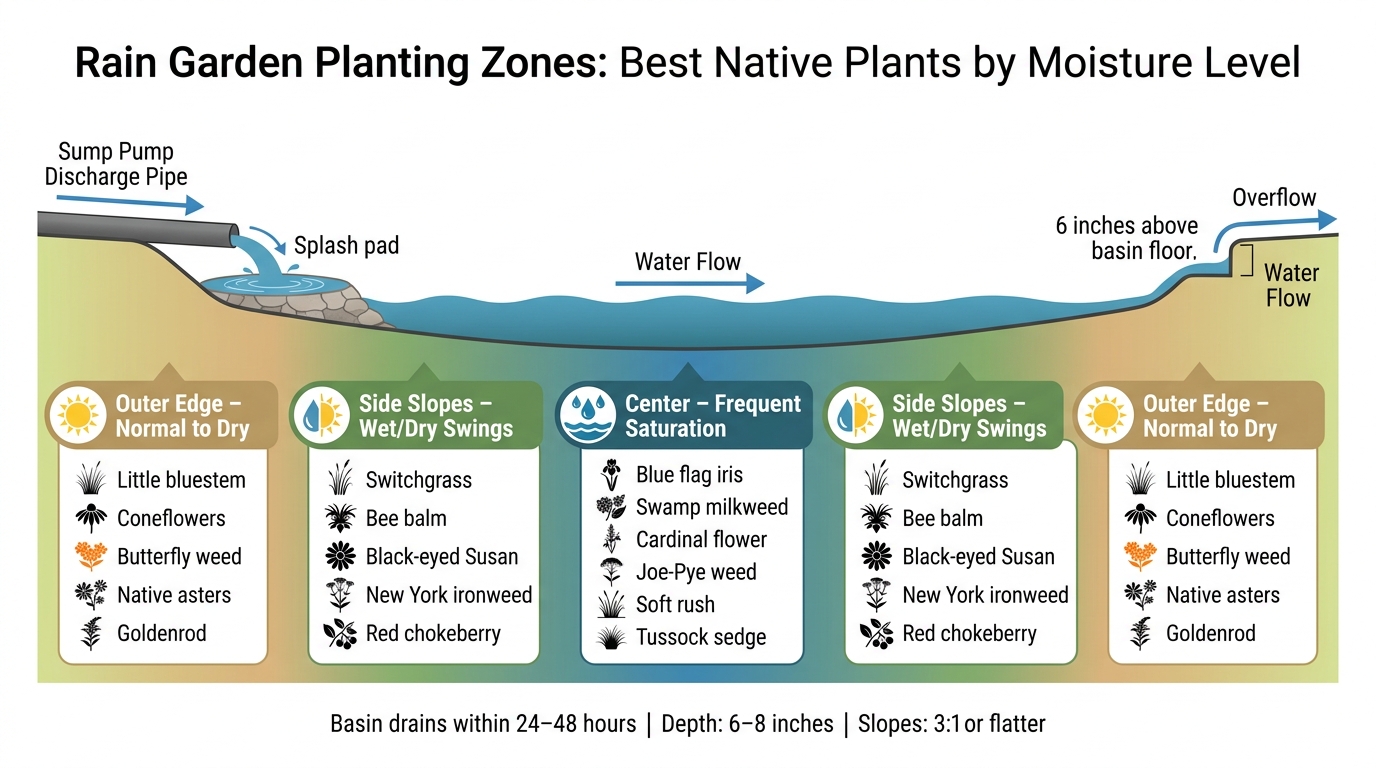
Rain Garden Planting Zones: Best Native Plants by Moisture Level
Match Plants to the Center, Side Slopes, and Outer Edge
Once the basin, inlet, and overflow are in place, plants take over. They help hold the soil, soften the look of the drainage area, and deal with a hard truth of rain gardens: the same spot can be soaked one day and dry a few days later.
That’s why it helps to split the basin into three planting zones based on how long each area stays wet.
The center stays wet the longest and gets the most frequent saturation, so it needs plants that can take brief flooding without falling apart. The side slopes swing back and forth between wet and dry, which makes them a good fit for plants that can handle both short inundation and later dry spells. The outer edge is the driest part, so it should be planted with species that like better drainage but can still take a strong rain event.
The center zone also takes the most discharge. In plain terms, it gets hit hardest. So plants there should have deep, fibrous roots that help keep soil in place.
Maryland-Friendly Perennials, Grasses, and Shrubs for Rain Gardens
For the center zone, solid Maryland and Mid-Atlantic native choices include swamp milkweed, blue flag iris, cardinal flower, Joe-Pye weed, soft rush, and tussock sedge. These plants can take periodic saturation and help the basin read more like a garden bed than a drainage ditch.
The side slopes do well with switchgrass, bee balm, black-eyed Susan, New York ironweed, and red chokeberry. These plants handle the wet-dry swings that are common in a sump-pump-fed rain garden and help this middle band stay filled in through both rainy stretches and drier spells.
On the outer edge, go with plants like little bluestem, coneflowers, butterfly weed, native asters, and goldenrod. They do well in normal to dry soil and help the rain garden blend into the rest of the yard instead of looking like a separate feature.
| Plant | Best Zone | Notes |
|---|---|---|
| Blue flag iris | Center | Good for the wettest part of the basin |
| Swamp milkweed | Center | Tolerates periodic saturation |
| Cardinal flower | Center | Works well in the wettest part of the basin |
| Joe-Pye weed | Center | Adds height in the basin |
| Soft rush | Center | Handles wet conditions |
| Tussock sedge | Center | Suited to wet to moist soil |
| Switchgrass | Side slopes | Handles wet-to-dry swings |
| Bee balm | Side slopes | Works in the moist transition zone |
| Black-eyed Susan | Side slopes | Tolerates moisture swings |
| New York ironweed | Side slopes | Fits moist slopes and adds structure |
| Red chokeberry | Side slopes | Shrub option for the transition zone |
| Little bluestem | Outer edge | Suited to drier conditions |
| Coneflowers | Outer edge | Good for the driest edge |
| Butterfly weed | Outer edge | Fits the drier rim |
| Native asters | Outer edge | Works well on the rim |
| Goldenrod | Outer edge | Adds late-season color |
Space Plants for Root Coverage, Airflow, and Easier Upkeep
Space plants by their mature spread, not by how small they look in a nursery pot. It’s tempting to pack them tight so the bed looks full right away, but that usually backfires. Crowded plants can trap moisture, cut down airflow, and turn weeding or inspection into a chore.
A few layout moves make a big difference:
- Place taller shrubs and grasses on the downhill side so they don’t block water flow or cast too much shade on lower plants in the center.
- Keep the area right around the inlet fairly open. Dense stems at the pipe outlet can get scoured or pulled out during strong pump cycles, so let the stone apron absorb that force first.
- Plant in clusters instead of singles for a cleaner look and simpler upkeep.
After planting, keep an eye on the first few storms. They’ll show you fast if anything is settling, washing out, or getting too crowded.
5. Maintain the Rain Garden and Watch for Foundation Problems
Check the Garden After Storms and Sump Pump Cycles
Once the garden is planted, the work changes. Now you need to see how it performs each time the sump pump runs.
After each heavy rain, walk the basin and see how it drains. If water is still sitting after 48 hours, something isn’t working. The soil mix, basin size, or outlet likely needs to be fixed. Check that the water level is going down, the inlet stone is still in place, and the flow keeps moving away from the house. Pay close attention to where the discharge lands and whether any water starts drifting back toward the home.
A few warning signs are hard to miss:
- Soggy soil
- New ruts
- Puddles near window wells
- Overflow during moderate rain
Those all point to a system that needs adjustment. And if moderate storms are already setting off the overflow, the basin is too small for the pump.
Seasonal Upkeep to Prevent Small Issues from Becoming Repairs
A rain garden doesn’t need a ton of work, but it does need steady attention. Spring and fall matter most.
In spring, add mulch back to about 2–3 inches using shredded hardwood. Replace plants in bare spots before weeds get established. That one step can save you a lot of cleanup later.
In fall, clear leaves and debris from the inlet and overflow. Remove built-up sediment from the basin’s low point. Also check that the sump discharge outlet is clear before the ground freezes.
During summer, keep up with weeding, especially aggressive grasses and volunteer weeds. Dense root growth can slow infiltration. If mulch has washed into the basin’s lowest area, spread it back out before it forms a crust. When sediment buildup reaches more than about 1 inch at the inlet or basin bottom, scoop it out and remove it from the basin area [24].
Conclusion: Move Water Away from the House and Improve the Yard
Regular checks help the basin keep draining and help protect the foundation. When the siting, soil, overflow, and plant choices are handled well, most of the work comes down to seasonal upkeep.
If your property has steep grades, tight setbacks, or heavy clay, Pro Landscapes MD can design and install rain gardens, French drains, dry riverbeds, and grading fixes across central Maryland and Washington, DC.
FAQs
How do I know if my yard is suitable for a rain garden?
Watch how water behaves during and after heavy rain. Pay attention to spots where it pools, rushes through, or leaves the ground soggy. At the same time, note how much sun the area gets and what plants are already growing there.
You’ll also want to check the soil a few inches below the surface. Look at its texture, test the pH, and see how damp it stays. A good site has a gentle slope that moves runoff away from the foundation and sits at least 10 feet from any structure.
What should I do if my rain garden stays soggy too long?
If your rain garden stays soggy for more than 48 hours, the soil may not be soaking up water the way it should, or something may be stopping drainage. Start by checking for debris, clogs, and sediment buildup.
If the issue keeps coming back, take a closer look at the site grading and think about adding drainage help, like a French drain or dry riverbed. Pro Landscapes MD can help with drainage repair and soil assessment.
Can a rain garden handle heavy sump pump discharge?
Yes – if it’s designed the right way.
Place the rain garden at least 10 feet from house walls and basements. Then send discharge to the center with a pipe or swale, so water doesn’t collect near the foundation.
It also helps to group plants by wet, mesic, and transition zones. That layout lets the garden handle steady sump output and Maryland’s wet-dry swings, while still giving water time to soak into the soil.
Chat with Us