









- bhavya gada
- No Comments
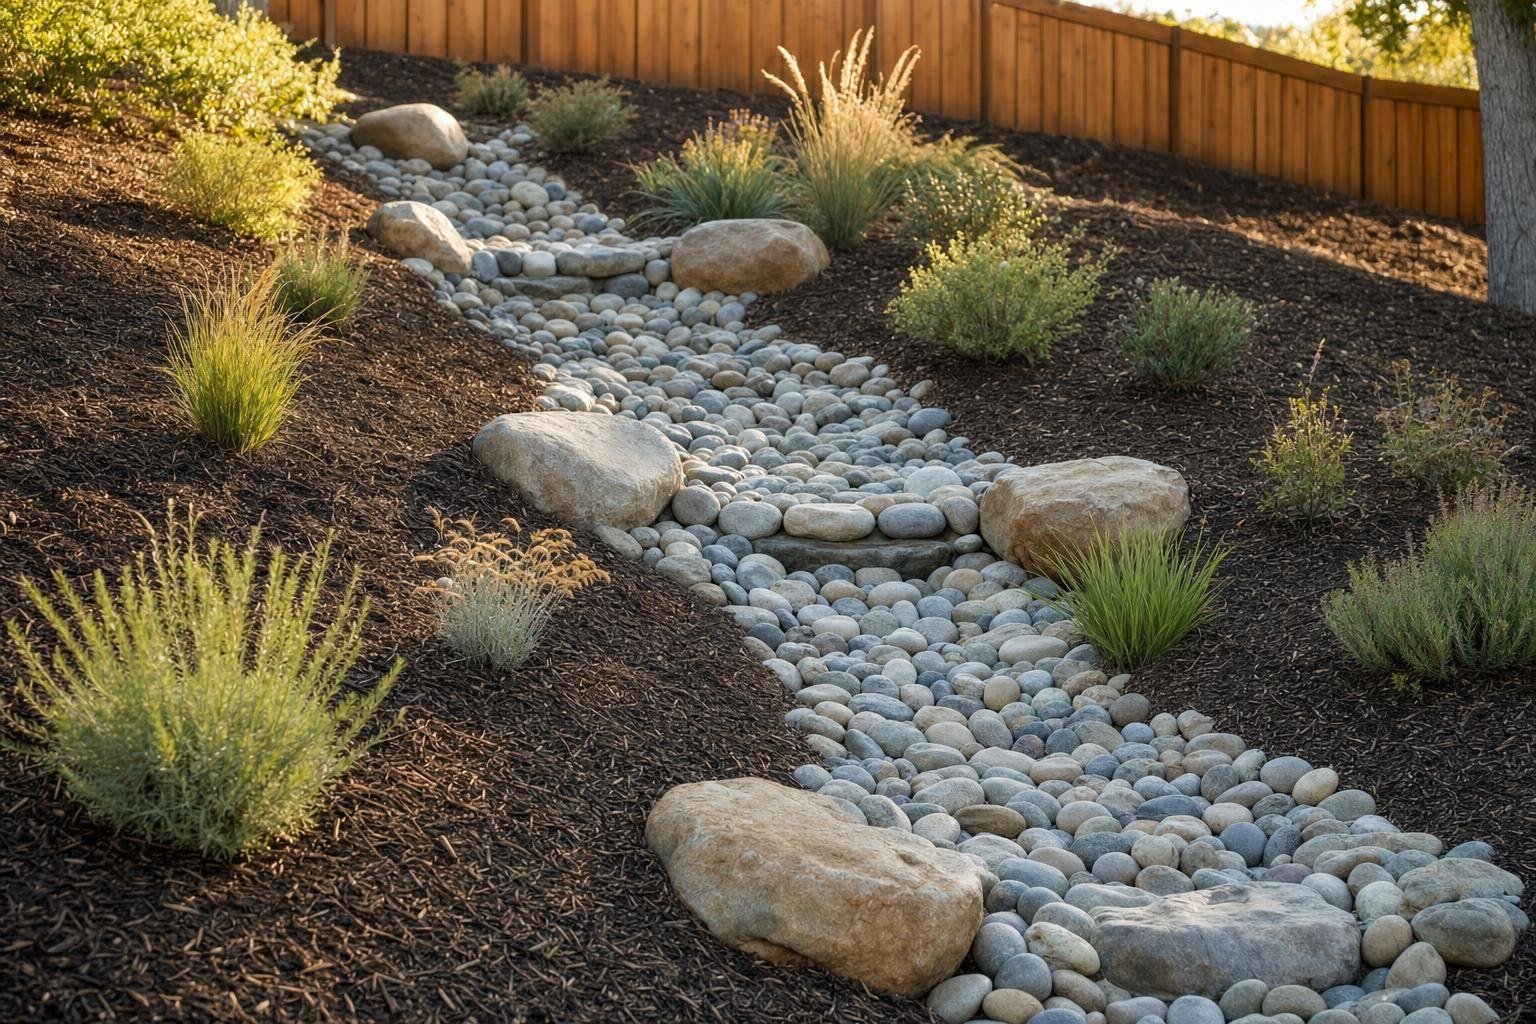
If water is cutting ruts down your yard, a dry creek bed can give it a set path and help keep it away from your patio, walkway, driveway, and foundation.
I’d boil the whole process down to this:
- Follow the water’s natural path
- Keep a steady 1%–2% downhill grade
- Use a shallow channel sized to the slope
- Put non-woven fabric under the stone
- Use larger rock at bends, steep spots, inlets, and the outlet
- Discharge water onto stable ground, not bare soil or hard surfaces
- Check it after storms for shifted stone, sediment, and washouts
For many sloped yards, a channel around 18–36 inches wide and 6–12 inches deep works well. On steeper slopes, the bed often needs to be 3–4 feet wide and 10–16 inches deep. A slope above 5% may need rock checks or small step-down sections to slow the water.
Here’s the main point: a dry creek bed works best for visible surface runoff on a slope, while a buried drain fits point discharge like downspouts or sump lines. The job only works if the outlet is planned with care and protected with rock.
How to Build a Dry Creek Bed That Actually Works
sbb-itb-843f8be
Quick comparison
| Topic | Dry Creek Bed | Buried Drain |
|---|---|---|
| Best for | Surface runoff on slopes | Downspouts, sump lines, flat wet spots |
| Depth | Shallow, about 6–18 in. | Trench, often 12–24 in. or more |
| What you see | Flow and trouble spots are visible | Clogs stay hidden until backup shows up |
| Erosion control | Slows water along the full channel | Can send fast flow to the outlet |
| Look | Blends into the yard with stone and plants | Mostly hidden, with visible inlets/outlets |
In short: if I saw water moving across the surface and washing out soil or mulch, I’d look at a dry creek bed first. If I was dealing with pipe-fed water from one source, I’d look at a buried drain.
Plan the Route, Slope, and Discharge Point
Dry creek beds work best when they follow the site’s natural drainage pattern instead of fighting it. Start by mapping where the water already wants to go. Then set the grade and outlet so flow stays controlled.
Trace the Water Path Before Digging
Check runoff during a heavy rain, or right after one. Watch where water shows up first, how it moves downhill, and where it still lingers 24–48 hours later. Those wet, stubborn spots tell you a lot.
Pay attention to signs like erosion streaks in mulch or soil, exposed roots, silt deposits, moss in wet areas, and soggy low spots near patios or foundation walls.
Mark the route with spray paint, stakes, a hose, or a simple sketch. The goal is to connect all inlets to a safe outlet. If the channel needs to curve, use broad bends instead of sharp turns. Tight bends push water harder against the outside edge, which can scour stone and wash out exposed soil.
Set the Grade and Shape for Steady Flow
The channel needs a steady downhill grade from inlet to outlet. No flat sections. No spots that tip back uphill. A good target is a 1%–2% slope, or about 1 to 2 ft of drop per 100 ft. If the slope goes above 5%, add boulder sills or stepped weirs to slow the water down.[2][5][7][11]
Before you dig, verify the grade. Set stakes every 8–10 ft along the route, starting at the outlet and moving uphill. Run a string line between the stakes, then use a carpenter’s level or line level to check the planned drop at each section.[8][9][10]
It’s a simple step, but it can save a lot of rework later.
Choose a Safe Outlet That Will Not Erode
The outlet matters just as much as the inlet. Send water onto stable, vegetated ground like a lawn, swale, rain garden, or wooded buffer. Don’t dump it onto bare soil, a neighbor’s low spot, or a hard surface like a driveway.
The outlet also needs rock protection. A rock apron made of angular stone – usually 2–4 in. in diameter and extending about 3–6 ft wide and 4–8 ft long beyond the end of the channel – helps spread out the flow and keeps a new channel from cutting into the soil.[3][4][6]
Set the rock slightly below the final channel elevation, and key it into the surrounding ground so it holds during heavy storms. Planting deep-rooted native grasses or perennials around and beyond the apron adds another layer of support.
With the route and outlet set, the next step is picking the right width, depth, fabric, and stone.
Choose the Right Width, Depth, Fabric, and Stone
With the route and outlet set, the next job is simple: size the channel for the slope and the amount of runoff you expect.
Channel Shape and Sizing for Slope Drainage
For most residential slopes, a shallow U-shaped or gently trapezoidal profile works best. It spreads water across a broader bottom instead of forcing it into a tight groove.
On gentle to moderate slopes in the 3–5% range, a channel about 18–36 inches wide with a 6–12 inch central depth usually handles typical suburban runoff well. If the slope is steeper, around 6–12%, go bigger: widen the bed to 3–4 feet and deepen the center to 10–16 inches. That extra space helps carry faster water without letting it spill over the sides.
Use 3:1 to 4:1 side slopes. Also leave 2–3 inches of freeboard above the expected water level so the channel doesn’t overtop during Maryland’s intense summer thunderstorms. Once the slope gets above 8–10%, it often makes sense to add check stones or step pools to slow the water before velocity turns into erosion.
How to Use Geotextile Fabric Correctly
Fabric keeps soil out of the stone bed while still letting water move through. The key detail here is placement: put non-woven geotextile fabric under the stone, never over it.
Why? Because it allows water to pass while stopping fine soil particles from moving up into the rock layer. When soil migrates into the stone bed, it fills the open spaces and weakens drainage.
Lay the fabric in continuous runs going downslope. Where two panels meet, overlap seams by at least 12 inches in the direction of flow so water can’t slip through a gap. Extend the fabric 6–12 inches up both sides of the channel, above the finished stone depth, to help stop soil from washing in from the banks during storms.
Pin the fabric with landscape staples every 2–3 feet along seams and edges, especially on steeper slopes where it can shift as heavy stone is placed on top. Then cover it fully. Exposed fabric breaks down in sunlight. A smaller base layer with river rock above it helps protect the fabric well.
Stone Sizes for the Base, Channel, Edges, and Outlet
Stone size should match flow speed. As water moves faster, stone needs to get bigger.
Start with a 3–6 inch-thick base layer of coarse stone, such as #3 or #4 aggregate in the 1–2.5 inch range, placed directly over the fabric. This forms a stable, interlocking foundation. On top of that, add 3–5 inches of river rock or washed stone in the 1–3 inch range for the main channel surface. This two-layer setup gives the bed strength while keeping enough open space for drainage.
At bends, inlets, and steep sections, where water hits hardest, switch to 4–8 inch angular stone. Angular rock locks together better than smooth, rounded stone, so it stays put under heavier flow.
Here’s the breakdown:
- Base layer: 1–2.5 in. aggregate
- Main channel: 1–3 in. river rock
- Outlet, bends, and steep sections: 4–8 in. angular stone
Along the edges and upper banks, 1–2 inch river rock makes the transition into turf or planting beds look more natural. In the center, use 2–4 inch cobble with a few larger anchor rocks partially buried in the bed to help hold everything in place.
With dimensions, fabric, and stone selected, the next step is excavation and installation.
How to Build a Dry Creek Bed Step by Step
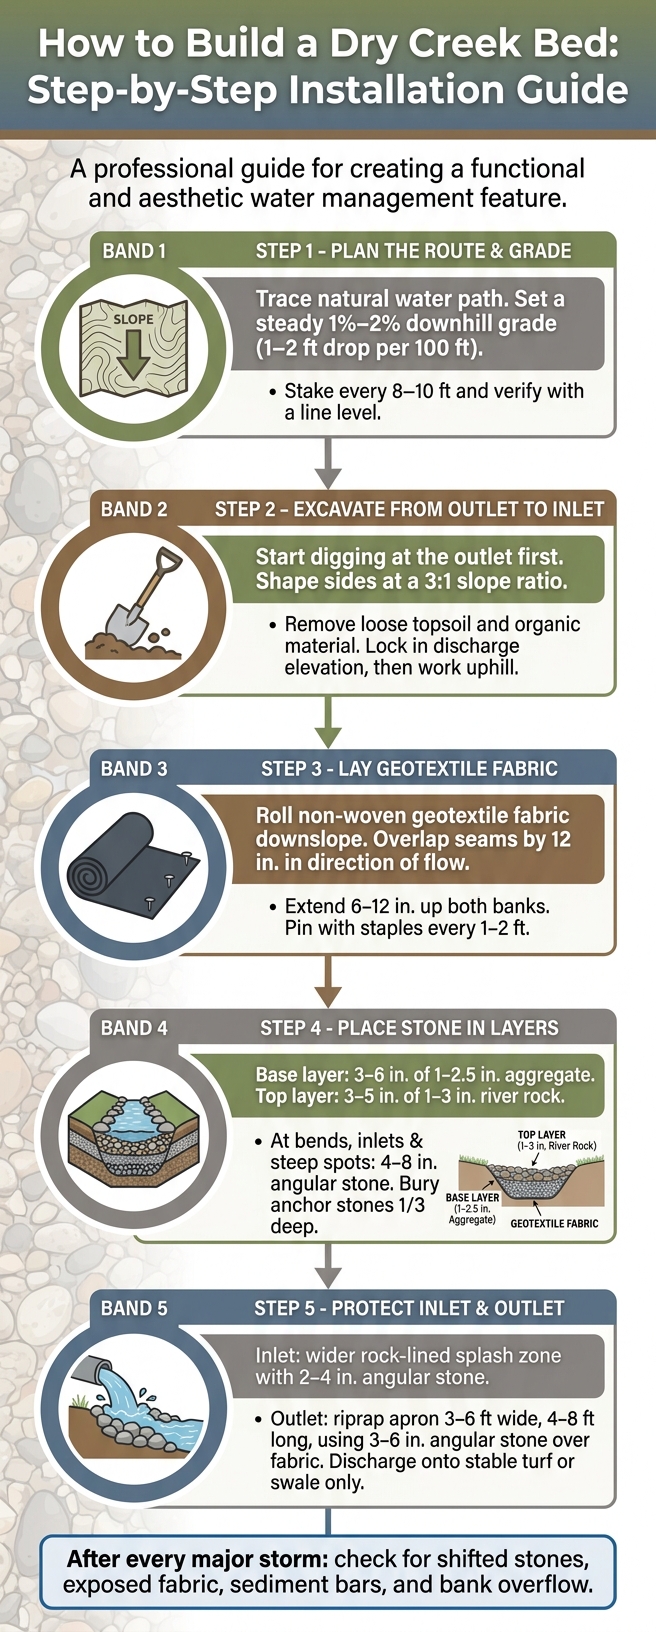
How to Build a Dry Creek Bed: Step-by-Step Installation Guide
Build it in the same order you planned: outlet first, then fabric, stone, and end protection.
Excavate and Grade from Outlet to Inlet
Start digging at the outlet, not the inlet, so you lock in the discharge elevation first and work uphill with a steady fall.[15][16][17] Use a string line with a line level or a laser level to hold the grade you already marked. If you need to, dig a bit deeper than the final grade at first, then fine-tune the bottom with a thin layer of compacted gravel. That makes it much easier to fix small low spots.
Shape the sides to about a 3:1 ratio or flatter. In plain English, the banks should slope gently toward the center so runoff moves into the middle of the bed. Skip vertical cuts. Clear out loose topsoil, roots, and other organic material from the channel bottom so the fabric and stone sit on firm, compacted subgrade.
Once the grade looks right, lay the fabric before you add stone.
Place Fabric, Base Stone, and Edge Rock
Roll out non-woven geotextile fabric from the outlet uphill. Overlap seams by at least 12 inches in the direction of flow. Pin the fabric with landscape staples every 1 to 2 feet along edges and seams, and tighten that spacing on steeper sections.[12][18][19]
Set your largest anchor stones first. Bury at least one-third of each large anchor stone into the subgrade and base rock. On steeper sections, give the stones a slight backward lean so they’re less likely to shift. Put these structural stones at bends, grade breaks, and other spots where water will hit hardest. Then spread a 3 to 6 inch base layer of 1–2.5 inch aggregate over the fabric, and add river rock on top.[1][17]
Protect the Inlet and Outlet to Limit Washouts
At the inlet, where a downspout or concentrated runoff enters the bed, send that flow into a rock-lined splash area. Make this section a little wider and deeper than the main channel. Fill it with 2 to 4 inch angular stone set firmly over fabric.[6] You can also place a flat rock or small paver pad under the downspout outlet for extra scour protection.
At the outlet, build a riprap apron that extends several feet beyond the end of the creek bed in the direction of flow. Fill it with larger angular stone, about 3 to 6 inches or more, over compacted gravel and fabric, with a minimum thickness of 1.5 times the maximum stone diameter.[15] Keep the apron level, or slightly lower in the center, so water spreads out and slows down instead of cutting into one narrow path. A level apron at the end helps protect the receiving area from erosion.[13][14]
Once water leaves the apron, it should move into stable turf, a swale, or a rain garden, not bare soil.[13][14]
After the first storm, check both ends for movement or scour.
Maintenance and When a Dry Creek Bed Beats a Buried Drain
Once the bed is in place, maintenance is mostly about checking it after storms.
What to Check After Heavy Rain
After each major storm, walk the full length of the bed. You want to see if water stayed where it should and whether the channel is still doing its job.
Good signs: water stayed in the channel, the rocks are still locked in place, and the outlet area shows no new gully forming.
Warning signs that need attention:
- Missing or shifted stones, especially at bends, mean flow is too fast for that section.
- Exposed fabric needs immediate repair; water can tear it and undermine the bed.
- Sediment bars building up in flatter sections lift the bed level and push water sideways; rake or shovel these out before the next storm.
- Water jumping the banks means the channel is too small or too shallow along that stretch; deepen or widen it where needed.
- Standing water that remains after 48 hours points to a grading issue, a clog, or a blocked outlet.
After major storms, inspect the bed, clear debris, add stone where needed, and pull weeds each spring and fall.
If the bed still doesn’t control runoff, it’s time to decide whether a surface channel or a buried drain makes more sense for the site.
Dry Creek Bed vs. Buried Drain on a Slope
Use the table below to match the drainage method to the problem.
In a sloped yard in central Maryland, if you can see surface runoff eroding soil or washing away mulch, a dry creek bed is usually the better fit. It handles sheet flow moving downhill, slows it through the stone, and helps cut down erosion.
A buried drain works better for concentrated discharge, like downspouts, sump pump lines, or flat areas that hold water.
| Factor | Dry Creek Bed | Buried Drain (Pipe System) |
|---|---|---|
| Installation depth | Shallow surface channel, typically 6–18 in. deep | Trench required, often 12–24 in. or more |
| Best use case | Visible surface runoff, natural swale stabilization, slope erosion control | Point sources (downspouts, inlets), limited surface space |
| Washout control | Stone dissipates energy along the full channel length | Pipe confines water but can discharge high-velocity flow at the outlet |
| Troubleshooting visibility | Very high – problems are visible at the surface during and after storms | Low – clogs and pipe failures are hidden until backups or sinkholes appear |
| Appearance | Natural-looking stream bed; can integrate boulders and plantings | Mostly invisible; inlets and outlets tend to be utilitarian |
A dry creek bed gives you something a buried pipe doesn’t: you can watch it work during a storm. If something starts going wrong, you’ll usually spot it right away.
With a buried pipe, the first clue is often a soggy lawn, a sinkhole, or water backing up at the inlet. At that point, figuring out the cause often means camera inspection or digging.
Key Takeaways for a Stable, Low-Maintenance Slope Drain
A dry creek bed stays low-maintenance when the basics are right from the start: follow the natural water path, keep a steady grade without flat spots or sudden drops, size the channel for peak flow, use non-woven geotextile fabric under properly graded stone, and protect both the inlet and outlet with extra angular rock.
When those pieces are in place, upkeep is usually limited to seasonal cleaning and the occasional stone reset.
Choose a dry creek bed over a buried drain when the main issue is visible surface runoff on a slope, when you want erosion control built into the landscape, and when easy, visible troubleshooting matters.
For Maryland slopes with repeat runoff issues, Pro Landscapes MD can help assess grading and dry riverbed drainage.
FAQs
Do I need a dry creek bed or a buried drain?
It comes down to where the water is coming from.
A dry creek bed deals with surface water. It moves visible runoff through a stone-lined channel, which helps cut down on erosion.
A buried drain, such as a French drain, deals with water below the soil. It collects that subsurface water and redirects it away.
In some cases, the best fix is to use both systems together.
How do I know what size dry creek bed to build?
A dry creek bed is usually 12 to 18 inches wide and 8 to 12 inches deep. Those dimensions often help slow water as it moves and cut down on erosion, especially on slopes.
That said, every yard behaves a little differently. Watch how water moves across your property when it rains to make sure the size can handle runoff well. If the drainage issue is more involved, it may be worth getting a professional evaluation.
What causes a dry creek bed to wash out?
A dry creek bed can wash out when the channel can’t handle the force of moving water or when the bed itself isn’t stable. If debris piles up or a blockage forms, water may spill out of its intended path and start eating away at the nearby soil.
Washouts can also happen when the system isn’t sized or sloped well for the amount of runoff it carries. In that case, fast-moving water can push and shift the stones. Regular inspections help spot clogs early, and features like check dams can help lower the risk.
Chat with Us