









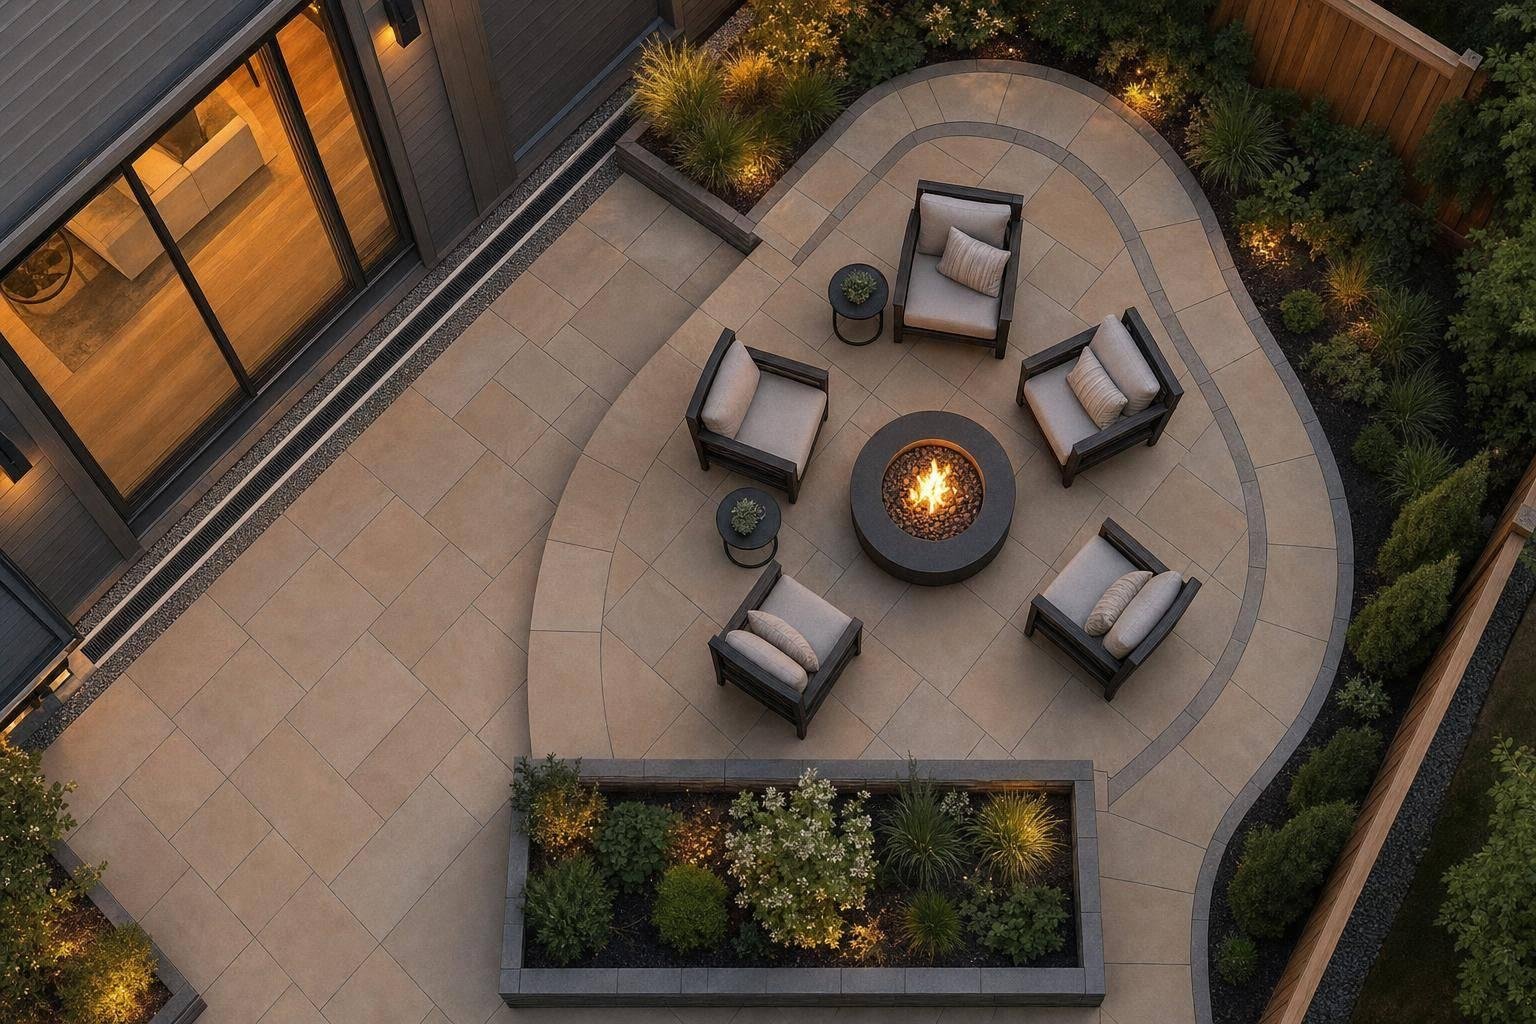
- bhavya gada
- No Comments
If I plan the fire pit first, the whole patio usually works better. That means safer spacing, cleaner traffic flow, better seating, and fewer problems with heat, smoke, drainage, and surface wear.
Here’s the short version:
- I start with how the fire pit will be used: conversation, cooking, or both.
- I match the pit size to the group size. Most built-in pits are 36 to 48 inches wide and often fit 4 to 10 people.
- I leave safe space around it:
- 2 to 3 feet from gas fire pits to chairs
- 3 to 4 feet from wood-burning pits to chairs
- 24 to 36 inches behind chairs
- 3 to 4 feet for main walkways
- I keep the fire pit at least 10 feet from combustible structures and allow about 10 feet of space above it.
- I use non-combustible patio materials like pavers, concrete, brick, or stone.
- I slope the patio about 2% away from the house so water drains off.
- If cooking is part of the plan, I leave 3 to 4 feet of work space on one side.
A fire pit can take up a lot of room fast. For example, a 44-inch fire pit with six seats may need about a 14 x 14-foot area once seating and walking space are added. That’s why I don’t treat the fire pit like a last-minute add-on.
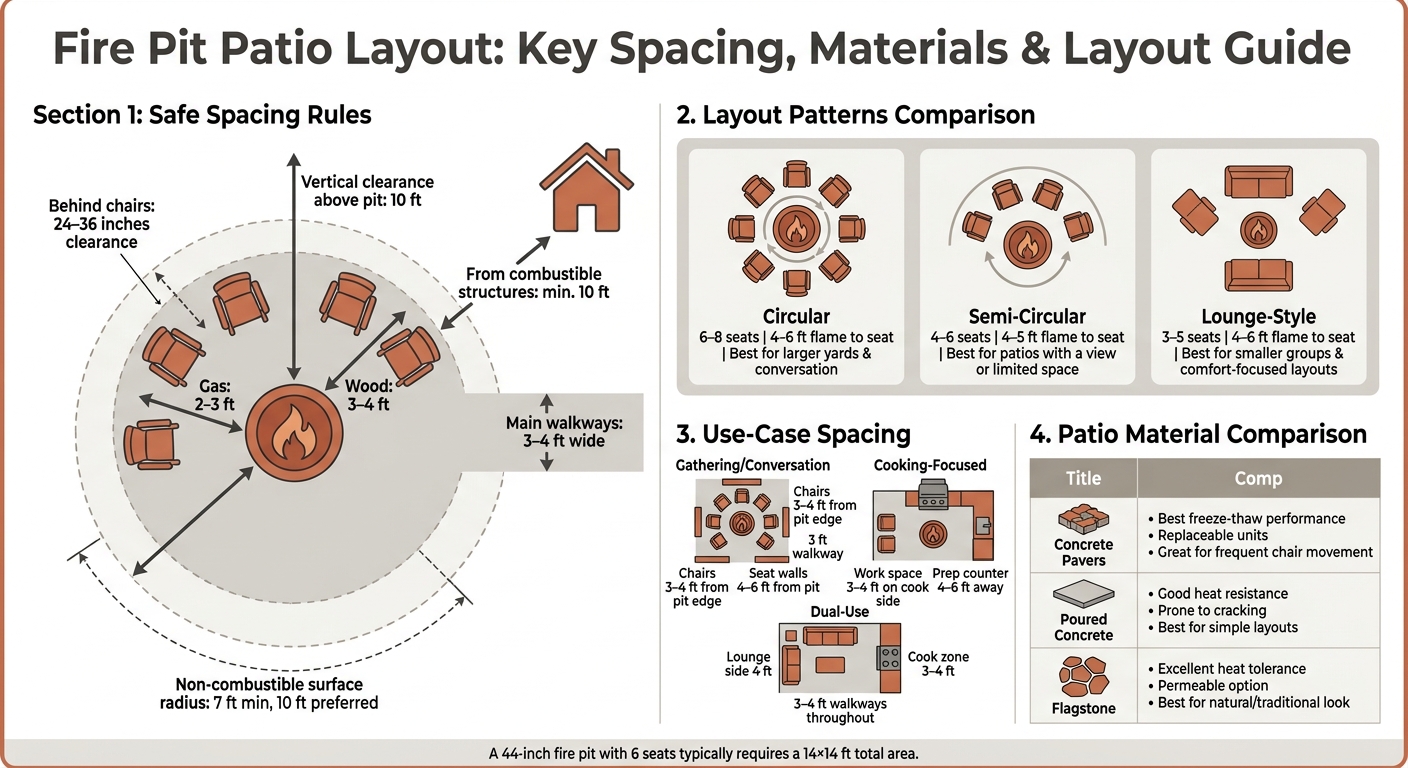
Fire Pit Patio Layout: Spacing, Materials & Layout Guide
My 4-Day Fire Pit Patio Build [Full DIY Project]
sbb-itb-843f8be
Quick comparison
| Focus | What I plan first | Common spacing |
|---|---|---|
| Conversation | Seating ring and view | 3 to 4 ft from pit edge to chairs |
| Cooking | Open side, prep space, path to table | 3 to 4 ft work zone on cook side |
| Dual-use | Moveable seats and split zones | 4 ft on lounge side, 3 to 4 ft on cook side |
In Maryland, weather matters too. Humid summers and freeze-thaw cycles can wear down weak surfaces, so I plan the fire pit, drainage, and patio material as one layout from the start.
Place the Fire Pit for Comfort, Views, and Safe Access
Fire pit placement shapes how the whole patio works. It affects traffic flow, comfort, and what people look at when they sit down. Put it in the wrong spot, and you can end up with guests weaving around the fire, smoke drifting toward the house, or a seating area aimed straight at a fence.
Set the fire pit location before you lock in the rest of the patio layout. Then work around it.
Keep the pit at least 10 feet from combustible structures, follow the manufacturer’s instructions and local code rules, and maintain 10 feet of vertical clearance above it. [6][7][8][9][10][11][12]
Use Offset Placement to Keep the Patio Open
A centered fire pit may sound like the neatest option, but it often gets in the way.
When the pit sits in the middle, people may have to circle the flame to get from the back door to the lawn, the dining area, or the steps. That can make the patio feel awkward fast. Moving the pit a bit off-center, closer to the outer part of the patio, helps keep a natural walking path open while still letting the fire act as the visual anchor.
That small move can also free up space on the other side for a dining table, a grill area, or a planted edge without making the seating zone feel cramped.
Set Seating Distances That Feel Warm, Not Crowded
The best seating distance depends on the kind of fire pit you have.
For gas fire pits, start with about 2 to 3 feet from the pit edge to the front of the chair. Wood-burning pits usually need 3 to 4 feet because the heat can vary more and sparks may drift. [14][15][16][17]
From there, adjust based on the pit size, burner output, wind, and chair depth. A simple way to test this before building is to mock it up first. Set out chairs or mark the layout with painter’s tape, then sit in each spot and see how it feels from every angle.
That spacing gives you the footprint for the seating area, walkways, and the rest of the furniture plan.
Keep Entry Paths Clear and Orient Seating Toward Good Views
Make sure there’s at least one clear path into the seating area that doesn’t bring guests too close to the flame. [6][12] In most cases, the main route should run behind the chairs along the outer edge of the patio, not between the fire and the people sitting around it.
This becomes even more important when the patio connects to a kitchen door, a basement walkout, or a path from the pool.
Views matter just as much as clearance. Since people naturally face the fire, the fire pit also frames whatever sits beyond it. Aim the seating so guests look toward the yard, a garden bed, or a tree line, not a driveway, utility zone, or a neighbor’s fence.
Sometimes a small shift is all it takes to make the space feel much better. With the fire pit set, the next step is mapping chair spacing and traffic flow around it.
Plan Traffic Flow and Furniture Spacing Around the Fire Pit
Once you’ve fixed the fire pit location, plan how people will move around it before you pick furniture. That order matters. Fire pit integration tends to work best when the pit shapes the patio footprint, seating, and circulation from the start. A simple way to do that is to sketch three zones first: the fire zone, the seating zone, and the walking zone. Keep those zones separate on paper. When they overlap, the patio usually feels tight and awkward once it’s built. [20][21][8]
Try to keep the fire pit and its clearance to no more than one-third of the patio area. For example, a 44-inch fire pit with six seats needs about a 14 × 14-foot area. A 48-inch pit can take up about a 14-foot footprint across the seating circle once chairs and walkways are part of the plan. [22][13][23]
Allow Enough Room Between the Fire Pit, Chairs, and Walkways
A good target is 4 to 6 feet from the edge of the fire pit to the front of the chairs. [20][15] That gives people enough room to enjoy the heat without feeling like they’re sitting on top of the flame.
Behind each chair, leave 24 to 36 inches so people can stand up, slide the chair back, and pass by without bumping into someone else. [20][21][8] For seat width, allow 20 to 24 inches per person on individual chairs and at least 24 inches per person on benches or seat walls. [5]
The main walking path behind the seating should be at least 3 feet wide. If the path runs between the back door and the yard, aim for 4 feet. [21][8] If space gets tight, it’s usually better to remove a chair than to squeeze the walkway. A cramped path is the kind of thing people notice right away.
Pick a Layout Pattern That Fits the Patio Shape
For most residential fire pit patios, three layout patterns make the most sense: circular, semi-circular, and lounge-style. Each one fits a different kind of space, so the best choice often comes down to patio shape and how you want people to gather.
| Layout Type | Typical Seat Count | Key Clearances | Traffic Flow | Best Fit |
|---|---|---|---|---|
| Circular | 6–8 | 4–6 ft from flame to seat; 24–30 in. behind chairs | Good if you leave an entry gap | Larger yards and conversation-centered gatherings [18][3][19] |
| Semi-circular | 4–6 | 4–5 ft from flame to seat; 3-foot-plus walkway on the open side | Strong one-sided access; easy entry | Patios with a view, a wall, or limited space [18][3][19] |
| Lounge-style | 3–5 | 4–6 ft from flame to seat; 36+ in. behind deep seating | Works well on rectangular or L-shaped patios | Smaller groups, comfort-focused layouts, sectionals [4] |
In plain terms, circular layouts fit larger patios, semi-circles work well in tighter spots, and lounge-style layouts suit relaxed seating for smaller groups.
Once the circulation plan is set, choose a surface that can handle heat, weather, and drainage.
Choose Patio Materials That Handle Heat, Weather, and Drainage
After layout and spacing, the next job is picking a surface that can take heat, handle bad weather, and move water away from the patio. Around a fire pit, the material needs to stand up to high temperatures, survive freeze-thaw cycles, and drain well.
Use Non-Combustible Surfaces Around the Fire Pit
Concrete pavers, poured concrete, clay brick, and natural stone like flagstone or bluestone are solid options for the area right around a fire pit. They handle heat well and stand up to foot traffic, which matters when people are sliding chairs around and walking back and forth.
Keep combustible finishes like wood, dry grass, leaves, or mulch well away from the fire zone. A simple rule is to keep a non-combustible surface radius of at least 7 feet from the fire pit center, with 10 feet preferred [24]. Decorative stone or gravel can also work well as a buffer between the paved area and nearby planting beds.
Grade and Prep the Base So Water Drains Away From the Patio
The base does a lot of the heavy lifting. It affects drainage and helps the patio stay stable over time. Start by removing topsoil, then compact 4 to 8 inches of crushed stone or gravel before setting the surface on top. That helps cut down on frost heave and keeps the patio from shifting.
For drainage, the patio should slope about 2% – roughly 1/4 inch per foot – away from the home [25][26]. The spots where the patio meets a lawn, planting bed, or other low area need extra care, because that’s where water tends to collect. French drains and dry riverbeds are common fixes that move water away from the hardscape and help keep the fire pit area level, dry, and steady for chairs and foot traffic.
Pavers, Concrete, and Flagstone: How They Compare for Fire Pit Patios
Concrete pavers tend to deal with freeze-thaw movement best. Poured concrete is the most straightforward option, but it’s less forgiving. Flagstone gives you a natural look and holds up well for years when it’s installed on a stable base.
Match the material to the patio shape you already planned. Pavers work well for flexible seating rings, poured concrete fits simple rectangles, and flagstone suits natural curves.
| Material | Heat & Weather Performance | Drainage & Maintenance | Best Fit |
|---|---|---|---|
| Concrete Pavers | Good heat resistance and strong freeze-thaw performance. | Individual units can be replaced, and flexible joints reduce cracking. | Great for family-friendly patios with frequent chair movement. |
| Poured Concrete | Good heat resistance, but more prone to cracking in freeze-thaw conditions. | Smooth, continuous surface; repairs can be more visible. | Works best for simple layouts. |
| Flagstone | Excellent heat tolerance and strong long-term durability when properly set. | Can be installed as a permeable surface; may need occasional re-leveling or repointing. | A strong choice for traditional or natural-looking patios. |
Once the surface is in place, the next step is to fine-tune the layout based on how the fire pit will actually be used.
Adjust the Layout for Cooking or Gathering and Finalize the Plan
Once you’ve picked the surface material, the last step is shaping the layout around how the fire pit will actually be used. A patio meant for laid-back conversation won’t work the same way as one built for open-fire cooking.
Add Work Space and Support for Cooking Use
If the fire pit will double as a cooking area, give one side to prep and keep foot traffic away from that zone. Set aside 3–4 feet of clear work space on the cooking side, and place a ledge or prep counter there[27][28][29].
A simple setup usually works best:
- Add a low masonry ledge 2–3 feet from the fire pit for tools[27][28][29]
- Place a prep counter 4–6 feet away for ingredients[27][28][29]
- Keep seating 4–6 feet from the fire pit edge on the lounge side[27][28][29]
- Maintain a direct path to any nearby kitchen or dining area that stays at least 4 feet wide[27][28][29]
That layout makes the space easier to use. The cook gets room to move, and guests aren’t crossing through the hottest, busiest part of the patio.
Keep Gathering Layouts Focused on Conversation and Comfort
If the fire pit is mainly for conversation, keep the layout tighter and centered on the seating ring. Place chairs 3–4 feet from the fire pit edge in a semicircle or horseshoe[2][30][32][33].
For comfort, spacing matters just as much as the fire pit itself. Leave 18–24 inches of legroom between chair fronts and any low table, and keep about 3 feet of clear space behind chairs so people can stand up and move around without that awkward shuffle[3][1][31][28].
Built-in seat walls set 4–6 feet from the fire pit edge are a smart upgrade. They add permanent seating, define the fire zone, and cut down on the amount of loose furniture you need[2][30][32][33].
Use these spacing ranges for each layout:
| Layout Type | Seating Distance | Key Nearby Features | Primary Walkway Width |
|---|---|---|---|
| Gathering-Only | 3–4 ft from fire pit edge | Seat walls, side tables for drinks | 3 ft |
| Cooking-Focused | 4–6 ft from fire pit edge | Prep counter, grill island, masonry ledge | 4 ft (cook’s side) |
| Dual-Use | 4 ft (lounge side), 3–4 ft cook’s zone | Outdoor kitchen on one side, lounge seating on the other | 3–4 ft throughout |
Conclusion: Good Fire Pit Patios Balance Use, Spacing, Materials, and Access
Good fire pit patios work best when use, spacing, materials, and drainage are planned together. For homeowners in central Maryland, Pro Landscapes MD designs and builds patios, fire pits, seat walls, outdoor kitchens, and drainage systems as one coordinated plan.
FAQs
How big should my patio be for a fire pit?
Your patio needs enough room for comfortable seating and safe movement around the fire pit. The exact size depends on the space you have, but the goal is simple: create a gathering area where people can sit, stand, and walk around without feeling cramped.
Pro Landscapes MD can assess your site and design a layout that balances traffic flow with the size of your chosen fire pit.
Should my fire pit go in the center or off to one side?
It comes down to how you plan to use the patio and how much room you have to work with.
A central placement turns the fire pit into the main hangout spot. It tends to work best in symmetrical layouts and makes conversation feel easy and natural.
An off-to-one-side placement can make foot traffic smoother and leave more open patio space for dining, seating, or other activities. Pro Landscapes MD can help you find the right balance between function and your property’s natural look.
What patio material is best around a fire pit?
Natural stone and flagstone work especially well around a fire pit. They hold up well, look great, and help you avoid problems like chemical leaching or excess heat buildup that can come with some other surface materials.
They also create a stable, elegant, long-lasting base that fits smoothly into the surrounding landscape.
Chat with Us