









- bhavya gada
- No Comments
If you want dry-lay flagstone to last in a Maryland yard, the base, slope, and drainage matter more than the stone pattern. In most cases, that means 1.5-inch-thick flagstone, a 6–8 inch compacted crushed stone base in clay-heavy soil, a 1–2 inch bedding layer, and a slope of about 1/4 inch per foot away from the house.
Here’s the short version:
- You should use dry-lay flagstone for patios, paths, and seating areas, not for vehicle traffic.
- Maryland clay soil holds water, which can lead to heaving, settling, and washout if the base is weak.
- Freeze-thaw weather makes trapped water a big problem, so drainage and compaction come first.
- A geotextile layer helps keep soil fines out of the stone base.
- Polymeric sand is often the lowest-upkeep joint fill for patios and walkways.
- You should call Miss Utility at least 2 business days before digging.
- After install, check for rocking stones, edge movement, and standing water in spring and fall.
A simple way to think about it: firm subgrade, compacted base in lifts, correct pitch, and tight joints. If one of those parts is off, the surface may shift after heavy rain or winter freezing.
For a fast side-by-side view, here’s the main material choice most homeowners care about:
| Joint Fill | Drainage | Hold | Upkeep | Best Fit |
|---|---|---|---|---|
| Polymeric sand | Medium | High | Low | Patios and walkways |
| Stone dust | Low | Medium | Medium | Basic dry-lay paths |
| Fine gravel | High | Low | Medium | Wet spots and rustic paths |
If I were planning this job in Maryland, I’d focus first on water flow and base depth, then on stone shape and finish.
Choosing Flagstone, Base Layers, and Joint Materials
In Maryland yards, material choice shapes how a patio or path deals with clay soil, heavy rain, and freeze-thaw shifts. That’s why it helps to pick these materials before any install work begins.
Flagstone Thickness, Finish, and Shape
For dry-lay patios and paths, use flagstone that’s at least 1.5 inches thick [1].
A thermal finish gives you a flatter, safer walking surface than natural cleft stone [1]. That difference matters more than many people think. A patio can look great, but if the surface feels uneven underfoot, people notice fast.
Shape affects the look just as much as the feel:
- Random shapes give the space a more rustic look [1][2]
- Dimensional stone creates cleaner, straighter lines [1][2]
Crushed Stone Base, Bedding Layer, and Geotextile Fabric
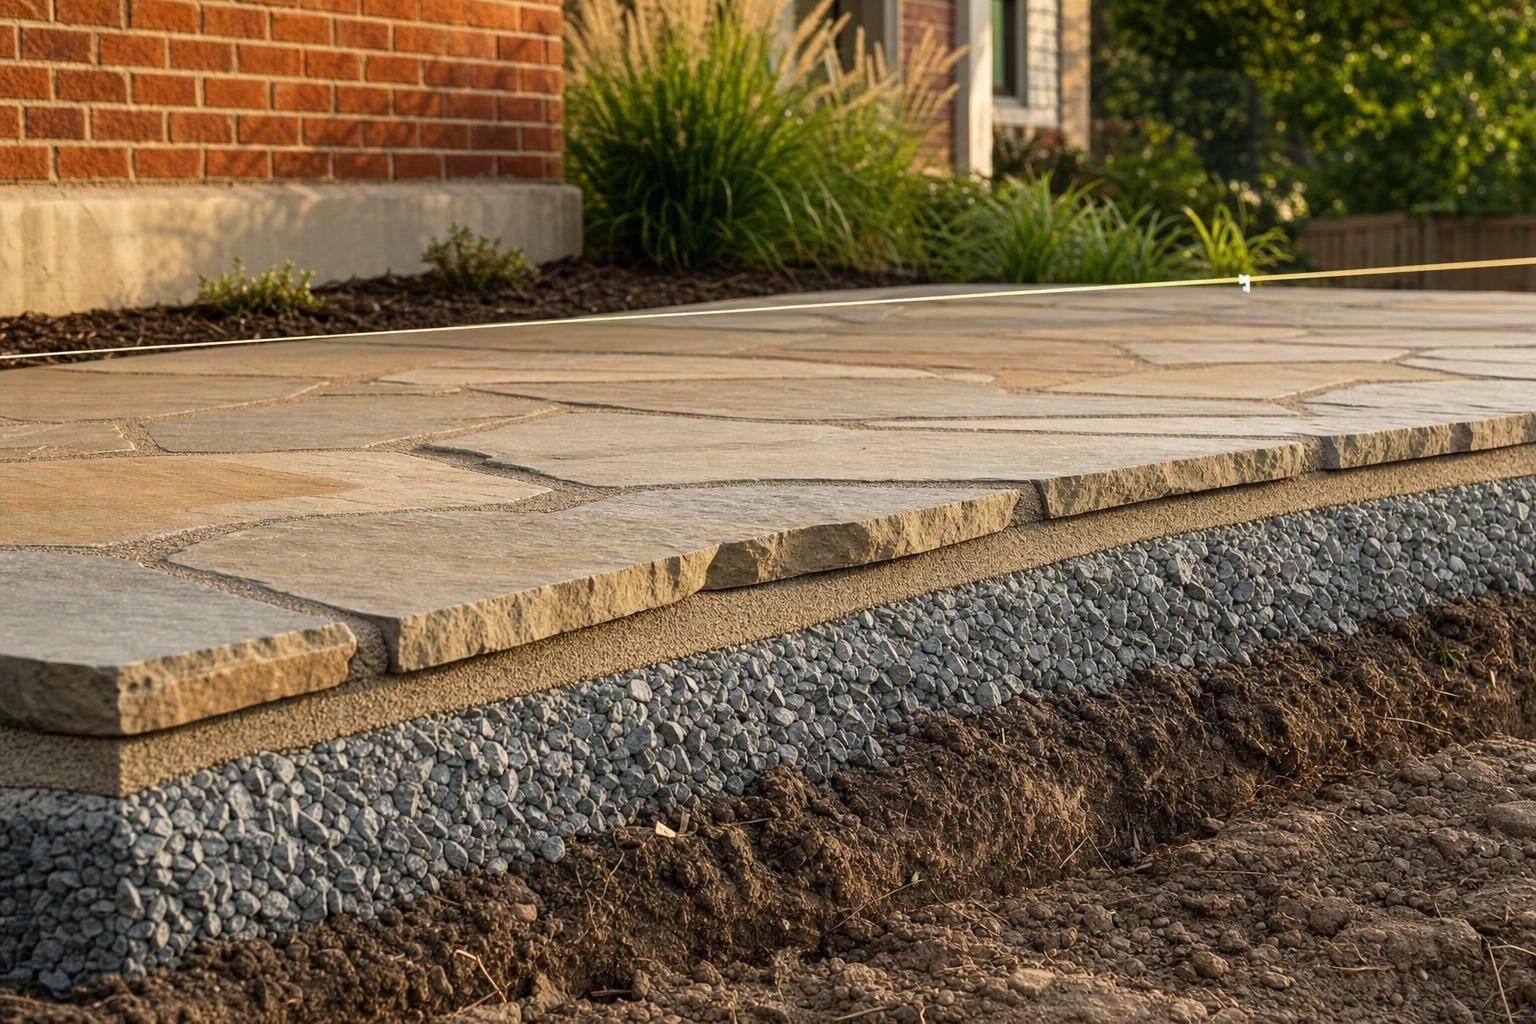
Geotextile fabric should go between the native soil and the aggregate base. Its job is to keep fines from moving up into the base over time [2].
Above that, use compacted crushed aggregate as the main foundation. Compact each lift before adding the next. If you skip that step, the surface can shift later.
Over the base, add a 1–2 inch bedding layer of coarse sand or stone dust to level the stone [2]. In weak soils or wet spots, you may need a deeper base along with perforated drain lines under the aggregate [2].
Joint Fill Options: Drainage, Stability, and Upkeep
| Material | Drainage | Joint Stability | Maintenance | Best Use in Maryland |
|---|---|---|---|---|
| Polymeric Sand | Moderate | High | Low | High-traffic patios and walkways |
| Stone Dust | Low | Moderate | Moderate | Traditional dry-lay paths; cost-effective |
| Fine Gravel | High | Low | Moderate | Areas with severe drainage issues or rustic garden paths |
| Decomposed Granite | Moderate | Moderate | Moderate | Rustic garden paths |
| Planted Joints | Very High | Low | High | Low-traffic garden accents |
For most Maryland patios and paths, polymeric sand is the practical pick. You sweep it into the joints while dry, then mist it with water so it locks the stones in place and helps resist washout during heavy summer rainstorms [2].
If low upkeep is the goal, use polymeric sand for most patios and paths. Go with stone dust or fine gravel only when drainage matters more than easy maintenance.
With the materials picked, the next step is marking the layout and setting the slope.
sbb-itb-843f8be
Planning the Layout, Grade, and Water Runoff
Before you dig, call Miss Utility of Maryland at least 2 business days in advance so public utilities can be marked [3]. Maryland law requires this for any excavation work. Private lines, like irrigation and lighting, usually won’t be marked, so you’ll need to trace those from as-builts or site records.
Mark the Area and Check the Slope
Once utilities are marked, lay out the footprint and set the finished elevations before any digging starts. Use stakes and string lines to mark straight edges. If the layout has curves, place a garden hose first to shape the line, then trace it with marking paint before setting the final string lines.
Use a 6-foot level or laser level to check elevations at key spots near the siding and door thresholds. As you work, keep checking the pitch. It’s a lot easier to fix slope issues now than after the base is in place.
Set the Right Finished Grade Away From the House
Set the surface to slope away from the house at 2%, or about 1/4 inch per foot [3]. That pitch helps move water away instead of letting it sit near the foundation. Avoid deep cuts next to the house, since unsupported soil can slump after heavy rain [3].
At the lawn edge, compact a wider transition area to help stop slumping there too [3]. Near trees, keep grade changes within a few inches of the trunk so you don’t wound roots.
Once the grade is set, check where the runoff will leave the site.
Add Drainage When the Yard Holds Water
If the yard holds water or drains slowly, install drainage before the stone goes down. French drains and catch basins need the right slope and a safe place to discharge [3]. Fix drainage issues first so the base has a firm surface to sit on.
After that, excavation and base work can begin.
Step-by-Step Dry-Lay Flagstone Installation
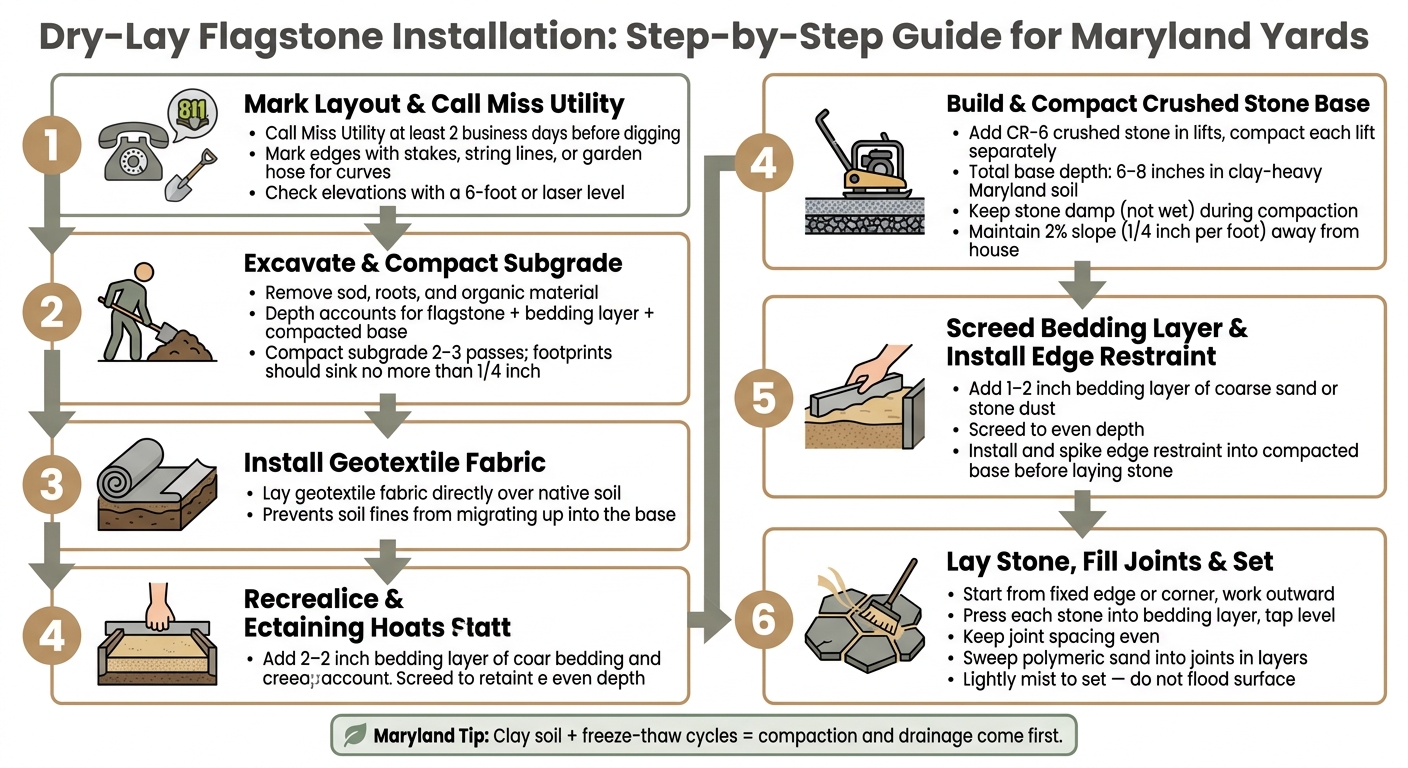
Dry-Lay Flagstone Installation Steps for Maryland Yards
With drainage handled and the grade checked, it’s time to build. The sequence matters here. Each step sets up the next one, so it’s worth sticking to the order.
Excavate and Compact the Subgrade
Use your marked slope and drainage plan to guide the excavation depth. Work in sections, and remove sod, roots, and other organic material to a depth that allows for the flagstone, the bedding layer, and the compacted crushed stone base. If you’re working in clay, stay away from steep vertical cuts, especially near a foundation. After a heavy rain, those faces can slump and create a mess.
Compact the subgrade in two or three passes. Then check firmness by walking across it or rolling a loaded wheelbarrow over the area. If your footprints sink more than 1/4 inch, compact it again or wait until the moisture level drops[3].
Build the Base, Screed the Bedding Layer, and Set Edge Restraint
Add CR-6 crushed stone, or a similar aggregate, in lifts and compact each lift on its own. The moisture level matters more than many people expect. The stone should be damp, not wet. If it’s too dry, it won’t lock together. If it’s saturated, it can pump under the compactor[3]. In most cases, a garden hose with a spray nozzle is enough to dial that in.
As you compact the base, keep the slope you already established. Once the base is compacted and graded, screed a 1–2 inch bedding layer so the depth stays even.
Install the edge restraint before you start laying stone, then spike it into the compacted base[3].
Lay the Stone, Space the Joints, and Fill Them In
Start from a fixed edge or corner and work outward. Press each stone into the bedding layer and tap it level before moving on to the next one. Take your time fitting the stones together. Keep the joint spacing even so the surface stays level and the joint fill can work the way it’s supposed to.
After all the stones are set, sweep joint material into the gaps in layers. Sweep away dust, fill the joints, then lightly mist polymeric sand to set it. Don’t flood the surface[3].
Once the joints are filled, move on to routine cleaning and seasonal freeze-thaw checks.
Maintaining the Surface and Knowing When to Call a Pro
Seasonal Upkeep for Maryland Freeze-Thaw Cycles
Once the joints are filled and the stones are in place, maintenance helps keep the surface steady through Maryland winters. Check the patio in early spring and late fall. Pay close attention to the edge restraint, and watch for lifting, leaning, or gaps around the perimeter.
After winter, walk the surface and look for stones that rock, settle, or rise. If you find a problem stone, lift it, re-level the bedding layer underneath, and set it back down firmly. Refill any joints that have washed out, then mist lightly to help set the fill.
Clear leaves and debris before freezing weather hits. That simple step helps cut down on ice trouble. Skip deicing salts. Use sand or fine gravel for traction instead.
Water control still matters after the patio is installed. After major storms, check downspout outlets and swales near the patio. If a downspout is sending water near the edge, extend it. If you spot standing water after heavy rain, deal with it within 24 hours.
When the Project Calls for Professional Help
Some issues go past normal wear and point to trouble with the base or drainage.
- Minor loose stones or joint loss: DIY
- Recurring washout, lifting edges, or settlement: professional review
- Persistent pooling, settlement, or slope change near the house, or hardscape tie-ins: professional evaluation
When these signs keep showing up, the dry-lay system has likely moved beyond basic surface maintenance. At that point, repeated spot fixes usually won’t solve the root issue. The surface needs a structural assessment. For recurring drainage or settlement problems, Pro Landscapes MD handles flagstone repair, grading, and drainage work across central Maryland.
Conclusion: Key Steps for a Dry-Lay Flagstone Surface That Lasts
A dry-lay flagstone surface can hold up well in Maryland yards when each layer does its part. Start with durable flagstone that’s sized for dry-lay use.
Then excavate down to firm subgrade and compact the crushed-stone base in lifts. Maryland’s clay-heavy soils swell and shrink as moisture levels change, so a well-compacted base is key for long-term stability [3]. After that, set the pitch so water drains away from the house.
Aim for a 1.5% to 2% slope away from the house and secure edge restraint to the compacted base [3]. Once the base and slope are in place, the joint fill helps keep the surface steady.
Filled joints keep stones tight and level [3].
If the site still drains poorly, the issue goes past the surface build. For persistent drainage or settlement issues, Pro Landscapes MD handles flagstone installation, grading, and drainage across central Maryland.
FAQs
How deep should a dry-lay flagstone base be in Maryland?
In Maryland, a dry-lay flagstone base usually calls for 6 to 8 inches of excavation to make room for the sub-base and bedding layer.
That excavated area should be filled with compacted crushed stone or gravel. This helps give the patio or walkway a stable base and lets water drain instead of pooling.
You’ll also want the finished surface to slope 2 to 3 percent away from building foundations. That slight pitch helps move runoff away from the house and can help protect your home from moisture problems.
What joint fill works best for a flagstone patio?
For a dry-lay flagstone patio, the best joint fill comes down to two things: how you want the patio to perform and how you want it to look.
Polymeric sand is a common pick because it helps keep joints stable and can cut down on weed growth. But there’s a catch: you need to apply it with care. Remove all dust first, then mist it lightly instead of soaking it. Too much water can cause problems fast.
You can also use fine stone dust or a similar aggregate. This option often works well if you want a more natural look or better drainage between the stones.
No matter which material you choose, the stones need to be set well. If they shift, the joints can crack, wear out, or come apart.
When should I add drainage under flagstone?
Add drainage under flagstone when you need to manage runoff, prevent soil erosion, or stop water from pooling near your foundation.
It matters most when the slope doesn’t carry water away from structures at roughly 2 to 3 inches over 10 feet, or when the area floods easily or has compacted soil that slows infiltration.
Chat with Us