









- bhavya gada
- No Comments
If a retaining wall sits on a steep slope, geogrid is often what keeps it from pushing out, tipping, or sliding with the soil behind it.
I’d boil the whole topic down like this: geogrid ties the wall face to the compacted soil behind it, which helps the wall handle height, slope pressure, water-related stress, and extra loads from things like driveways or patios. For many residential walls, once height gets past about 3 to 4 feet, or when the ground slopes up behind the wall, reinforcement and engineering are often part of the job.
Here’s the short version:
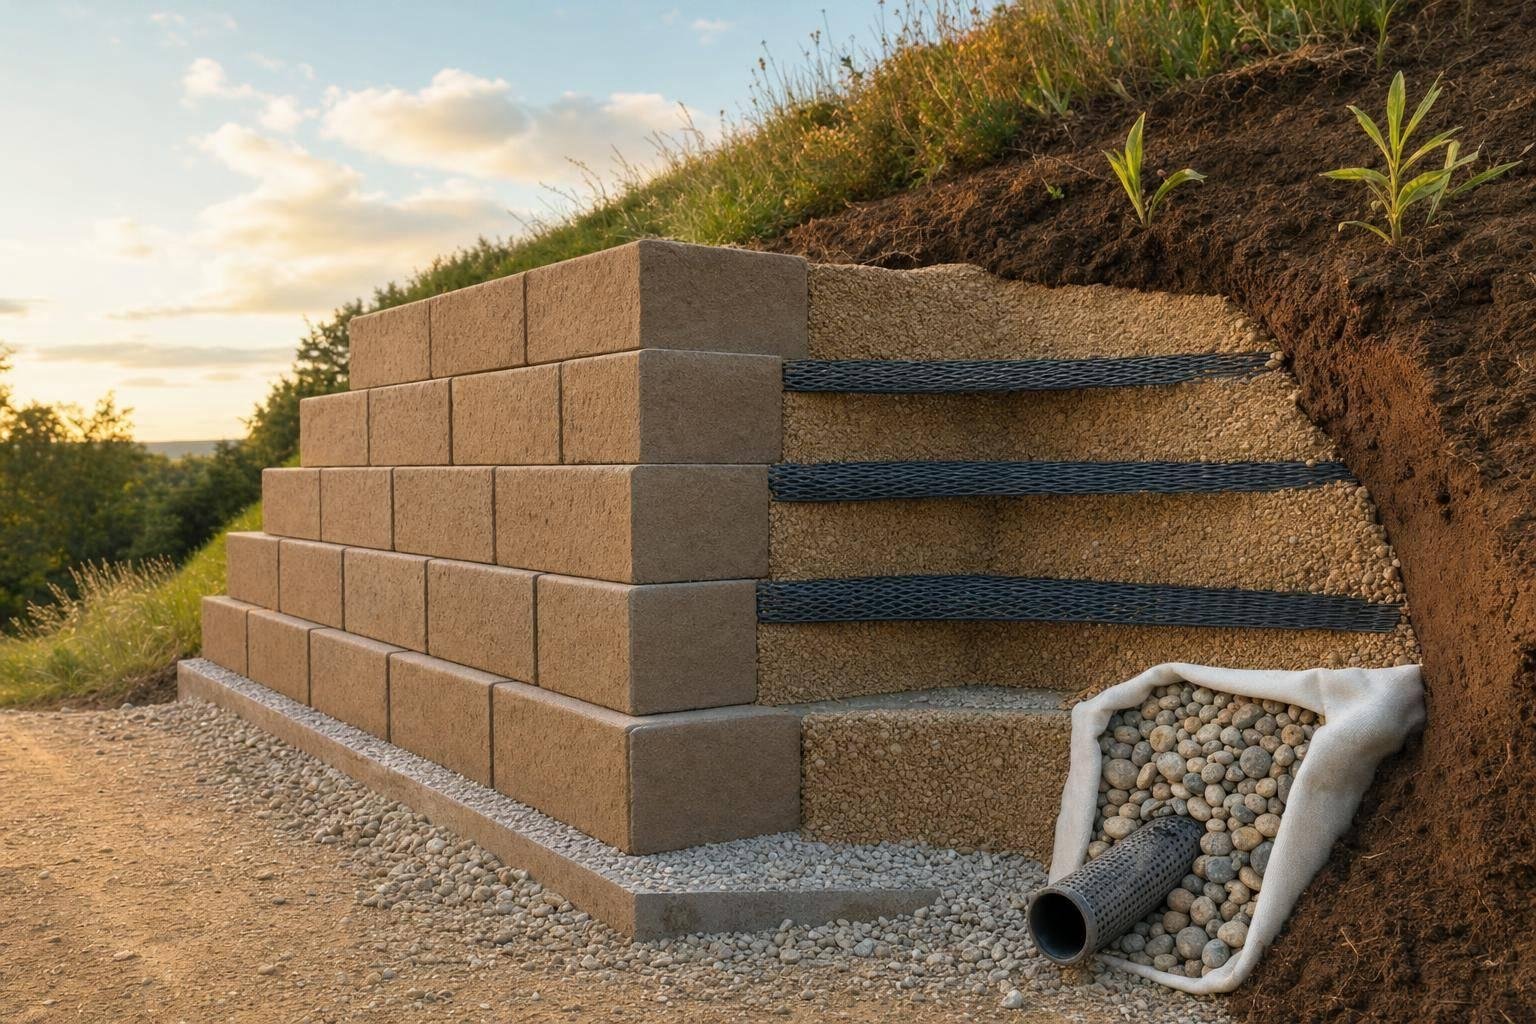
- Geogrid is laid in horizontal layers between wall courses and extends back into compacted fill.
- It helps form one reinforced soil mass, not just a stack of blocks.
- Common grid length is about 60% to 70% of wall height, though steep slopes and loaded areas may need 0.8 to 1.0 times wall height or more.
- Layer spacing is often around 16 to 24 inches.
- Backfill is usually placed in 6- to 8-inch lifts and compacted to about 95% Standard Proctor density.
- Drainage still matters because geogrid does not drain water.
- Global slope checks matter on steep sites because the issue may be the whole hillside, not only the wall face.
What matters most? Not the grid alone. The wall works only when geogrid, backfill, compaction, and drainage all work together.
This article explains how geogrid works, when walls need it, how it helps with slope and surcharge loads, and why drainage and build quality matter just as much as the grid itself.
How to Build a Geogrid Stabilized Retaining Wall – Part 1
sbb-itb-843f8be
How Geogrid Reinforces Soil Behind the Wall
On steep slopes, geogrid turns loose fill behind the wall into a reinforced mass that resists outward pressure. Put simply, it gives the soil tensile strength in a place where soil alone struggles to handle sideways force. In that role, the geogrid works as tensile reinforcement inside the soil.[17]
Friction, Interlock, and the Reinforced Soil Mass
The main idea is pretty simple: soil particles press into the grid openings and lock against the ribs. That soil–grid interlock is what does most of the work. Instead of acting as separate pieces, the wall blocks, geogrid layers, and compacted backfill work together as one reinforced mass. That lowers the chance of internal sliding and makes grid pullout much less likely, as long as the grid extends past the potential slip surface.[8][12][13] Rib shape also plays a part in pullout resistance.[18]
That only works if the grid is long enough and buried in the right backfill.
Grid Length, Layer Spacing, and Backfill Quality
Grid length and spacing follow set design rules. Guidance often calls for geogrid to extend back from the wall face at least 60–70% of the wall height, with a common minimum of 4 ft for residential walls.[7][13] So for a 10-ft wall, you’re usually looking at 6–7 ft of embedment. On steep slopes, longer grids push the failure plane deeper and help the wall resist sliding and overturning.
Vertical spacing between layers is usually 16–24 in., or about every two to three block courses, depending on engineering needs and soil conditions.[7][1][11] Taller walls, or walls dealing with more lateral pressure, often use tighter spacing.
Backfill matters just as much as layout. Well-draining granular fill compacts well and locks into the grid.[8][9][11][13] Expansive clays are a different story. They weaken when wet and cut into grid performance. In central Maryland, clay-heavy native soils often need to be replaced in the reinforced zone with angular, well-drained aggregate.[17]
Correct orientation and compaction are what turn those design assumptions into wall strength in the field.
How Orientation and Compaction Affect Performance
Most commercial geogrids used behind walls are one-directional, which means their main strength runs in the roll direction. That strong axis needs to run perpendicular to the wall face. The grid should be laid flat, pulled taut, and anchored before new backfill is placed on top.[10][5]
Backfill is then placed in 6–8 in. lifts and compacted to about 95% of Standard Proctor density. That helps keep the soil in firm contact with the grid and cuts down on settlement, bulging, and soft pockets.[13][5] On steep slopes, poor compaction can weaken the whole reinforced system – even if the grid itself was installed the right way.[15]
With the soil mass reinforced, the next issue is how geogrid helps the wall handle height and added loads.
Wall Height Limits, Surcharge Loads, and Steep-Slope Stability
How Geogrid Supports Taller Retaining Walls
Once the soil mass is reinforced, the next big limits are wall height and any loads near the top. Under typical residential conditions, an unreinforced segmental retaining wall is usually capped at about 3 to 4 feet of exposed height. If the soil is weak, the slope is steep, or extra weight sits near the crest, that limit can drop even more.[22]
Geogrid changes the job the wall is doing. Instead of acting like a simple stack of blocks, the wall works as a reinforced system.[13][26]
That added support allows engineered walls to reach much greater heights, from small residential installs to large structural wall systems.[21][13] The reinforced zone helps the wall resist sliding, overturning, and bearing failure by spreading loads through the full width of the geogrid instead of putting the burden on the block face alone.[13][26] Typical design specs call for minimum safety factors of 1.5 for sliding and 2.0 for overturning and bearing.[31][30]
In Maryland, walls over 3 to 4 feet or any wall with surcharge loads usually need permits and engineering.[22][25]
How Loads from Driveways, Patios, and Structures Are Handled
Any added weight behind a retaining wall, such as a driveway, patio, parked vehicles, or a nearby structure, increases lateral earth pressure. If that load is ignored, the wall’s allowable height can drop. Design guidance often treats residential driveway loading at about 250 psf, while pedestrian surcharge conditions are often set at 50 psf.[28][29]
Geogrid helps by keeping surcharge loads from piling up at the face.[13][24] A wider reinforced zone spreads the force across more area, which lowers bearing pressure at the base and cuts the risk of settlement or rotation. When a driveway or patio sits close to the wall crest, engineers often extend the geogrid to about 0.8 to 1.0 times the wall height to keep the system stable under those conditions.[13][4]
Footing loads from houses, garages, or additions have to be modeled on their own. The distance from the foundation to the wall face also matters, because it changes how much lateral force the wall must resist.[23][26]
When Geogrid Helps Control Slope Movement Behind the Wall
When those added loads sit near a steep hillside, the design has to do more than support the wall. It also has to keep the larger slope in place. On steep sites, the bigger problem may be the hillside behind the wall.
Global stability refers to whether the full soil mass, including ground well behind the reinforced zone, could move along a deep rotational or compound failure surface.[23][27] A wall can pass its internal checks and still be at risk if the larger slope is unstable.
Geogrid helps control that movement by extending the reinforced zone far enough into the hillside that a slip surface has to cut through a long, anchored soil mass instead of sliding around it.[23][27] On tougher sites, geogrid lengths may need to reach 100% of wall height or more to meet an acceptable global safety factor. The minimum global stability factor is 1.3.[30][27]
On steep Maryland sites, steep grades above or below a wall often end up driving the design. That’s why engineers may call for longer geogrid, deeper embedment, and sometimes benches or tiered wall layouts.[23][27]
That stability still depends on drainage, which comes next.
Why Drainage Is Critical in a Geogrid-Reinforced Wall
Geogrid makes soil stronger, but it does not move water. When water collects behind a retaining wall, hydrostatic pressure can still shove the wall outward and weaken the bond between the soil and the grid.[32][36]
Base Drains, Drainage Stone, and Outlet Protection
That’s why a reinforced wall needs a clear drainage path, not just stronger wall units. A common setup includes a 3- or 4-inch perforated pipe at the base that discharges to a safe outlet, a clean gravel drainage zone behind the wall face, and nonwoven geotextile to keep fine soil out.[30][21][35][37]
On taller walls, the gravel drainage zone may be widened to 24 to 36 inches. That extra width helps move water and makes compaction near the face easier.[30][13] If groundwater or heavy rain may collect behind the wall, the base drain may run beneath the full reinforced soil area so water doesn’t get trapped under the geogrid layers.[6]
At the outlet, riprap pads or splash blocks protect the soil where water leaves the system. That helps cut down on gully erosion that could wash out the wall’s leveling pad.[34][6]
Connecting the Wall to Site Drainage on Maryland Properties
Internal drainage only works if the rest of the yard also sends water away from the wall. Surface runoff, roof water, and groundwater need to be routed away before they reach the reinforced zone.[16][30]
Positive surface grading, usually a 2% to 5% slope away from the wall crest, sends runoff toward swales or lawn areas instead of letting it sit behind the wall.[16][30] Where downspouts or driveway runoff dump water near the wall, a French drain or separate drain line can intercept that flow and reroute it before it soaks into the reinforced zone.[33][21]
On steep sites, poor drainage can lead to movement in both the wall face and the slope behind it.
How Pro Landscapes MD Builds Retaining Walls with Drainage in Mind

Pro Landscapes MD handles drainage, grading, and retaining wall installation as one system, so water is redirected before it can weaken the reinforced slope.
With drainage handled, the next step is installing the grid and checking the wall after the build.
Construction Steps, Maintenance, and Key Takeaways

How Geogrid Reinforces a Retaining Wall on Steep Slopes
Where Geogrid Fits in the Installation Sequence
A geogrid wall on a steep slope needs to be built in a strict sequence. If you skip steps, the wall can develop problems that cost a lot to fix later.
Start by excavating the full reinforced zone and removing any organic or unstable material. After that, set the base and drainage system. Then build the wall in lifts and place geogrid at the engineered intervals.
After that, the process repeats in a steady rhythm: add wall courses, place backfill in compacted lifts to project spec, and install geogrid with its strong axis perpendicular to the wall face every 2–3 courses.[2][3][20][33] Each layer needs to be pulled taut, covered with backfill, and compacted before the next course goes in. The last steps are adding the cap and grading the surface so water drains away from the wall crest.[20][14][39]
What to Check After the Wall Is Built
Once the wall is finished, routine inspections help spot early signs of stress and drainage trouble. A visual check twice a year – usually in spring and fall – will catch most issues before they turn into bigger repairs.[40][44][47]
Pay close attention to the same trouble spots that affect steep-slope walls most often: trapped water, poor compaction, and soil movement behind the face. Walk the full length of the wall and look for bulging or bowing, tilting or cracking, and gaps opening between blocks.[42][43][45][46] Check that drainage outlets are flowing freely when the soil is wet.[41][48] Also inspect the crest for erosion channels, which can show that runoff is concentrating there instead of moving away from the wall.
Key Points Homeowners Should Remember
For homeowners, the big takeaway is simple: geogrid only works when the whole wall system works. It depends on proper backfill, steady compaction, correct layer spacing, and drainage that keeps doing its job. If a grid layer is buried in poorly compacted or organic soil, it adds very little reinforcement. Why? Because friction is what makes it work – not the grid material by itself.[3]
Taller walls on steep slopes, or walls placed near driveways and patios, need engineered geogrid layouts with longer embedment lengths and tighter vertical spacing.[13][19][33][38] The grid lengths, spacing, and drainage details should match the site conditions. On steep slopes, geogrid, backfill, compaction, and drainage all have to work together.
FAQs
How do I know if my wall needs geogrid?
Consider geogrid if your retaining wall is taller than 4 feet, holds back a surcharge load like a driveway or a nearby structure, or sits in loose or unstable soil.
Bulging, leaning, cracking, or uneven settling are warning signs. They often mean the soil pressure is more than the wall can safely handle right now, and extra reinforcement may be needed to keep it stable over time.
Can geogrid fix drainage problems behind a wall?
Geogrid is not a substitute for a dedicated drainage system. But it does help drainage do its job by holding soil structure and stability together when the ground gets saturated.
Its open mesh allows water to pass through, which helps cut down water buildup and hydrostatic pressure behind the wall. It also keeps backfill in place, so parts like French drains, weep holes, and perforated pipes can keep working the way they should.
Does a geogrid wall stabilize the slope behind it?
Yes. A geogrid wall helps stabilize the slope behind it by creating a reinforced soil mass.
When the geogrid locks into the backfill, it spreads loads across a larger area and helps limit side-to-side soil movement. That lowers the risk of bulging, settling, and structural failure, while helping the wall and the slope act like one more stable unit.
Chat with Us