









- bhavya gada
- No Comments
Proper drainage is critical for retaining walls to prevent water buildup, which can lead to bulging, cracking, or collapse. Installing drainage pipes ensures water flows away from the wall, extending its lifespan and avoiding costly repairs. Here’s a quick overview of the process:
- Site Assessment: Identify water sources, soil type, and drainage needs.
- Materials: Use a 4-inch perforated drain pipe, ¾-inch crushed stone, and geotextile fabric.
- Installation Steps:
- Excavate a trench behind the wall.
- Lay a gravel base and position the pipe with holes facing downward.
- Backfill with gravel and wrap in geotextile fabric.
- Ensure proper slope (1–2%) for water flow.
- Outlet Design: Direct water to a lower elevation or stormwater system, protecting the outlet with a rodent screen and riprap.
Regular maintenance, like clearing debris from outlets and inspecting for blockages, keeps the system working efficiently. For walls over 4 feet or complex conditions, professional help is recommended.
This guide simplifies the process so you can tackle drainage installation with confidence.
Essential Drainage Methods to Prevent Retaining Wall Failure
sbb-itb-843f8be
Planning and Preparing for Drainage Installation
Laying the groundwork for a proper drainage system starts well before digging begins. A carefully crafted plan tailored to your site can save you from expensive corrections down the road. This early preparation ensures you choose the right system and gather the necessary materials.
Site Assessment and Design Considerations
Start by walking around your property to pinpoint water sources. These might include roof downspouts, driveways, irrigation systems, or natural slopes. Next, test your soil: grab a damp handful and squeeze it. If it holds its shape, you’re likely dealing with clay-heavy soil, which drains poorly and builds up hydrostatic pressure quickly [3]. If the soil crumbles, it’s sandier and drains better, though adding geotextile fabric can prevent washouts.
Take note of areas where water tends to collect – these spots are prime candidates for drainage outlets. If your retaining wall will exceed 4 feet in height, plan for a toe drain system with pipes vented to daylight at least every 50 feet [1]. For multi-tiered walls, each tier needs its own drainage system [1]. Don’t forget to check local codes and secure any required permits before moving forward.
| Condition | Drainage Requirement |
|---|---|
| Wall height over 4 ft | Toe drain vented every 50 ft [1] |
| Clay-heavy soil | Toe drain required regardless of wall height [1] |
| Slopes above the wall | Additional drainage to handle increased runoff [1] |
| Paved areas nearby | Integrated drainage to avoid sub-base saturation [1] |
| Multi-tiered walls | Separate drainage systems for each tier [1] |
These considerations are essential for ensuring your drainage system supports the wall and prevents future issues.
Choosing the Right Drainage System
For most residential retaining walls, a 4-inch perforated drain pipe behind the lowest course of the wall is standard [3]. In colder climates, like Maryland winters, smooth-walled pipes are a better choice than corrugated ones. Smooth walls reduce the risk of sediment or ice buildup, which can block the system [3].
If your wall is near impervious surfaces such as driveways or patios, these areas can channel significant runoff toward the wall. In such cases, connect these runoff sources to a separate drain pipe to divert water away from the wall instead of letting it collect behind it [3]. For clay-heavy soils or steep slopes, consider adding a French drain or linking the system to an existing yard drainage setup.
Materials and Tools Checklist
Before starting, gather everything you’ll need:
- Excavation tools: A round-point shovel, trenching spade, and a plate compactor for packing backfill layers
- Pipe and fittings: 4-inch perforated drain pipe (smooth-walled preferred), along with end caps, couplings, and outlet fittings
- Drainage aggregate: ¾-inch clean crushed stone (avoid pea gravel or sand, as they retain moisture [3])
- Geotextile fabric: Non-woven filter fabric to wrap the gravel and pipe, keeping fine soil particles from clogging the system [3]
- Outlet protection: Rodent screens for pipe ends to block debris and pests while ensuring water flows freely [1]
- Safety and layout tools: Stakes, string line, a tape measure, and safety glasses
When backfilling, make sure the drainage stone extends at least 12 inches behind the wall [3]. Skipping this step is a common DIY mistake that can lead to drainage failure.
Step-by-Step Guide to Installing Drainage Pipes
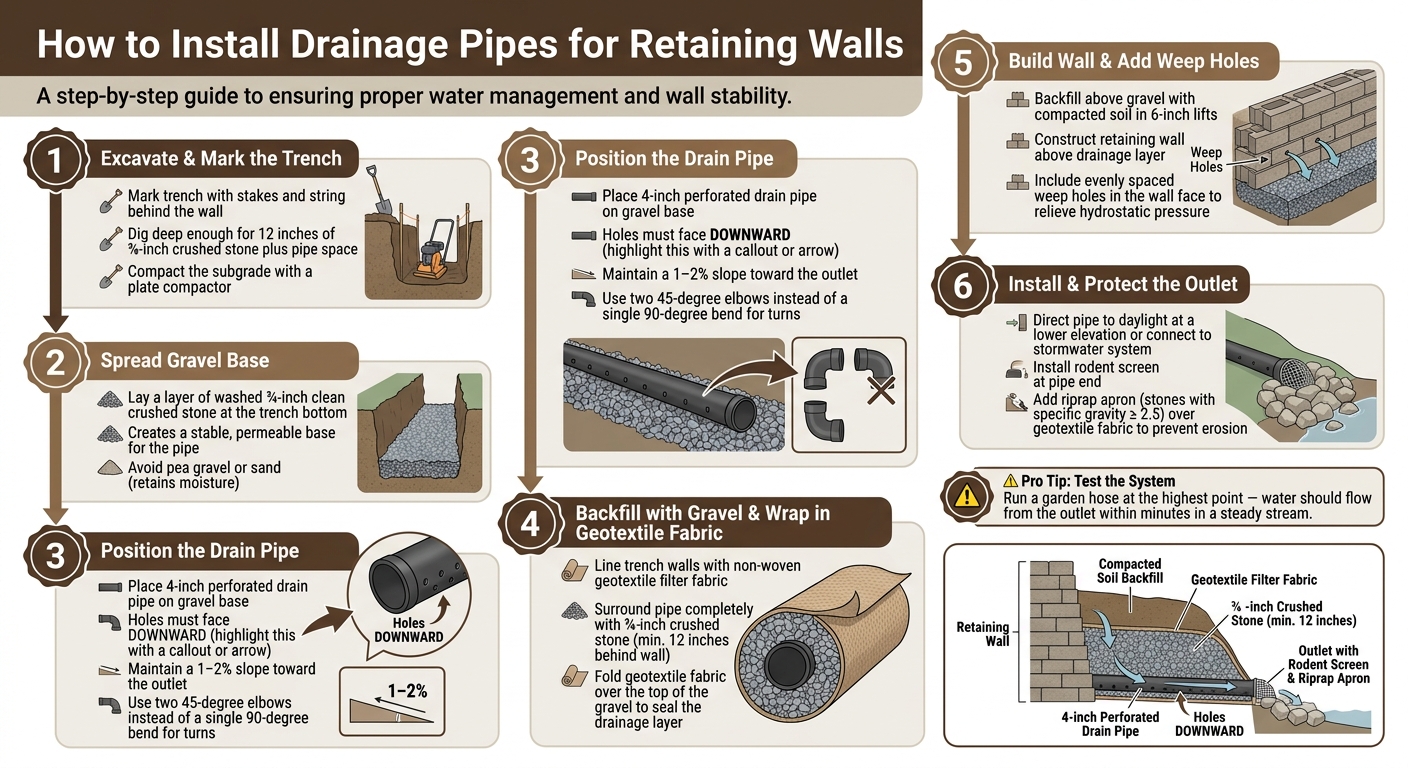
How to Install Drainage Pipes for Retaining Walls: Step-by-Step Guide
Now that you’ve gathered your materials and evaluated the site, it’s time to dive into the installation process. Each step builds on the previous one, so following the sequence is crucial for a drainage system that performs well over the long haul.
Excavating and Preparing the Base
Start by marking the trench with stakes and string, positioning it behind where the wall will be built. Dig deep enough to allow for at least 12 inches of ¾-inch crushed stone behind the wall face, plus enough space for the drainage pipe at the trench’s lowest point [4]. This low point is essential because water naturally collects there, making it the ideal spot for the pipe.
Once the trench is dug, use a plate compactor to firmly compact the subgrade. A well-compacted base ensures the pipe stays in place and maintains the proper slope. Skipping this step can lead to uneven settling, which disrupts drainage and creates standing water behind the wall.
Positioning and Installing the Drain Pipe
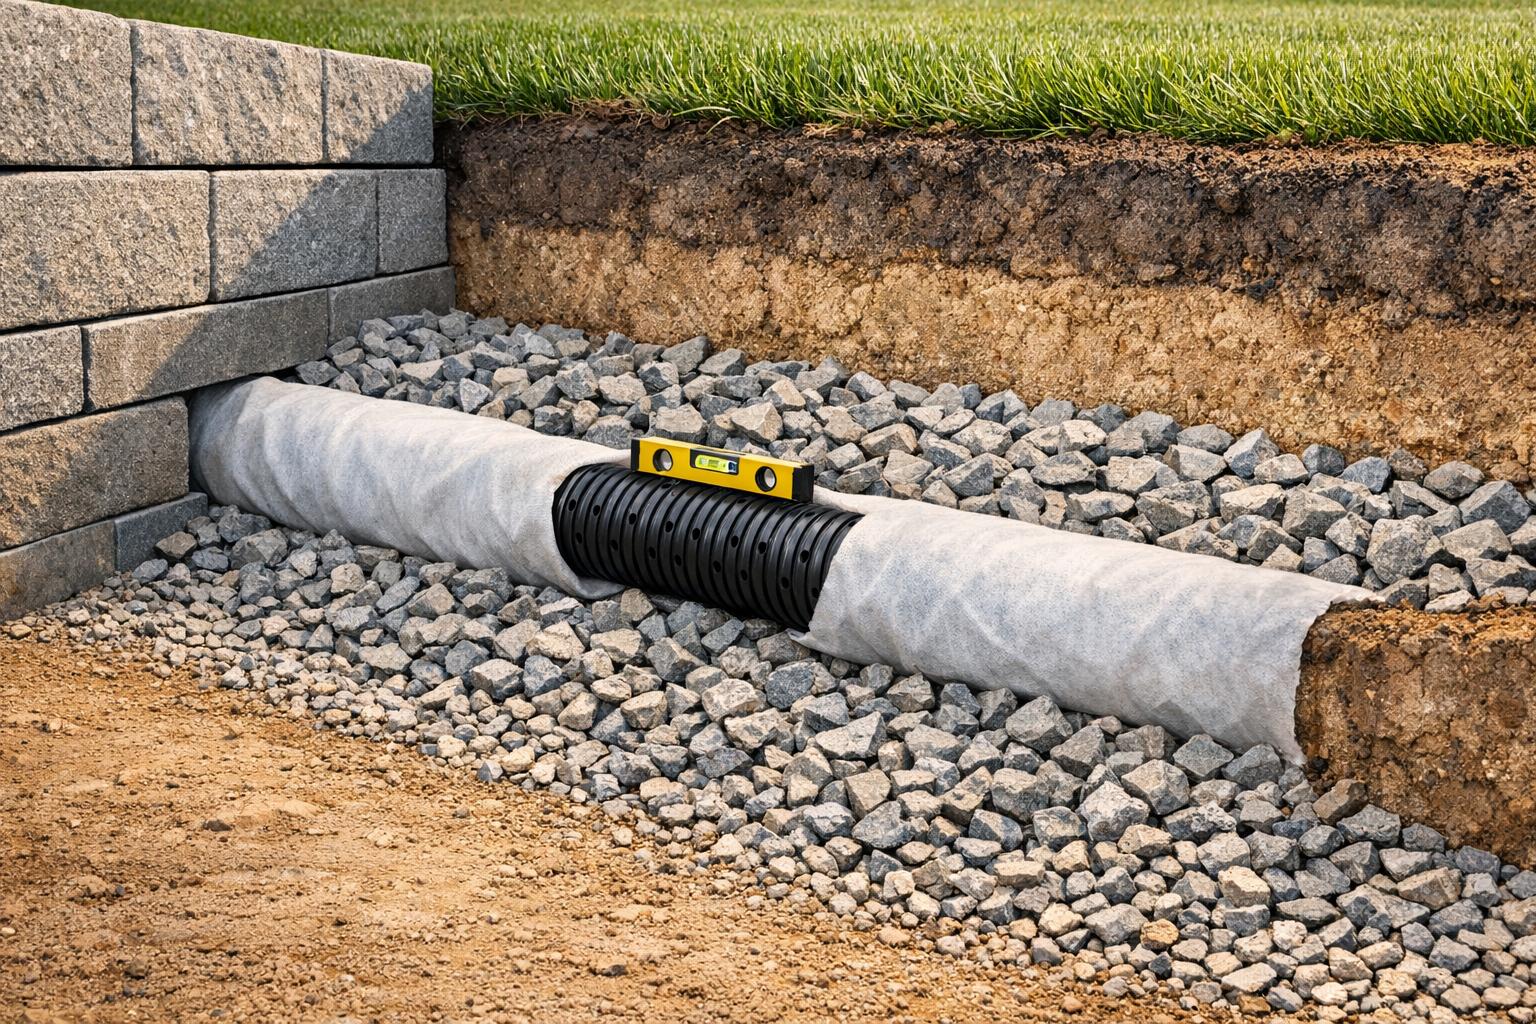
Before laying the pipe, spread a layer of washed gravel at the trench’s bottom. This creates a stable base and encourages water to seep into the system quickly. Place the 4-inch perforated drain pipe on top, ensuring the holes face downward [4].
Why downward-facing holes? This setup allows water to enter the pipe from below and flow out efficiently. If the holes face upward, water has to rise above the pipe before draining begins, which slows the process and causes silt buildup that clogs the system [4].
"Counterintuitively, you usually want the holes in drainage pipe to point down, not up. This way, water from below can get forced up into the pipe from underneath, which then has a low-resistance path to flow away." – Nuclear Hoagie, Stack Exchange Contributor [4]
Ensure the pipe maintains a 1–2% slope along its length toward the outlet. For turns, use two 45-degree elbows with a short straight section between them instead of a single 90-degree bend [5]. This design keeps water flowing smoothly and makes it easier to clear blockages if needed. Once the pipe is secured with the correct slope, you’re ready to backfill and start building the wall.
Backfilling and Building the Wall
With the pipe in place, secure it with backfill. Line the trench walls with non-woven geotextile fabric, letting it extend over the sides. Fill the trench with ¾-inch crushed stone, completely surrounding the pipe. Then, fold the geotextile over the stone to create a sealed drainage layer. This step prevents soil from seeping into the gravel and clogging the system.
After wrapping the drainage column, begin constructing the wall. Backfill with compacted soil above the gravel layer, working in 6-inch lifts. Proper compaction prevents future settling, which could disrupt the wall’s alignment. As you build, include evenly spaced weep holes in the wall face. These holes help relieve pressure from water buildup during heavy rains [4].
Creating and Protecting Drainage Outlets
Outlet Placement and Design
Once you’ve installed the pipe and backfill, the next step is to ensure the water is discharged completely off your property, not just redirected away from the wall. The outlet plays a crucial role in the long-term effectiveness of your drainage system.
One simple solution is to direct the pipe to "daylight" – this means allowing the pipe to exit in an open area at a lower elevation in your yard where water can naturally disperse [4]. If your yard lacks a natural low point, you can connect the pipe to an existing stormwater system. Either way, the outlet must be positioned at a lower elevation to let gravity do its job.
Before finalizing the outlet’s location, take note of nearby concentrated water sources, such as roof downspouts, driveway runoff, or sump pump discharges. Placing your outlet away from these areas helps prevent backflow and reduces the risk of erosion.
At the outlet, install a rodent screen to block pests and debris from entering the pipe. You should also add a riprap apron to slow the water’s velocity and protect against erosion. Use stones with a specific gravity of at least 2.5 to ensure they resist weathering and deterioration [6]. Beneath the riprap, lay a layer of geotextile filter fabric to stop sediment from migrating upward and clogging the outlet [6].
Once the outlet is secure and protected from erosion, test the system to make sure it performs as intended.
Testing and Final Adjustments
After securing the outlet and integrating it into your drainage system, it’s time to test its performance. Run a garden hose at the highest point of the drainage pipe and watch the outlet. Water should flow out within a few minutes in a steady stream, without pooling or backing up. If the flow is slow or nonexistent, check to ensure the pipe has a consistent 1–2% grade toward the outlet.
Next, inspect the wall for any unexpected wet spots or signs of seepage. Addressing minor issues, like clearing a blocked weep hole or adjusting a misplaced stone at the outlet, is much easier while the area is still accessible.
For added assurance, conduct a second test after a heavy rainstorm. This will confirm that the system handles real-world conditions effectively before you consider the project complete.
Maintaining and Troubleshooting Your Drainage System
Routine Inspections and Seasonal Maintenance
Once your drainage system is in place, keeping it in good working order requires regular care. Simple, consistent checks – especially before the rainy season or freezing temperatures – can help avoid wall damage and system failure. These conditions often put extra stress on the drainage system, increasing the risk of blockages.
During inspections, focus on the outlet pipe. Check for debris clogging the rodent screen and clear it out with a small brush or by flushing with a hose. Walk along the wall and look for warning signs like bulging, tilting, or new cracks. These could mean water is building up behind the wall instead of draining as it should.
As Allan Block emphasizes, "It is important that all drain locations are properly marked and protected to ensure that the drainpipe is not damaged or plugged." [1]
If regular maintenance doesn’t resolve issues, it’s time to move on to troubleshooting.
Fixing Common Drainage Problems
Addressing drainage problems quickly is crucial to prevent further damage. Below is a guide to some frequent issues and how to resolve them:
| Problem | Sign | Solution |
|---|---|---|
| Clogged weep holes | No water exiting during rain | Clear mud and debris using a small tool or pressurized water. |
| Silt-filled pipe | Muddy water at outlet; slow flow | Flush the pipe and ensure perforations face downward. [4] |
| Soil infiltration | Sinkholes forming behind the wall | Add or replace filter fabric around the gravel and pipe. |
| Hydrostatic pressure | Wall bulging, leaning, or cracking | Improve drainage and replace compacted soil with permeable gravel. |
| Improper grading | Standing water at the top of the wall | Regrade the surface to create a 1–2% slope away from the wall. |
"Cracks frequently indicate that a wall is being overpressed and may fail shortly if drainage isn’t improved." – Victor Miller, Lawn Care Journalist [7]
If you notice standing water or continued wall movement after clearing blockages, it might be time to call in a professional for further evaluation.
When to Hire a Professional
Taking on a retaining wall project can be manageable for seasoned DIYers, but there are times when bringing in a professional is a must. For example, walls over 4 feet tall come with technical requirements that go beyond most DIY capabilities. Without meeting these requirements, you risk wall failure, property damage, or expensive repairs.
Complicated site conditions can also make professional help essential. If your property has slopes above the wall, nearby impervious surfaces, or areas with high water runoff – like those fed by roof downspouts, sump pump outlets, or irrigation systems – the pressure behind the wall can increase dramatically. A skilled contractor will evaluate these factors and design a drainage system that addresses them effectively.
Things get even trickier with multi-tiered walls. Each tier has unique drainage needs, and they all have to work together to prevent overwhelming any single outlet [1]. These challenges highlight why hiring a professional often becomes the smartest choice. With expert guidance, you can ensure the wall performs as intended.
Pro Landscapes MD specializes in tackling these kinds of projects across central Maryland, including Howard County, Montgomery County, and Baltimore County, as well as Washington, DC. Their services cover everything from drain pipe installation and French drains to full-scale stormwater management and grading, ensuring your retaining wall’s drainage system is built to stand the test of time.
Conclusion: Key Steps for Successful Drainage Pipe Installation
To ensure a successful drainage pipe installation, it’s essential to start by identifying water sources early on. Whether it’s roof downspouts, irrigation systems, or sloped terrain above the wall, pinpointing these sources lays the groundwork for every decision that follows – from design to long-term upkeep [1].
During installation, paying attention to a few critical details can make all the difference. Place the perforated pipe at the lowest point behind the wall, ensure the holes are facing downward, and surround the gravel with filter fabric to keep silt out. Additionally, evenly spaced weep holes across the wall face help relieve pressure during heavy rains [4]. These steps aren’t just helpful – they’re essential for ensuring the wall remains stable and effective over time.
Post-construction, regular maintenance is key. Inspect drain outlets and clear debris at least once each season to keep the system functioning properly [1]. As the saying goes, "Proper drainage extends the life and stability of the wall" [2]. A little ongoing care can save you from costly repairs and protect your property in the long run.
FAQs
How do I know if my wall needs a drain pipe?
If you’re wondering whether your retaining wall needs a drain pipe, take a closer look at its height and the surrounding conditions. For walls over 4 feet tall or those constructed on soil that doesn’t drain well, a drainage system is often essential to avoid water buildup, which can lead to damage. Even shorter walls might require drainage if water tends to pool nearby – think about runoff from slopes, driveways, or downspouts. Proper drainage helps maintain the wall’s stability and prevents potential structural problems.
Where should the drain pipe outlet discharge to?
Proper placement of the drain pipe outlet is crucial to ensure water flows away safely without causing pooling or damage. Ideally, the outlet should discharge to an open area, like daylight or a lower elevation on the property. This setup helps water drain effectively, preventing buildup behind the retaining wall. By doing so, it reduces pressure on the wall and safeguards both the wall and nearby structures from potential harm.
What mistakes cause retaining wall drains to clog?
Clogged retaining wall drains often result from a few key mistakes. One major issue is using low-grade backfill material or neglecting geotextile fabric, which allows fine soil particles to seep in and block the drainage system. Another common problem is improper pipe installation – if pipes lack the right slope or an outlet, water can stagnate, leading to sediment accumulation and clogs.
To avoid these problems, it’s essential to follow best practices. Use perforated pipes wrapped in fabric to keep debris out, ensure the pipes are installed with the correct slope, and include features like overflow outlets or clear weep holes to maintain efficient drainage. These steps can make a big difference in keeping your retaining wall’s drainage system functioning smoothly.
Chat with Us