









- bhavya gada
- No Comments
The short answer: if you want a Maryland pollinator garden that people will use, start with sun, drainage, and yard shape first, then add one clear activity area like a bench, path, learning stop, or small water feature.
Maryland spans USDA zones 5b to 8a, so plant options are broad. But the article’s main point is simple: the right layout depends less on looks and more on where water sits, how many hours of sun the space gets, and how people move through it. It also stresses a long bloom window – at least three plants in bloom from spring through fall for about 80% of the growing season.
Here’s the article in plain terms:
- Front yard: sunny, neat border, small seating nook near the entry
- Side yard: part-sun path with small learning markers
- Backyard low spot: rain-garden layout with seating on dry ground
- Courtyard: edge planting with an open center for chairs and movement
- Custom plan: site-based layout for yards with mixed conditions or drainage work
A few rules show up again and again:
- Plant in drifts of 3 or more
- Use short plants in front, medium in the middle, tall in back
- Keep paths about 24–36 inches wide
- Put seating or pause points on firm, dry ground
- Leave some stems, seed heads, bare soil, and water for pollinators
Pollinator Garden Design Ideas – How to Attract Bees, Butterflies & Hummingbirds 🐝 🦋
sbb-itb-843f8be
Quick Comparison
| Template | Best For | Light / Moisture | Main Activity Area |
|---|---|---|---|
| Custom plan | Mixed yard conditions | Site-specific | Paths, seating, walls, water feature |
| Sunny front yard | Entry spaces | Full sun, average to dry soil | Small seating nook |
| Side-yard lane | Narrow pass-throughs | Part sun, average to moist | Learning stations along a path |
| Backyard rain garden | Low or sloped yards | Sun to part sun, wet after rain | Seating by basin edge |
| Courtyard pocket garden | Small enclosed spaces | Part sun to part shade, mixed moisture | Open center with chairs |
If I were planning from this guide, I’d make my choice in this order: check sun, test drainage, pick the yard type, then fit one simple destination into the planting.
How Maryland Pollinator Garden Templates Work
Every template in this article starts with two basic questions: How much sun does the space get? And where does the water go? Once you know those two things, it gets much easier to choose the right layout. The site needs to fit the template first, so the garden doesn’t end up fighting the conditions. After that, you can place seating, paths, and activity areas in ways that make sense. The planting plan comes first. The extras come after.
Light and moisture template types for Maryland yards
The University of Maryland Extension sorts pollinator beds into six site types: sunny/dry, sunny/moist, part sun/dry, part sun/moist, shade, and wet. The right match depends on sun exposure, drainage, and runoff. A south- or west-facing front yard usually points you in one direction. A low spot, a slope, or a shady area along the foundation points you in another. That’s why these templates start with site conditions, not style.
Bloom sequence from spring to fall
Maryland guidance calls for at least three species in bloom from early spring through late fall, covering about 80% of the growing season [3][4][5][9]. The goal is simple: keep food available for pollinators for as long as possible.
A common way to do that is to mix plants across the season. Use early bloomers like serviceberry and Virginia bluebells, follow with midsummer plants like coneflower, bee balm, and mountain mint, and then carry the garden into fall with goldenrod and asters.
Planting in drifts and layers
Plant each species in drifts of three or more, then repeat those drifts across the bed. That gives the planting a cleaner look and makes flowers easier for pollinators to find.
For height, think in layers:
- 12–18-inch plants at the front
- 18–36-inch plants in the middle
- Taller species at the back, or in the center of island beds
It’s a simple setup, but it keeps the bed readable instead of messy.
Host plants, nectar plants, and shelter features
A pollinator bed needs more than flowers. Add host plants, nectar plants, and shelter features so the space supports the full life cycle of insects, not just adult feeding.
That can include milkweed, oaks, willows, native cherries, leaf litter, standing stems cut to 12–18 inches, bare soil, and a shallow water source with stones. Those basics are what make the paths, seating, and learning features in the next section fit naturally instead of feeling tacked on.
What Makes an Activity-Zone Pollinator Garden Work
An activity-zone pollinator garden works when it handles four basic jobs well: it fits the site, makes movement easy, gives people a clear place to pause, and still looks good across the year. That’s what turns a pollinator bed from “nice planting” into a garden people can actually use.
Match the template to sun and drainage
Before you pick a layout, spend time watching the yard during the growing season. Note which spots get full sun, part sun, or shade. Then check drainage after rain. Walk the yard, see where puddles sit, and note how long they stick around.
If water hangs on for more than 24 hours, a rain garden setup makes more sense, using moisture-tolerant plants like swamp milkweed or blue flag iris.[16] Drier, well-drained areas are a better fit for black-eyed Susan and purple coneflower. Seating nooks and other activity zones usually belong on slightly higher, drier ground so they’re still usable after storms.
Use simple paths and clear circulation
One clear route through the garden usually does the heavy lifting. People shouldn’t have to guess where to walk.
In front yards, an 18–24-inch mowed strip or a low groundcover edge along the bed can mark the route. In side yards and backyards, stepping stones or a narrow mulch path – ideally 24–36 inches wide – can curve gently between planting blocks and link a patio, back door, or seating nook without sending foot traffic through the habitat itself. Keeping plants set back 6–12 inches from path edges helps cut down on damage from walking, mowing, and other yard work.[13][14][15] The path should lead straight to the stopping point in the next section.
Add one usable destination
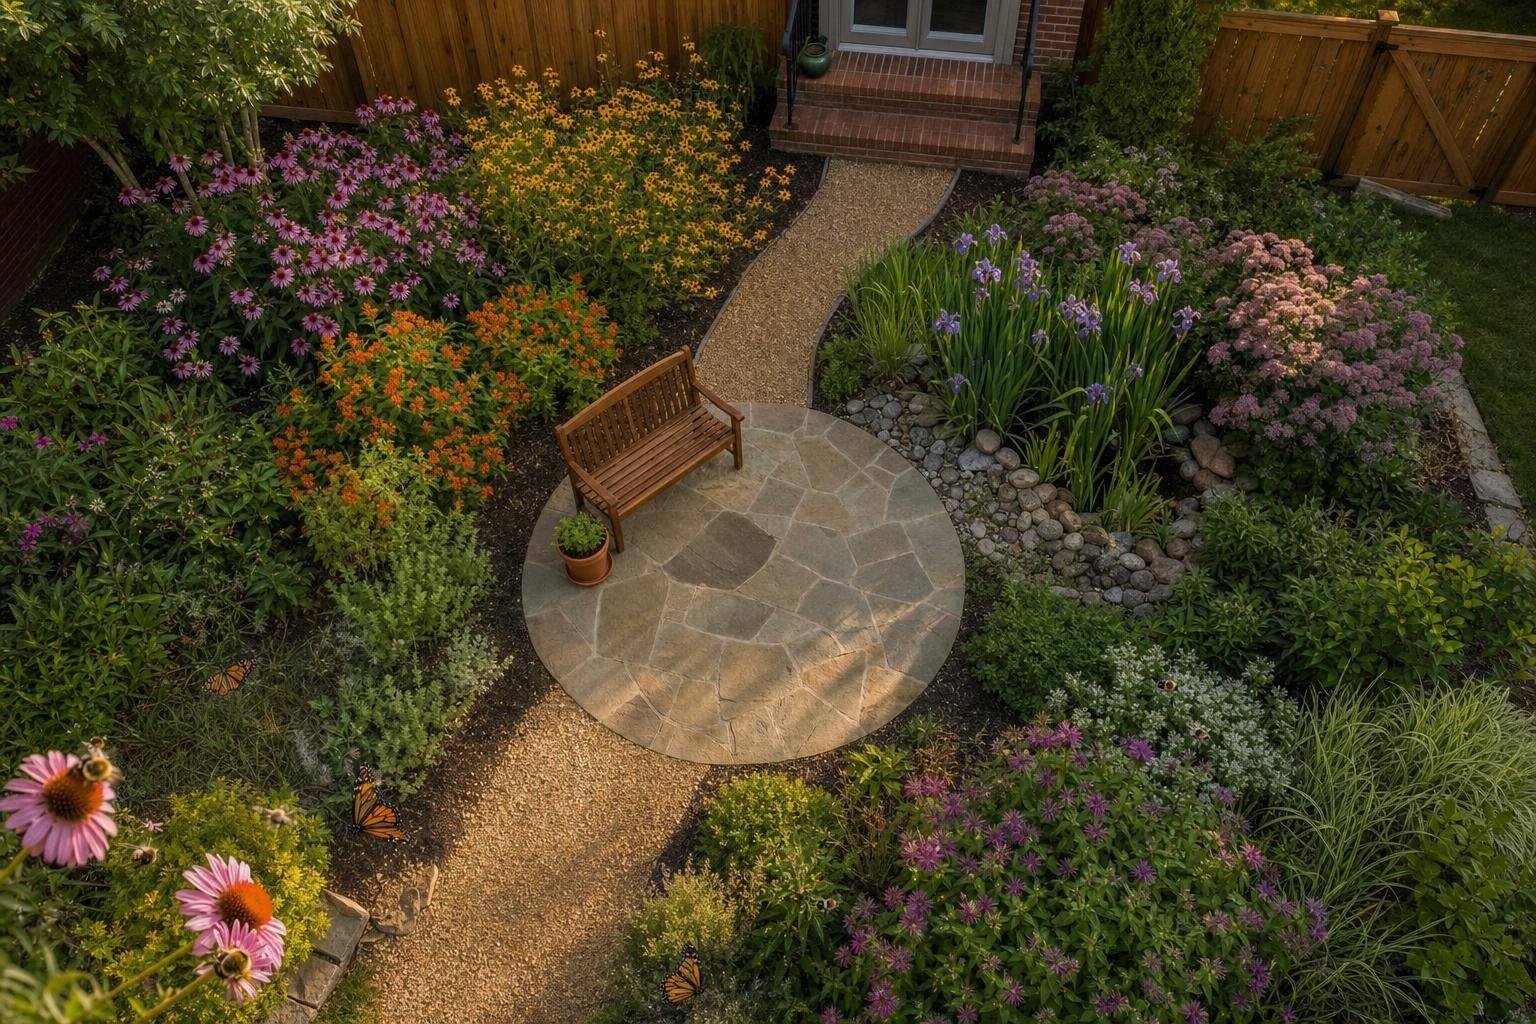
Once the path is in place, the garden needs one clear reason to enter or approach it. That pause point doesn’t have to be fancy. A bench tucked into native flowers can work. So can a slightly wider path area for observation, a small sign with a guide shelf, or a shallow bird bath.
You don’t need much space. A 4-by-6-foot or 6-by-8-foot area is enough. Put it where the ground is firm and dry, and where nearby plants bring color and wildlife activity.[10][11][12] In front yards, a small viewing niche near the porch often works better than a bench facing the street. In backyards, a tucked-away nook near a flowering shrub border usually gives the space a bit more privacy.
Keep the planting attractive in every season
After movement and stopping points are set, the planting should still read clearly in winter. One easy way to do that is to repeat a few core native species in drifts so the bed feels orderly instead of messy.
Defined edges also help. A crisp mulch band, stone border, or low edging frames the planting and shows that the garden is cared for. That matters a lot in front yards and shared spaces. For winter shape, pair perennials with native grasses like little bluestem and switchgrass, and leave some seed heads standing for birds. After summer storms, light cleanup – like trimming floppy stems near paths while leaving seed-bearing plants alone – keeps the garden neat without giving up habitat value.[17][18]
1. Pro Landscapes MD Custom Pollinator Garden Template

Built from the site-fit rules above, this custom template turns native planting into a garden room you can actually use. Pro Landscapes MD shapes each plan around the conditions of the Maryland property, including sun, drainage, and how people move through and use the space.
Yard placement
This template can work in front yards, side yards, and backyards across central Maryland. In a front yard, the layout can stay compact and easy to see near the entry. In a side yard, it can turn a narrow strip into a simple walking path or a small learning station. In a backyard, it can run along the property edge to form a habitat corridor without taking over the whole space.
Sun and moisture fit
Plant choices should match both sun exposure and drainage. Sunny areas with well-drained soil can support native shrubs and flowering plants. Wetter spots can shift to moisture-tolerant planting or a small rain garden.
If the property has drainage issues, Pro Landscapes MD can fix them before planting starts with grading, French drains, drainpipe installation, and leveling.
Native plant layering
A strong template uses layered planting with native shrubs, trees, and flowers. That mix helps create height, spread bloom times across the season, and give pollinators and other wildlife shelter. It also helps shape the space, framing paths and seating areas so the garden feels intentional instead of scattered.
Activity zone features
Seat walls, stone steps, paver pads, and a small water feature can create one clear destination in the garden without taking away too much habitat area.
2. Front Yard Sunny Welcome Garden With Seating Nook
Yard placement
Place this layout along a front walk or on the porch side that gets at least 6 hours of sun. Use a wide border or mirrored beds to frame the entry, with the street edge kept 4–6 feet deep and the bed widening as it moves toward the house. That extra room near the house gives taller plants space to shape the seating nook without making the entry feel crowded.
This setup helps the front yard read as neat and planned from the street. At the same time, it still works as pollinator habitat.
Sun and moisture fit
This template works best in full to part sun with average, well-drained soil. A simple drainage check can tell you if the spot is a match: dig a hole about 8–12 inches deep, fill it with water, and see how fast it drains.
- If the water drains within 1–2 hours, the site should work well.
- If water sits for more than 24 hours, use raised planting, amended soil, or a rain-garden version instead.
Once you know the soil moisture is right, plant height and bloom timing can take over.
Native plant layering
A three-layer planting keeps the front yard tidy from the street while feeding pollinators through the season. Put low growers at the front edge, like creeping phlox, alumroot, and butterfly weed. In the middle layer, use the main color plants: black-eyed Susan, coneflower, coreopsis, and wild bergamot. At the back, taller plants such as switchgrass, sweet pepperbush, and Virginia sweetspire add height and help frame the seating nook.
Plant each species in groups of 3–7. That gives the bed a more planned look and improves pollinator use.[20][21]
Activity zone features
Build the nook as a 6–8-foot square paved pad with a 3–4-foot spur path coming off the main walk. Keep the seating area small so the planting still reads as the star of the space.
Wrap the pad on two or three sides with mid-height pollinator plants, about 18–36 inches tall. That gives the nook shape without shutting off views of the front yard. A low seat wall, 18–24 inches high, along one edge adds built-in seating, helps with minor grade changes, and makes the space feel finished. You can also add a shallow birdbath or a stone-filled water dish to support birds and helpful insects without crowding the entry.[22][23]
3. Side Yard Part-Sun Learning Lane With Mini Stations
Where front-yard gardens shape the entry, a side-yard layout turns a pass-through space into a simple learning lane.
Yard placement
This setup works best in a side-yard strip that’s 6–8 feet wide, with a 2–3-foot path and planting bands on one or both sides. A run of 20–40 feet gives you enough space for a few mini stations set 6–10 feet apart without making the area feel packed. [6][25]
Try to line the lane up with a route people already use, like the path from the front yard to the gate or the walk from the driveway to a side door. One soft curve can slow people down a bit and make the walk feel more inviting, but the path should still be easy to read. In a narrow side yard like this, sun and drainage usually make the final call.
Sun and moisture fit
Many side yards in Maryland get 3–6 hours of direct sun and often stay moist to average because of roof runoff, downspouts, and compacted turf. [6][2][26]
A simple test helps here: if water drains within 24 hours after a normal rain, the site is a good fit for this layout. A downspout that drains into the side yard can actually help. You can use a shallow swale or a small rain-garden pocket along the lane to catch runoff and make room for native plants that like more moisture. [1][2][26] That moisture pattern also helps guide where each planting drift and station should go.
Native plant layering
Use height in layers so the lane has texture and color without feeling wild or closed in. In the low layer, foamflower (Tiarella cordifolia) and woodland phlox (Phlox divaricata) bring early spring bloom. In the middle layer, white turtlehead (Chelone glabra) and bee balm (Monarda fistulosa) carry color into summer. For taller structure, sweet pepperbush (Clethra alnifolia) and Joe Pye weed help hold the space through late summer and fall.
Plant these side-yard species in drifts. That makes the lane look planned, not random, and it also helps pollinators spot the flowers more easily.
Activity zone features
Each station should stay small and stick to one clear idea. A pollinator ID sign near the bee balm, a bloom calendar board that shows what’s flowering from spring through fall, and a host-plant marker beside the turtlehead make a strong set of three without crowding the path.
Use weatherproof signs that include:
- Common name
- Bloom time
- Sun and moisture needs
Leave stems and seed heads standing through winter for habitat and structure.
4. Backyard Rain Garden Retreat With Water Feature
A backyard rain garden retreat puts runoff at the center of the plan. Like the other templates, it combines native plants with a clear place to sit, walk, and spend time.
Yard placement
Set the basin in a natural low area, 10–30 feet downslope from the house. Keep the main planting area at least 10 feet from the foundation and 25 feet from wells or septic fields.[27][29][31]
If your backyard is narrow, place the garden along the rear property line or run it parallel to the longest slope. That can help you keep more open lawn or patio space. For many Maryland backyards, an irregular basin about 6–12 inches deep with gently sloped sides works well. Size it to about 20–30% of the impervious surface draining into it.[29][31]
Put seating on the slightly higher, dry edge. That way, you can look into the garden without stepping into wet soil. It also gives people a usable border while the lowest part handles the runoff.
Sun and moisture fit
This setup works best in full sun to part sun and in soil that drains within 24–48 hours.[27][28]
A simple test can tell you what you’re working with: dig a hole 8–12 inches deep, fill it with water, and track how long it takes to drain. If water is still there after 48 hours, the site may need amended soil or an underdrain before you plant.
Native plant layering
Choose plants based on moisture levels across the basin. The lowest zone should hold deep-rooted, water-tolerant natives such as blue flag iris (Iris versicolor), swamp milkweed (Asclepias incarnata), and soft rush (Juncus effusus).
Move up the side slopes and shift to plants like black-eyed Susan (Rudbeckia fulgida), Virginia mountain mint (Pycnanthemum virginianum), and golden alexanders (Zizia aurea). These can handle periodic moisture, but they don’t want to sit in standing water.
Near the upper edge by the seating area, use plants for drier soil, including purple coneflower (Echinacea purpurea), little bluestem (Schizachyrium scoparium), and New Jersey tea (Ceanothus americanus). They add structure and late-season color.
Plant each species in drifts of 3–7 plants. That simple move helps the whole basin read like one planned garden instead of a mix of wet and dry spots.
Activity zone features
A shallow stone-lined inlet, a dry riverbed that fills during storms, or a small recirculating bubbler near the upper edge can make water movement visible without leaving standing water.[27][28]
Pair that with a compact flagstone or paver pad about 6–8 feet across on the dry upper edge for two chairs or a bench.[30][28] Keep paths 24–36 inches wide and curve them around the basin edge so people can stay on dry ground while the garden handles stormwater.
5. Compact Courtyard Pollinator Pocket Garden With Multiuse Space
A compact courtyard pollinator garden proves that even a small space can help pollinators and still leave room for people to use the area.
Yard placement
This layout works well in three common Maryland setups: a small front patio in a townhome community, a side courtyard between the house and driveway, or a rear patio enclosed by a fence or privacy wall.
Keep the middle open for seating, then place planting beds in a U- or L-shape around the edges. In front courtyards, use shorter plants near the entry path and taller ones in the back corners so sightlines from the street stay open. In side courtyards, place beds along the wall or fence and keep at least 3 feet of clear circulation from the main door to the seating area.
After you lock in the footprint, match the planting plan to sun, shade, and runoff.
Sun and moisture fit
Most Maryland courtyards get part sun to part shade, and they often have dry, hot edges near walls and pavers. Those hard surfaces can pull moisture out of the soil fast, especially near foundations.
Watch where water moves or collects during a normal rain before you plant. That simple step can save a lot of guesswork.
Dry spots near walls are a good fit for Echinacea purpurea (purple coneflower), Rudbeckia fulgida (black-eyed Susan), and Coreopsis verticillata (threadleaf coreopsis). Shadier corners do well with Packera aurea (golden ragwort), Carex pensylvanica (Pennsylvania sedge), and Heuchera americana (alumroot). Near downspouts or low spots, moisture-loving natives such as Iris versicolor (blue flag iris), Lobelia cardinalis (cardinal flower), and Chelone glabra (turtlehead) can do well. Chelone glabra is also a host plant for the Baltimore checkerspot butterfly.
Those site conditions should guide what goes by the walls, what fills the corners, and what belongs in downspout pockets.
Native plant layering
Layering keeps a small courtyard garden from feeling messy. It also helps the planting read as planned, not packed in at random.
Use low groundcovers such as Carex pensylvanica, Phlox subulata (moss phlox), and Sedum ternatum (woodland stonecrop) at 6–18 inches along bed edges. They create a clear line between the walking area and the planted space.
The middle layer does most of the bloom work. Rudbeckia fulgida, Echinacea purpurea, Coreopsis lanceolata, and Monarda didyma (bee balm) fit well at 18–30 inches.
For back corners along fences, use taller anchor plants like Aster novae-angliae (New England aster), Solidago rugosa (rough goldenrod), and Eutrochium fistulosum (Joe Pye weed) at 30–60 inches. These bring late-season nectar and give the garden height.
Use 8–12 species in drifts of 3–5 to make the planting look intentional instead of cluttered.[7][32] With the beds doing the work around the edges, the middle can stay open for seating and foot traffic.
Activity zone features
Set aside a 6–8-foot open center for two chairs, a shallow water dish, a small trellis, and low edging around the bed. That gives the space a job beyond planting.
Place seating 2–3 feet from dense flower clusters, so people can enjoy pollinator activity without sitting right on top of it. A small vertical trellis with a flowering vine creates a strong focal point and doesn’t take up much floor space.[19][24] Low steel or stone edging between the bed and the patio surface helps keep mulch off the hardscape and marks the edge of the planting area.
Comparison Tables for Choosing the Right Template
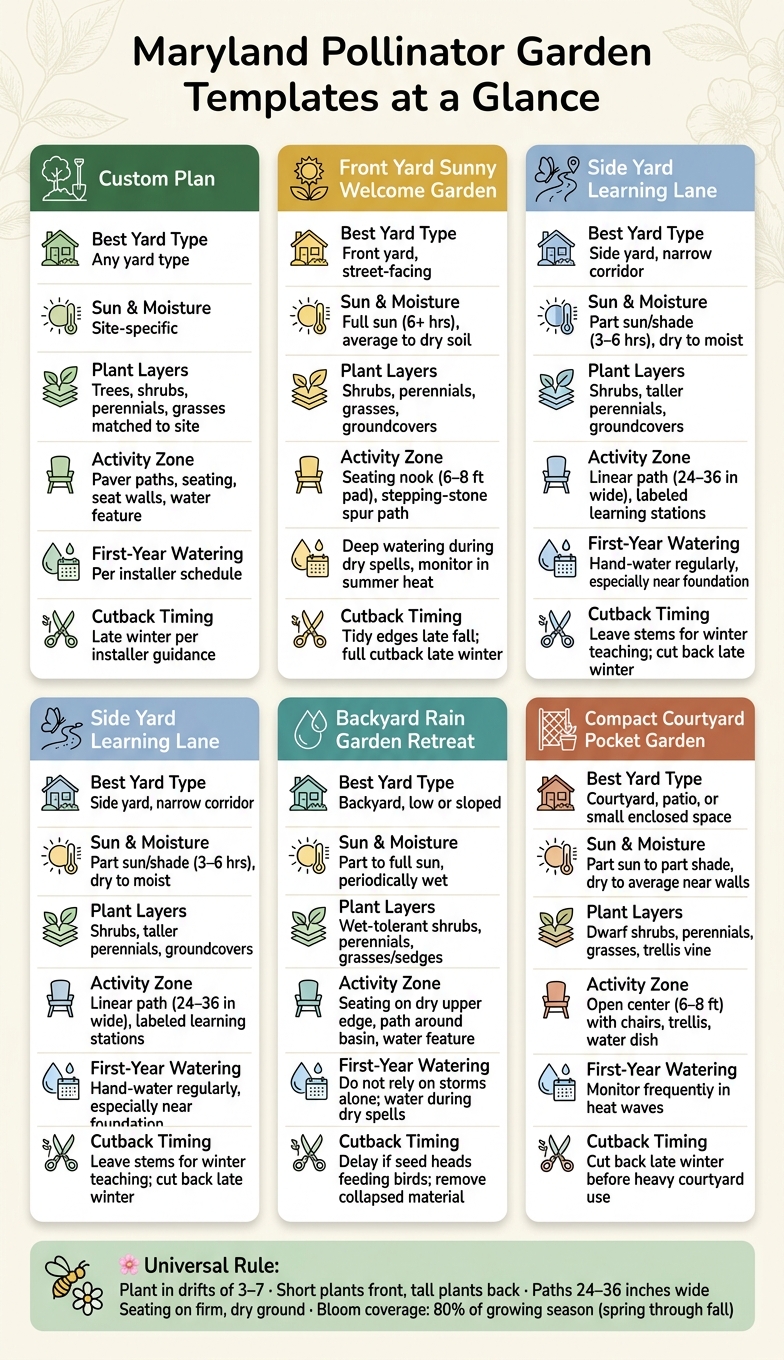
Maryland Pollinator Garden Templates: Side-by-Side Comparison
The tables below make it easier to compare site fit, activity features, and day-to-day care at a glance.
These templates vary most in light, drainage, and how much room people need to move through the space. So instead of guessing, you can narrow the choice fast.
Template comparison table
| Template | Yard Type | Best Sun & Moisture | Plant Layers | Activity-Zone Elements |
|---|---|---|---|---|
| Pro Landscapes MD Custom | Any yard type | Site-specific | Small trees, shrubs, perennials, grasses/sedges matched to site needs | Paver or flagstone paths, seating, seat walls, and water features |
| Front Yard Sunny Welcome Garden | Front yard, street-facing | Full sun (6+ hrs), average to dry soil | Shrubs, perennials, grasses/sedges, groundcovers | Seating nook with bench, short stepping-stone path from driveway or front walk |
| Side Yard Part-Sun Learning Lane | Side yard, transitional corridor | Part sun/part shade (3–6 hrs), dry to moist near foundation | Shrubs, taller perennials as station anchors, groundcovers | Linear path with stepping stones, mini labeled learning stations for pollinators |
| Backyard Rain Garden Retreat | Backyard, low or sloped area | Part sun to full sun, periodically wet; tolerates brief ponding | Small tree (optional), wet-tolerant shrubs, perennials, grasses/sedges | Seating area overlooking basin, short access path around the rain garden, water feature or planted basin |
| Compact Courtyard Pollinator Pocket Garden | Courtyard, patio, or small enclosed space | Part sun to part shade, dry to average near walls | Dwarf shrubs, perennials, grasses/sedges, and dwarf plants plus a trellis or small tree for height | Small patio or paved area with clear edging and short access from the door |
Maintenance notes table
Care shifts with the site. A rain garden needs drainage checks. A front yard usually needs neat edges. And across all five, first-year watering is the big one.
| Template | Establishment Watering | Cutback Timing | Mulch Approach | Special Upkeep |
|---|---|---|---|---|
| Pro Landscapes MD Custom | Follow the installer’s watering schedule based on site conditions | Late winter before new growth, per installer guidance | Mulch details are set in the design | Follow-up may be needed for complex hardscape or drainage features |
| Front Yard Sunny Welcome Garden | Water deeply during dry spells in the first season; monitor more often in summer heat | Selectively tidy front-facing edges in late fall; full cutback in late winter | Use shredded hardwood mulch with a clean edge or low edging; reduce visible mulch as groundcovers fill in | Weed regularly near the street edge |
| Side Yard Part-Sun Learning Lane | Check moisture regularly; hand-water new plants as needed, especially near the foundation | Leave winter stems standing as teaching tools; cut back in late winter | Shredded wood chips or fine gravel on the path; light mulch in beds until plants knit together | Inspect path footing after heavy rain; refresh station labels or signage as needed |
| Backyard Rain Garden Retreat | Do not rely on storms alone in the first year; water during dry spells to keep soil lightly moist | Delay cutback if seed heads are still feeding birds; remove collapsed material that could block drainage | Use shredded mulch that stays in place during heavy rain; dense plantings should gradually reduce exposed mulch | Check inlets and overflow points after storms, remove sediment at the inflow, and plan for up to 10% plant replacement in year one [34] |
| Compact Courtyard Pocket Garden | Monitor frequently in heat waves, especially if you use containers or raised beds | Cut back in late winter before heavy courtyard use begins | Keep mulch thin in beds and use gravel or pavers near seating to reduce mess | Keep circulation clear and maintain tidy edges around the patio |
First-year watering has the biggest impact, so it helps to keep the schedule simple.
Follow a staged first-year watering plan: daily or every other day in week one, every other day for two weeks, then two to three times per week for six weeks, tapering through the first and second summers. [35]
A small mulch detail can help pollinators too:
Pull mulch back from plant crowns and leave a small patch of bare soil in a less visible spot for ground-nesting bees. [33][32]
The planning notes below turn the best-fit template into a workable Maryland installation.
Maryland Planning Notes for Installation and Upkeep
Use these notes to turn the chosen template into a layout you can actually build. Once you pick the template, these details help settle bed lines, drainage, and access.
Front-of-bed visibility and street-facing edges
Place lower plants along the front edge of street-facing beds, and keep taller shrubs toward the back. That simple move keeps sightlines open and makes the planting look neat instead of overgrown.
A narrow mow strip or stone edge helps the bed stay sharp and keeps mulch and plants out of sidewalks and driveways. Maryland DNR guidance also recommends placing pollinator beds at least 4 feet back from sidewalks to allow for snow removal and pedestrian safety.[8]
A small sign that marks the space as pollinator habitat can also help. It gives neighbors context, and that often cuts down on complaints that the garden looks messy or neglected.
Runoff, grading, and drainage basics
Before planting anything, map where water moves. Watch where runoff starts, where it collects, and how long it sits. That step can save a lot of headaches later.
Rain-garden beds should drain within 24 to 48 hours. If they don’t, regrade the area, amend the soil, or install an underdrain.[36][29] Water that stands longer than that can create mosquito habitat and put stress on plant roots.
For most residential rain gardens, a ponding depth of about 6 inches is a common target.[36][37]
Paths, edging, and intentional structure
Once drainage is handled, define how people move through or around the space. A stepping-stone path, mow strip, or edging gives the bed a clear outline and helps protect plants from foot traffic.
In front yards, this matters even more. From the street, a clean border signals that the bed is planned on purpose, not just left to grow wild.
When to get professional installation help
Some projects are straightforward. Others can go sideways fast.
Professional installation is most helpful when you’re dealing with:
- grading fixes
- drainage problems
- heavy clay soil
- steep slopes
- layouts that need to tie into patios or walkways
Pro Landscapes MD serves central Maryland and handles grading, drainage, planting, and hardscape tie-ins when a project calls for pro installation. These are usually the jobs where a combined planting-and-hardscape plan helps avoid rework.
Conclusion
The right Maryland pollinator garden template only works when it fits your yard. A sunny front yard works well with a visible border and a small seating nook. A side yard can work better as a learning lane. And a wet backyard is often a good match for a rain-garden retreat. Start with three things: light, moisture, and where the space sits in the yard. Once those line up, the right template becomes much easier to pick. That fit is what makes an activity zone feel like it belongs there instead of looking forced.
Activity zones are what make the garden feel usable, not just pretty to look at. One small destination is often enough – a bench, a short path, or a simple water feature. You don’t need anything huge or flashy. It just needs to suit the space and work with the planting around it.
Native host plants, nectar plants, and layered structure help keep the garden in bloom from spring through frost. If grading or drainage makes the layout harder to pull off, professional installation can turn the idea into something that can actually be built.
If your site has grading problems, drainage trouble, or hardscape tie-ins like paths or patios, Pro Landscapes MD offers landscaping, drainage, and hardscaping services across central Maryland, including planting and walkway installation.
FAQs
How do I choose the right template for my yard?
Start with a site assessment. Watch how sunlight moves across the area and pay attention to drainage after rain. That helps you spot places with full sun, partial shade, and higher moisture.
Then pick a template that matches your space, soil, and goals. That could be a small container garden, a large backyard layout, or a feature like a rain garden. For better habitat value, build in layers with groundcover, perennials, and shrubs.
Which native plants bloom the longest season?
For a long bloom season in Maryland, purple coneflower and Black-eyed Susan are two standout native picks. They provide nectar and pollen from June through October, which gives pollinators a steady food source for much of the growing season.
It also helps to mix in plants that flower at different times. Early spring bloomers like Virginia bluebells get things started, while late-season plants such as New England aster or goldenrod keep food available into fall. That kind of planting mix supports pollinators across a much longer stretch of the year.
When should I get help with drainage or grading?
Get professional help if water pools on your property, moves the wrong way, or drains too slowly, especially during or after heavy rain.
If you have clay-heavy soil, uneven ground, or need options like French drains or rain gardens, an expert can assess the problem and grade the area to help protect your garden and improve growing conditions.
Chat with Us