









- bhavya gada
- No Comments
If your retaining wall in Columbia is over 4 feet tall, sits on a slope, or has a driveway or patio above it, reinforcement is often part of the job. In many cases, that also means permits, engineered plans, drainage work, and inspections.
I’d boil the article down to this:
- Height matters. In Howard County, walls over 4 feet of retained height usually need a permit and engineering.
- Retained height is what counts. It’s measured from the lowest grade or footing base to the top of the wall, not just the part you see from the front.
- Geogrid is used when a simple gravity wall isn’t enough. That often happens on steeper lots, taller walls, and walls with surcharge loads like patios, sheds, or driveways.
- Drainage is a structural issue, not just a water issue. Columbia’s clay-heavy soils can hold water, which adds pressure behind the wall.
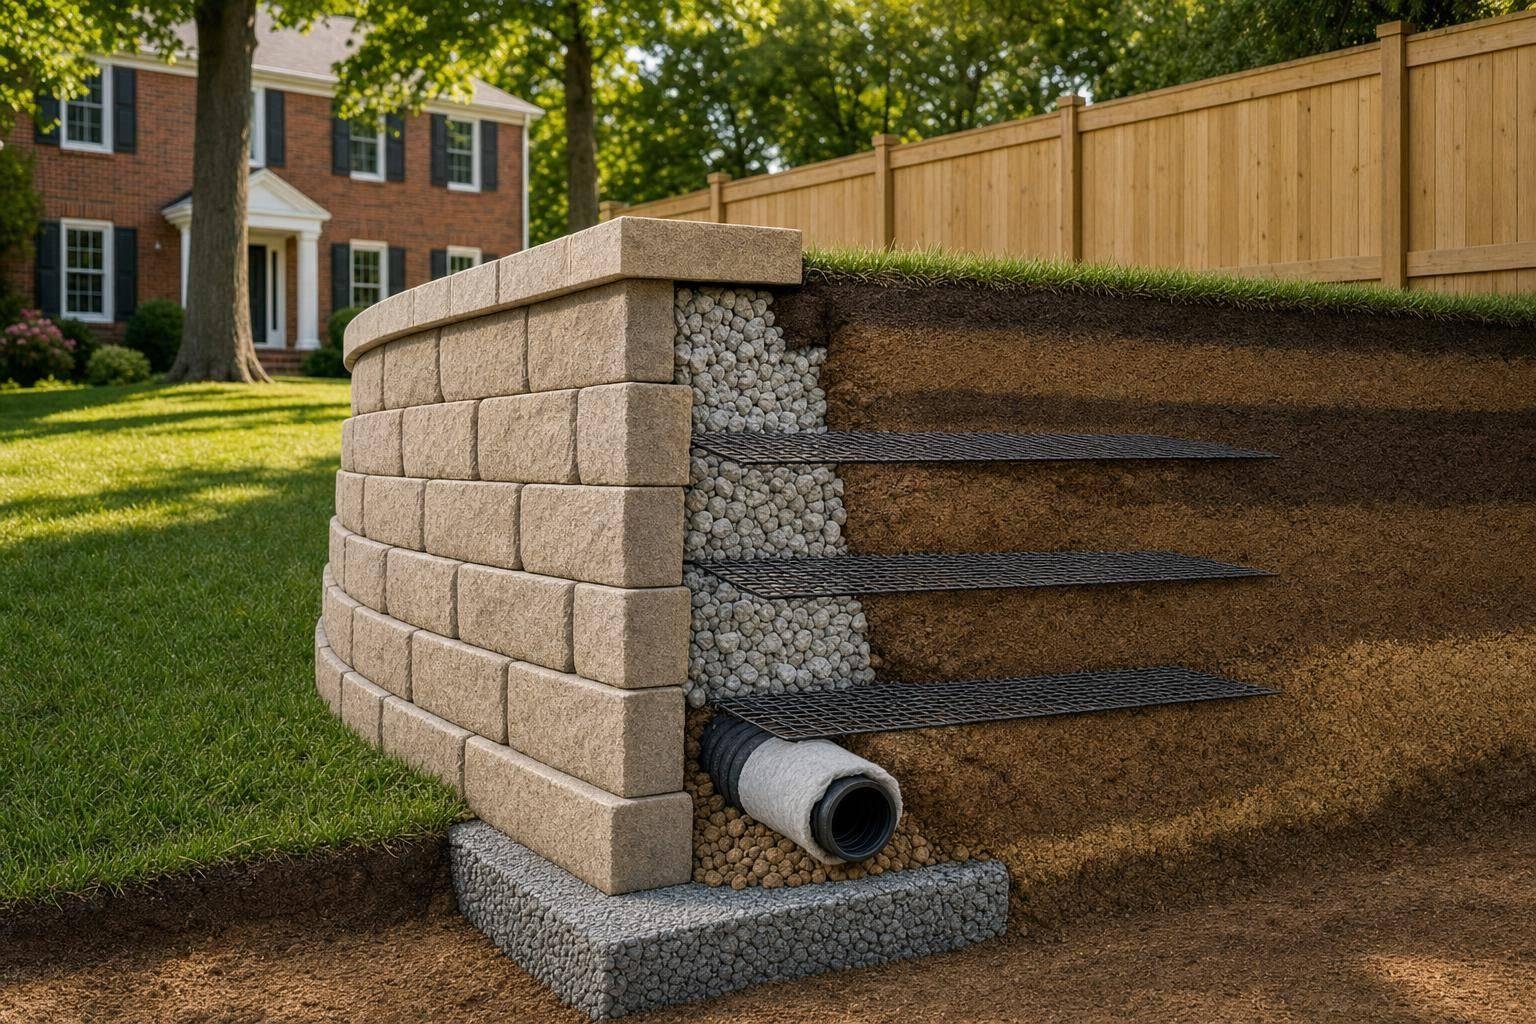
- Base prep and backfill matter as much as the block itself. A wall should sit on compacted crushed stone over firm native soil, with at least 12 inches of clean drainage stone behind the face.
- Water needs a way out. A perforated drain pipe should slope about 1% to daylight or another approved outlet.
- Maintenance still matters after install. Check for leaning, bulging, cracks, seepage, and erosion, and keep outlets clear.
Here’s the simple version: if you build a wall without enough reinforcement or drainage, the wall may start to lean, crack, or move. If you build it with the right base, stone, drain pipe, and geogrid where needed, it has a much better shot at staying put through heavy rain, wet clay, and freeze-thaw cycles.
| Condition | What it usually means |
|---|---|
| Wall at or under 4 ft and no extra load | May not need permit or geogrid |
| Wall over 4 ft retained height | Permit and engineered plans are often required |
| Patio, driveway, or structure above wall | Permit is often needed, even under 4 ft |
| Steep yard or terrace layout | Reinforcement is often the safer route |
| Clay soil or poor drainage | More pressure behind wall, more risk of failure |
If I were planning a wall in Columbia, I’d look at retained height, slope, surcharge, soil, and drainage path first. Those five items usually tell you whether you’re dealing with a simple wall or a reinforced system.
Build an AB Reinforced Retaining Wall with Geogrid Reinforcement – Installation Steps
sbb-itb-843f8be
Height Limits, Site Conditions, and Permit Triggers
Wall height affects two big things: how much reinforcement the wall needs and whether you’ll need a permit. It also helps decide when geogrid and engineering move from optional to part of the plan.
How wall height is measured and why retained height matters
Retained height is measured from the lowest adjacent grade or footing base to the top of the wall, not the visible face [2].
That detail matters more than many people expect. A wall can look modest from the front but still count as taller if the grade behind it drops farther down. For permit review and design, it’s the retained height that counts, not just what you can see from the exposed side.
When walls in Columbia need engineering or permits
In Howard County, walls that exceed 4 feet in retained height generally require a building permit and engineered plans [3][2]. Walls at or under 4 feet are often exempt unless a surcharge load is present [2]. A surcharge is any extra weight from above, such as a driveway, patio, or structure [2]. If that extra load is in play, a permit is typically required no matter the wall height [2].
Bigger walls also bring added costs for permits, inspections, and engineering.
Most permitted retaining wall projects in the area go through four inspection stages: footing/foundation, drainage/subdrain, reinforcement at mid-height, and final inspection [2].
Non-reinforced vs. geogrid-reinforced walls: a side-by-side comparison
The table below shows where each wall type tends to make sense.
| Feature | Non-Reinforced (Gravity) Wall | Geogrid-Reinforced Wall |
|---|---|---|
| Typical height range | Usually suited to walls under 4 ft without surcharge [3] | Used when height, slope, or surcharge requires reinforcement [3][1] |
| Steep slope suitability | Level or minor grades only [3] | Well-suited for steep slopes and terraces [3][1] |
| Surcharge load handling | Not recommended; prone to leaning or failure [2] | Designed to handle driveways, patios, and structures [2] |
| Permit/engineering required | Usually exempt if under 4 ft with no surcharge [2] | Permit and engineered plans typically required [2] |
Once height and permit triggers are clear, base prep and drainage decide whether the wall performs the way it should.
Base Preparation, Backfill, and Geogrid Installation
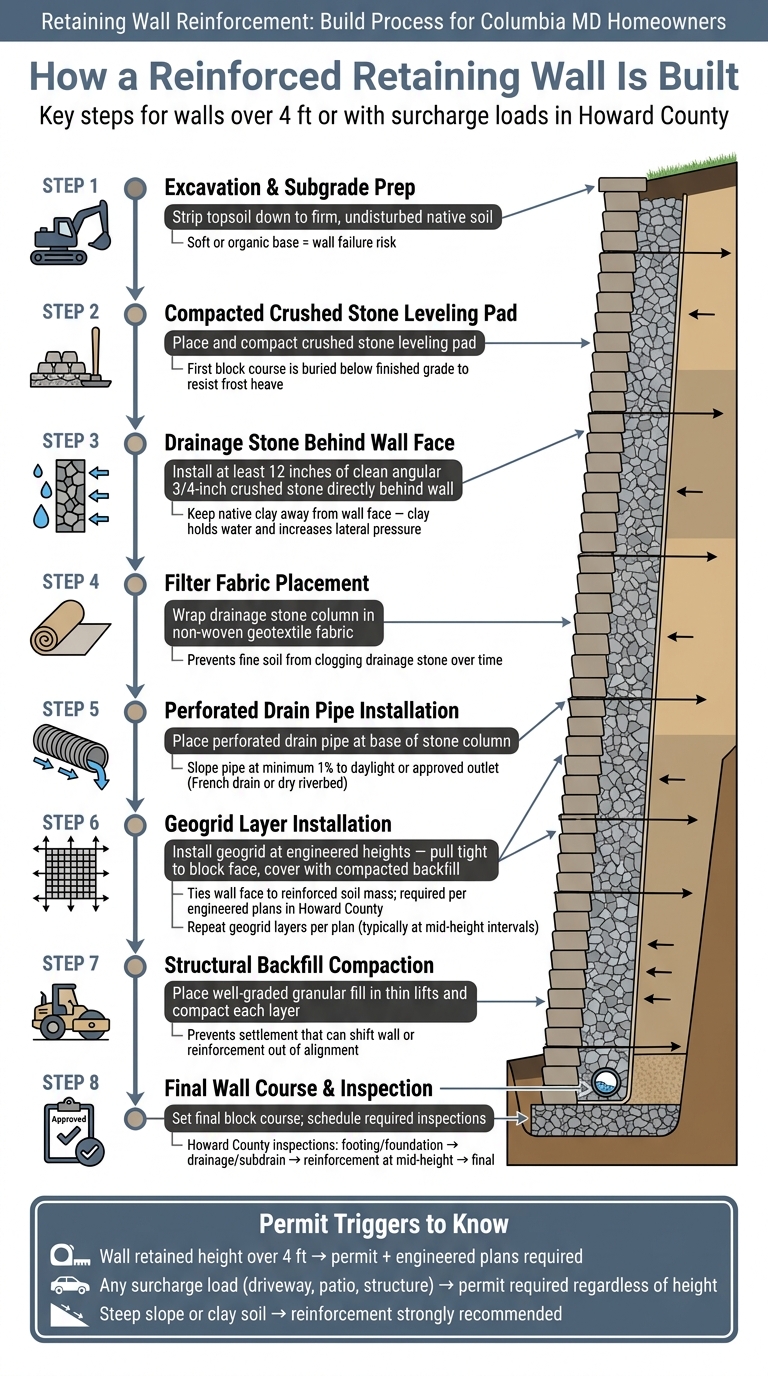
Retaining Wall Reinforcement Process: Columbia MD Step-by-Step Guide
Base excavation and leveling pad requirements
Start by stripping away topsoil and organic material until you reach firm, undisturbed native soil. If the base fails, the wall can fail with it – and that can mean tearing the whole thing out and rebuilding it.
On top of that subgrade, place a compacted crushed-stone leveling pad. This pad spreads the load and gives you a flat, even starting point. The first course of blocks sits on this pad and is buried below finished grade, which adds stability and helps guard against frost heave.
That said, a level base isn’t enough on its own. The backfill and drainage layers behind the wall need to match that same level of care.
Structural backfill and drainage stone behind the wall
Place at least 12 inches of clean angular stone – usually 3/4-inch clean crushed stone – directly behind the wall face [2]. This drainage zone helps relieve hydrostatic pressure after rain.
Keep native clay away from the wall face. Clay holds water, swells when wet, and increases lateral pressure. To stop fine soil from washing into the stone over time, use filter fabric between the drainage stone and the structural backfill farther behind the wall.
Past the drainage zone, use well-graded granular fill to build the reinforced soil mass. Compact that backfill in thin lifts so it doesn’t settle later and throw the wall or reinforcement out of line.
Once the wall mass is compacted and kept separate from clay, the geogrid can tie the system together.
Geogrid layout, spacing, and installation steps
Geogrid connects the wall face to the reinforced soil mass so loads are carried beyond the blocks instead of pushing only on the face.
In Howard County, geogrid placement heights and embedment lengths must follow the engineered plans [2]. Install each geogrid layer at the required height, pull it tight to the block face, and cover it with compacted backfill before setting the next course. If the grid is loose or placed at the wrong elevation, it won’t anchor the reinforced mass the way it should.
Even with reinforcement in place, drainage still does a lot of the heavy lifting for wall stability.
Drainage Tie-Ins and Reinforced Walls on Steep Yards
Once the wall is reinforced, drainage becomes the next structural control. On Columbia’s sloped lots, runoff, downspouts, and perched groundwater can build hydrostatic pressure that reinforcement alone can’t relieve.
Drain pipe, stone column, filter fabric, and discharge points
A perforated drain pipe at the base of that stone column moves water to an outlet. Non-woven geotextile fabric wraps the stone column and helps stop soil from clogging the drainage stone. The pipe should daylight to open air at a lower point on the slope or connect to an approved drainage system.
Connecting wall drainage to yard drainage systems
Wall drainage can’t work on its own. On steep Columbia lots, runoff tends to collect at the base of the wall. If downspouts empty near the reinforced backfill zone, they can overload the drainage stone and soak the soil mass.
The fix is pretty simple: extend the downspouts and pipe that water to a discharge point away from the wall. That helps prevent a serious long-term issue. On steeper Columbia lots, that drain line often needs to tie into a French drain, dry riverbed, or corrected grading.
Backfill and drainage tie-in options for Columbia lots: a side-by-side comparison
Choosing the right backfill and outlet type matters just as much as the wall itself.
Backfill materials:
| Material | Drainage Performance | Stability | Best Use Case |
|---|---|---|---|
| Clean Angular Stone | Excellent | High | Primary drainage zone directly behind the wall |
| Native Clay | Poor | Variable | Should be avoided in the drainage zone; causes pressure |
The outlet should fit both the lot grade and how water enters the wall system.
Drainage outlet options:
| Outlet Type | Best Lot Conditions | Drainage Performance | Maintenance Needs |
|---|---|---|---|
| Daylight Discharge | Sloped lots with a clear downhill exit | High | Low; keep pipe outlet clear of debris |
| French Drain | Flat areas or yards with poor surface drainage | High | Moderate; flush periodically |
| Dry Riverbed | High-runoff areas with a visible channel | Moderate to High | Moderate; weed control and debris removal |
Daylight discharge works best on sloped lots with a clear downhill exit. French drains fit flatter yards. Dry riverbeds make sense in high-runoff areas where a visible channel also fits the yard’s layout.
After the outlet is set, long-term performance comes down to one thing: keeping water moving and drains clear.
Long-Term Performance and Key Takeaways
Warning signs and maintenance priorities after installation
After reinforcement and drainage are in place, long-term performance comes down to two things: inspection and load control.
Even a reinforced wall needs regular checkups. Trouble usually shows up in familiar ways: bulging, leaning, settlement, cracks, seepage, or erosion at the base. Bulging and leaning often signal load or drainage issues. Seepage, on the other hand, usually means the drainage system is clogged [1][2].
Plan to inspect the wall at least every two years. Look closely at the base, clear the drain outlets, and check for standing water after storms. Also, don’t place heavy loads near the top of the wall unless an engineer has reviewed it first [2].
The same rules that keep a wall steady on day one are the ones that help it hold up year after year.
Main points for Columbia homeowners to keep in mind
For Columbia homeowners, a few long-term priorities matter most:
- Geogrid is often needed when a gravity wall no longer works for the wall height or slope [1][2].
- Build on a compacted aggregate leveling pad over undisturbed native soil [1][2].
- Use free-draining structural backfill and at least 12 inches of gravel directly behind the wall [2].
- Slope drain pipes at least 1% to a working outlet [2].
- On steep Columbia yards, reinforced or terraced layouts usually make more sense than one tall gravity wall [1][2].
Pro Landscapes MD handles retaining walls, grading, drainage installation, and yard leveling in Columbia and Howard County.
FAQs
How do I measure retained wall height?
Measure from the buried base course – the lowest part below grade – up to the top of the retained soil, not just the part of the stone or block face you can see.
That total wall height helps determine reinforcement needs and whether a geogrid-reinforced system makes sense. This matters more as walls get taller, such as beyond roughly 3–4 ft, depending on site conditions.
When is geogrid reinforcement needed?
Geogrid reinforcement is often needed for taller retaining walls, usually anything above 3 to 4 feet. Its job is simple: help the wall hold back soil pressure and lower the chance of failure.
It also matters when the wall has to deal with surcharge loads. That includes things like driveways, parked vehicles, or nearby structures putting extra weight on the soil behind the wall. If the site has weak or unstable soils, geogrid becomes even more important.
In Maryland’s clay-heavy soils, geogrid adds tensile strength to the wall system. That extra support helps limit bulging, cracking, and shifting.
What drainage does a retaining wall need?
A retaining wall needs solid drainage to relieve hydrostatic pressure and stay stable in Maryland’s climate.
Place 12 to 18 inches of clean, angular #57 stone behind the wall, starting at the base and stopping within 6 inches of the surface. At the bottom, install a 4-inch perforated PVC or HDPE pipe and slope it 1% to 2% toward a safe outlet. Use nonwoven geotextile fabric to separate the native soil from the stone.
Chat with Us