









- bhavya gada
- No Comments
If you want to place riprap in Maryland, you usually need approval before any stone is delivered. In many cases, I’d expect review from your county, Maryland agencies, and sometimes the U.S. Army Corps of Engineers.
Here’s the short version:
- First, I’d confirm the site type: tidal, non-tidal, and whether it sits in the Critical Area.
- Then, I’d check where the work goes: above mean high water, below it, or into wetlands.
- If the site is tidal, a joint state/federal application is often part of the process.
- If the site is in the Critical Area, extra buffer paperwork may apply.
- If riprap is proposed instead of a living shoreline, I’d expect a written case showing why the non-structural option will not work.
- If land disturbance hits 5,000 square feet or 100 cubic yards, county grading and erosion-control review is often triggered.
- Timing matters: minor tidal wetlands review can take about 90 days after a complete filing, while larger cases can take about 240 to 325 days.
My main takeaway: I would not finalize design or hire a crew until I knew which offices must sign off, what plans are needed, and whether buffer planting, seasonal limits, or inspections will apply.
| Issue | What I’d expect |
|---|---|
| Tidal work below mean high water | State wetlands review and possible federal review |
| Non-tidal shoreline work | County grading and sediment-control review may apply |
| Property in Critical Area | Buffer forms, plans, and possible planting |
| Riprap instead of living shoreline | Waiver support or similar written justification |
| Larger disturbance | More local review and plan detail |
| Missing items | Delays, comment letters, and resubmittals |
Bottom line: I’d treat riprap permitting in Maryland as a multi-step approval process, not a small landscaping job. The article below walks through the permit path, the main triggers, the paperwork, and the mistakes that slow homeowners down.
Maryland Riprap Permitting Process: Step-by-Step Guide for Homeowners
Step 1: Confirm Site Conditions and Permit Triggers
Check Whether the Property Is Tidal, Non-Tidal, or in the Critical Area
Start by confirming whether the shoreline is tidal, non-tidal, or in the Critical Area. That one call shapes the rest of the permit path. It tells you whether you’re dealing with only local review or a joint county, state, and federal process.
A tidal shoreline rises and falls with the tide. Non-tidal sites include inland streams, ponds, and lakes. The Critical Area adds another layer of review. It covers land within 1,000 feet of mean high water or the landward edge of tidal wetlands, plus the waters and lands under the Chesapeake Bay and its tributaries. [11]
To verify how your site is classified, use your county’s GIS viewer or Critical Area map. Those tools show the 1,000-foot Critical Area boundary and the 100-foot Critical Area Buffer measured from mean high water. While you’re at it, gather a basic record of the site:
- Photos of the shoreline at high and low tide
- Notes on visible erosion
- Screenshots from the mapping tool showing your parcel’s designation
That paper trail makes the permit process a lot easier later on. [1][8][10]
Identify When County, State, and Federal Approvals Are Required
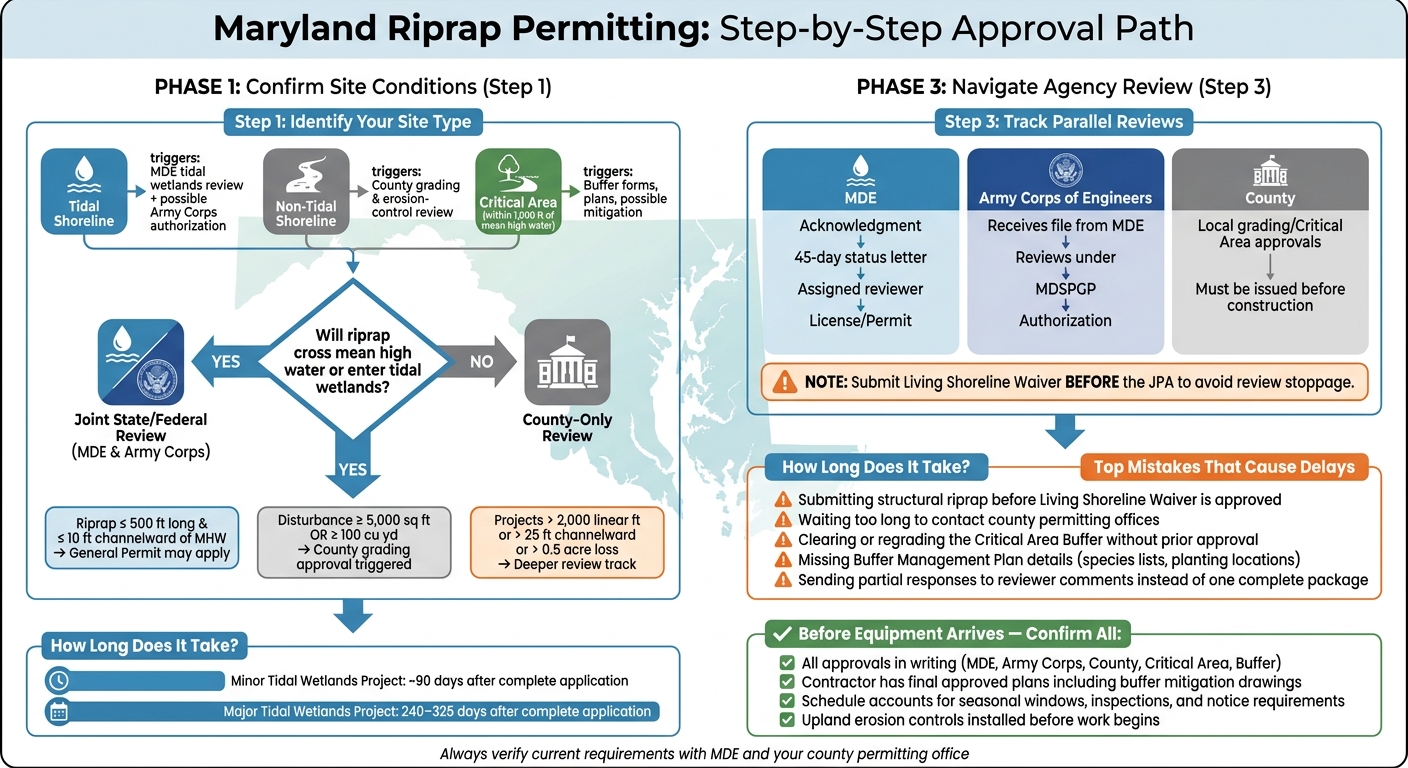
Once you know the shoreline type, the next issue is placement. The big question is simple: Will the riprap cross mean high water or enter tidal wetlands? That line matters because it decides which agencies step in.
If the work extends below mean high water or into tidal wetlands, MDE review under tidal wetlands rules is required, usually through a license or permit. The Army Corps of Engineers also has jurisdiction over work in waters of the United States. That’s why Maryland uses a joint federal/state application process for tidal shoreline projects. [2][6][15]
Some projects fit within general permits. Maryland rules allow a riprap revetment for shore erosion control under a general provision when it is no more than 500 feet long and no more than 10 feet channelward of mean high water. Bigger tidal revetment jobs can shift into a deeper review track, including projects that exceed 2,000 linear feet, extend more than 25 feet channelward, or cause more than 0.5 acre of waters of the United States loss. [14][17][12]
County review is a separate trigger. Grading and erosion and sediment control approvals usually come into play when a project disturbs 5,000 square feet or more or more than 100 cubic yards of earth. It’s smart to measure disturbance early so you don’t get blindsided later. [20][21]
| Site condition | Typical permit consequence |
|---|---|
| Tidal shoreline, work below mean high water | MDE tidal wetlands review + possible Army Corps authorization [16][18] |
| Non-tidal shoreline | County grading and erosion-control review based on disturbance size [20][21] |
| Within the Critical Area | Critical Area Worksheet, buffer plan, possible mitigation [11][15][19] |
| Disturbance ≥ 5,000 sq ft or ≥ 100 cu yd | Grading and erosion-control approvals likely required [20][21] |
Use these triggers to figure out your application set before you submit anything.
Contact County Permitting Offices Before Design Is Finalized
After you identify the likely permits, check the county’s local rules before the design is locked in. This step can save a lot of back-and-forth.
Reach out to county permitting, grading, sediment and erosion control, and Critical Area staff. Bring a site sketch, site photos, and your estimated disturbance area. Ask directly whether you need a grading permit, erosion and sediment control plan, zoning certificate, or Critical Area Worksheet. [20][22][23]
Also ask whether barge-only work done entirely below mean high water changes any local worksheet rules. Some counties handle that situation differently, so it’s worth clearing up early. [1]
sbb-itb-843f8be
Step 2: Prepare the Permit Package and Required Plans
Submit the Joint Federal/State Permit Application
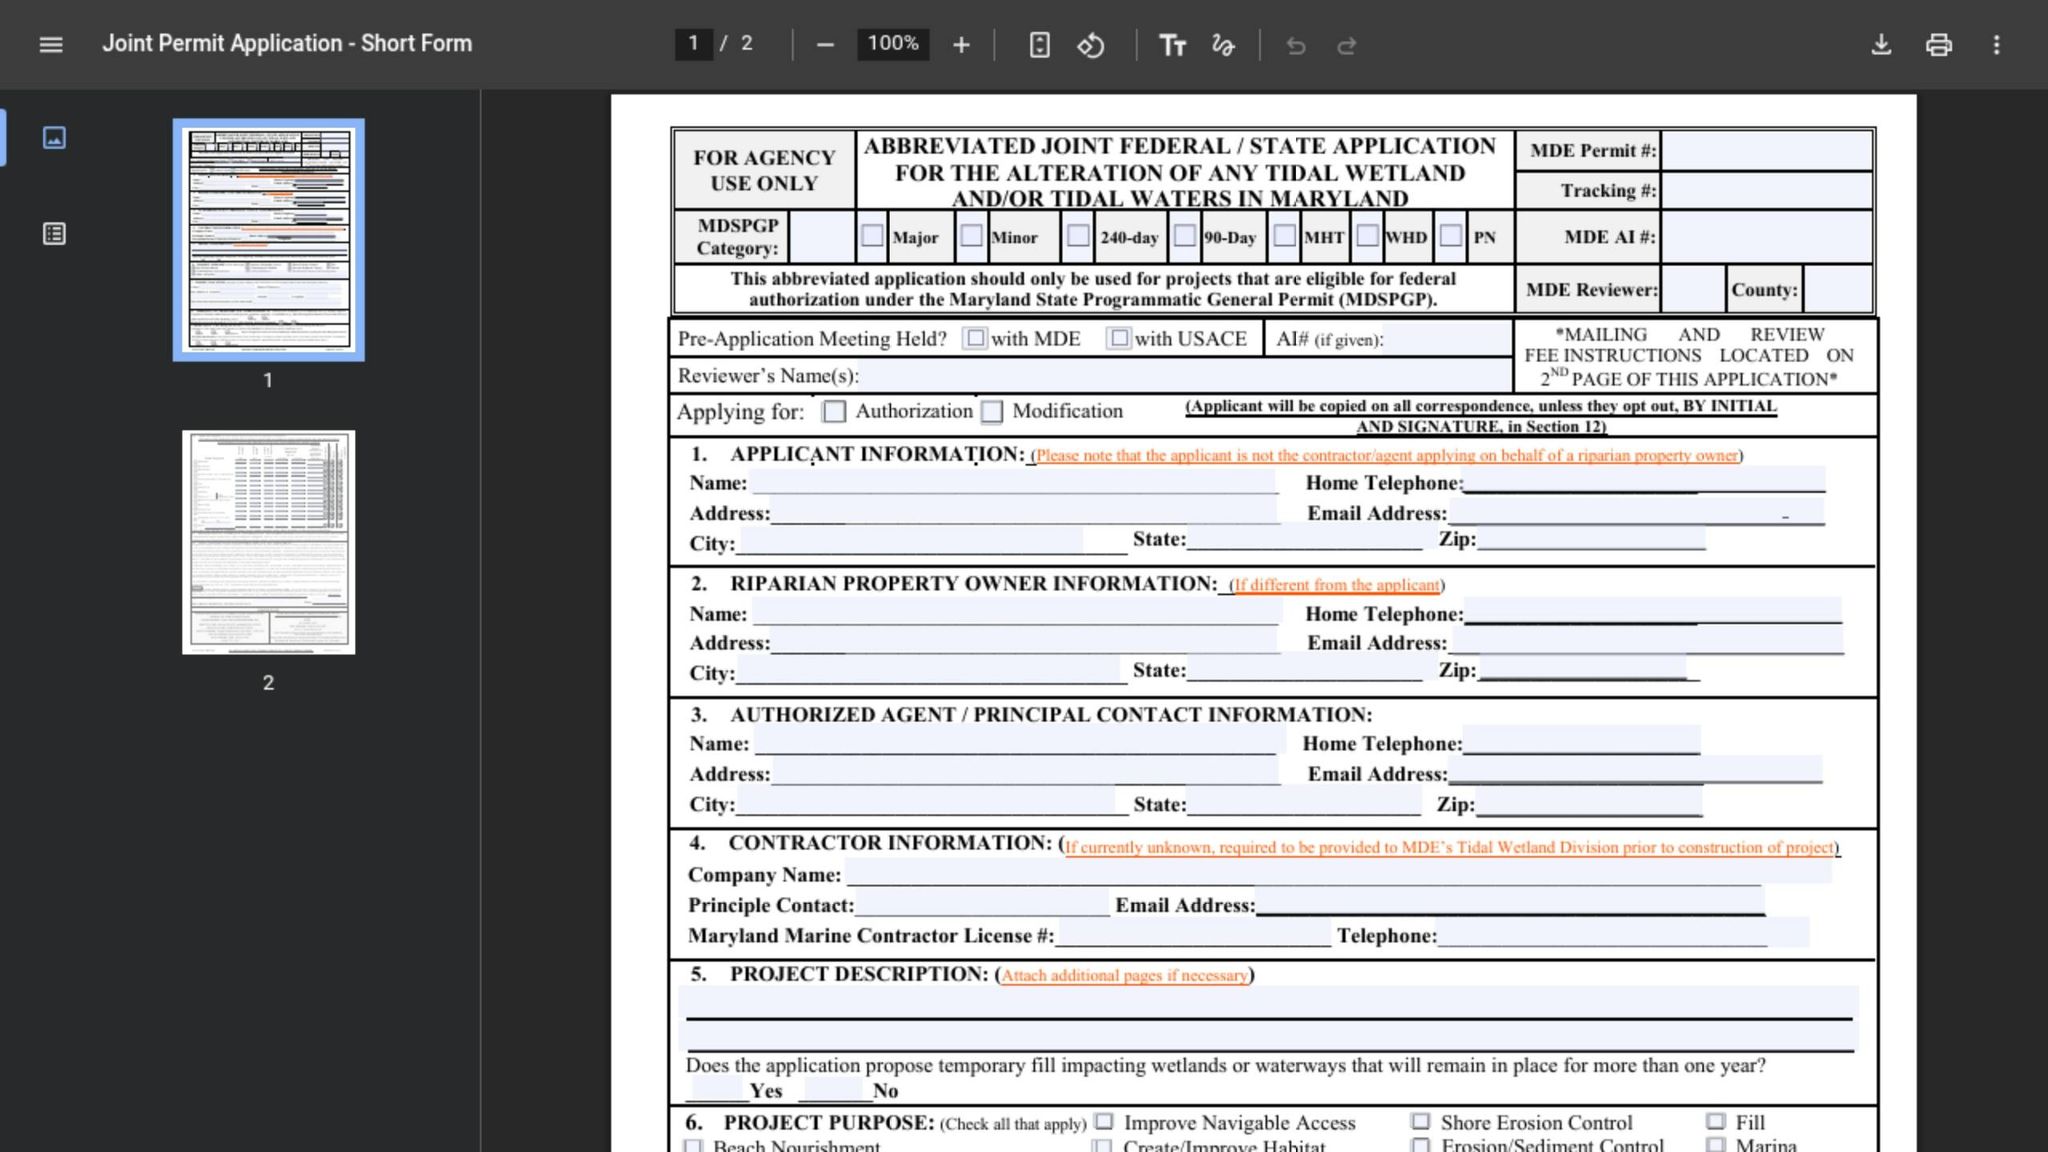
Once you’ve checked site conditions, it’s time to put the permit package together. Use the county findings from Step 1 to fill it out. For most tidal riprap projects in Maryland, the starting point is the Joint Federal/State Permit Application (JPA), which MDE and the U.S. Army Corps of Engineers review together [8][24][26]
The JPA covers tidal wetlands licenses. It may also cover non-tidal wetlands and waterways permits, plus federal authorization when needed. Fill it out carefully. Include the proposed riprap length, width, and height, the total volume of stone, and any grading or fill below mean high water. If the application is incomplete, review slows down [8][24][26][27] You also need to mail seven copies of the full application and plan package to MDE’s Regulatory Services Coordination Office [5][7]
The form by itself won’t do the job. Agencies also need the site plans and design drawings.
Include Site Plans, Riprap Design, and Buffer Documents
The JPA has to include supporting plans. When plan sheets are missing, agencies often send information requests and ask for resubmittals [8][26]
Include an existing conditions survey that shows:
- Property lines
- Mean high water
- Tidal wetlands
- Existing structures
- Access routes
You should also include proposed riprap design drawings in both plan view and cross-section. These need to show armor stone size, filter layer, toe depth, slope, and crest elevation in relation to mean high water. If upland grading is needed to reach the shoreline, add a grading plan with cut/fill areas and limits of disturbance. You may also need an erosion and sediment control plan if your county requires one [8][6][24][31]
If the property is in the Critical Area, you’ll also need a Buffer Management Plan (BMP) and a signed Buffer Notification Form. The BMP explains what buffer vegetation will be disturbed, what native plantings will replace it, and how the replanted area will be maintained, usually during a 2-year monitoring period. Check with your county’s Critical Area office to confirm the right plan type. MDE will not issue the license without an approved BMP [25][28][29][30]
Add Living Shoreline Waiver Support When Structural Riprap Is Proposed
If you’re proposing structural riprap, waiver support is part of the package. If your shoreline is not already mapped by MDE as fit for structural stabilization, you will need an approved Living Shoreline Waiver before the JPA can move ahead [6][9][3]
This waiver means showing why a nonstructural option will not work at your site. Back it up with photos, wave or depth evidence, and records that show why a living shoreline will not work. It also helps to include a short explanation from an engineer or shoreline specialist as part of the package [6][9][3]
Send in the waiver before the JPA so review can start without a stop in the process. Once the waiver is approved, the package is set for agency review.
Step 3: Move Through Agency Review Without Avoidable Delays
Track Parallel Reviews from MDE, the Army Corps, and Local Agencies
Once the package is filed, the job shifts from submitting documents to staying on top of several reviews at once. After submission, expect parallel reviews from MDE, the U.S. Army Corps of Engineers, and your county. [24][8][33]
MDE will usually send an acknowledgment first. After that, you can expect a 45-day status letter that says whether the file is complete and names the assigned reviewer. [38] MDE then shares the file with the Corps and other reviewers. The Corps reviews the project under the Maryland State Programmatic General Permit (MDSPGP) after it receives a complete pre-construction notification. [36] At the same time, your county may still need to issue local approvals before any work can begin. [8][34][15]
This is where people get tripped up. One approval does not mean you’re cleared across the board. Check with your county office and ask exactly which local permits must be issued before construction starts. Then track each one on its own.
Respond Quickly to Comments, Revisions, and Missing Items
Fast replies can shave time off the review process. Reviewers often come back with questions about unclear site plans, missing Buffer Management Plan details or Buffer Notification Forms, incomplete waiver materials, or shoreline limits that aren’t clearly shown. [8][33][34][35]
When comments come in, avoid sending a little here and a little there. It’s usually smarter to set up a short call with the reviewer first so you can pin down exactly what they want. Then send one complete response package.
Each response should:
- Restate the comment
- Explain the change you made
- Point to the updated sheets by name and date
That may sound a bit fussy, but it saves time. Partial replies often lead to yet another round of questions. [8][35][15]
Plan for Permit Conditions, Inspections, and Construction Timing
Once comments are cleared, final approval often comes with conditions that affect when and how the work can happen. Riprap permits in Maryland often include erosion and sediment control rules, native planting duties when the project disturbs the Critical Area Buffer, and seasonal work windows that limit in-water activity during fish spawning or bird nesting periods. [8][34][32][4]
Build those items into your schedule and budget before you sign a construction contract. Otherwise, a project that looked simple on paper can run into delays in the field.
A residential riprap project often takes several months from a complete application to final authorization. For minor tidal wetlands projects, MDE lists about 90 days after a complete application. Major projects can take 240 to 325 days. [37]
| Project path | Typical MDE turnaround |
|---|---|
| Minor tidal wetlands project | About 90 days after a complete application [37] |
| Major tidal wetlands project | 240–325 days after a complete application [37] |
State and local inspectors may visit during and after construction to check riprap dimensions, erosion controls, and buffer plantings. [8][34][15] Keep permits and approved plans on site, take dated photos at each stage of construction, and give any required advance notice before work starts. If field conditions change, contact MDE before changing the work. Unauthorized changes can lead to enforcement or a permit amendment.
Avoid Common Mistakes and Prepare for the Next Step
Before construction starts, do one last review. It can save you from permit delays, revision requests, and a lot of back-and-forth.
Mistakes That Lead to Permit Delays or Denials
One mistake shows up again and again: proposing structural riprap before proving that a living shoreline will not work. Maryland leans toward living shorelines, so structural riprap should not be submitted until the waiver is approved. [44][46][10][13][3]
Another hold-up is waiting too long to contact the county. Local offices may also need to sign off on building, grading, and sediment control items. If you wait, you may end up reworking the plan later to fit Critical Area rules. It’s much easier to make that call early. [45][41][42][43]
Critical Area buffer errors are also common. Don’t clear or regrade the buffer before construction unless you have approval. In many cases, buffer disturbance calls for a Buffer Management Plan and replacement planting. When that plan is missing – or when it leaves out species lists and planting locations – revision requests often follow. [39][40][42][43]
Once those issues are handled, make sure the site is ready before any machines show up.
Pre-Construction Checklist for Homeowners
Before any equipment arrives at the shoreline, confirm these items:
- All required approvals are in writing: MDE, Army Corps, county, Critical Area, and buffer documents.
- Your contractor has the final approved plans, including buffer mitigation drawings.
- The schedule accounts for seasonal windows, inspections, and notice requirements.
- Upland erosion controls are installed before work starts.
Match upland drainage and grading to the approved riprap plan so runoff doesn’t weaken the shoreline.
FAQs
How do I know if my shoreline is tidal or in the Critical Area?
In Maryland, the Chesapeake Bay Critical Area covers all land within 1,000 feet of tidal waters and tidal wetlands.
If you want to see whether your shoreline falls inside that area, check your county’s official resources, like a Chesapeake Bay Critical Area map or the local planning department’s geodatabase. That step matters because projects in the Critical Area face stricter review and may need grading permits no matter the project size.
Do I need a living shoreline waiver before applying for riprap permits?
Not always. Maryland does call for an early site review when a property includes sensitive features like wetlands or floodplains, but the information here does not say that a living shoreline waiver is required for every project.
If your project affects sensitive areas or watercourses, you may need extra review from MDE or local agencies. Before you start, check with your local soil conservation district or environmental agency.
What can delay riprap permit approval in Maryland?
Delays usually happen when an application is incomplete.
That can mean:
- Missing documents
- Incomplete plans
- Unpaid fees
- Wrong calculations for impervious area
- Wrong calculations for soil disturbance
When any of those pieces are missing or off, the review often takes longer and approval can slow down.
Deadlines matter too. In some jurisdictions, there’s a five-day electronic upload window. Miss it, and the application can be voided.
Reviews also slow down when required zoning, health, or state approvals aren’t secured at the same time.
Chat with Us