









- bhavya gada
- No Comments
If I clean a Maryland patio in the wrong order, I can turn dry pollen and leaves into muddy mess and wash sand out of the joints. The simple fix is to follow this order: clear the space, sweep it dry, treat stains and slick growth, rinse with care, then inspect the joints after the patio dries.
I’m dealing with a few common spring problems in Maryland: freeze-thaw damage, pollen, damp shade, algae, mildew, moss, and washed-out joint sand. In shaded spots, slick growth can build up fast after winter, and direct pressure washing can make things worse by stripping sand from joints or marking softer stone.
Here’s the whole process at a glance:
- Move furniture, planters, and decor first
- Sweep dry leaves, dirt, and pollen before adding water
- Spot-treat oil, rust, grease, food spills, moss, algae, and mildew
- Use the mildest rinse that works
- Keep pressure low and avoid spraying straight into joints
- Let the patio dry, then check for low sand, loose pavers, cracks, and drainage trouble
A few points stand out:
- Wet debris turns to mud, which can pack into joints
- Shaded patios stay slick longer because damp areas help algae and mildew grow
- Low-pressure washing is safer than blasting the surface at full force
- Loose or rocking stones need more than new sand
- Recurring wet spots may point to drainage trouble, not just surface dirt
If I find missing joint sand, settled sections, alligator cracking, or cracks near the foundation, cleaning shifts into repair. That’s the main takeaway from this guide.
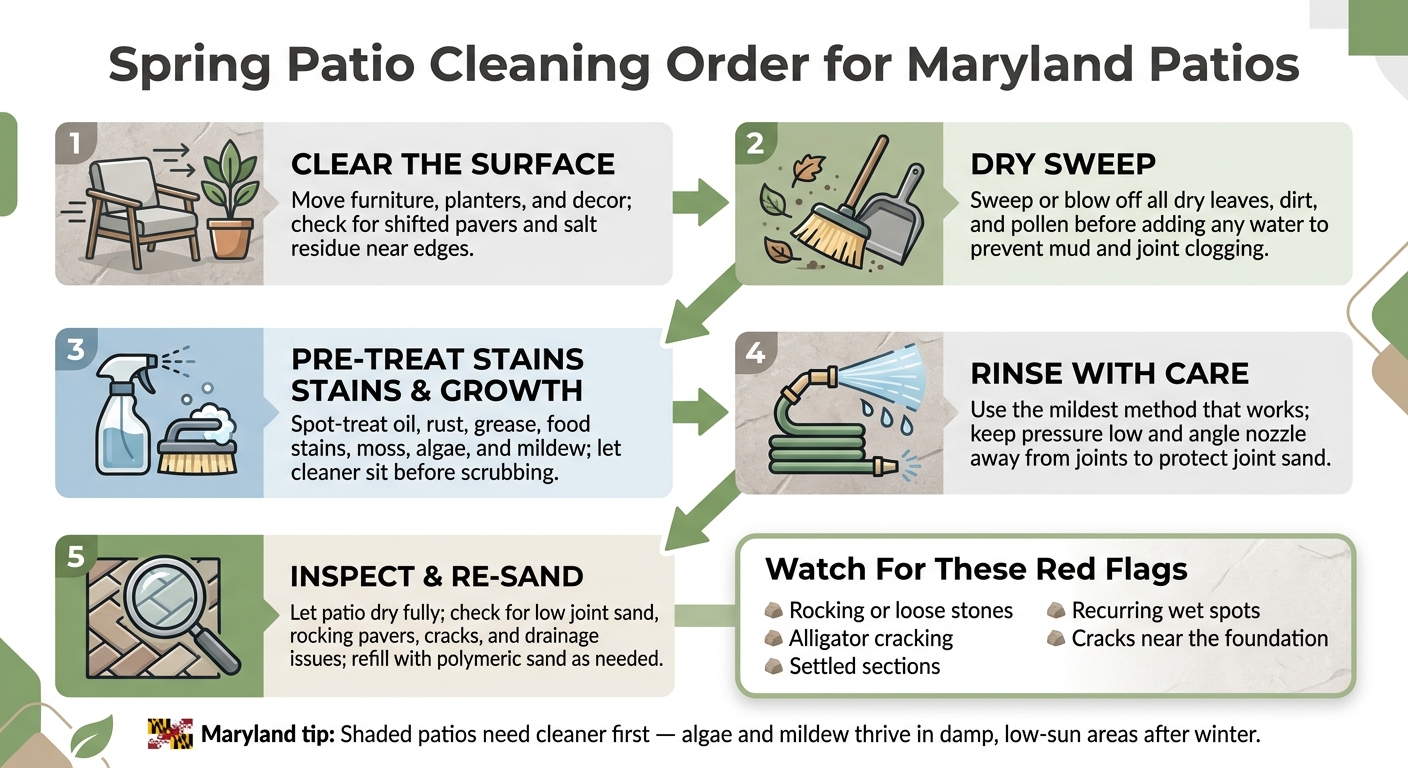
Spring Patio Cleaning Order for Maryland Patios
Step 1: Clear the Surface and Remove Loose Debris
Remove Furniture, Planters, and Winter Debris
Before you bring out the hose, clear the area first. Move furniture, planters, and decor off the surface so you can see what you’re working with.
That open view makes it much easier to spot stains, moss, loose pavers, and cracked stones. Pay close attention to corners, edges, steps, and low spots. Those areas tend to hold moisture, and that’s often where problems show up first.
It also helps to check for pavers that shifted during freeze-thaw cycles. And if the patio sits near a salt-treated walkway or driveway, brush away any salt residue along the edges.
Sweep Before Using Water
Sweep or blow off all dry debris before adding water. This step matters more than people think.
Once leaves, dirt, and pollen get wet, they turn into mud. That mud can clog joints and make stain treatment less effective. In shaded Maryland yards, pollen and organic buildup can pile up fast, so it’s smart to clean the surface while it’s still dry.
A dry sweep also gives you a clean starting point. You’ll have a much easier time spotting slick patches of algae or dark blotches that need extra attention. With the surface cleared, stain and algae treatment gets a lot easier.
Once the surface is clear, move to stain and growth treatment.
sbb-itb-843f8be
7 Easy Spring Cleaning Tips for Pavers, Patios, and Outdoor Kitchens
Step 2: Pre-Treat Stains and Remove Moss or Algae
Now that the surface is swept clean, deal with stains and organic growth before you rinse. In Maryland, shade, humidity, and winter buildup can leave patios with dark marks, slick patches, and grime that won’t come off with water alone. Always test any cleaner in a small, hidden spot first, since patio materials don’t all react the same way to cleaning products.[1] Start with the stains that need time to sit before rinsing.
Treat Oil, Grease, Rust, and Food Stains First
Begin with the stains that stand out most: greasy spots, food spills, bird droppings, and rust marks. For light food spills and bird droppings, a mild detergent rinse is often enough. Greasy areas usually need a cleaner that’s safe for the surface, so follow the product label closely. Rust stains should be treated early because they get harder to remove the longer they sit.[1]
Scrub Moss, Algae, and Mildew in Shaded or Damp Areas
Shaded patios in Maryland tend to grow algae and mildew first. Humidity, shade, and tree cover create the right conditions for growth, especially in north-facing spots and other low-sun areas. If the surface feels slick, that’s often a sign that algae or mildew is active.[1]
Don’t handle algae and mildew the same way you’d handle plain dirt. Use a cleaner made for hardscapes, let it sit for the time listed on the label, then scrub with a stiff-bristle brush. Focus extra effort on low spots and shaded corners, since those areas stay damp longer and usually collect the most growth.
Once the stains and growth have been loosened, rinse using the mildest method the surface allows.
Step 3: Rinse or Pressure Wash Without Damaging the Patio
Once you’ve treated the stains, use the gentlest rinse that still gets the job done.
Choose the Right Cleaning Method for the Surface
| Method | Best Use Case | Risk to Joint Sand |
|---|---|---|
| Hand Scrubbing | Spot-treating oil, grease, or food stains; delicate natural stone | Very Low |
| Garden Hose Rinsing | Removing loose winter debris, pollen, and dust | Low |
| Low-Pressure Washing | Lifting embedded grime, algae, and traffic film | Moderate (if not angled) |
For most spring cleanups, a garden hose is enough. If grime or algae still sticks around after rinsing, move up to low-pressure washing.
How to Pressure Wash Pavers and Natural Stone Safely
If a basic rinse doesn’t clear the buildup, use low pressure and work in short passes.
Keep the nozzle moving and point it at a shallow angle, not straight into the joints. That matters more than many people think. A direct stream can wash out joint sand and even loosen the pavers.
Start with the lowest pressure that works, then increase only if you need to. Concrete and tightly set pavers can handle more force than bluestone or travertine. Those surfaces need a lighter touch. Also skip narrow spray tips. They focus too much force in one spot and can leave marks or etch the surface.
Step 4: Inspect Joints, Refill Sand, and Check for Repairs
After pressure washing or rinsing, let the patio dry all the way. Then walk the surface before you put the furniture back.
Check for Missing Joint Sand After Cleaning
Look for gaps, sunken joints, or spots where the joint material sits low or has washed out. If pavers or stones rock when you step on them, the base may need repair instead of just more sand [6]. In plain English: if the surface moves, new joint sand alone won’t solve it.
If the joints look low or uneven, refill them before resetting the furniture. For paver patios, add joint sand or polymeric sand once the surface is dry. Polymeric sand hardens after light misting, which helps it stay in place and cut down on weed growth. Re-sanding worn joints now can help limit washout and weeds later.
Signs That Professional Patio Repair May Be Needed
Some problems go past a simple sand refill. Rocking or loose stones usually need to be lifted and reset. Joint sand by itself will not fix that.
Recurring algae in the same shady spots can point to poor drainage, especially if water pools or drains slowly. When that happens, the grading may need to be corrected, or a French drain may be needed.
Other warning signs include:
For patio repair or drainage issues in central Maryland, Pro Landscapes MD can help.
Conclusion: The Right Spring Cleaning Order for Maryland Patios
Use this order: clear, sweep, pre-treat, rinse, then inspect and re-sand after drying [5]. Once the patio is dry, check the joints before you move furniture back into place.
Early spring is the best time to remove pollen before it sticks to the surface [1]. Spring cleaning also helps you spot freeze-thaw damage, like cracked pavers or shifted joints, before the patio gets heavy summer use [3][4].
Shaded sections need a cleaner first, then a rinse. If cleaning exposes loose stones or washed-out joints, it’s time to shift from basic upkeep to repair. And if you find loose stones, drainage problems, or joint erosion, Pro Landscapes MD handles patio repair and hardscaping across central Maryland.
FAQs
When should I pressure wash my patio?
In Maryland, the best times to pressure wash your patio are spring and late summer to early fall.
Spring is a smart time to do it because it clears away winter grime and pollen before that mess settles in and sticks to the surface.
Late summer or early fall also works well. Maryland’s humid weather can lead to algae buildup, and cleaning at that point helps get the patio ready before leaves start piling up.
It’s also time to wash your patio if it starts feeling slick, dark patches begin to spread, or you’re getting the space ready for guests or property photos.
How do I know if my patio needs repair?
Once the patio is clean, give it a close look and a quick hands-on check. Walk across the whole area and pay attention to any movement, wobble, or soft spots. Then check it again when the surface is damp so you can spot puddling more easily.
Look for cracks, spalling, and loose pavers. If a paver rocks underfoot, the base usually needs repair. With flagstone, a hollow sound can point to a failed bond. Height differences of 1/4 inch or more are a trip hazard. Anything over 1/2 inch calls for professional attention.
What cleaner is safest for algae and moss?
A mild detergent and regular rinsing are the safest, most effective way to deal with light algae and moss on patio surfaces.
Go easy here. A softer cleaning method usually works better than relying only on high-pressure washing, which can etch the surface or push water into fragile spots.
For long-term care, sweep the patio from time to time and apply breathable stone sealers every three to five years to help cut down on future buildup and staining.
Chat with Us