









- bhavya gada
- No Comments
Water, not soil, is often what knocks a block retaining wall out of line. If water gets trapped behind the wall, pressure builds fast. In some cases, a 6-foot wall with 4 feet of soaked backfill can take on more than 1,000 pounds of force per linear foot.
If I had to sum up the whole article in a few points, it would be this:
- Use clean wall rock behind the blocks, not native soil
- Place a 4-inch perforated drain pipe at the base and give it a 1% slope
- Wrap the soil side with non-woven filter fabric to keep fine soil out of the stone
- Make sure water has somewhere to go, such as a daylight outlet, pop-up emitter, swale, or dry riverbed
- Slope the top grade away from the wall and keep roof runoff out of the backfill
- Check the wall after heavy rain and freeze-thaw weather for leaning, cracks, stains, and clogged outlets
For many Maryland sites, this matters even more because clay soils drain slowly, sloped lots send more runoff toward walls, and winter freeze-thaw can make small drainage problems worse. On taller walls or clay-heavy sites, I’d plan for a 12- to 18-inch stone zone, and in tougher spots even 18 to 24 inches may make sense.
At its core, the job is simple: move water from soil to stone, from stone to pipe, and from pipe to a clear outlet before pressure builds.
| Part | What it does | Basic rule |
|---|---|---|
| Wall rock | Lets water move down behind the wall | 12 inches of clean angular stone |
| Drain pipe | Carries water out at the base | 4-inch perforated pipe, 1% slope |
| Filter fabric | Keeps soil from clogging stone | Non-woven fabric, 12-inch overlaps |
| Surface grading | Keeps new water out | 1% to 2% slope away from wall |
| Outlet | Releases collected water | Daylight, pop-up emitter, swale, or dry riverbed |
If you want the short answer: a block wall lasts longer when every drainage layer stays open, connected, and able to discharge water away from the wall.
How water moves behind block walls and why failures happen
Water gets behind block walls in a few common ways: runoff, soil infiltration, perched water sitting above clay, and groundwater moving through slopes. That’s why what sits behind the wall matters more than how the wall looks from the front.
In Central Maryland, clay-heavy Piedmont soils tend to hold water for longer stretches. As a result, perched water above clay layers often puts pressure on the wall around mid-height, which can change where damage shows up first.[1][21][22]
Hydrostatic pressure, saturated backfill, and wall movement
When water gets trapped, pressure builds as depth increases and pushes the base of the wall forward.[3][14] The warning signs usually follow a familiar pattern: bowing, leaning, joint cracking, toe washout, staining, and efflorescence.[13][7][16]
Heavy Mid-Atlantic storms can soak backfill fast and send pressure up before the water has time to drain out.[20][23] Freeze-thaw cycles make things worse. Trapped water expands as it freezes, and that can open cracks even more.[18][19][2]
The next step is figuring out which backfill helps relieve that pressure instead of holding it in place.
Drainage aggregate vs. native soil behind the wall
The material placed right behind the blocks controls how fast water can move away from the wall. Clean wall rock – the drainage zone directly behind the blocks – drains fast and is less likely to clog.[8][9][10]
Stone with fines, such as crusher run or unwashed gravel, is a poor middle ground. It may drain well enough at first, but over time the fines can compact and trap migrating silt, which slows drainage.[5][12] Native soil should never be used in the drainage zone behind the blocks.
That’s why the wall rock zone, filter fabric, and pipe need to work together.
sbb-itb-843f8be
The main drainage layers behind a block retaining wall
How to Drain a Block Retaining Wall: 5 Key Layers
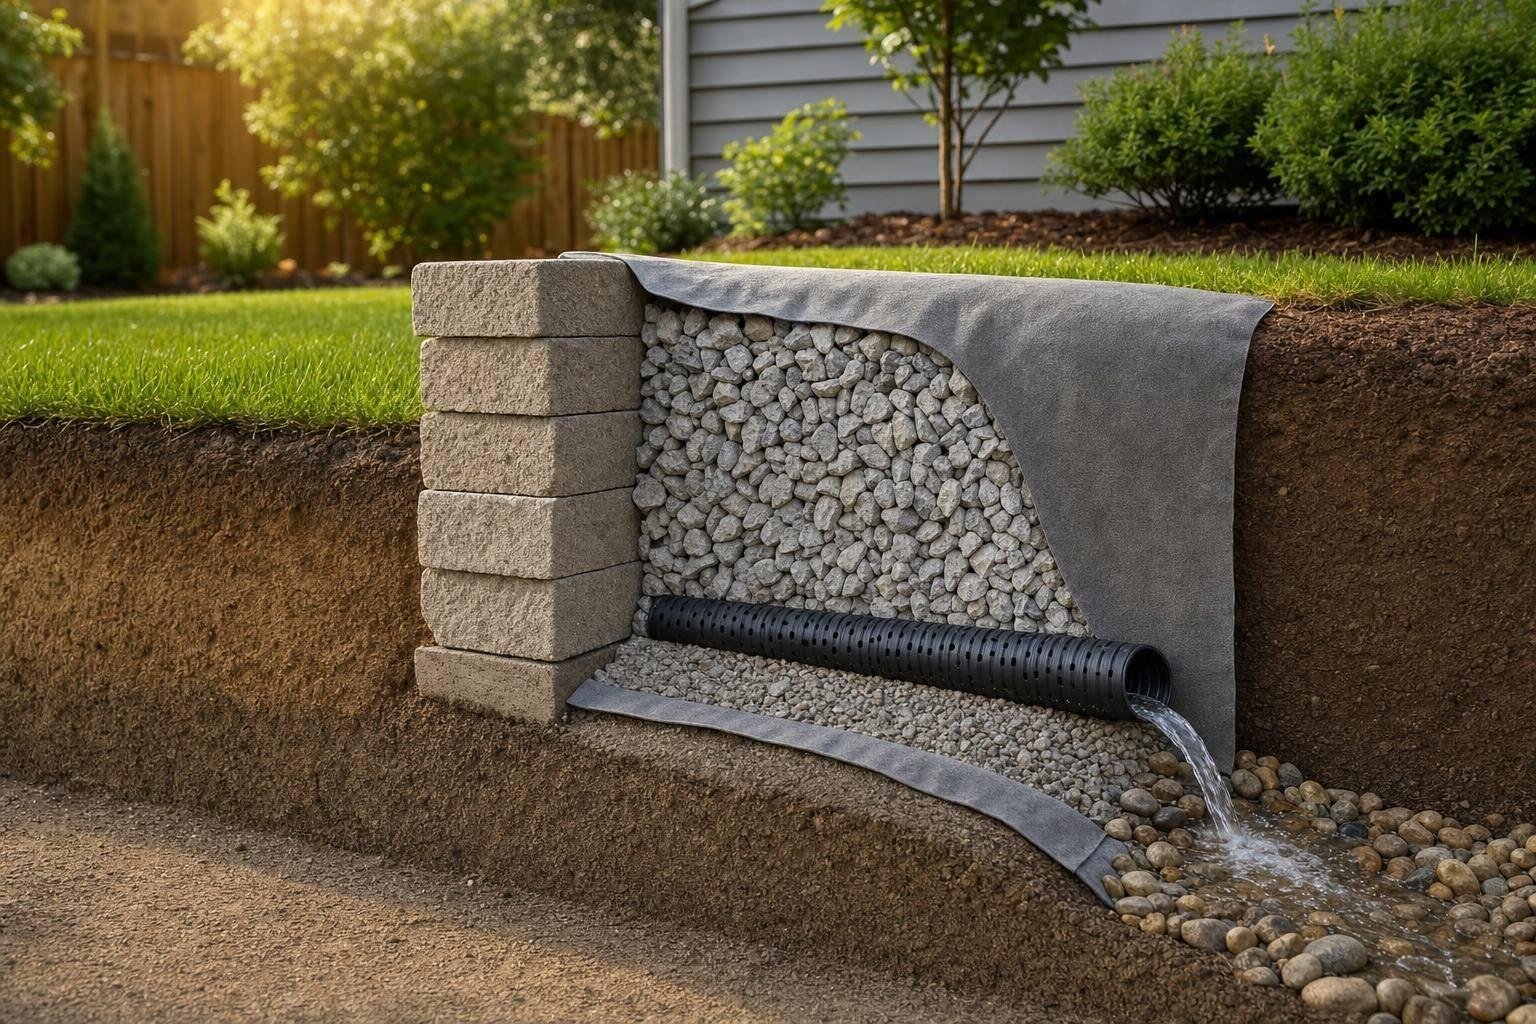
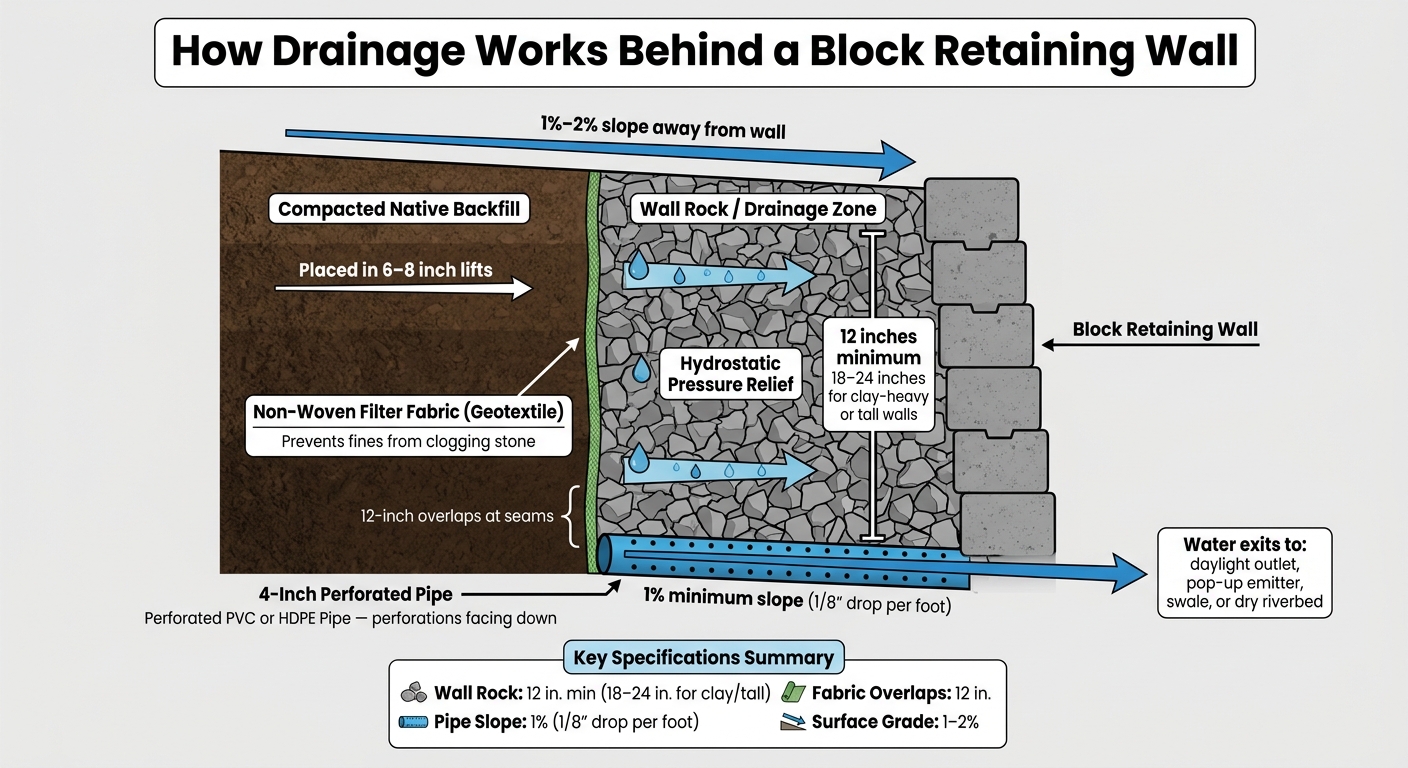
Behind a block wall, drainage needs to work as one connected system: wall rock, perforated pipe, filter fabric, and compacted backfill. The job is simple. Get water down and out before pressure builds behind the wall.
Wall rock: the free-draining zone directly behind the blocks
Place 12 inches of clean, angular aggregate right behind the wall. ASTM No. 57 or a similar stone is the usual pick. On taller walls or wetter sites, increase that zone to 12 to 18 inches.[24][28][29][32][33]
Skip pea gravel and river rock. They tend to settle tight and lose the open space that helps water move. Fines should stay below about 5%.[27]
Perforated pipe placement and outlet slope at the base course
Set a 4-inch perforated PVC or HDPE pipe at the base course, just behind the lowest blocks.[25][26][29] Install the pipe with the perforations facing down, and keep at least a 1% slope to a daylight outlet or other discharge point. That works out to about 1/8 inch of drop per foot.
This part matters more than people think. The pipe does nothing if it doesn’t lead to a clear outlet. A dead-end run is a common failure point in residential walls: water backs up, the aggregate gets saturated, and pressure starts building behind the blocks.[17][15]
Filter fabric and backfill separation
Line the soil side with non-woven geotextile so fines stay out of the wall rock.[25][11][30] Run the fabric from the base of the wall up through the drainage zone, then fold it over the top of the aggregate before placing backfill above it. At seams, keep overlaps to at least 12 inches.[31]
Beyond the fabric, place compacted backfill in 6–8 inch lifts. Compact it with care so you don’t shove the wall units out of line. At the surface, the finished grade should slope away from the wall. That way, rainwater sheds outward instead of draining back into the system.
These layers only do their job when water has a clear path out. Next comes the discharge path – weep openings, daylight outlets, and grading that keep water moving away from the wall.
Weep paths, outlet routing, and grading around the wall
Once water gets into the drainage zone, the outlet path decides what happens next. If that water can leave, pressure stays low. If it can’t, pressure starts to build. It’s that simple. Drainage only works when water has a clear way out.
Weep paths and face outlets that stay clear
Weep drains let water escape through the face of the wall, which helps relieve pressure before it reaches a point where it can cause damage. Keep those outlets visible and clear of mulch, sediment, and debris. If they get buried or blocked, the system can’t do its job.
Regular checks also help spot early trouble. Watch for staining, algae growth, or mineral deposits on the wall face. Those marks can be small clues that water isn’t moving the way it should. [34]
Daylight outlets, swales, dry riverbeds, and other discharge routes
The base pipe should connect to buried solid pipe that carries water to daylight or to a pop-up emitter. In most cases, daylight outlets work well on sloped lots, while pop-up emitters fit flatter yards better. For heavier runoff, swales and dry riverbeds can move more water without letting it collect near the wall.
A few common outlet options include:
- Daylight outlets for sloped sites
- Pop-up emitters for flatter yards
- Swales or dry riverbeds for larger runoff
It’s also smart to add accessible cleanouts along buried pipe runs. That makes seasonal flushing much easier and helps keep the drainage line open. [34]
That surface routing matters even more on Maryland slopes and sites with heavy clay soils.
Top-of-wall grading and upslope water control
Grade the top of the wall so it slopes 1% to 2% away from the wall. That small pitch helps move surface water away instead of letting it soak into the area behind the wall.
On hillside sites, use a swale or berm upslope to divert sheet flow around the wall. And don’t overlook roof downspouts. They often end up being a major source of wall saturation. Downspouts should stay out of the backfill and discharge far enough away that water doesn’t soak the wall zone all over again.
A common fix is to tie downspouts into solid buried pipe and route that pipe to a pop-up emitter at least 25 feet from the wall. [34]
Drainage details for Maryland soils, slopes, and long-term upkeep
Design adjustments for wall height, slope steepness, and clay-heavy sites
Maryland conditions can change how much drainage backup a retaining wall needs. In Central Maryland, soils are often fine-textured and slow to drain, which means water tends to sit behind walls longer. Clay makes that tougher. It swells when wet and shrinks when dry, and that cycle adds pressure over time.[36]
For taller walls, steeper slopes, or clay-heavy sites, it’s smart to make the drainage zone wider – about 18 to 24 inches – and catch uphill runoff before it ever gets to the wall.[1][6][4] On steep grades, tiered walls with drainage breaks between levels can also help. They lower pressure and give water more than one way out.[1][37]
On clay-heavy Maryland sites, don’t count on native backfill to move water away. It won’t do the job well enough. The drainage stone zone and pipe need to handle that work, and both need a clear, steady outlet that moves water away from the wall into a swale, French drain, or dry riverbed.[35][38]
Inspection, maintenance, and early signs of drainage problems
Even a well-sized drainage zone can fail if it isn’t kept open. Most problems build slowly, not all at once. After heavy rain or winter freeze-thaw weather, walk the wall and check for signs that point to blocked wall rock, a clogged pipe, or poor grading. Common red flags include:
- Bulging or leaning sections
- Separated cap blocks
- New cracks
- Soil washing through joints
- White mineral staining (efflorescence)[39][40]
Check outlet pipes after storms to make sure water is still moving through them. If an outlet that usually runs after rain suddenly stays dry, or if the backfill area stays soggy for days, the system is likely blocked somewhere. A quick check each spring and after any major storm is often enough to spot most issues before they turn into structural damage. Clear leaves, mulch, and sediment away from outlet openings, and make sure the surface grade still slopes away from the top of the wall.
Baltimore’s East 26th Street retaining wall collapsed after 5.45 inches of rain in 48 hours, showing how fast compromised drainage can fail in an extreme storm.[39]
Conclusion: the drainage layers that matter most
The drainage path only works when every layer stays open and linked. Water needs to move from soil to stone, into pipe, and then away from the wall without getting trapped. For property owners in Central Maryland, tying retaining wall drainage into the rest of the yard’s drainage – and controlling uphill water before it arrives – is what helps the system keep working year after year.
FAQs
How do I know if my wall drainage is failing?
Signs that a wall’s drainage is failing are usually pretty easy to spot once you know what to look for.
If you see standing water or muddy soil near the base that stays there for more than 24–48 hours after rain, that’s a red flag. The same goes for seepage through joints, blocked outlets, soil washout gaps, or white mineral deposits on the wall surface.
You should also keep an eye out for cracks, leaning, bulging, or uneven settling. Those issues can point to pressure building up behind the wall, and that’s when small drainage trouble can turn into a bigger structural problem.
A good rule of thumb: inspect the wall twice a year and again after major storms.
What stone should go behind a block wall?
Use clean, angular #57 stone in the drainage zone behind a block wall. The angular shape helps limit settling, and the open spaces between the stones let water move through the backfill with less resistance.
Keep fines low. Material passing the No. 200 sieve should stay under 5% to 10% to help reduce clogging over time.
Place the stone in a 12- to 18-inch layer behind the wall, starting at the base pipe and extending to 6 inches below final grade.
Where should a retaining wall drain outlet go?
A retaining wall drain outlet needs to lead to a safe outlet where the perforated drain pipe can daylight with a 1% to 2% slope. The goal is simple: move water out of the system so it doesn’t pool at the base.
Set the 4-inch perforated pipe at the base of the clean drainage stone zone, then run it to that outlet. Also make sure the outlet stays clear. If it gets blocked, water can back up and hydrostatic pressure can build behind the wall.
Chat with Us